


一、下载 RT-Thread Nano 源码
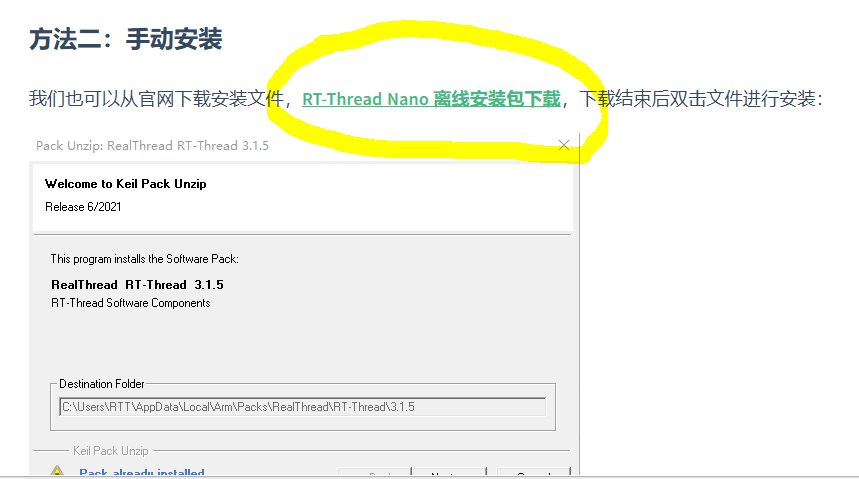
1、RT-Thread Master 的源码可从 RT-Thread GitHub 仓库下载,Nano 就是从里面扣出来的,去掉了一些组件和各种开发板的 BSP,保留了 OS的核心功能,但足够我们使用。点击黄颜色图标下载RT-Thread nano3.1.5安装到keilRT-Thread 文档中心
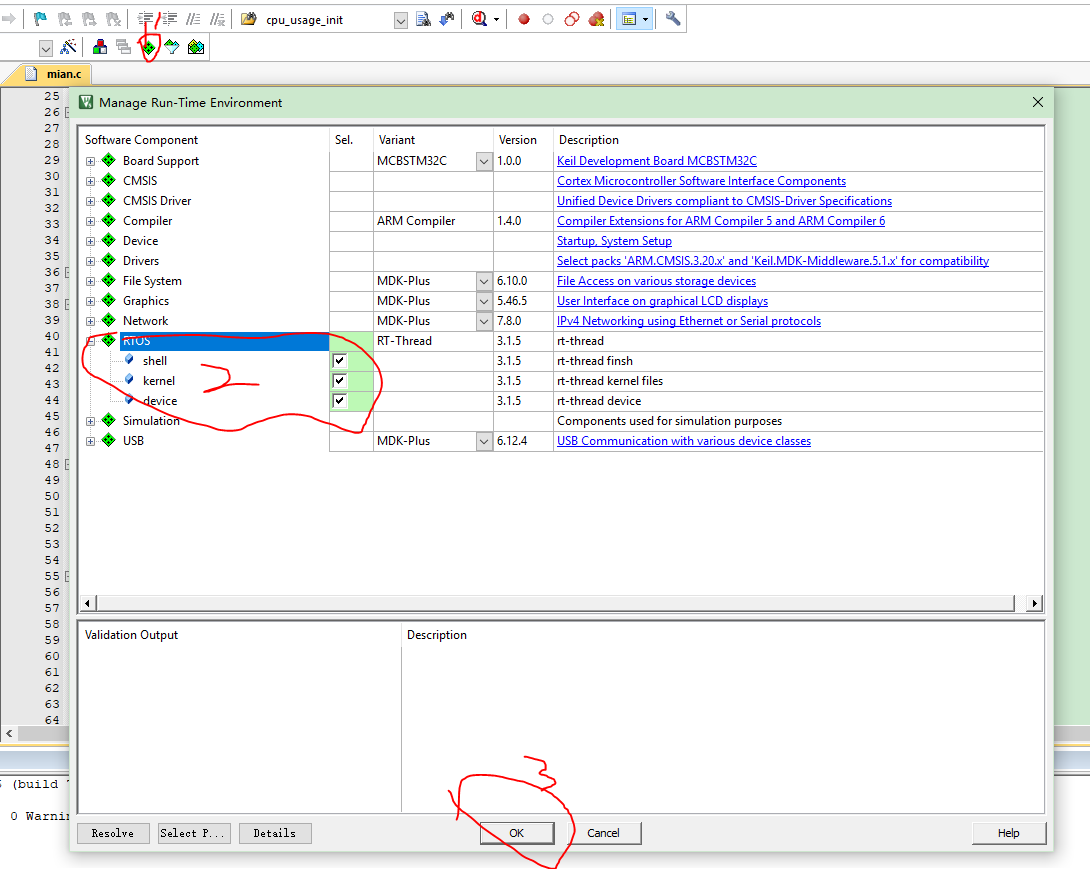
(二)打开keil随便找一个正点原子的点灯例程
如图所示点击1进入manage run,点击2进入rtos选择三个都打对钩,3点击OK、如下图
(三)复制下面代码到stm32f10x_it.c替换
/*
*********************************************************************************************************
*
*	模块名称 : 中断模块
*	文件名称 : stm32f10x_it.c
*	版    本 : V2.0
*	说    明 : 本文件存放所有的中断服务函数。为了便于他人了解程序用到的中断,我们不建议将中断函数移到其他
*			的文件。
*
*			我们只需要添加需要的中断函数即可。一般中断函数名是固定的,除非您修改了启动文件:startup_stm32f10x_hd.s
*
*			启动文件是汇编语言文件,定了每个中断的服务函数,这些函数使用了WEAK 关键字,表示弱定义,因此如
*			果我们在c文件中重定义了该服务函数(必须和它同名),那么启动文件的中断函数将自动无效。这也就
*			函数重定义的概念,这和C++中的函数重载的意义类似。
*
*********************************************************************************************************
*/

#include "stm32f10x_it.h"
//#include "main.h"

/*
*********************************************************************************************************
*	Cortex-M3 内核异常中断服务程序
*********************************************************************************************************
*/

/*
*********************************************************************************************************
*	函 数 名: NMI_Handler
*	功能说明: 不可屏蔽中断服务程序。
*	形    参:无
*	返 回 值: 无
*********************************************************************************************************
*/
void NMI_Handler(void)
{
}
/*
*********************************************************************************************************
*	函 数 名: HardFault_Handler
*	功能说明: 硬件失效中断服务程序。
*	形    参:无
*	返 回 值: 无
*********************************************************************************************************
*/
//void HardFault_Handler(void)
//{
//  /* 当硬件失效异常发生时进入死循环 */
//  while (1)
//  {
//  }
//}
/*
*********************************************************************************************************
*	函 数 名: MemManage_Handler
*	功能说明: 内存管理异常中断服务程序。
*	形    参:无
*	返 回 值: 无
*********************************************************************************************************
*/
void MemManage_Handler(void)
{
    /* 当内存管理异常发生时进入死循环 */
    while (1)
    {
    }
}
/*
*********************************************************************************************************
*	函 数 名: BusFault_Handler
*	功能说明: 总线访问异常中断服务程序。
*	形    参:无
*	返 回 值: 无
*********************************************************************************************************
*/
void BusFault_Handler(void)
{
    /* 当总线异常时进入死循环 */
    while (1)
    {
    }
}
/*
*********************************************************************************************************
*	函 数 名: UsageFault_Handler
*	功能说明: 未定义的指令或非法状态中断服务程序。
*	形    参:无
*	返 回 值: 无
*********************************************************************************************************
*/
void UsageFault_Handler(void)
{
    /* 当用法异常时进入死循环 */
    while (1)
    {
    }
}
/*
*********************************************************************************************************
*	函 数 名: SVC_Handler
*	功能说明: 通过SWI指令的系统服务调用中断服务程序。
*	形    参:无
*	返 回 值: 无
*********************************************************************************************************
*/
void SVC_Handler(void)
{
}

/*
*********************************************************************************************************
*	函 数 名: DebugMon_Handler
*	功能说明: 调试监视器中断服务程序。
*	形    参:无
*	返 回 值: 无
*********************************************************************************************************
*/
void DebugMon_Handler(void)
{
}

/*
*********************************************************************************************************
*	函 数 名: PendSV_Handler
*	功能说明: 可挂起的系统服务调用中断服务程序。
*	形    参:无
*	返 回 值: 无
*********************************************************************************************************
*/
//void PendSV_Handler(void)
//{
//}


/*
*********************************************************************************************************
*	STM32F10x内部外设中断服务程序
*	用户在此添加用到外设中断服务函数。有效的中断服务函数名请参考启动文件(startup_stm32f10x_xx.s)
*********************************************************************************************************
*/
)
四(finsh_config.h)配置如下代码
/* FinSH config file */

#ifndef __MSH_CFG_H__
#define __MSH_CFG_H__

// <<< Use Configuration Wizard in Context Menu >>>
#define RT_USING_FINSH
#define FINSH_USING_MSH
#define FINSH_USING_MSH_ONLY
// <h>FinSH Configuration
// <o>the priority of finsh thread <1-30>
//  <i>the priority of finsh thread
//  <i>Default: 21
#define FINSH_THREAD_PRIORITY       18
// <o>the stack of finsh thread <1-4096>
//  <i>the stack of finsh thread
//  <i>Default: 4096  (4096Byte)
#define FINSH_THREAD_STACK_SIZE     1024

#define FINSH_USING_SYMTAB
// <c1>Enable command description
//  <i>Enable command description
#define FINSH_USING_DESCRIPTION
//  </c>
// </h>

// <<< end of configuration section >>>
#endif
(五)rtconfig.h配置代码修改如下面所示
/* RT-Thread config file */

#ifndef __RTTHREAD_CFG_H__
#define __RTTHREAD_CFG_H__

// <<< Use Configuration Wizard in Context Menu >>>

// <h>Basic Configuration
// <o>Maximal level of thread priority <8-256>
//  <i>Default: 32
#define RT_THREAD_PRIORITY_MAX  32
// <o>OS tick per second
//  <i>Default: 1000   (1ms)
#define RT_TICK_PER_SECOND  1000
// <o>Alignment size for CPU architecture data access
//  <i>Default: 4
#define RT_ALIGN_SIZE   4
// <o>the max length of object name<2-16>
//  <i>Default: 8
#define RT_NAME_MAX    8
// <c1>Using RT-Thread components initialization
//  <i>Using RT-Thread components initialization
#define RT_USING_COMPONENTS_INIT
// </c>

#define RT_USING_USER_MAIN

// <o>the stack size of main thread<1-4086>
//  <i>Default: 512
#define RT_MAIN_THREAD_STACK_SIZE     256

// </h>

// <h>Debug Configuration
// <c1>enable kernel debug configuration
//  <i>Default: enable kernel debug configuration
//#define RT_DEBUG
// </c>
// <o>enable components initialization debug configuration<0-1>
//  <i>Default: 0
#define RT_DEBUG_INIT 0
// <c1>thread stack over flow detect
//  <i> Diable Thread stack over flow detect
//#define RT_USING_OVERFLOW_CHECK
// </c>
// </h>

// <h>Hook Configuration
// <c1>using hook
//  <i>using hook
//#define RT_USING_HOOK
// </c>
// <c1>using idle hook
//  <i>using idle hook
#define RT_USING_IDLE_HOOK
// </c>
// </h>

// <e>Software timers Configuration
// <i> Enables user timers
#define RT_USING_TIMER_SOFT         0
#if RT_USING_TIMER_SOFT == 0
    #undef RT_USING_TIMER_SOFT
#endif
// <o>The priority level of timer thread <0-31>
//  <i>Default: 4
#define RT_TIMER_THREAD_PRIO        4
// <o>The stack size of timer thread <0-8192>
//  <i>Default: 512
#define RT_TIMER_THREAD_STACK_SIZE  512
// </e>

// <h>IPC(Inter-process communication) Configuration
// <c1>Using Semaphore
//  <i>Using Semaphore
#define RT_USING_SEMAPHORE
// </c>
// <c1>Using Mutex
//  <i>Using Mutex
//#define RT_USING_MUTEX
// </c>
// <c1>Using Event
//  <i>Using Event
//#define RT_USING_EVENT
// </c>
// <c1>Using MailBox
//  <i>Using MailBox
#define RT_USING_MAILBOX
// </c>
// <c1>Using Message Queue
//  <i>Using Message Queue
//#define RT_USING_MESSAGEQUEUE
// </c>
// </h>

// <h>Memory Management Configuration
// <c1>Memory Pool Management
//  <i>Memory Pool Management
#define RT_USING_MEMPOOL
// </c>
// <c1>Dynamic Heap Management(Algorithm: small memory )
//  <i>Dynamic Heap Management
#define RT_USING_HEAP
#define RT_USING_SMALL_MEM
// </c>
// <c1>using tiny size of memory
//  <i>using tiny size of memory
//#define RT_USING_TINY_SIZE
// </c>
// </h>

// <h>Console Configuration
// <c1>Using console
//  <i>Using console
#define RT_USING_CONSOLE
// </c>
// <o>the buffer size of console <1-1024>
//  <i>the buffer size of console
//  <i>Default: 128  (128Byte)
#define RT_CONSOLEBUF_SIZE          256
// </h>

// <h>FinSH Configuration
// <c1>include finsh config
//  <i>Select this choice if you using FinSH
#include "finsh_config.h"
// </c>
// </h>

// <h>Device Configuration
// <c1>using device framework
//  <i>using device framework
#define RT_USING_DEVICE
// </c>
// </h>

// <<< end of configuration section >>>

#endif
(六)finsh用串口四做控制台,uart4.c,uart4.h
#include "sys.h"
#include "usart.h"
#include <rtthread.h>
#if  UART4_RX_ENABLE                   //如果使能接收功能
char Uart4_RxCompleted =
    0;            //定义一个变量 0:表示接收未完成 1:表示接收完成
unsigned int Uart4_RxCounter =
    0;      //定义一个变量,记录串口1总共接收了多少字节的数据
char Uart4_RxBuff[UART4_RXBUFF_SIZE]; //定义一个数组,用于保存串口1接收到的数据
#endif
void UART4_Init(void)
{
    GPIO_InitTypeDef GPIO_InitStructure;
    USART_InitTypeDef USART_InitStructure;
    // 特别注意:HK32需要先使能AFIO时钟
    RCC_APB2PeriphClockCmd(RCC_APB2Periph_GPIOC, ENABLE);
    // UART4时钟使能(在APB1上)
    RCC_APB1PeriphClockCmd(RCC_APB1Periph_UART4, ENABLE);

    // PC10(TX) 推挽输出
    GPIO_InitStructure.GPIO_Pin = GPIO_Pin_10;
    GPIO_InitStructure.GPIO_Mode = GPIO_Mode_AF_PP;
    GPIO_InitStructure.GPIO_Speed = GPIO_Speed_50MHz;
    GPIO_Init(GPIOC, &GPIO_InitStructure);
    // PC11(RX) 浮空输入
    GPIO_InitStructure.GPIO_Pin = GPIO_Pin_11;
    GPIO_InitStructure.GPIO_Mode = GPIO_Mode_IN_FLOATING;
    GPIO_Init(GPIOC, &GPIO_InitStructure);
    // USART参数配置
    USART_InitStructure.USART_BaudRate = 115200;
    USART_InitStructure.USART_WordLength = USART_WordLength_8b;
    USART_InitStructure.USART_StopBits = USART_StopBits_1;
    USART_InitStructure.USART_Parity = USART_Parity_No;
    USART_InitStructure.USART_HardwareFlowControl = USART_HardwareFlowControl_None;
    USART_InitStructure.USART_Mode = USART_Mode_Rx | USART_Mode_Tx;
    USART_Init(UART4, &USART_InitStructure);
    // 特别注意:HK32需要额外使能USART时钟
    USART_Cmd(UART4, ENABLE);
    USART_ITConfig(UART4, USART_IT_RXNE, DISABLE); // 关闭接收中断
}
//*************************************************************//
// 系统rt_kprintf()函数是通过调用 rt_hw_console_output();来实现
// 而rt_hw_console_output();函数系统默认是没有实现的,所以如果要
// 使用rt_kprintf()函数,就需要用户自己实现rt_hw_console_output()函数
// 实现rt_hw_console_output()函数的前提是,要初始化串口功能,串口初始化
// 过程和裸机串口初始化过程完全一样
//************************************************************//
/**
  * @brief  重映射串口DEBUG_USARTx到rt_kprintf()函数
  *   Note:DEBUG_USARTx是在bsp_usart.h中定义的宏,默认使用串口1
  * @param  str:要输出到串口的字符串
  * @retval 无
  *
  * @attention
  *
  */
void rt_hw_console_output(const char *str)
{
    /* 进入临界段 */
    rt_enter_critical();
    /* 直到字符串结束 */
    while (*str != '\0') {
        /* 换行 */
        //RT-Thread 系统中已有的打印均以 \n 结尾,而并非 \r\n,所以在字符输出时,需要在输出 \n 之前输出 \r,完成回车与换行,否则系统打印出来的信息将只有换行
        if (*str == '\n') {
            USART_SendData(UART4, '\r');
            while (USART_GetFlagStatus(UART4, USART_FLAG_TXE) == RESET);
        }
        USART_SendData(UART4, *str++);
        while (USART_GetFlagStatus(UART4, USART_FLAG_TXE) == RESET);
    }
    /* 退出临界段 */
    rt_exit_critical();
}

//使用Finsh组件三步骤:
//1.实现该函数及rt_hw_console_output函数;
//2.rtconfig.h中开启RT_USING_FINSH宏;
//3.添加Finsh组件(cmd.c、msh.c、shell.c);
char rt_hw_console_getchar(void)
{
    //查询方式实现,记得将Uart4初始化中的中断接收配置相关代码注释掉
    int ch = -1;
    /*等待串口1输入数据*/
    if (USART_GetFlagStatus(UART4, USART_SR_RXNE) != RESET) {
				ch = ( int )USART_ReceiveData( UART4 );
				USART_ClearFlag( UART4, USART_FLAG_RXNE );
    }
    else {
        if (USART_GetFlagStatus(UART4, USART_FLAG_ORE) != RESET) {
            USART_ClearFlag(UART4, USART_FLAG_ORE);
        }
        rt_thread_mdelay(10);
    }
    return ch;

}
#ifndef __USART_H
#define __USART_H
#include "stdio.h"
#include "sys.h"
#include "stdio.h"      //包含需要的头文件
#include "stdarg.h"     //包含需要的头文件
#include "string.h"     //包含需要的头文件

#define UART4_RX_ENABLE     1      //是否开启接收功能  1:开启  0:关闭
#define UART4_TXBUFF_SIZE   256    //定义串口1 发送缓冲区大小 256字节

#if  UART4_RX_ENABLE                          //如果使能接收功能
#define UART4_RXBUFF_SIZE   256               //定义串口1 接收缓冲区大小 256字节
extern char Uart4_RxCompleted ;               //外部声明,其他文件可以调用该变量
extern unsigned int Uart4_RxCounter;          //外部声明,其他文件可以调用该变量
extern char Uart4_RxBuff[UART4_RXBUFF_SIZE]; //外部声明,其他文件可以调用该变量
#endif

void UART4_Init(void);     //串口4 初始化函数
void rt_hw_console_output(const char *str);
#endif
(七)在board.c中rt_hw_board_init()添加串口初始化函数
/*
 * Copyright (c) 2006-2019, RT-Thread Development Team
 *
 * SPDX-License-Identifier: Apache-2.0
 *
 * Change Logs:
 * Date           Author       Notes
 * 2017-07-24     Tanek        the first version
 * 2018-11-12     Ernest Chen  modify copyright
 */
#include "stm32f10x.h"
#include <stdint.h>
#include <rthw.h>
#include <rtthread.h>
#include "delay.h"
#include "usart.h"
#include "sys.h"
#define _SCB_BASE       (0xE000E010UL)
#define _SYSTICK_CTRL   (*(rt_uint32_t *)(_SCB_BASE + 0x0))
#define _SYSTICK_LOAD   (*(rt_uint32_t *)(_SCB_BASE + 0x4))
#define _SYSTICK_VAL    (*(rt_uint32_t *)(_SCB_BASE + 0x8))
#define _SYSTICK_CALIB  (*(rt_uint32_t *)(_SCB_BASE + 0xC))
#define _SYSTICK_PRI    (*(rt_uint8_t  *)(0xE000ED23UL))

// Updates the variable SystemCoreClock and must be called
// whenever the core clock is changed during program execution.
extern void SystemCoreClockUpdate(void);

// Holds the system core clock, which is the system clock
// frequency supplied to the SysTick timer and the processor
// core clock.
extern uint32_t SystemCoreClock;
#if defined(RT_USING_USER_MAIN) && defined(RT_USING_HEAP)
#define RT_HEAP_SIZE 1024*4
static uint32_t rt_heap[RT_HEAP_SIZE];     // heap default size: 4K(1024 * 4)
RT_WEAK void *rt_heap_begin_get(void)
{
    return rt_heap;
}

RT_WEAK void *rt_heap_end_get(void)
{
    return rt_heap + RT_HEAP_SIZE;
}
#endif
/*******************************************************************************
* 函 数 名         :RCC_Configuration
* 函数功能           :时钟配置
* 输    入         : 无
* 输    出         : 无
*******************************************************************************/
void RCC_Configuration(void)
{

    ErrorStatus HSEStartUpStatus;                                                           //定义枚举类型变量 HSEStartUpStatus
    RCC_DeInit();                                                                                           //复位系统时钟设置
    RCC_HSEConfig(RCC_HSE_ON);                                                              //开启HSE
    HSEStartUpStatus = RCC_WaitForHSEStartUp();                     //等待HSE起振并稳定
    if (HSEStartUpStatus == SUCCESS)                                                    //判断HSE起是否振成功,是则进入if()内部
    {
        RCC_HCLKConfig(RCC_SYSCLK_Div1);                                    //选择HCLK(AHB)时钟源为SYSCLK 1分频
        RCC_PCLK2Config(RCC_HCLK_Div1);                                             //选择PCLK2时钟源为 HCLK(AHB) 1分频
        RCC_PCLK1Config(RCC_HCLK_Div2);                                             //选择PCLK1时钟源为 HCLK(AHB) 2分频
//        FLASH_SetLatency(FLASH_Latency_2);                                      //设置FLASH延时周期数为2
//        FLASH_PrefetchBufferCmd(FLASH_PrefetchBuffer_Enable); //使能FLASH预取缓存
        RCC_PLLConfig(RCC_PLLSource_HSE_Div1, RCC_PLLMul_9);  //选择锁相环(PLL)时钟源为HSE 1分频,倍频数为9,则PLL输出频率为 8MHz * 9 = 72MHz
        RCC_PLLCmd(ENABLE);                                                                 //使能PLL
        while (RCC_GetFlagStatus(RCC_FLAG_PLLRDY) == RESET);  //等待PLL输出稳定

        RCC_SYSCLKConfig(RCC_SYSCLKSource_PLLCLK);                      //选择SYSCLK时钟源为PLL
        while (RCC_GetSYSCLKSource() != 0x08);                              //等待PLL成为SYSCLK时钟源
    }
    RCC_APB2PeriphClockCmd(RCC_APB2Periph_GPIOA | RCC_APB2Periph_ADC1 | RCC_APB2Periph_GPIOB, ENABLE);
    RCC_APB2PeriphClockCmd(RCC_APB2Periph_AFIO | RCC_APB2Periph_GPIOB | RCC_APB2Periph_GPIOF, ENABLE);
    GPIO_PinRemapConfig(GPIO_Remap_SWJ_JTAGDisable, ENABLE);
}
RCC_ClocksTypeDef ClockInfo;
/**
 * This function will initial your board.
 */
void rt_hw_board_init()
{
	 RCC_Configuration();	//时钟配置
   SysTick_Config(SystemCoreClock / RT_TICK_PER_SECOND);
	 SysTick_Init(72);
	 NVIC_PriorityGroupConfig(NVIC_PriorityGroup_2);  //中断优先级分组 分2组
	 OSRunning=1;
	 RCC_GetClocksFreq(&ClockInfo); //获取时钟
	 UART4_Init();        						 //串口4初始化用于finsh组件
    /* Call components board initial (use INIT_BOARD_EXPORT()) */
#ifdef RT_USING_COMPONENTS_INIT
    rt_components_board_init();
#endif

#if defined(RT_USING_USER_MAIN) && defined(RT_USING_HEAP)
    rt_system_heap_init(rt_heap_begin_get(), rt_heap_end_get());
#endif
}

void SysTick_Handler(void)
{
    /* enter interrupt */
    rt_interrupt_enter();//表示进入中断,在src/irp.c中定义,中断嵌套计数器rt_interrupt_nest加1

    rt_tick_increase(); //rt_tick加1,并检查当前运行线程的剩余时间片是否耗尽,若耗尽则让出处理器并重新调度线程,接着执行硬件定时器中断模式下的定时器超时检查rt_timer_check();

    /* leave interrupt */
    rt_interrupt_leave();//rt_tick加1,并检查当前运行线程的剩余时间片是否耗尽,若耗尽则让出处理器并重新调度线程,接着执行硬件定时器中断模式下的定时器超时检查rt_timer_check();
}
(八)delay.c delay.h修改如下
#include "delay.h"
#include "stm32f10x_it.h"
#include "rtthread.h"

static u8  fac_us=0;							//us延时倍乘数
static u16 fac_ms=0;							//ms延时倍乘数,在os下,代表每个节拍的ms数


extern volatile rt_uint8_t rt_interrupt_nest;

//在board.c文件的rt_hw_board_init()里面将其置为1
uint8_t OSRunning=0;

#ifdef 	RT_THREAD_PRIORITY_MAX					         //RT_THREAD_PRIORITY_MAX定义了,说明要支持RT-Thread
#define delay_osrunning		  OSRunning			       //OS是否运行标记,0,不运行;1,在运行
#define delay_ostickspersec	RT_TICK_PER_SECOND	//OS时钟节拍,即每秒调度次数
#define delay_osintnesting 	rt_interrupt_nest		//中断嵌套级别,即中断嵌套次数
#endif

//us级延时时,关闭任务调度(防止打断us级延迟)
void delay_osschedlock(void)
{
#ifdef RT_THREAD_PRIORITY_MAX
	 rt_enter_critical();
#endif
}

//us级延时时,恢复任务调度
void delay_osschedunlock(void)
{
#ifdef RT_THREAD_PRIORITY_MAX
	  rt_exit_critical();
#endif
}

//调用OS自带的延时函数延时
//ticks:延时的节拍数
void delay_ostimedly(u32 ticks)
{
#ifdef RT_THREAD_PRIORITY_MAX
	  rt_thread_delay(ticks);
#endif
}

//初始化延迟函数
//SYSTICK的时钟固定为AHB时钟的1/8
//SYSCLK:系统时钟频率
void SysTick_Init(u8 SYSCLK)
{
	u32 reload;
	SysTick_CLKSourceConfig(SysTick_CLKSource_HCLK_Div8);
	fac_us=SYSCLK/8;						//不论是否使用OS,fac_us都需要使用
	reload=SYSCLK/8;				//每秒钟的计数次数
	reload*=1000000/delay_ostickspersec;		//根据delay_ostickspersec设定溢出时间
												//reload为24位寄存器,最大值:16777216,在72M下,约合1.86s左右
	fac_ms=1000/delay_ostickspersec;			//代表OS可以延时的最少单位

	SysTick->CTRL|=SysTick_CTRL_TICKINT_Msk;   	//开启SYSTICK中断
	SysTick->LOAD=reload; 						//每1/delay_ostickspersec秒中断一次
	SysTick->CTRL|=SysTick_CTRL_ENABLE_Msk;   	//开启SYSTICK
}


//延时nus
//nus为要延时的us数.
void delay_us(u32 nus)
{
	u32 ticks;
	u32 told,tnow,tcnt=0;
	u32 reload=SysTick->LOAD;					//LOAD的值
	ticks=nus*fac_us; 							//需要的节拍数
	tcnt=0;
	delay_osschedlock();						//阻止OS调度,防止打断us延时
	told=SysTick->VAL;        					//刚进入时的计数器值
	while(1)
	{
		tnow=SysTick->VAL;
		if(tnow!=told)
		{
			if(tnow<told)tcnt+=told-tnow;		//这里注意一下SYSTICK是一个递减的计数器就可以了.
			else tcnt+=reload-tnow+told;
			told=tnow;
			if(tcnt>=ticks)break;				//时间超过/等于要延迟的时间,则退出.
		}
	};
	delay_osschedunlock();						//恢复OS调度
}
//延时nms
//nms:要延时的ms数
void delay_ms(u16 nms)
{
	if(delay_osrunning&&delay_osintnesting==0)	//如果OS已经在跑了,并且不是在中断里面(中断里面不能任务调度)
	{
		if(nms>=fac_ms)							//延时的时间大于OS的最少时间周期
		{
   			delay_ostimedly(nms/fac_ms);		//OS延时
		}
		nms%=fac_ms;							//OS已经无法提供这么小的延时了,采用普通方式延时
	}
	delay_us((u32)(nms*1000));					//普通方式延时
}
#ifndef __DELAY_H
#define __DELAY_H
#include "sys.h"
extern u8 OSRunning;
extern void SysTick_Init(u8 SYSCLK);
extern void delay_ms(u16 nms);
extern void delay_us(u32 nus);
extern void delay_s(u16 s);

#endif
main函数
#include "sys.h"
#include "delay.h"
#include "usart.h"
#include "led.h"
int main(void)
{
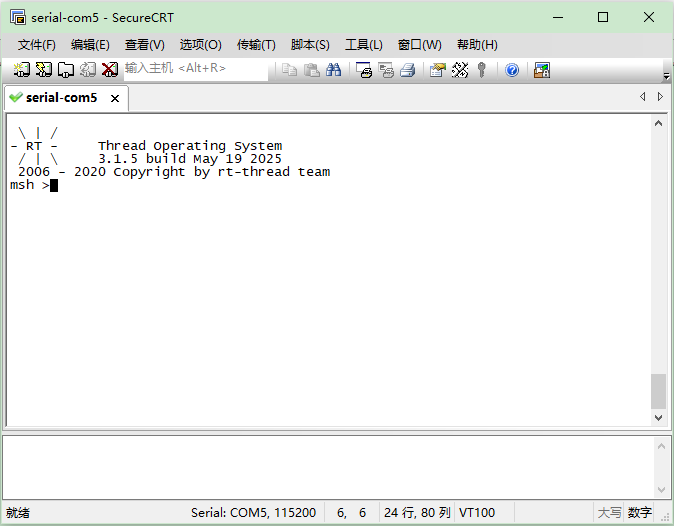
}(九)连接sercurecrt如下图
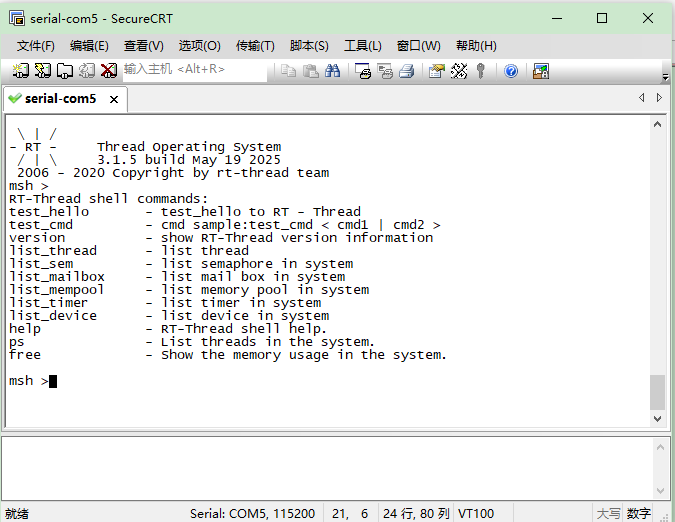
 点击tab或者help出现命令帮助
后续或许会详细解释创建动态静态线程,msh自己创建命令,等一系列操作


 3064
3064

 被折叠的 条评论
为什么被折叠?
被折叠的 条评论
为什么被折叠?
 到【灌水乐园】发言


