


文章目录
一、Java 多线程
Java中操作多线程最核心的类Thread,其被放置在java.lang下不需要我们手动导入
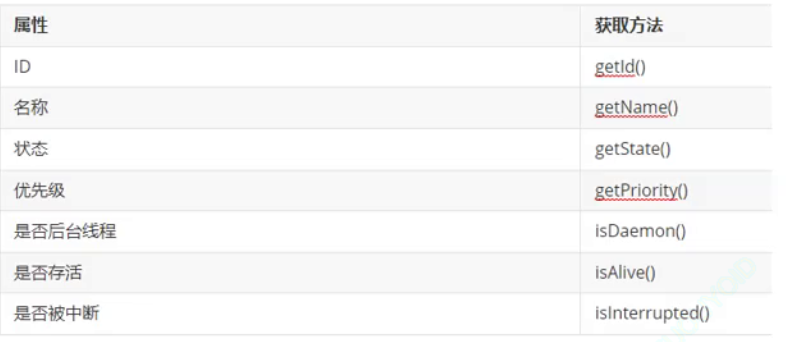
1.1 Java 线程基本属性
-
名称:构造方法里起的名字
-
线程状态:Java中的线程的状态要比操作系统原生的状态更加丰富一些
-
优先级:可以获取和设置,但是没有啥用,只是给操作系统建议
-
是否后台线程:前台线程会阻止进程结束,前台线程的工作没有做完,进程是无法结束的,后台线程,不会阻止进程结束,后台线程的工作没有做完,进程也是可以结束的
-
是否存活:判断系统里该线程是否工作
-
是否中断:通知线程,你应该停止了(建议)
-
interrupt会做两件事:
1、吧线程内部标识位设置成true
2、如果线程在sleep,就会触发异常,把线程唤醒。但是sleep在唤醒的时候,还会将刚才的中断标识位重新设置成false(清空标志位)
sleep重制标志位的意义:唤醒之后,线程到底要终止还是继续,到底是立即终止还是稍后终止,就把选择权交给了程序员
package thread;

public class ThreadDemo8 {
    public static void main(String[] args) {
        Thread t = new Thread(() -> {
            // currentThread()(静态成员方法)可以获取到线程对象的引用
            System.out.println("hello world");
            while (!Thread.currentThread().isInterrupted()) {
                try {
                    Thread.sleep(1000);
                } catch (InterruptedException e) {
                    e.printStackTrace  ();
                  // break(); // 立即响应终止请求
                }
            }
        }, "myThread");
        t.start();

        try {
            Thread.sleep(3000);
          // 告诉线程,你应该终止了
            t.interrupt();
        } catch (InterruptedException e) {
            e.printStackTrace();
        }
    }
}
-
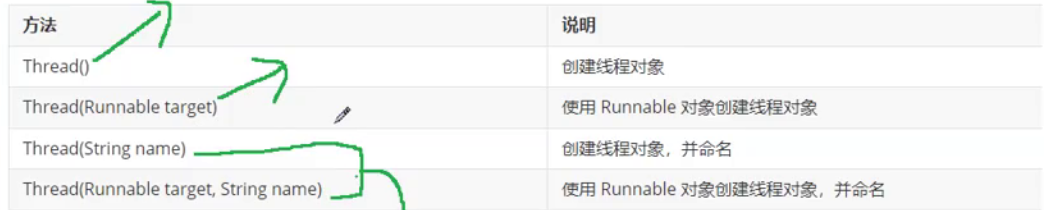
1.2 创建线程的五种方式
1、实现Callable接口
当我们需要创建一个可以返回结果的线程时,就可以使用实现了Callable接口的方式。Callable接口是在Java 5中引入的,它允许线程执行一个任务并返回一个结果,与Runnable接口相比,Callable接口的call()方法可以返回结果并抛出异常。
import java.util.concurrent.Callable;
import java.util.concurrent.FutureTask;

class MyCallable implements Callable<String> {
    public String call() {
        return "Thread is running...";
    }
}

public class Main {
    public static void main(String[] args) {
        // 创建Callable实现类的实例
        Callable<String> callable = new MyCallable();

        // 创建FutureTask对象,用于包装Callable对象
        FutureTask<String> futureTask = new FutureTask<>(callable);

        // 创建线程并启动
        Thread thread = new Thread(futureTask);
        thread.start();

        try {
            // 获取线程执行结果
            String result = futureTask.get();
            System.out.println(result);
        } catch (Exception e) {
            e.printStackTrace();
        }
    }
}
Callable 和 Runnable的最大区别就是前者接口中的方法是有返回值的,并且Callable接口需要通过FutureTask方法封装后进行使用,还有以下使用方法
package thread;


import java.util.concurrent.Callable;
import java.util.concurrent.ExecutionException;
import java.util.concurrent.FutureTask;

public class ThreadDemo29 {
    public static void main(String[] args) throws ExecutionException, InterruptedException {
        Callable<Integer> callable = new Callable<Integer>() {
            public Integer call() throws Exception {
                int sum = 0;
                for (int i = 1; i <= 1000; i++) {
                    sum += i;
                }
                return sum;
            }
        };
        FutureTask<Integer> futureTask = new FutureTask<>(callable);
        Thread t1 = new Thread(futureTask);
        Thread t2 = new Thread(new FutureTask<Integer>(new Callable<Integer>() {
            public Integer call() throws Exception {
                int sum = 0;
                for (int i = 1; i <= 1000; i++) {
                    sum += i;
                }
                return sum;
            }
        }));
        t1.start();
        t2.start();

        // get 方法获取结果,如果线程没有执行完get方法会被阻塞
        Integer result = futureTask.get();
        System.out.println(result);
    }

}
2、实现Runnable 接口
// Runnable 作用,是描述一个需要执行的任务,run方法就是执行细节
class MyRunnable implements Runnable {
    @Override
    public void run() {
        System.out.println("hello thread");
    }
}

public class ThreadDemo2 {
    public static void main(String[] args) {
        Runnable runnable = new MyRunnable();
        Thread t = new Thread(runnable);
        t.start();
    }
}
3、使用匿名内部类
public class Main {
    public static void main(String[] args) {
        Thread thread = new Thread(new Runnable() {
            public void run() {
                System.out.println("Thread is running...");
            }
        });
        thread.start(); // 启动线程
    }
}
4、继承Thread
可以通过继承Thread类来创建线程,然后重写run()方法来定义线程执行的任务。
class MyThread extends Thread {
    public void run() {
        System.out.println("Thread is running...");
    }
}

public class Main {
    public static void main(String[] args) {
        MyThread thread = new MyThread();
        thread.start(); // 启动线程
    }
}
5、使用lambda表达式
public class Main {
    public static void main(String[] args) {
        Thread thread = new Thread(() -> {
            System.out.println("Thread is running...");
        });
        thread.start(); // 启动线程
    }
}
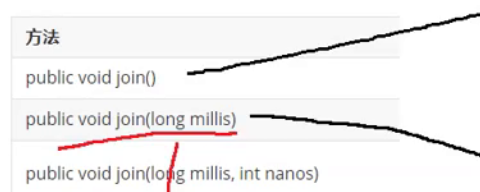
1.3 Java 线程等待
线程是一个随机调度的过程,等待线程做的事就是控制两个线程的结束顺序
package thread;

public class ThreadDemo9 {
    public static void main(String[] args) throws InterruptedException {

        Thread t = new Thread(() -> {
            for (int i = 0; i < 3; i++) {
                System.out.println("hello thread");
                try {
                    Thread.sleep(1000);
                } catch (InterruptedException e) {
                    e.printStackTrace();
                }
            }
        });

        t.start();

        try {
            t.join();
            System.out.println("child quit");
            System.out.println("I'm quit");

        } catch (InterruptedException e) {
            e.printStackTrace();
        }

    }
}
1.4 Java 线程状态
package thread;

public class ThreadDemo10 {
    public static void main(String[] args) {
        Thread t = new Thread(() -> {
            for (int i = 0; i < 10000000; i++) {

            }
        });

        System.out.println("start 之前:" + t.getState());
        t.start();

        try {
        	  System.out.println("start 之后:" + t.getState());
            t.join();
        } catch (InterruptedException e) {
            e.printStackTrace();
        }
        // 执行完毕之后,就是TERMINATED状态
        System.out.println("t 结束之后:" + t.getState());
    }
}
线程对象只能start一次,不能重复start
TERMINATED状态:内核中的线程PCB消亡了,此时代码中变量t就没啥用了,而Java中对象的生命周期由Java自己控制,此时就需要特定的状态,来把t对象标识成无效的
1.5 多线程的优点
package thread;

public class ThreadDemo11 {
    public static void main(String[] args) {
        serial1();
        serial2();
    }

    public static void serial2() {
        // 为了衡量执行速度,加上一个计时操作
        // currentTimeMillis 获取到当前系统的 ms 级时间戳

        long beg = System.currentTimeMillis(); // 毫秒级时间戳

        long a = 0;
        for (long i = 0; i < 100_0000_0000L; i++) {
            a++;
        }

        long b = 0;
        for (long i = 0; i < 100_0000_0000L; i++) {
            b++;
        }

        long end = System.currentTimeMillis();
        System.out.println("执行时间:" + (end - beg) + "ms");
    }

    public static void serial1() {
        // 为了衡量执行速度,加上一个计时操作
        // currentTimeMillis 获取到当前系统的 ms 级时间戳

        long beg = System.currentTimeMillis(); // 毫秒级时间戳

        Thread t1 = new Thread(() -> {
            long a = 0;
            for (long i = 0; i < 100_0000_0000L; i++) {
                a++;
            }
        });

        Thread t2 = new Thread(() -> {
            long b = 0;
            for (long i = 0; i < 100_0000_0000L; i++) {
                b++;
            }
        });
        t1.start();
        t2.start();

        try {
            t1.join();
            t2.join();
        } catch (InterruptedException e) {
            e.printStackTrace();
        }

        long end = System.currentTimeMillis();
        System.out.println("执行时间:" + (end - beg) + "ms");
    }
}
1.6 Java标准库中的线程安全类
线程不安全的
这些类在多线程代码中使用需要格外注意
ArrayList 、LinkedList、HashMap、TreeMap、HashSet、TreeSet、StringBuilder
线程安全的
已经内置了syncronized加锁,相对来说安全一点
Vector(不推荐使用),HashTable(不推荐使用),ConcurrentHashMap,StringBuffer
1.7 保证线程安全的方法
使用synchronized 直接对this指针进行加锁
public synchronized void add() {
        count++;
}
1.8 Java 实现自定义类型比较器
方法1:给自定义类型实继承Comparable接口,实现虚接口compareTo()
package thread;
import java.util.concurrent.PriorityBlockingQueue;

class MyTask implements Comparable<MyTask> {
    public MyTask(Runnable runnable, long time) {
        this.runnable = runnable;
        this.time = time;
    }

    public long getTime() {
        return time;
    }

    public void run() {
        runnable.run();
    }

    private Runnable runnable;
    private long time;

    @Override
    public int compareTo(MyTask o) {
        return (int)(this.time - o.time);
    }
}

class MyTimer {
    // 扫描线程
    private Thread t = null;
    // 有一个阻塞优先级队列用来保存队列
    private PriorityBlockingQueue<MyTask> queue = new PriorityBlockingQueue<>();

    public MyTimer() {
        t = new Thread(() -> {
            while (true) {
                // 取出队首元素,检查队首元素是否到时间了
                try {
                    MyTask myTask = queue.take();
                    long curTime = System.currentTimeMillis();
                    if (curTime < myTask.getTime()) {
                        // 如果时间没到,就把任务塞回到队列中去
                        queue.put(myTask);
                        synchronized(this) {
                            this.wait(myTask.getTime() - curTime);
                        }
                    } else {
                        // 如果时间到了,就把任务进行执行
                        myTask.run();
                    }
                } catch (InterruptedException e) {
                    e.printStackTrace();
                }
            }
        });
        t.start();
    }

    // 第一个参数是任务内容,第二个参数是任务多久后执行
    public void schedule(Runnable runnable, long after) {
        // 注意这里时间进行换算
        MyTask task = new MyTask(runnable, System.currentTimeMillis() + after);
        queue.put(task);
        synchronized (this) {
            this.notify();
        }
    }
}

public class ThreadDemo25 {
    public static void main(String[] args) {
        MyTimer myTimer = new MyTimer();

        myTimer.schedule(new Runnable() {
            @Override
            public void run() {
                System.out.println("任务1:");
            }
        }, 1000);

        myTimer.schedule(new Runnable() {
            @Override
            public void run() {
                System.out.println("任务1:");
            }
        }, 2000);
    }
}
方法2:使用Comparator单独写个比较器
二、Java 线程池
标准库中的线程池
// 简单构建一个线程池
// 创建一个线程池,线程里线程数目固定10个
ExecutorService pool1 = Executors.newFixedThreadPool(10);
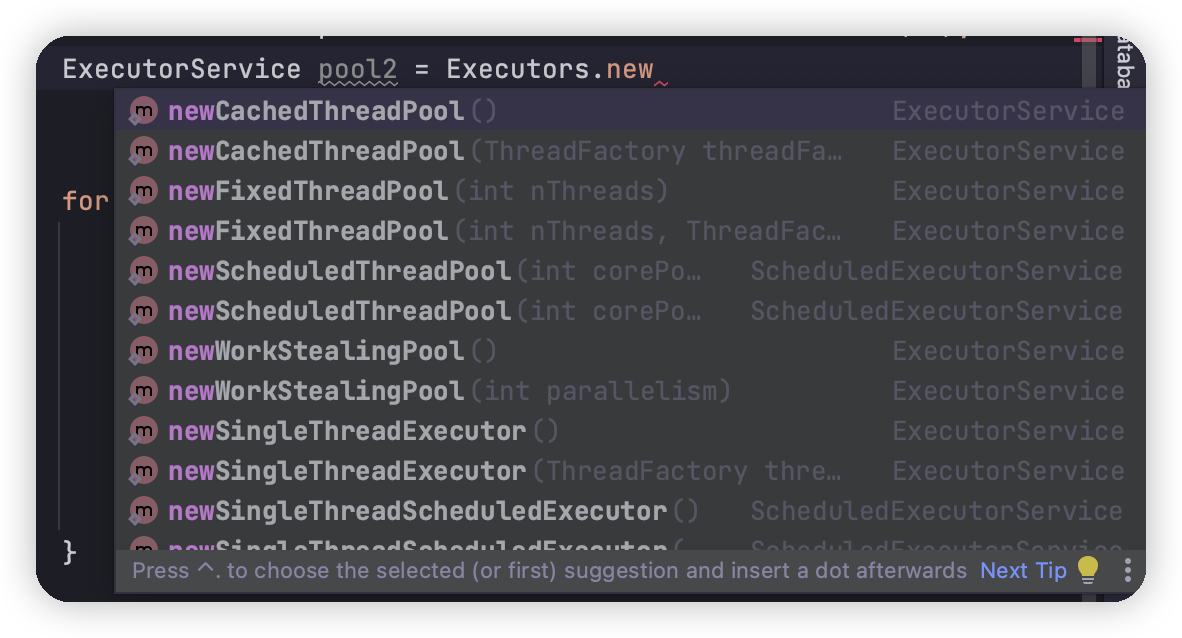
- newCachedThreadPool : 线程动态变化的线程池
- newFIxedThreadPool: 固定线程数量的线程池
- newSingleThreadPool : 只有一个线程的线程池
- newScheduledThreadPool: 类似于定时器,让任务延时执行,执行时并非由扫描线程执行,而是由单独的线程池进行执行
上述的线程池都是通过包装ThreadPoolExecutor实现的,使用工厂设计模式使用更加方便
2.1 ThreadPoolExecutor
文档网址:https://docs.oracle.com/javase/8/docs/api/index.html

ThreadPoolExecutor(
    int corePoolSize,
    int maximumPoolSize,
    long keepAliveTime,
    TimeUnit unit,
    BlockingQueue<Runnable> workQueue,
    ThreadFactory threadFactory,
    RejectedExecutionHandler handler
)
- corePoolSize:核心线程数
- maximumPoolSize: 最大线程数
- workQueue : 线程池的任务队列(阻塞队列,每个工作线程take成功执行任务,失败,进入阻塞)
- threadFactory : 线程工厂,帮助线程池创建线程
- handler:拒绝策略,当任务队列满了后再添加任务需要进行判断
解释:
核心线程:即线程池中工作的正式员工线程,其余的是临时线程(临时工),两者区别就是临时工摸鱼会被销毁
拒绝策略:以下是标准库提供的四种拒绝策略

- ThreadPoolExecutor.AbortPolicy: 队列满了再插入,就抛异常
- ThreadPoolExecutor.CallerRunsPolicy:队列满了再插入,谁加的谁执行
- ThreadPoolExecutor.DiscardOldestPolicy:如果队列满了,丢弃最早的任务
- ThreadPoolExecutor.DiscardPolicy:丢弃最新的任务
2.2 Java简易线程池的实现
package thread;

import java.util.concurrent.BlockingQueue;
import java.util.concurrent.LinkedBlockingQueue;

//
class MyThreadPool {
    private BlockingQueue<Runnable> queue = new LinkedBlockingQueue<>();

    public MyThreadPool(int n) {
        for (int i = 0; i < n; i++) {
            Thread t = new Thread(() -> {
                while (true) {
                    Runnable runnable = null;
                    try {
                        runnable = queue.take();
                        runnable.run();
                    } catch (InterruptedException e) {
                        e.printStackTrace();
                    }
                }
            });
            t.start();
        }
    }

    public void submit(Runnable runnable) {
        try {
            queue.put(runnable);
        } catch (InterruptedException e) {
            e.printStackTrace();
        }
    }
}

public class ThreadDemo27 {
    public static void main(String[] args) {
        MyThreadPool pool = new MyThreadPool(10);
        for (int i = 0; i < 1000; i++) {
            int n = i;
            pool.submit(new Runnable() {

                public void run() {
                    System.out.println("hello " + n);
                }
            });
        }
    }
}
三、Java 线程安全
3.1 Java 原子类
源自类内部使用CAS方法实现,所以性能会比加锁操作高很多,标准库中提供了AtomicBoolean,AtomicInteger,AtomicIntegerArray,AtomicLong,AtomicReference,AtomicStampedReference几个类
CAS存在ABA问题,自旋时间过长,以及线程安全的范围不能灵活控制等问题
原子类的原理将用以下伪代码进行解释:
这里CAS本身修改value,不过CAS需要判定value和oldValue是否相等,不相等就重新进行读取
class AtomicInteger {
		private int value;

		public int getAndIncrement() {
      // oldValue可以理解寄存器中的值,将内存的值读取到寄存器中
		int oldValue = value;
    // 正常情况下oldValue和value相同,但是也可能另外一个线程修改value值,所以进行CAS判定,如果value值发生了变化则重新读取value的值,然后对其进行操作
				while (CAS(value, oldValue, oldValue + 1) != true) {
						oldValue = value;
				}
				return oldValue;
		}
}
package thread;

import java.util.concurrent.atomic.AtomicInteger;

public class ThreadDemo28 {
    public static void main(String[] args) {

        AtomicInteger count = new AtomicInteger(0);

        Thread t1 = new Thread(() -> {
            for (int i = 0; i < 50000; i++) {
                count.incrementAndGet();
                count.getAndIncrement();
            }
        });

        Thread t2 = new Thread(() -> {
            for (int i = 0; i < 50000; i++) {
                count.incrementAndGet();
                count.getAndIncrement();
            }
        });

        try {
            t1.start();
            t2.start();
            t1.join();
            t2.join();
        } catch (InterruptedException e) {
            throw new RuntimeException(e);
        }

        System.out.println(count);
    }
}
3.2 SpinLock 自旋锁
监测当前的owner是否为null,如果为null将当前线程的引用赋值给owner,如果赋值成功,循环结束,加锁完成
如果当前锁被其他线程占用,CAS就会发现this.owner不是null,CS就不会产生赋值操作,同时返回false,循环继续执行,进行下次判定
public class SpinLock {
		private Thread owner = null;
		public void lock() {
				 while (!CAS(this.owner, null, Thread.currentThread())) {

				 }
		}
		public void unlock() {
			this.owner = null;
		}
}
3.3 ReentrantLock
相比于synchronized,ReentrantLock使用方法更复古,手动调用lock和unlock进行加锁解锁
使用方法
package thread;

import java.util.concurrent.locks.ReentrantLock;

public class ThreadDemo30 {
    public static void main(String[] args) {
        ReentrantLock reentrantLock = new ReentrantLock();

        try {
            reentrantLock.lock();
            if (coud1) {
                return;
            }

            if (coud2) {
                return;
            }
            throw new Exception();
        } finally {
            reentrantLock.unlock();
        }
    }
}
手动unlock确实带来了很多不便的地方,但是ReentrantLock也是有优势的
-
ReentrantLock 提供了公平锁版本的实现
// 添加参数true提供公平锁 ReentrantLock reentrantLock = new ReentrantLock(true); -
对于synchronized来说,加锁操作就是死等,只要获取不到锁就会一直等待,但是ReentrantLock提供了更加灵活的等待方式,tryLock,无参数版本,能加锁就加锁,不能就放弃。有参数版本,等一段时间加上就算了,没有就放弃
reentrantLock.trylock(); -
ReentrantLock还搭配了一个Condition类,进行唤醒的时候可以指定唤醒线程
但是虽然ReentrantLock功能更加强大,但是使用方法较为复杂,工作中使用的较少
3.4 Semaphore 信号量
和Linux的信号量类似,使用acquire方法申请信号量(P操作),使用release方法释放信号量(V操作)
package thread;

import java.util.concurrent.Semaphore;

public class ThreadDemo31 {
    public static void main(String[] args) throws InterruptedException {
        Semaphore semaphore = new Semaphore(3);
        semaphore.acquire();
        System.out.println("执行一次P操作");
        semaphore.acquire();
        System.out.println("执行一次P操作");
        semaphore.acquire();
        System.out.println("执行一次P操作");
        semaphore.release();
        System.out.println("执行一次V操作");
        semaphore.acquire();
        System.out.println("执行一次P操作");
    }
}
四、多线程环境下Java标准库使用
Java标准库中大部分集合类都是线程不安全的,多个线程使用同一个集合类对象可能会出问题
Vector,Stack,HashTable这几个类是少数线程安全的集合类,但是其是无脑加锁的,不推荐使用
多线程环境使用ArrayList
1、自己加锁,使用synchronized 或者 ReentrantLock 进行加锁
2、Collections.synchronizedList 这里会提供一些ArrayList相关方法,同时是带锁的,使用这个方法把集合类套一层
3、CopyOnWriteArrayList 简称COW也叫做写时拷贝,如果针对ArrayList进行读取操作,不需要做任何工作,如果进行写操作,就需要拷贝一份新的ArrayList进行修改,修改过程中只能读取旧的,修改完毕后就用新的替换旧的
多线程使用哈希表
HashMap线程不安全,但是HashTable线程安全,但是更推荐使用ConcurrentHashMap更优化的线程安全哈希表
1、最大优化之处,就是相对于HashTable大大缩小了锁冲突的概率,把一把大锁替换成了很多小锁(分段锁)
2、只针对写进行加锁,读和写没有冲突,使用代码控制写操作是原子的
3、内部充分使用CAS,通过这个来进一步削减加锁操作的数目
4、针对扩容,采取化整为零的方式,创建一个更大的数组空间,但是保留旧的数组,每次进行put操作都往新数组添加的同时也搬运一小部分元素


 4149
4149


 被折叠的 条评论
为什么被折叠?
被折叠的 条评论
为什么被折叠?
 到【灌水乐园】发言


