


一、HBase配置和启动(基于hadoop-3.1.2)
1、安装zookeeper和hbase
下载文件zookeeper-3.4.14.tar.gz
https://archive.apache.org/dist/zookeeper/zookeeper-3.4.14/
下载的文件需上传至Linux本地的/home目录下,然后执行解压的操作
tar xfz /home/zookeeper-3.4.14.tar.gz
默认解压到/home/zookeeper-3.4.14
下载文件hbase-2.1.5-bin.tar.gz
https://archive.apache.org/dist/hbase/2.1.5/
下载的文件同样需上传至Linux本地的/home目录下,然后执行解压的操作
tar xfz /home/hbase-2.1.5-bin.tar.gz
默认解压到/home/hbase-2.1.5
2、将hbase添加到环境变量中
vi /etc/profile
export HBASE_HOME=/home/hbase-2.1.5
export PATH=$HBASE_HOME/bin:$PATH
3、修改hbase-env.sh
vi /home/hbase-2.1.5/conf/hbase-env.sh
export JAVA_HOME=/home/jdk1.8.0_161 //去掉该行注释并改为实际安装的jdk版本
4、修改conf/hbase-site.xml的配置
注意把第三行"主节点IP地址“和第七行指定位置替换为hadoop集群中主节点的IP地址
<configuration>
  <property>
    <name>hbase.rootdir</name>				//指定本机的hbase的存储目录
   <value>hdfs://主节点IP地址:9000/hbase</value>	//必须与hadoop中的core-site.xml中的地址保持一致
  </property>
  <property>
    <name>hbase.cluster.distributed</name>		//指定hbase的运行模式,true代表全分布模式
    <value>true</value>
  </property>
  <property>
    <name>hbase.zookeeper.property.dataDir</name>	//Zookeeper安装目录
    <value>/home/zookeeper-3.4.14</value>
  </property>
  <property>
    <name>hbase.unsafe.stream.capability.enforce</name>
    <value>false</value>
  </property>
  <property>
    <name>hbase.zookeeper.quorum</name>			//Zookeeper的运行节点
    <value>节点ip或主机名:2181(多个节点用逗号隔开)</value>	//须配置多个节点
  </property>
  <property>
    <name>hbase.master.info.port</name>		//HBase Web服务
  <value>60010</value>
</property>
</configuration>
5、修改域服务器地址
vi /home/hbase-2.1.5/conf/regionservers
可以使用主机名或IP地址,最好使用主机名,比如:

6、将zookeeper和hbase复制至slave(需要修改为自己实际的节点IP地址或主机名)
scp -r /home/zookeeper-3.4.14 root@192.168.56.202:/home
scp -r /home/zookeeper-3.4.14 root@192.168.56.203:/home
scp -r /home/hbase-2.1.5 root@192.168.56.202:/home
scp -r /home/hbase-2.1.5 root@192.168.56.203:/home
7、启动hbased
首先启动hadoop
cd /home/hadoop/hadoop-3.1.2
sbin/start-all.sh
启动hbase
cd /home/hbase-2.1.5
bin/start-hbase.sh
查看守护进程,jps,除了hadoop的守护进程外还需要包括hbase的守护进程:
Master:HMaster (由Zookpeer选举产生,一般在主节点中)
域服务器:HRegionServer (regionservers中指定的节点有此进程)
Zookeeper节点:HQuorumPeer (在多个节点上运行,hbase.zookeeper.quorum中配置的节点)
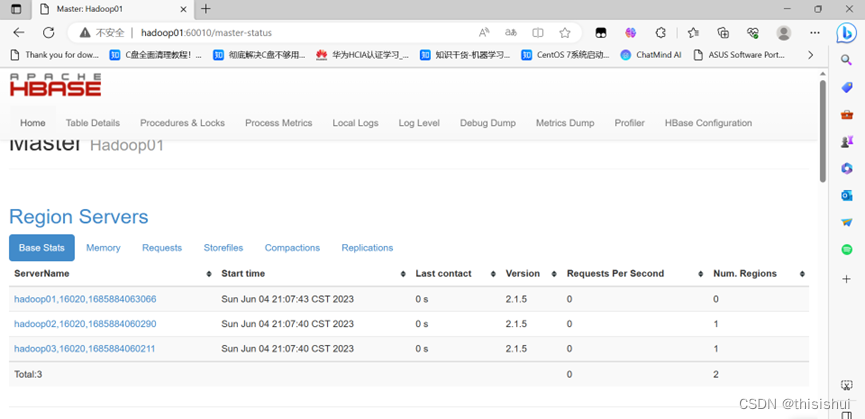
查看web页面
宿主机浏览器中:主节点地址:60010
二、解决HMaster消失问题
1、在第一步最后,执行jps之后,过一段时间再执行jps,可能发现HMaster守护进程消失
HMaster消失,一般是zookeeper崩溃导致,进入HBase的logs目录,查看zookeeper的日志可看到类似错误:
quorum.QuorumCnxManager: Cannot open channel to 1 at election address node2/192.168.56.12:3888
java.net.ConnectException: Connection refused(Connection refused)
也有可能zookeeper未崩溃,但是无法选举新的hmaster,执行建表命令时会报错:
ERROR: KeeperErrorCode = NoNode for /hbase/master
2、解决方案:
1.确定DataNode正常运行,最好是三个节点都配上DataNode
在hadoop的workers文件中将三个节点都配上
2.(1)进入hbase安装目录
(2)进入配置文件目录conf
(3)打开配置文件hbase-site.xml
(4)修改配置项hbase.zookeeper.quorum的值,将所有节点配入(最好是奇数个),以自己实际的主机名或IP地址为主
主节点IP地址:2181,从节点1IP地址:2181,从节点2IP地址:2181
(5)用scp命令将hbase-site.xml复制到其他节点
3.(1)进入zookeeper安装目录
cd /home/zookeeper-3.4.14
分别查看三个节点的myid文件
cat myid


(2)进入配置文件目录conf
(3)用拷贝命令从示例文件中创建配置文件
cp zoo_sample.cfg zoo.cfg
(4)修改zoo.cfg,在尾部添加
注意:server.后的数字为前文查看三个节点中myid对应的数字
 server.0:主节点名称或IP地址:2888:3888
 server.1:从节点1名称或IP地址:2888:3888
 server.2:从节点2名称或IP地址:2888:3888

(5)用scp命令将zoo.cfg复制到其他节点
scp zoo.cfg root@从节点1IP地址:/home/zookeeper-3.4.14/conf
scp zoo.cfg root@从节点2IP地址:/home/zookeeper-3.4.14/conf
4.(1)添加zookeeper数据目录(三个节点均操作)
mkdir /tmp/zookeeper
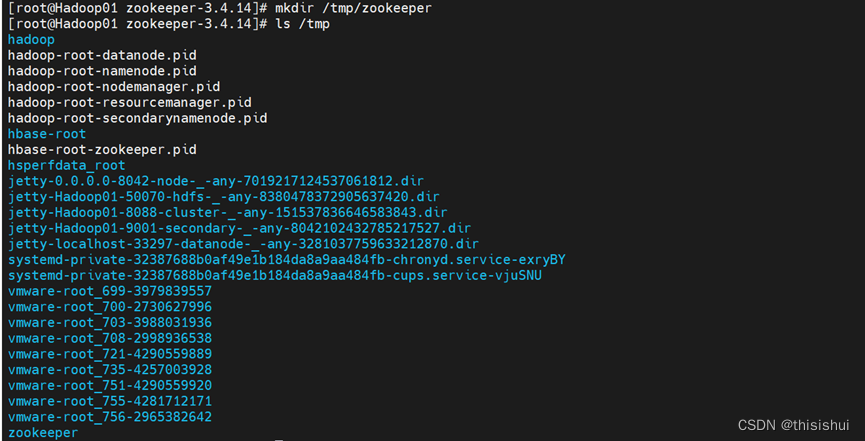
(2)在三个节点中的/tmp/zookeeper中分别创建文本文件myid,内容具体为zoo.cfg中server后的数字,如:
节点Hadoop01中的myid文件内容为0
节点Hadoop02中的myid文件内容为1
节点Hadoop03中的myid文件内容为2
三、HBase命令行测试(确保hadoop已启动,且HMaster不再消失)
启动hbase,进入hbase命令行
cd /home/hbase-2.1.5
bin/start-hbase.sh
bin/hbase shell
- 创建一个Student表,包含Base和Score两个列族;Base列族包含Number、Name、Sex、Prof列;Score列族包含English、Math、Market、Java、Python、BigData列

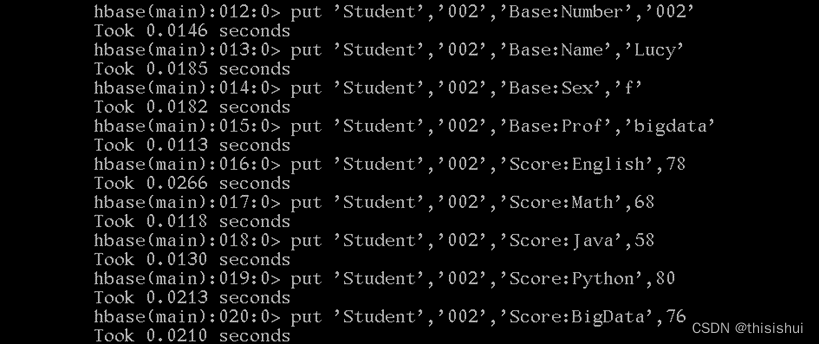
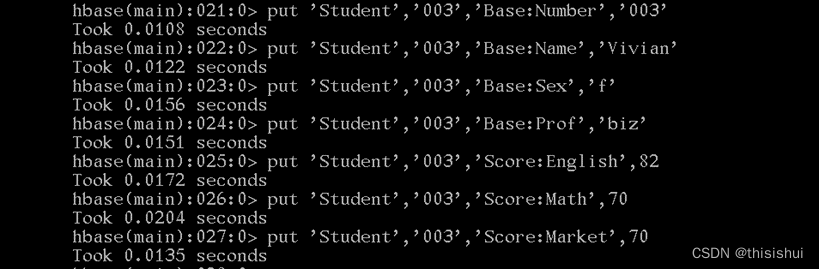
2.往表中新增数据,每行rowkey设置为学生学号

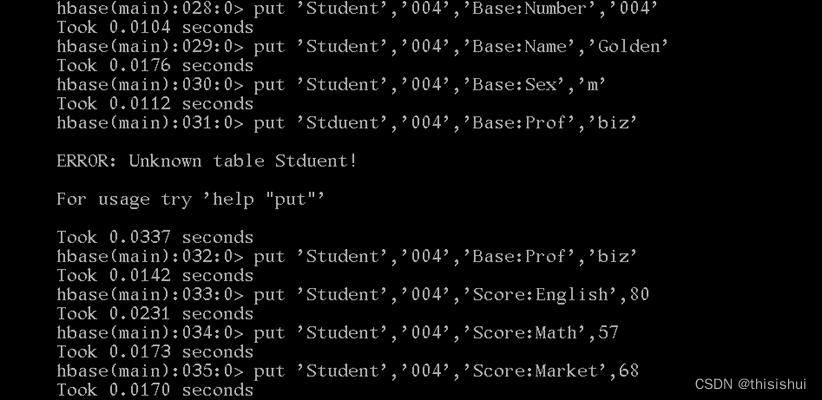
3.获取列键001的数学成绩;
get 'Student','001','Score:Math'

4.删除一行数据
deleteall 'Student','004'

5.获取学号范围从001~003的学生的基本信息(列族为Base)
scan 'Student',{STARTROW=>'001',STOPROW=>'004',COLUMNS=>'Base'}

6.搜索所有bigdata专业的学生
scan 'Student',{COLUMNS=>'Base:Prof',FILTER=>"ValueFilter(=,'binary:bigdata')"}

7.使用scan命令的filter搜索所有不及格的成绩记录
scan 'Student',{COLUMN=>'Score',FILTER=>"ValueFilter(<,'binary:60')"}

四、HBase Java API 操作
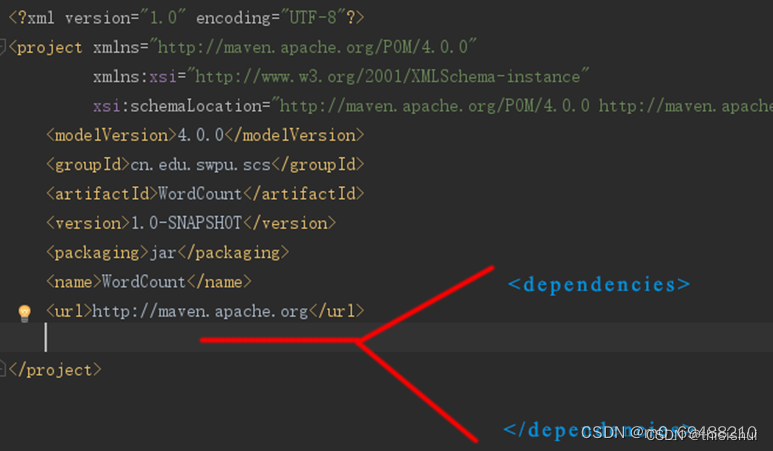
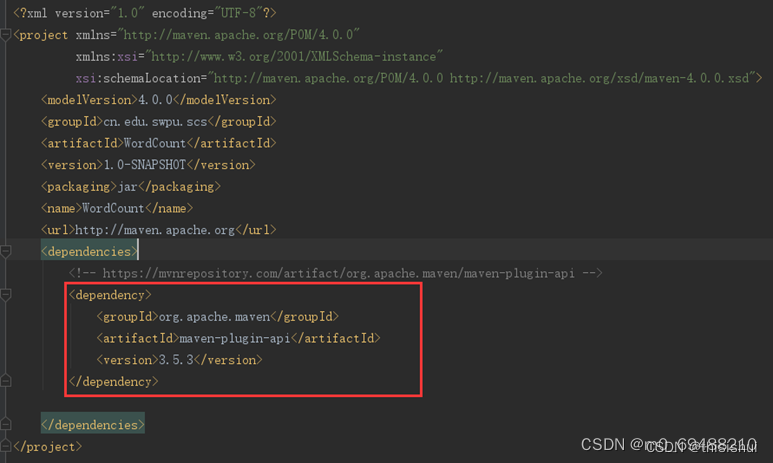
1、在IDEA中新建Marven项目,修改pom.xml,在pom.xml文件中的根节点中,添加一个子节点,如下图:
2、查询maven组件配置https://mvnrepository.com/
!!注意在查询组件时选择的组件要和实际安装的hadoop版本一致,下面的以hadoop-3.1.2版本为例
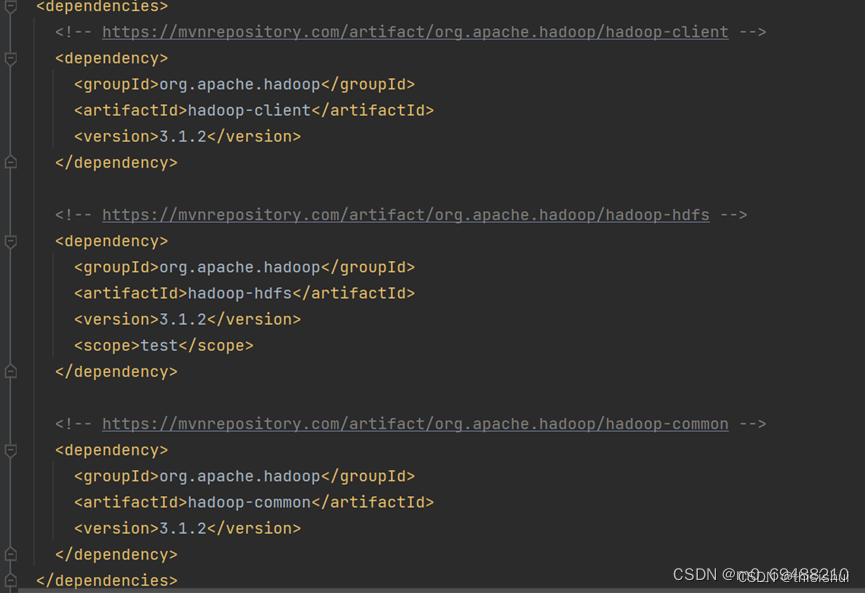
需要查询的组件:
hadoop-client
<!-- https://mvnrepository.com/artifact/org.apache.hadoop/hadoop-client -->
<dependency>
    <groupId>org.apache.hadoop</groupId>
    <artifactId>hadoop-client</artifactId>
    <version>3.1.2</version>
</dependency>
hadoop-hdfs
<!-- https://mvnrepository.com/artifact/org.apache.hadoop/hadoop-hdfs -->
<dependency>
    <groupId>org.apache.hadoop</groupId>
    <artifactId>hadoop-hdfs</artifactId>
    <version>3.1.2</version>
    <scope>test</scope>
</dependency>
hadoop-common
<!-- https://mvnrepository.com/artifact/org.apache.hadoop/hadoop-common -->
<dependency>
    <groupId>org.apache.hadoop</groupId>
    <artifactId>hadoop-common</artifactId>
    <version>3.1.2</version>
</dependency>
hbase-client
<!-- https://mvnrepository.com/artifact/org.apache.hbase/hbase-client -->
    <dependency>
      <groupId>org.apache.hbase</groupId>
      <artifactId>hbase-client</artifactId>
      <version>2.1.5</version>
    </dependency>
将所有查询到的组件的XML插入到节点中去,如下图:
pom.xml修改完毕后,点击右下角的"Import Changes"即可将MAVEN库中的JAR包下载到项目中,默认情况下,会从MAVEN官网下载,速度比较慢;可事先配置MAVEN淘宝镜像库,基本方法就是在IntelliJ IDEA的安装目录下,找到MAVEN插件的安装目录,修改其配置文件,将镜像设置添加到配置文件中即可
3、如果已经创建过Student表,需要首先删除
disable 'Student'
drop 'Student'
4、要求:
使用HBase Shell往Student表新增一行rowkey为index的数据,列族/列为Base:Indexes,值为:001,002,004
编写代码获取值:Student,rowkey,Base:Indexes
将获取到的值按 , 切分为数组,遍历数组,以数组中的值为rowkey获取其对应的姓名、学号、英语和Java成绩,并print出来,print格式为:
Tim(001): 80 85
Lucy(002): 78 88
Golden(004): 80
注意:对一个表创建一次连接后,所有的get操作执行完后,再close连接
注意:以下代码中 节点名:2181需要替换为自己实际的节点主机名
并修改C:\Windows\System32\drivers\etc\hosts文件,添加对应的映射即可,如:
主节点IP地址 主节点主机名
从节点1IP地址 从节点1主机名
从节点2IP地址 从节点2主机名
*若无权限修改,可将其拷贝到其他地方,修改了后再拷贝回来覆盖
import org.apache.hadoop.conf.Configuration;
import org.apache.hadoop.hbase.Cell;
import org.apache.hadoop.hbase.HBaseConfiguration;
import org.apache.hadoop.hbase.TableName;
import org.apache.hadoop.hbase.client.*;
import org.apache.hadoop.hbase.util.Bytes;
import java.io.IOException;
import java.util.ArrayList;
import java.util.List;

public class HBaseTest {
    static Configuration conf = HBaseConfiguration.create();
    static Connection conn;

    public static void main(String[] args){
        //创建HBase配置
        //conf.set("hbase.rootdir", "hdfs://node1:9000/hbase");
        conf.set("hbase.zookeeper.quorum", "Hadoop01:2181,Hadoop02:2181,Hadoop03:2181");
        //conf.set("hbase.zookeeper.property.clientPort", "2181");
        try {
            //创建HBase连接
            System.out.println("连接Hbase...");
            conn = ConnectionFactory.createConnection(conf);
            //创建表
            System.out.println("创建表");
            createTable("Student", new String[]{ "Base", "Score" });	//创建一个具备Base和Score两个CollumnFamily(列族)的表Student
            //数据写入例
            System.out.println("数据写入");
            putSingleValue("Student", "001", "Base", "Number", "001");	//5个参数分别为:表名、RowKey、CollumnFamily、Collumn、Cell值
            putSingleValue("Student", "001", "Base", "Name", "Tim");
            putSingleValue("Student", "001", "Base", "Sex", "m");
            putSingleValue("Student", "001", "Base", "Prof", "bigdata");
            putSingleValue("Student", "001", "Score", "English", "50");
            putSingleValue("Student", "001", "Score", "Math", "72");
            putSingleValue("Student", "001", "Score", "Java", "85");
            putSingleValue("Student", "001", "Score", "Python", "75");
            putSingleValue("Student", "001", "Score", "BigData", "80");

            putSingleValue("Student", "002", "Base", "Number", "002");
            putSingleValue("Student", "002", "Base", "Name", "Lucy");
            putSingleValue("Student", "002", "Base", "Sex", "f");
            putSingleValue("Student", "002", "Base", "Prof", "bigdata");
            putSingleValue("Student", "002", "Score", "English", "78");
            putSingleValue("Student", "002", "Score", "Math", "68");
            putSingleValue("Student", "002", "Score", "Java", "58");
            putSingleValue("Student", "002", "Score", "Python", "80");
            putSingleValue("Student", "002", "Score", "BigData", "76");

            putSingleValue("Student", "003", "Base", "Number", "003");
            putSingleValue("Student", "003", "Base", "Name", "Vivian");
            putSingleValue("Student", "003", "Base", "Sex", "f");
            putSingleValue("Student", "003", "Base", "Prof", "biz");
            putSingleValue("Student", "003", "Score", "English", "82");
            putSingleValue("Student", "003", "Score", "Math", "70");
            putSingleValue("Student", "003", "Score", "Market", "70");

            putSingleValue("Student", "004", "Base", "Number", "004");
            putSingleValue("Student", "004", "Base", "Name", "Golden");
            putSingleValue("Student", "004", "Base", "Sex", "m");
            putSingleValue("Student", "004", "Base", "Prof", "biz");
            putSingleValue("Student", "004", "Score", "English", "80");
            putSingleValue("Student", "004", "Score", "Math", "57");
            putSingleValue("Student", "004", "Score", "Market", "68");

            System.out.println("写入学生索引");
            putSingleValue("Student", "index", "Base", "Indexes", "001,002,004");
            //数据读取例
            String value = getSingleValue("Student", "index", "Base", "Indexes");	//4个参数分别为:表名、RowKey、CollumnFamily、Collumn、Cell值
            String[] valsplit=value.split(",");
            String name,number,English,Java;
            List<String> lst=new ArrayList<String>();
            for (String rk : valsplit) {
                name=getSingleValue("Student",rk,"Base","Name");
                number=getSingleValue("Student",rk,"Base","Number");
                English=getSingleValue("Student",rk,"Score","English");
                Java=getSingleValue("Student",rk,"Score","Java");
                lst.add(name+"("+number+"): "+English+"  "+Java); //把要求输出的信息存入列表

            }
            System.out.println();
            System.out.println("打印出获取到的姓名、学号、英语和Java成绩");
            for (String info : lst) {
                System.out.println(info); //依次遍历列表输出要输出的信息
            }
            conn.close();
            //String name = getSingleValue("Student", "001", "Base", "Name");		//获取学号为001的学生姓名
        }
        catch(Exception e) {
            e.printStackTrace();
        }
    }

    //创建表
    public static void createTable(String table, String[] families) throws IOException {
        //构造表名对象
        TableName tableName = TableName.valueOf(table);
        //获取管理对象
        Admin admin = conn.getAdmin();
        //判断表是否存在
        if(!admin.tableExists(tableName)) {
            //构造表描述器器
            TableDescriptorBuilder tableDescipt = TableDescriptorBuilder.newBuilder(tableName);

            for(String family : families){
                //构造列族描述器
                ColumnFamilyDescriptorBuilder columnFamilyDescript =  ColumnFamilyDescriptorBuilder.newBuilder(Bytes.toBytes(family));
                //创建列描述器
                ColumnFamilyDescriptor columnFamily = columnFamilyDescript.build();
                //添加列族
                tableDescipt.setColumnFamily(columnFamily);
            }

            //获得表描述器
            TableDescriptor td = tableDescipt.build();
            //创建表
            admin.createTable(td);
        }else {
            System.out.println("表 " + tableName.getNameAsString() + " 已存在");
        }
    }

    //新增单条数据
    public static void putSingleValue(String tableStr, String rowKey, String columnFamily, String columnName, String cellValue) throws IOException{
        TableName tableName = TableName.valueOf(tableStr);
        Table table = conn.getTable(tableName);// Tabel负责跟记录相关的操作如增删改查等//
        Put put=new Put(Bytes.toBytes(rowKey));
        put.addColumn(Bytes.toBytes(columnFamily), Bytes.toBytes(columnName), Bytes.toBytes(cellValue));
        table.put(put);
        table.close();
        System.out.println("add data Success!");
    }

    //删除单条数据
    public static void deleteSingleValue(String tableStr,String rowKey, String columnFamily, String columnName) throws IOException {
        TableName tableName = TableName.valueOf(tableStr);
        //创建表对象,实现表删除
        Table table = conn.getTable(tableName);
        Delete delete = new Delete(Bytes.toBytes(rowKey));  //定义行
        //delete.addFamily(Bytes.toBytes(columnFamily));    //定义需要删除的列族
        //delete.addColumn(Bytes.toBytes(columnFamily), Bytes.toBytes(columnName));   //定义需要删除的列
        table.delete(delete);
        table.close();
    }

    //删除表
    public static  void deleteTable(String tableStr) throws IOException{
        TableName tableName = TableName.valueOf(tableStr);
        //创建管理对象并禁用表,删除表前先禁用掉
        Admin admin = conn.getAdmin();
        admin.disableTable(tableName);
        admin.deleteTable(tableName);
    }

    //获取单条数据
    public static String getSingleValue(String tableStr, String rowKey, String columnFamily, String columnName) throws IOException {
        TableName tableName = TableName.valueOf(tableStr);
        Table table = conn.getTable(tableName);
        Get get = new Get(Bytes.toBytes(rowKey));
        //get.addFamily(Bytes.toBytes(columnFamily));
        get.addColumn(Bytes.toBytes(columnFamily), Bytes.toBytes(columnName));
        //执行数据读取并返回结果对象
        Result set = table.get(get);
        //获取一行数据集中的所有单元格(cell)对象
        Cell[] cells  = set.rawCells();
        //遍历所有单元格对象
        for(Cell cell : cells) {
            //System.out.println(Bytes.toString(cell.getRowArray()));
            //System.out.println(Bytes.toString(cell.getFamilyArray()));
            //System.out.println(Bytes.toString(cell.getQualifierArray()));
            //System.out.println(Bytes.toString(cell.getValueArray()));
            byte[] cellValue = cell.getValueArray();
            String row = Bytes.toString(cellValue, cell.getRowOffset(), cell.getRowLength());
            String family = Bytes.toString(cellValue, cell.getFamilyOffset(), cell.getFamilyLength());
            String column = Bytes.toString(cellValue, cell.getQualifierOffset(), cell.getQualifierLength());
            Long timestamp = cell.getTimestamp();
            String value = Bytes.toString(cellValue, cell.getValueOffset(), cell.getValueLength());
            System.out.println(String.format("%s:%s:%s:%d=%s",row, family, column, timestamp, value));
            return  value;
        }
        table.close();
        return "";
    }
}
运行代码:成功创建表并插入数据

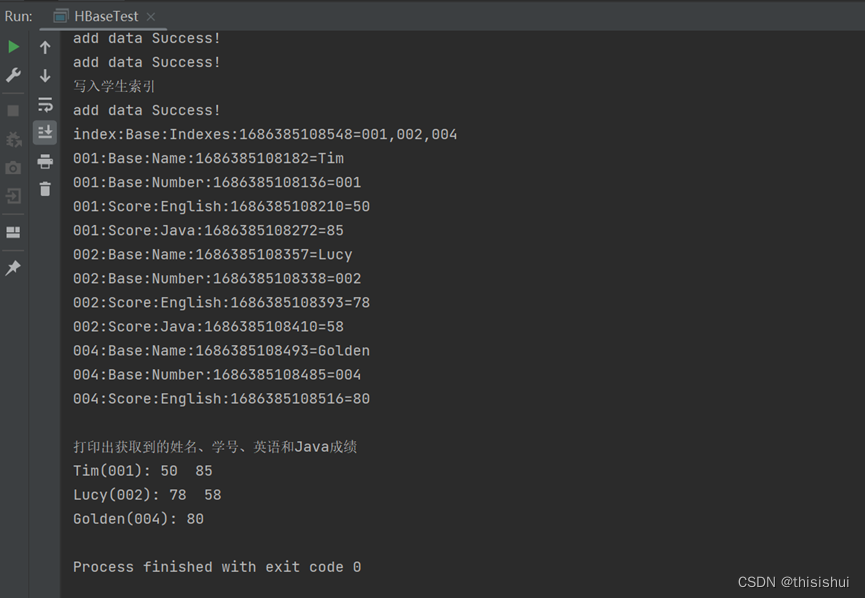
在hbase上通过命令查看Student表的信息:

五、启动hbase的常见异常
(1)错误1:ERROR [main] regionserver.HRegionServer: Failed construction RegionServer java.lang.NoClassDefFoundError: org/apache/htrace/SamplerBuilder
把hbase-2.1.5/lib/client-facing-thirdparty目录下的htrace-core-3.1.0-incubating.jar 复制到hbase-2.1.5/lib即可。
(2)错误2:master.HMaster: Failed to become active master
conf/hbase-site.xml添加
hbase.unsafe.stream.capability.enforce
false
(3)警告:zookeeper.clientcnxn session 0X0 for server null attempting reconnect
zookeeper无法通信的警告,连续操过一定次数会造成zookeeper节点退出的错误,最终导致HRegionServer失效
1、检查节点防火墙有无关闭
2、conf/hbase-site.xml添加
hbase.zookeeper.quorum //Zookeeper的运行节点
节点ip或主机名:2181(多个节点用逗号隔开)
为Zookeeper多添加几个节点


 731
731


 被折叠的 条评论
为什么被折叠?
被折叠的 条评论
为什么被折叠?
 到【灌水乐园】发言


