


概述
文档环境
开发环境:Windows 11
编译环境:Ubuntu 22.04
开发板型号:DAYU 200(RK3568)
系统版本:OpenHarmony-3.2-Release
功能简介
- 在 OpenHarmony 系统中预安装应用的 hap 包会随系统编译打包到镜像中,目前有两种编译预安装应用 hap 包的方式,一种为随系统编译时,编译应用源码生成 hap 包的方式,另一种是将已生成的 hap 包放入系统源码中,再进行打包的方式。后者需要开发者使用 DevEco Studio 或其它途径,把应用源码编译构建为 hap 包,再将 hap 放入系统源码中。
- 本文档以系统应用 Launcher 为例,带大家了解如何通过系统源码编译应用的方式来打包预安装应用。
3.2-Release 系统编译 Launcher
1.删除或注释系统中默认的 Launcher 应用 hap 包编译方式。
文件位置:applications/standard/hap/BUILD.gn
group("hap") {
  deps = [
    	...
      # "//applications/standard/hap:launcher_hap", // 直接删除或注释,不参与编译
      # "//applications/standard/hap:launcher_settings_hap",  // 直接删除或注释,不参与编译
    	...
  ]
 }

2.在 applications/standard/launcher/product/phone 目录中增加 BUILD.gn 文件。

内容如下:
import("//build/ohos.gni")

ohos_hap("launcher_hap") {
  hap_profile = "src/main/module.json"
  deps = [
    ":launcher_js_assets",
    ":launcher_resources",
  ]
  certificate_profile = "../../signature/launcher.p7b"
  hap_name = "Launcher_OS"
  part_name = "prebuilt_hap"
  subsystem_name = "applications"
  js_build_mode = "release"
  module_install_dir = "app/com.ohos.launcher"
}

ohos_js_assets("launcher_js_assets") {
  ets2abc = true
  source_dir = "src/main/ets"
}

ohos_resources("launcher_resources") {
  sources = [ "src/main/resources", "../../common/src/main/resources" ]
  deps = [ ":launcher_app_profile" ]
  hap_profile = "src/main/module.json"
}

ohos_app_scope("launcher_app_profile") {
  app_profile = "../../AppScope/app.json"
  sources = [ "../../AppScope/resources" ]
}
说明:
- 此处把产物名称 hap_name 定义为 Launcher_OS 是为了区分原系统源码中默认的 hap 包名称,实际可以填写为 Launcher。
- 因为 launcher_hap 中使用了其它 har(common)中的资源,所以 launcher_resources 中的 sources 需要添加依赖的 resources 资源目录,在步骤 3 中 launcher_settings_hap
中的配置也是如此。
3.在 applications/standard/launcher/feature/settings 目录中增加 BUILD.gn 文件。

内容如下:
import("//build/ohos.gni")

ohos_hap("launcher_settings_hap") {
  hap_profile = "src/main/module.json"
  deps = [
    ":launcher_settings_js_assets",
    ":launcher_settings_resources",
  ]
  certificate_profile = "../../signature/launcher.p7b"
  hap_name = "Launcher_Settings_OS"
  part_name = "prebuilt_hap"
  subsystem_name = "applications"
  js_build_mode = "release"
  module_install_dir = "app/com.ohos.launcher"
}

ohos_js_assets("launcher_settings_js_assets") {
  ets2abc = true
  source_dir = "src/main/ets"
}

ohos_resources("launcher_settings_resources") {
  sources = [ "src/main/resources", "../../common/src/main/resources" ]
  deps = [ ":launcher_settings_app_profile" ]
  hap_profile = "src/main/module.json"
}

ohos_app_scope("launcher_settings_app_profile") {
  app_profile = "../../AppScope/app.json"
  sources = [ "../../AppScope/resources" ]
}
说明:
- 此处把产物名称 hap_name 定义为 Launcher_Settings_OS 是为了区分原系统源码中默认的 hap 包名称,实际可以填写为 Launcher_Settings。
4.因为系统编译只可读取 json 后缀的配置文件,所以需要把应用源码中的 app.json5 和 module.json5 文件复制,并改名为 app.json 和 module.json 文件。
(1)复制 applications/standard/launcher/AppScope/app.json5 文件为 app.json。

(2)复制 applications/standard/launcher/product/phone/src/main/module.json5 文件为 module.json。

(3)复制 applications/standard/launcher/feature/settings/src/main/module.json5 文件为 module.json。

5.在 applications/standard/hap/ohos.build 文件 module_list 中增加 launcher_hap 模块和 launcher_settings_hap 模块编译。
{
  "subsystem": "applications",
  "parts": {
    "prebuilt_hap": {
	  	...
      "module_list": [
       	...
        "//applications/standard/launcher/product/phone:launcher_hap",
        "//applications/standard/launcher/feature/settings:launcher_settings_hap",
        ...
      ]
    }
  }
}

6.修改预编译配置 build/prebuilts_download_config.json 文件,把 launcher 依赖增加到 npm_install_path 列表中。
{
  "prebuilts_download_dir": "../OpenHarmony_canary_prebuilts",
  "npm_install_path": [
    "developtools/ace_ets2bundle/compiler",
    "developtools/ace_js2bundle/ace-loader",
    "third_party/jsframework",
    "arkcompiler/ets_frontend/ts2panda",
    "arkcompiler/ets_frontend/legacy_bin/api8",
    "interface/sdk-js/build-tools",
    "applications/standard/launcher/common",
    "applications/standard/launcher/feature/appcenter",
    "applications/standard/launcher/feature/bigfolder",
    "applications/standard/launcher/feature/form",
    "applications/standard/launcher/feature/gesturenavigation",
    "applications/standard/launcher/feature/numbadge",
    "applications/standard/launcher/feature/pagedesktop",
    "applications/standard/launcher/feature/recents",
    "applications/standard/launcher/feature/smartdock",
    "applications/standard/launcher/feature/settings",
    "applications/standard/launcher/product/phone"
  ],
  ...
}

7.执行预编译指令。
bash build/prebuilts_download.sh --skip-ssl
可以在应用源码中看到应用内的依赖已经被正确的加载。

8.执行源码编译指令。如果以下 2 个目录产物正确,则说明应用源码编译方式修改成功。
(1)在 out/rk3568/obj/applications/standard/launcher 目录中,会生成 2 个 hap 的编译产物。

(2)在 out/rk3568/packages/phone/system/app/com.ohos.launcher 目录中,是实际系统环境中的 hap 包产物。

9.烧录系统验证功能。
Launcher 正常启动:

系统应用目录文件正确:

为了能让大家更好的学习鸿蒙(HarmonyOS NEXT)开发技术,这边特意整理了《鸿蒙开发学习手册》(共计890页),希望对大家有所帮助:https://qr21.cn/FV7h05
《鸿蒙开发学习手册》:
如何快速入门:https://qr21.cn/FV7h05
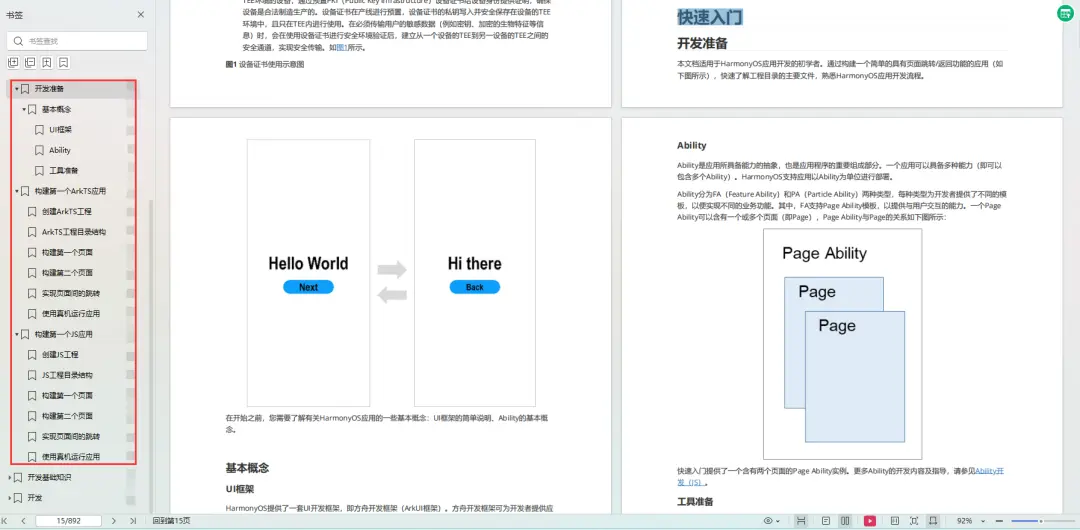
- 基本概念
- 构建第一个ArkTS应用
- ……
开发基础知识:https://qr21.cn/FV7h05
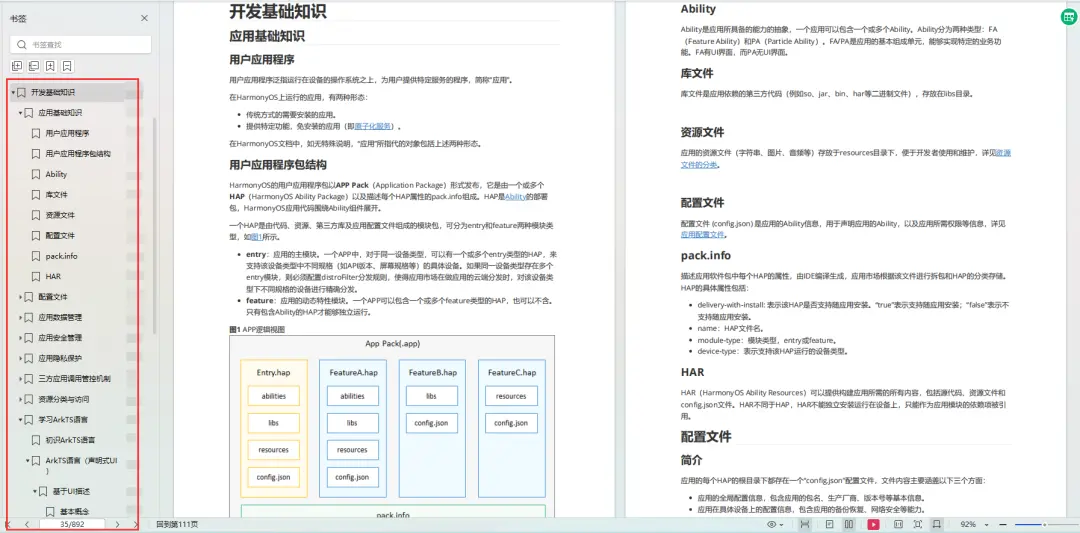
- 应用基础知识
- 配置文件
- 应用数据管理
- 应用安全管理
- 应用隐私保护
- 三方应用调用管控机制
- 资源分类与访问
- 学习ArkTS语言
- ……
基于ArkTS 开发:https://qr21.cn/FV7h05
- Ability开发
- UI开发
- 公共事件与通知
- 窗口管理
- 媒体
- 安全
- 网络与链接
- 电话服务
- 数据管理
- 后台任务(Background Task)管理
- 设备管理
- 设备使用信息统计
- DFX
- 国际化开发
- 折叠屏系列
- ……

鸿蒙开发面试真题(含参考答案):https://qr18.cn/F781PH

鸿蒙开发面试大盘集篇(共计319页):https://qr18.cn/F781PH
1.项目开发必备面试题
2.性能优化方向
3.架构方向
4.鸿蒙开发系统底层方向
5.鸿蒙音视频开发方向
6.鸿蒙车载开发方向
7.鸿蒙南向开发方向


 1159
1159

 被折叠的 条评论
为什么被折叠?
被折叠的 条评论
为什么被折叠?
 到【灌水乐园】发言


