


Intel在努力让cpu,也可以跑大模型,这次就体验一下,如何在CPU下,无GPU环境下,跑Flux来生图。
Flux介绍
Flux发布了3个版本的软件
- Pro 版本,仅仅api访问
- DEV版本,可以本地部署安装
- schnell版本,可以本地部署安装
DEV和schnell 区别,就是生图的质量和速度。schnell,4步生图,速度很快,质量差一点。
Flux,无论是DEV,还是schnell,对GPU要求都不低,要求16G显存。为了降低GPU的要求,甚至CPU都可以跑,那么就需要对这些模型进行量化。
能支持CPU上运行的就是GGUF的版本。DEV和schnell,都有相应的GGNF版本。为了更进一步降低硬件的需求,我就选择 schnell的GGNF版本。
大家会看到GGNF,也有很多版本,这里我选择:flux1-schnell-Q4_0.gguf
为了简化,我去掉了 ComfyUI-manager的安装。官方blog已经说了,下个月的版本,应该就默认包括ComfyUI-manager。
环境
- cpu:Intel® Core™ i5-7200U CPU @ 2.50GHz 2.70 GHz
- 内存:24G(16+8)
- ssd硬盘
2017的Dell笔记本,看看是否可以跑Flux模型。下面是基本操作过程
- ComfyUI_windows_portable_nvidia.7z,
- GGUF:默认ConfyUI里还没支持GGUF,需要单独来安装
- 下载需要使用的模型文件,放到相应的目录下
- 启动ComfyUI。建议使用powershell,管理员权限,运行bat文件。
- 导入gguf的工作流,进行配置
- 生图。
安装过程
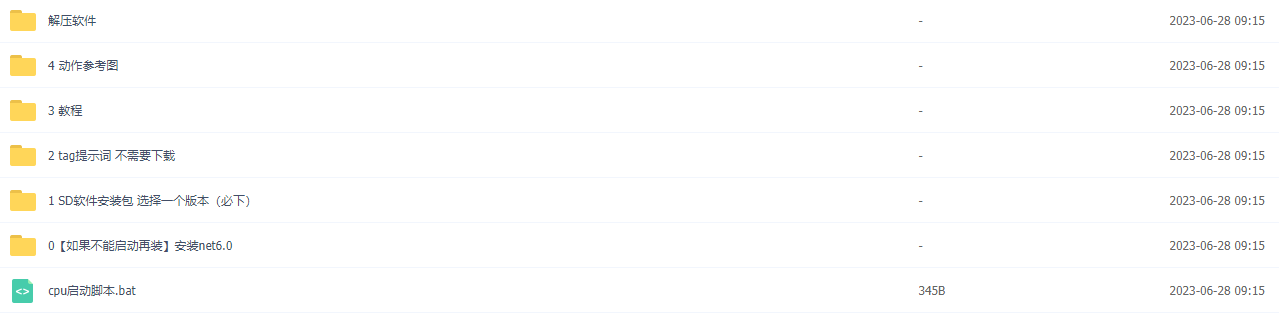
Step1:ComfyUI下载
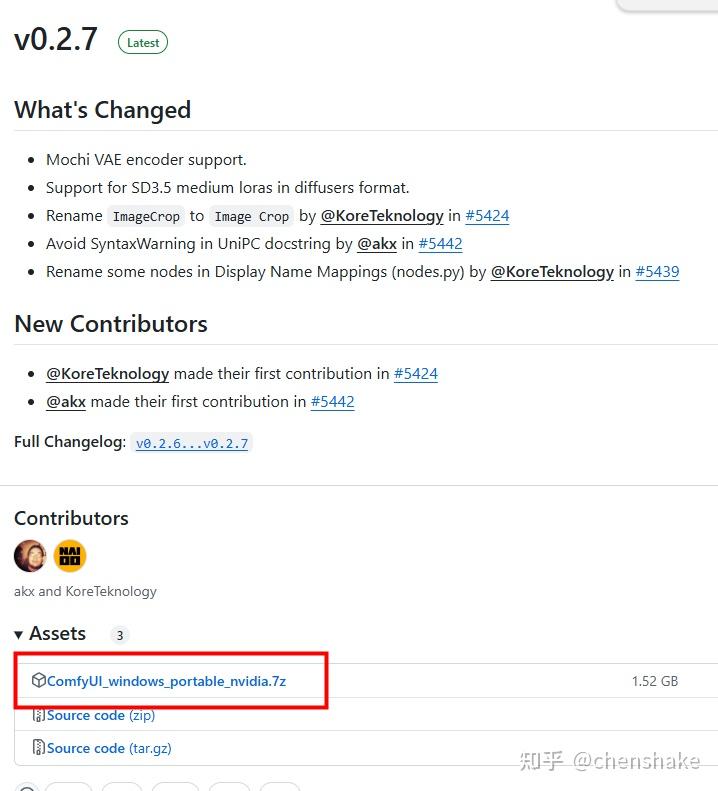
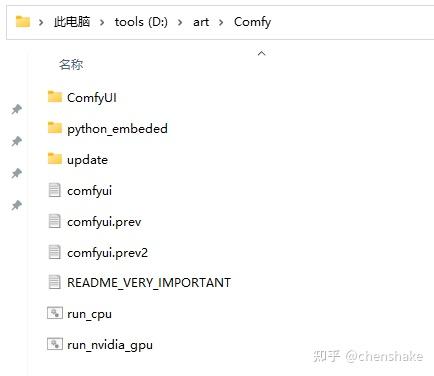
需要使用7zip 解压。把解压后的文件夹名字改短,comfy
我的目录结构
Step2:gguf
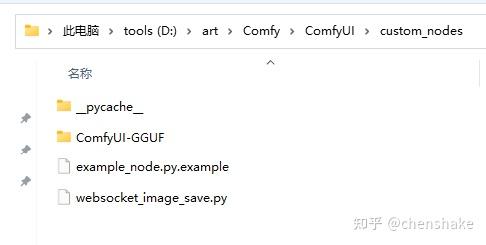
因为默认ComfyUI不支持gguf,所以需要安装一下。
ComfyUI-GGUF的文件夹,放到ComfyUI/custom_nodes/ 目录下。
安装依赖
使用powershell admin权限,进入 D:\art\Comfy
.\python_embeded\python.exe -s -m pip install -r .\ComfyUI\custom_nodes\ComfyUI-GGUF\requirements.txt
Step 3: 下载相关模型文件
GGUF
https://huggingface.co/city96/FLUX.1-schnell-gguf/blob/main/flux1-schnell-Q4_0.gguf
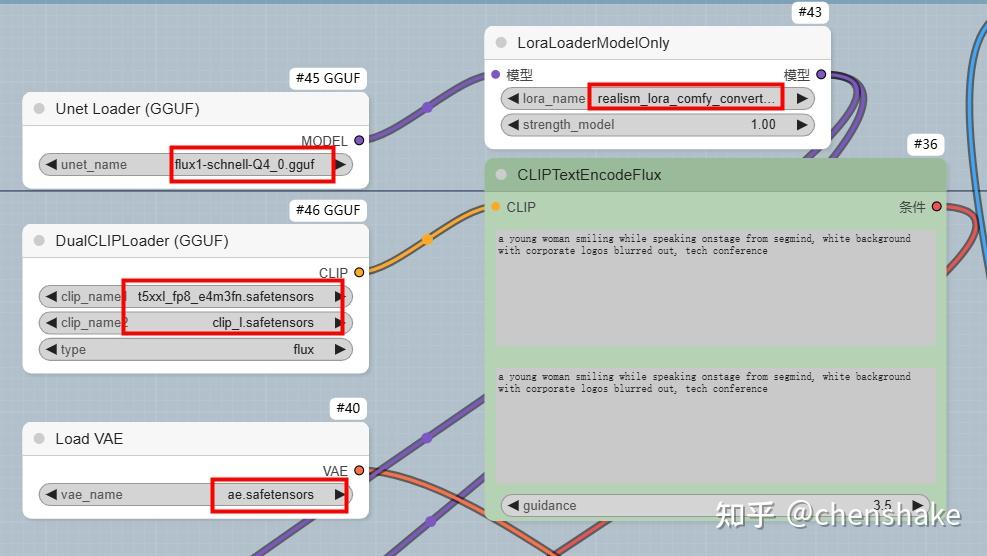
flux1-schnell-Q4_0.gguf
存放目录
ComfyUI/models/Unet
VAE
https://huggingface.co/black-forest-labs/FLUX.1-schnell/blob/main/ae.safetensors
ae.safetensors
存放目录
ComfyUI/models/vae
Clip
https://huggingface.co/comfyanonymous/flux_text_encoders/tree/main
clip_l.safetensors
t5xxl_fp8_e4m3fn.safetensors
存放目录
ComfyUI/models/clip
Lora
https://huggingface.co/XLabs-AI/flux-lora-collection/blob/main/realism_lora_comfy_converted.safetensors
realism_lora_comfy_converted.safetensors
/models/loras
Step 4:启动
这步简单。直接运行 run.bat 。如果遇到权限的问题,就建议powerhell admin权限下运行。应该就没问题。这个时候,成功,就会生成一个本地地址,直接打开浏览器访问。
Step 5:导入gguf工作流
导入一个简单的gguf工作流,配置好启动的大模型。就可以开始生图。
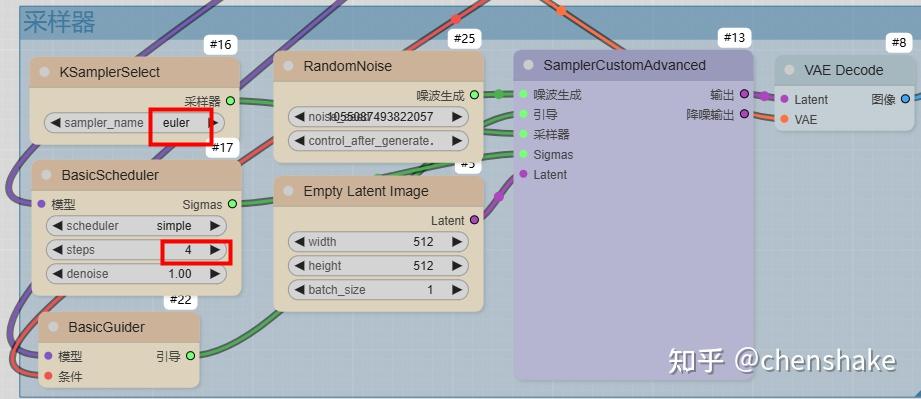
使用
- flux1-schnell-Q4_0.gguf,20分钟,生成一张图片。
- flux1-dev-Q2_K.gguf, 2个小时,生成一张图片
主要原因还是dev需要20步,schenll,4步就可以。更换模型,需要记得调整步数,其他无需修改。
PS D:\art\Comfy> .\run_cpu.bat

D:\art\Comfy>.\python_embeded\python.exe -s ComfyUI\main.py --cpu --windows-standalone-build
[START] Security scan
[DONE] Security scan
## ComfyUI-Manager: installing dependencies done.
** ComfyUI startup time: 2024-11-17 15:20:44.418047
** Platform: Windows
** Python version: 3.12.7 (tags/v3.12.7:0b05ead, Oct  1 2024, 03:06:41) [MSC v.1941 64 bit (AMD64)]
** Python executable: D:\art\Comfy\python_embeded\python.exe
** ComfyUI Path: D:\art\Comfy\ComfyUI
** Log path: D:\art\Comfy\comfyui.log

Prestartup times for custom nodes:
   1.6 seconds: D:\art\Comfy\ComfyUI\custom_nodes\ComfyUI-Manager

Total VRAM 24474 MB, total RAM 24474 MB
pytorch version: 2.5.1+cu124
Set vram state to: DISABLED
Device: cpu
Using sub quadratic optimization for cross attention, if you have memory or speed issues try using: --use-split-cross-attention
[Prompt Server] web root: D:\art\Comfy\ComfyUI\web
D:\art\Comfy\python_embeded\Lib\site-packages\kornia\feature\lightglue.py:44: FutureWarning: `torch.cuda.amp.custom_fwd(args...)` is deprecated. Please use `torch.amp.custom_fwd(args..., device_type='cuda')` instead.
  @torch.cuda.amp.custom_fwd(cast_inputs=torch.float32)
### Loading: ComfyUI-Manager (V2.51.9)
### ComfyUI Revision: 2834 [41886af1] | Released on '2024-11-16'

Import times for custom nodes:
   0.0 seconds: D:\art\Comfy\ComfyUI\custom_nodes\websocket_image_save.py
   0.1 seconds: D:\art\Comfy\ComfyUI\custom_nodes\ComfyUI-GGUF
   0.4 seconds: D:\art\Comfy\ComfyUI\custom_nodes\ComfyUI-Manager

Starting server

To see the GUI go to: http://127.0.0.1:8188
[ComfyUI-Manager] default cache updated: https://raw.githubusercontent.com/ltdrdata/ComfyUI-Manager/main/github-stats.json
[ComfyUI-Manager] default cache updated: https://raw.githubusercontent.com/ltdrdata/ComfyUI-Manager/main/alter-list.json[ComfyUI-Manager] default cache updated: https://raw.githubusercontent.com/ltdrdata/ComfyUI-Manager/main/model-list.json[ComfyUI-Manager] default cache updated: https://raw.githubusercontent.com/ltdrdata/ComfyUI-Manager/main/custom-node-list.json
[ComfyUI-Manager] default cache updated: https://raw.githubusercontent.com/ltdrdata/ComfyUI-Manager/main/extension-node-map.json
FETCH DATA from: D:\art\Comfy\ComfyUI\custom_nodes\ComfyUI-Manager\extension-node-map.json [DONE]
FETCH DATA from: D:\art\Comfy\ComfyUI\custom_nodes\ComfyUI-Manager\extension-node-map.json [DONE]
FETCH DATA from: D:\art\Comfy\ComfyUI\custom_nodes\ComfyUI-Manager\extension-node-map.json [DONE]
got prompt
Using split attention in VAE
Using split attention in VAE
D:\art\Comfy\ComfyUI\custom_nodes\ComfyUI-GGUF\nodes.py:79: UserWarning: The given NumPy array is not writable, and PyTorch does not support non-writable tensors. This means writing to this tensor will result in undefined behavior. You may want to copy the array to protect its data or make it writable before converting it to a tensor. This type of warning will be suppressed for the rest of this program. (Triggered internally at C:\actions-runner\_work\pytorch\pytorch\builder\windows\pytorch\torch\csrc\utils\tensor_numpy.cpp:212.)
  torch_tensor = torch.from_numpy(tensor.data) # mmap

ggml_sd_loader:
 0                             471
 10                            304
 1                               5
model weight dtype torch.float32, manual cast: None
model_type FLUX
Requested to load FluxClipModel_
Loading 1 new model
loaded completely 0.0 198.25439453125 True
Requested to load FluxClipModel_
Loading 1 new model
Requested to load Flux
Loading 1 new model
关于AI绘画技术储备
学好 AI绘画 不论是就业还是做副业赚钱都不错,但要学会 AI绘画 还是要有一个学习规划。最后大家分享一份全套的 AI绘画 学习资料,给那些想学习 AI绘画 的小伙伴们一点帮助!
对于0基础小白入门:
如果你是零基础小白,想快速入门AI绘画是可以考虑的。
一方面是学习时间相对较短,学习内容更全面更集中。
二方面是可以找到适合自己的学习方案
包括:stable diffusion安装包、stable diffusion0基础入门全套PDF,视频学习教程。带你从零基础系统性的学好AI绘画!
需要的可以微信扫描下方CSDN官方认证二维码免费领取【保证100%免费】

1.stable diffusion安装包 (全套教程文末领取哈)
随着技术的迭代,目前 Stable Diffusion 已经能够生成非常艺术化的图片了,完全有赶超人类的架势,已经有不少工作被这类服务替代,比如制作一个 logo 图片,画一张虚拟老婆照片,画质堪比相机。
最新 Stable Diffusion 除了有win多个版本,就算说底端的显卡也能玩了哦!此外还带来了Mac版本,仅支持macOS 12.3或更高版本。
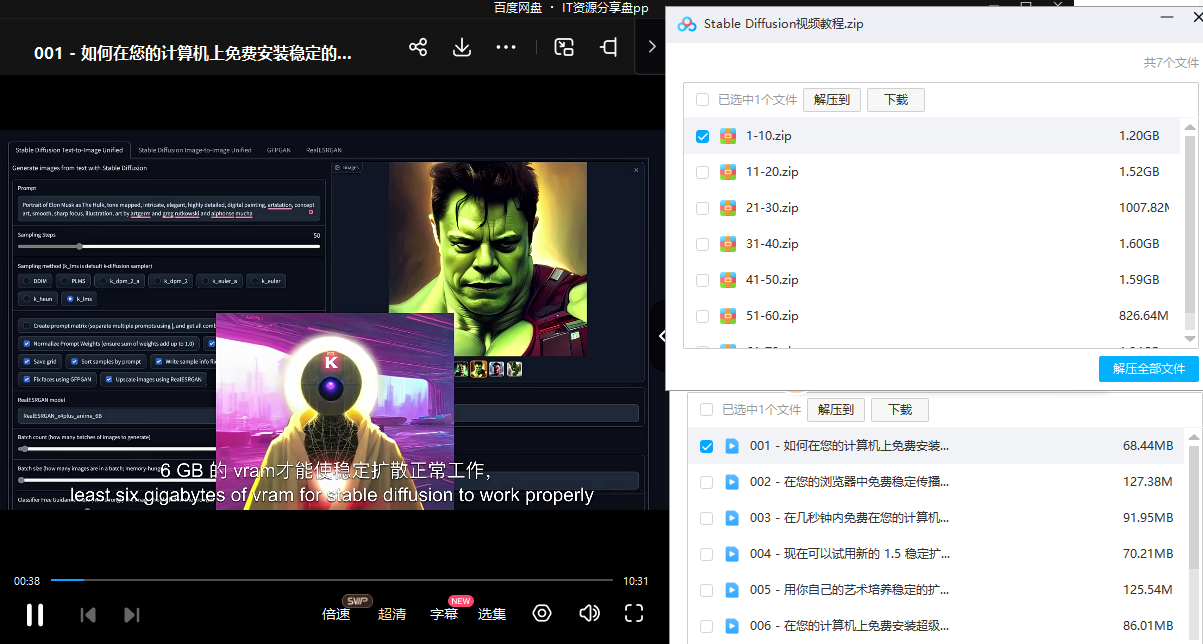
2.stable diffusion视频合集
我们在学习的时候,往往书籍代码难以理解,阅读困难,这时候视频教程教程是就很适合了,生动形象加上案例实战,一步步带你入门stable diffusion,科学有趣才能更方便的学习下去。
3.stable diffusion模型下载
stable diffusion往往一开始使用时图片等无法达到理想的生成效果,这时则需要通过使用大量训练数据,调整模型的超参数(如学习率、训练轮数、模型大小等),可以使得模型更好地适应数据集,并生成更加真实、准确、高质量的图像。

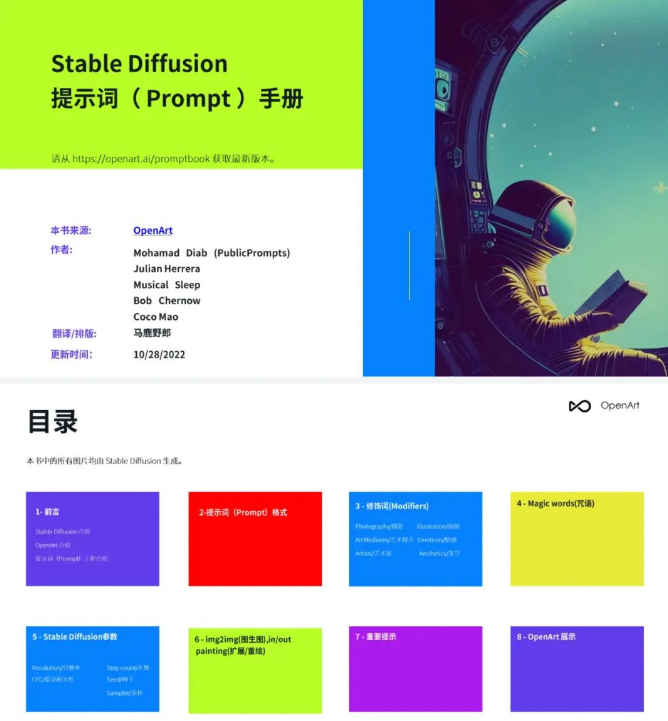
4.stable diffusion提示词
提示词是构建由文本到图像模型解释和理解的单词的过程。可以把它理解为你告诉 AI 模型要画什么而需要说的语言,整个SD学习过程中都离不开这本提示词手册。
5.AIGC视频教程合集
观看全面零基础学习视频,看视频学习是最快捷也是最有效果的方式,跟着视频中老师的思路,从基础到深入,还是很容易入门的。
实战案例
纸上得来终觉浅,要学会跟着视频一起敲,要动手实操,才能将自己的所学运用到实际当中去,这时候可以搞点实战案例来学习。

这份完整版的学习资料已经上传CSDN,朋友们如果需要可以微信扫描下方CSDN官方认证二维码免费领取【保证100%免费】


 854
854

 被折叠的 条评论
为什么被折叠?
被折叠的 条评论
为什么被折叠?
 到【灌水乐园】发言


