点击名片关注 阿尘blog,一起学习,一起成长
本文将接第三期继续分享flask相关知识,主要内容为个人博客网站登录页的制作
由于时间紧,许多地方未来得及优化,现在直接上代码
app.py
import VerificationCode
from io import BytesIO
from flask import Flask, redirect, url_for, render_template,session,flash,make_response,request

app = Flask(__name__)
# 创建安全码,后面使用session时的前提条件,后面的值可以根据需要变化
app.config["SECRET_KEY"] = "156456dsadasd"


@app.route('/getVerificationCode') # 获取验证码路由
def getVerificationCode():
    # 调用VerificationCode文件中的creatVerificationCode函数生成验证码,并用第1个参数接收图片,第2个参数接收字符
    image_code, char_code = VerificationCode.creatVerificationCode(6)
    # 生成local_buffer对象,以实现在内存中读写bytes
    buffer = BytesIO()
    # 将验证码图片以jpeg格式保存到内存中
    image_code.save(buffer, 'jpeg')
    # 定义一个名为response的响应,内容是内存中的图片文件
    response = make_response(buffer.getvalue())
    # 为响应定义头部关键字段,表明为图片
    response.headers['Content-Type'] = 'image/gif'
    # 验证码字符串存储在seesion中,以供校验输入是否正确
    session['veryficationCode'] = char_code
    # 返回生成的response响应对象,即验证码图片
    return response

@app.route('/')
def redirect_login():
    return redirect(url_for('login'))
@app.route('/login',methods=['GET','POST'])
def login():
    if request.method == 'POST':
        username = request.form['username']
        password = request.form['password']
        if username != 'admin' or password != 'a123456':
            flash('用户名或密码错误!')
            # return  redirect(url_for('/login'))
        elif request.form.get('captcha') != session.get('veryficationCode'):
            flash('验证码错误!')
            # return redirect(url_for('/login'))
        else:
            flash('登陆成功!')
            # return redirect(url_for('/index'))
    return render_template('login.html',)
@app.route('/index')
def index():
    return render_template('index.html')


if __name__ == '__main__':
    app.run(host='0.0.0.0')
创建一个生成验证码的VerificationCode.py
from PIL import Image
from PIL import ImageFont, ImageDraw, ImageFilter
# 从PIL库引入创建验证码用到的各模块。
# Image用于创建图片对象,相当于创建一个画板,是第1步;
# ImageDraw用于针对Image对象进行绘画,可用text将文字画上去,用line将线条画上去;
# ImageFont用于在将文字画上去时使用的字体。
# ImageFilter用于为图片加滤镜。
import random
# random模块用于随机取数,如取随机取字符,随机取颜色
def getColor():
    """
    利用random.randint返回三组0至255之间的整数,形成RGB颜色代码。
    """
    return random.randint(0, 255), random.randint(0, 255),random.randint(0, 255)

def creatVerificationCode(length):
    """
    验证码主函数,length为所创建验证码的长度
    """
    # 设置验证码图片的宽和高
    width = 120
    height = 30
    # 创建image,下面的(255, 255, 255)为背景颜色,可用getColor()函数替代,以实现背景颜色随机
    verificationImage = Image.new('RGB', (width, height), (255, 255, 255))
    # 创建Draw对象:
    drawImage = ImageDraw.Draw(verificationImage)
    # 采用Arial字体,将字体复制到static文件夹中可以直接使用。20号
    textFont = ImageFont.truetype("static/font/arial.ttf", 20)
    # 验证码的基本字符串,即只从这些字符中产生验证码
    verBaseChar = 'ABCDEFGHIJKLMNOPQRSTUVWXYZabcdefghijklmnopqrstuvwxyz0123456789'
    # 从上面基本字符串中随机选length指定长度个字符
    verChar = "".join(random.sample(verBaseChar,length))
    # 为每个验证码字符串生成不同位置,黑色
    for i in range(len(verChar)):
        # 字符位置为左:17*1+6,即隔6显示一个字符,上为2-8之间随机,字体为Arial,黑色(可用getColor())替换为随机颜色
        drawImage.text((17 * i + 6, random.randrange(2,8)), verChar[i], font=textFont, fill=(0,0,0))
    # 画2条干扰线,每条线X点从左到右(0-120),Y点在0-30之间随机产生,颜色随机。如需多条线可循环产生
    drawImage.line((0,random.randrange(0,30),120,random.randrange(0,30)),fill=getColor())
    drawImage.line((0,random.randrange(0,30),120,random.randrange(0,30)),fill=getColor())
    # 为验证码图片增加滤镜,本例中未使用,注释掉
    # verificationImage = verificationImage.filter(ImageFilter.DETAIL)
    # 将上面的各种方法生成的验证码对象保存为指定的文件名。测试用,成功后注释
    # verificationImage.save('code.png', 'png')
    # 返回生成的图片和使用的验证码字符
    return verificationImage,verChar

if __name__ == '__main__':
    creatVerificationCode(6)
login.html
<!DOCTYPE html>
<html lang="en">
<head>
    <meta charset="UTF-8">
    <meta name="viewport" content="width=device-width, initial-scale=1.0">
    <title>缘起书屋</title>
    <link rel="stylesheet" href="{{ url_for('static',filename='css/login.css') }}">
    <script src="{{ url_for('static',filename='js/login.js') }}"></script>
</head>
<body>
{#{% with messages = get_flashed_messages() %}#}
{#    {% if messages %}#}
{#        <ul class=flashes>#}
{#        {% for message in messages %}#}
{#            <li>{{ message }}</li>#}
{#        {% endfor %}#}
{#        </ul>#}
{#    {% endif %}#}
{#{% endwith %}#}
<div class="login-container">
    <h3>欢迎登录缘起书屋</h3>
    <h5>WELCOM TO YUANQI</h5>
    <form action="/login" method="post">
        <input type="text" name="username" placeholder="用户名" required>
        <br>
        <input type="password" name="password" placeholder="密码" required>
        <br>
        <div class="captcha-container">
            <input type="text" name="captcha" placeholder="请输入验证码" maxlength="6">
            <img src="{{ url_for('getVerificationCode') }}" alt="图形验证码" onclick="generateImageCode" id="captcha_1">
        </div>
        <br>
        <button type="submit">登 录</button>
    </form>
</div>

</body>
</html>
login.css
body {
            display: flex;
            justify-content: center;
            align-items: center;
            height: 100vh;
            margin: 0;
            background: url('../images/background.png') no-repeat center center fixed;
            background-size: cover;
        }

        .login-container {
            text-align: center;
            width: 300px;
            padding: 20px;
            border: 1px solid #ccc;
            border-radius: 8px;
            background: rgba(255, 255, 255, 0.8); /* Adding a semi-transparent white background */
        }

        .login-container input {
            width: 100%;
            margin-bottom: 10px;
            padding: 8px;
            box-sizing: border-box;
        }

        .login-container .captcha-container {
            display: flex;
            justify-content: space-between;
            align-items: center;
            margin-bottom: 10px;
        }

        .login-container .captcha-container input {
            width: calc(50% - 5px);
            align-self: flex-start;
        }

        .login-container .captcha-container img {
            width: calc(50% - 5px);
            border: 1px solid #ccc;
            border-radius: 5px;
            margin-top: 5px;
        }
        .login-container .captcha-container input,
        .login-container .captcha-container img {
            margin: auto;
            width: calc(50% - 5px);
        }
        .login-container button {
            width: 100%;
            padding: 10px;
            background-color: #4CAF50;
            color: white;
            border: none;
            border-radius: 4px;
            cursor: pointer;
        }adius: 4px;
            cursor: pointer;
        }
login.js
function generateImageCode() {
    //点击图片,则在id为captcha_1的src属性添加验证码图片地址
    $('#captcha_1').attr('src','{{url_for("getVerificationCode")}}?'+Math.random());


}
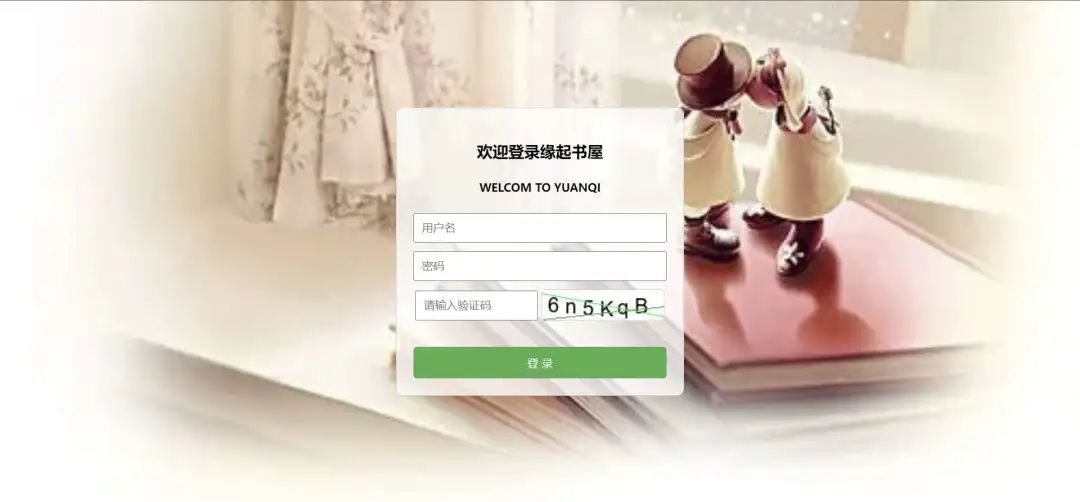
实际效果;

当然功能还需要完善,时间有限,分享到此结束,下期见
扫描二维码关注阿尘blog,一起交流学习


 698
698


 被折叠的 条评论
为什么被折叠?


