


服务端部署
#1.安装服务
[root@rsync-41 ~]# yum -y install rsync
#2.修改配置文件
[root@rsync-41 ~]# rpm -ql rsync | grep ".conf"
/etc/rsyncd.conf
/etc/sysconfig/rsyncd
/usr/share/man/man5/rsyncd.conf.5.gz
[root@rsync-41 ~]# cat /etc/rsyncd.conf
# /etc/rsyncd: configuration file for rsync daemon mode
# See rsyncd.conf man page for more options.
# configuration example:
# uid = nobody
# gid = nobody
# use chroot = yes
# max connections = 4
# pid file = /var/run/rsyncd.pid
# exclude = lost+found/
# transfer logging = yes
# timeout = 900
# ignore nonreadable = yes
# dont compress = *.gz *.tgz *.zip *.z *.Z *.rpm *.deb *.bz2
# [ftp]
# path = /home/ftp
# comment = ftp export area
#备份配置文件
[root@rsync-41 ~]# cp /etc/rsyncd.conf /etc/rsyncd.conf.bak
[root@rsync-41 ~]# cat > /etc/rsyncd.conf <<EOF
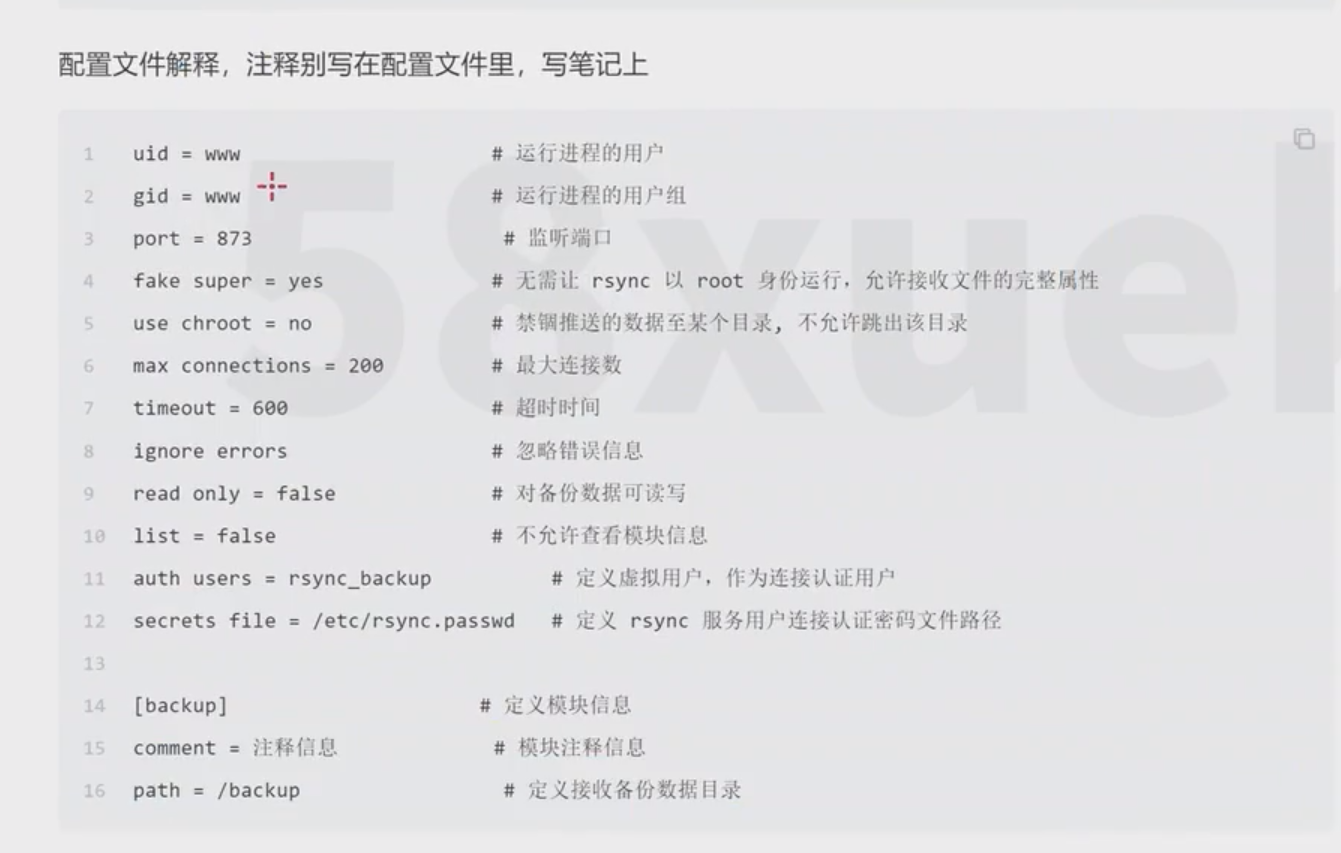
uid = www
gid = www
port = 873
fake super = yes
use chroot = no
max connections = 200
timeout = 600
ignore errors
read only = false
list = false
auth users = rsync_backup
secrets file = /etc/rsync.passwd
log file = /var/log/rsyncd.log
############################################
[backup]
comment = first backup dir
path = /backup
[data]
comment = second backup dir
path = /data
EOF
#3.创建用户及备份目录
根据你的配置文件中定义的信息,创建对应的用户,备份的目录
该无法登录的用户,只是用于运行进程的账户,进程是root运行,但工作的是www
#-M是不创建家目录
[root@rsync-41 ~]# useradd -u 1000 -M -s /sbin/nologin www
#创建备份文件目录
[root@rsync-41 ~]# mkdir /backup /data
[root@rsync-41 ~]# chown -R www:www /backup /data/
[root@rsync-41 ~]# ll -d /backup /data/
drwxr-xr-x 2 www www 6 Aug 31 22:27 /backup
drwxr-xr-x 2 www www 6 Aug 31 22:27 /data/
#4.创建密码文件
1.创建密码文件,写入账户和密码,用于和客户端连接时候的认证
[root@rsync-41 ~]# vim /etc/rsync.passwd
[root@rsync-41 ~]# cat /etc/rsync.passwd
rsync_backup:xiaopi666
2.待会客户端向rsync服务器推送数据,就得用这个账号密码!!!!
3.这一步,非常重要,rsync要求降低密码文件的权限,且必须是600
[root@rsync-41 ~]# chmod 600 /etc/rsync.passwd
[root@rsync-41 ~]# ll -d /etc/rsync.passwd
-rw------- 1 root root 23 Aug 31 22:31 /etc/rsync.passwd
#5.加入开机自启
设置rsyncd服务,运行,且开机自启
[root@rsync-41 ~]# systemctl start rsyncd
如果启动失败
思路1,看vsftpd服务指定的日志文件在哪
思路2, 检查是否运行了,以及它的运行日志部分信息
systemctl status vsftpd
检查是否开机运行
systemctl is-enabled vsftpd
# 无论是学习期间还是上班了,都养成好习惯
# 给别人启动了某程序后,给自己启动某程序
务必去检查,验证是否正确
[root@rsync-41 ~]# ps -ef | grep rsync | grep -v 'grep'
root 2180 1 0 22:48 ? 00:00:00 /usr/bin/rsync --daemon --no-detach
[root@rsync-41 ~]# netstat -tnlp | grep rsync
tcp 0 0 0.0.0.0:873 0.0.0.0:* LISTEN 2180/rsync
tcp6 0 0 :::873 :::* LISTEN 2180/rsync
客户端配置
#1.安装rsync
[root@nfs-31 ~]# yum -y install rsync

#2.推送、备份数据,发送nfs-31的数据发给rsync-41
把客户端的数据,发送给服务端的backup备份模块下

#生成文件
[root@nfs-31 ~]# ls /opt/
[root@nfs-31 ~]# dd if=/dev/zero of=/opt/200M.txt bs=100M count=2
2+0 records in
2+0 records out
209715200 bytes (210 MB) copied, 1.94289 s, 108 MB/s
[root@nfs-31 ~]# ls /opt/
200M.txt

#传输
语法:
rsync -avzP   /tmp/200M.txt  账户@主机名::模块名
# 默认无密码变量,也无密码文件,需要你自己输入该rsync_backup虚拟用户的密码
# 需要交互式的输入密码,无法再脚本中使用rsync同步命令
# rsync基本都是和脚本结合使用
[root@nfs-31 ~]# rsync -avzP /opt/200M.txt rsync_backup@rsync-41::backup
Password:																					#需要手动输入密码xiaopi666
sending incremental file list
200M.txt
    209,715,200 100%   97.69MB/s    0:00:02 (xfr#1, to-chk=0/1)

sent 204,045 bytes  received 43 bytes  19,436.95 bytes/sec
total size is 209,715,200  speedup is 1,027.57

#1.跟上密码文件传输到data目录下
[root@nfs-31 ~]# echo xiaopi666 >/etc/rsync.passwd
[root@nfs-31 ~]# cat /etc/rsync.passwd
xiaopi666
[root@nfs-31 ~]# rsync -az --password-file=/etc/rsync.passwd /opt/200M.txt rsync_backup@rsync-41::data
ERROR: password file must not be other-accessible
rsync error: syntax or usage error (code 1) at authenticate.c(196) [sender=3.1.2]
#报错是由于没有设置密码文件权限,必须设置为600

#去掉-v和-P选项是因为配合脚本使用更方便,不进行输出
[root@nfs-31 ~]# chmod 600 /etc/rsync.passwd
[root@nfs-31 ~]# rsync -az --password-file=/etc/rsync.passwd /opt/200M.txt rsync_backup@rsync-41::data
[root@nfs-31 ~]#


#2. 生成密码变量,让当前系统中存在叫做 RSYNC_PASSWORD 这个变量,以及变量的值,是配置文件中的密码即可
必要时可以写进环境变量
export RSYNC_PASSWORD='xiaopi666'
[root@nfs-31 ~]# export RSYNC_PASSWORD='xiaopi666'
[root@nfs-31 ~]# rsync -az /opt/200M.txt rsync_backup@rsync-41::backup
[root@nfs-31 ~]#

#3.下载备份的数据文件
#由于环境变量还在生效,所以可以直接下载
#由于没有指定目录下的内容,所以下载时带有目录
[root@nfs-31 ~]# rsync -az rsync_backup@rsync-41::backup /opt/200.log
[root@nfs-31 ~]# ls /opt/
200.log  200M.txt
[root@nfs-31 ~]# ll /opt/
total 204800
drwxr-xr-x 2 1000 1000        22 Aug 31 23:21 200.log
-rw-r--r-- 1 root root 209715200 Aug 31 23:08 200M.txt
[root@nfs-31 ~]# cd /opt/200.log/
[root@nfs-31 200.log]# ls
200M.txt

如何需要输入密码呢?
撤销这个密码变量
unset RSYNC_PASSWORD
或者重新登录,只要密码变量失效,就必须得输入密码了,或者使用密码文件

可以指定备份目录中文件进行下载
[root@nfs-31 ~]# unset RSYNC_PASSWORD
[root@nfs-31 ~]# echo $RSYNC_PASSWORD
[root@nfs-31 ~]# rsync -avzP --password-file=/etc/rsync.passwd rsync_backup@rsync-41::data/100.txt /opt/
receiving incremental file list
100.txt
              0 100%    0.00kB/s    0:00:00 (xfr#1, to-chk=0/1)

sent 43 bytes  received 93 bytes  272.00 bytes/sec
total size is 0  speedup is 0.00
#上传到rsync服务端的文件,是由www用户去工作的,所以用户所属是www
[root@rsync-41 ~]# ll /backup/
total 204800
-rw-r--r-- 1 www www 209715200 Aug 31 23:08 200M.txt

#下载到客户端时,用户是当前用户root去工作的,若切换为普通用户则无法打开密码文件,由于权限为600
[root@nfs-31 ~]# ll -d /opt/100.txt
-rw-r--r-- 1 root root 0 Aug 31 23:32 /opt/100.txt
rsync服务端排错思路
1.检查rsync服务端的配置文件路径是否正确:/etc/rsyncd.conf
2.查看配置文件的host allow,host deny允许的ip网段是否允许客户端访问
3.查看配置文件中的path参数路径是否存在,权限是否正确(和配置文件的uuid参数对应)
4.查看rsync服务是否启动,端口,进程是否存活
5.查看iptables防火墙,selinux是否允许rsync服务通过,或是关闭
6.查看服务端rsync配置文件的密码文件,权限是否600,格式,语法是否正确,且和配置文件的secrect fi1es参数对应
7.如果是推送数据,要查看配置rsyncd.conf中的用户对该rsync块下的文件是否可以读取
rsync客户端排错
1,查看rsync客户端配置的密码文件权限是否600,密码文件格式是否正确,是否和服务端的密码一致(只有密码)
2.尝试telnet连接rsync服务端的873端口,检测服务是否可以连接
3.客户端执行命令语法要检查,细心
实战
客户端需求
客户端需求:
1.客户端每天凌晨1点在服务器本地打包备份(/etc目录和/var/log目录)
2.客户端备份的数据必须存放至以 "主机名_ip地址_当前时间" 命名的目录中
3.客户端最后通过rsync推送本地已经打包好的备份文件至backup服务器
4.客户端服务器本地保留最近7天的数据,避免浪费磁盘空间
服务端需求
服务端需求:
1.服务端部署rsync,用于接收客户端推送过来的备份数据
2.服务端需要每天校验客户端推送过来的数据是否完整
3.服务端需要每天校验的结果通知给管理员
4.服务端仅保留6个月的备份数据,其余的全部删除
定时任务
crontab中尽量不体现绝对路径
- 结构目录不同,无法查找到绝对路径
- 存在权限问题,无法执行
- 路径修改,维护起来比较复杂
- 使用绝对路径可能会暴露系统的目录结构信息,增加潜在的安全风险
客户端
[root@nfs-31 ~]# vim my_rsyncd.sh
#!/bin/sh

# 主动在脚本中,定义path变量,防止命令无法执行,声明环境变量
PATH=/usr/local/sbin:/usr/local/bin:/usr/sbin:/usr/bin:/root/bin

#因之前执行报错,是由于没发现ifconfig命令,所以应将此命令放在环境变量下面
#定义dir目录名称,方便后面使用
dir=`hostname`_$(ifconfig eth0 | awk 'NR==2{print $2}')_`date "+%F"`

# 1.创建目录,注意目录名字规则
mkdir -p /momo1/$dir

# 2.打包备份数据
cd / && tar -czf /momo1/$dir/etc.tgz etc
cd / && tar -czf /momo1/$dir/log.tgz var/log

# 2.1 对数据进行校验,生成校验值的文件
md5sum /momo1/$dir/*.tgz >/momo1/$dir/all_data_md5.txt

# 3.传输客户端备份数据到,rsync备份服务器上,别忘记是如何验证密码的
rsync -az /momo1/$dir --password-file=/etc/rsync.momo momo01@rsync-41::momo_data1

# 4.删除过期文件
find /momo1/ -type f mtime +7 -delete &>/dev/null
脚本写好之后,需要加入定时任务
[root@nfs-31 ~]# crontab -e
00 22 * * * /usr/bin /root/my_rsyncd.sh
或
[root@nfs-31 ~]# echo "00 22 * * * /usr/bin /root/my_rsyncd.sh" >> /var/spool/cron/root
服务端
[root@rsync-41 ~]# cat rsyncd.sh
#!/bin/sh

# 1.安装rsync服务
yum -y install rsync &>/dev/null

# 2.写配置文件
cat > /etc/rsyncd.conf <<EOF
uid = www
gid = www
port = 873
fake super = yes
use chroot = no
max connections = 200
timeout = 600
ignore errors
read only = false
list = false
auth users = momo01
secrets file = /etc/rsync.momo
log file = /var/log/rsyncd.log
############################################
[momo_data1]
comment = first backup dir
path = /momo1

[momo_data2]
comment = second backup dir
path = /momo2
EOF

#3.工作用户是否已创建
id www &>/dev/null
if [ $? -ne 0 ];then
  useradd -u 1000 -M -s /sbin/nologin www
fi

# 4.创建配置文件定义的信息,并赋予权限
mkdir /momo1 /momo2
chown -R www:www /momo1 /momo2

# 4.创建用于连接的账户密码,并修改密码文件权限
echo "momo01:momo666" >/etc/rsync.momo
chmod 600 /etc/rsync.momo

# 5. 重启服务
systemctl restart rsyncd
脚本写好之后,需要加入定时任务
需要先操作邮件告警部分

#crontab任务中不识别``执行符号,可以更换成$()符号
#在执行date +%F时报错了,解析存在语法错误,需要对%进行转义\%
添加定时任务
[root@rsync-41 ~]# crontab -e
[root@rsync-41 ~]# crontab -l
* */1 * * * /usr/sbin/ntpdate time1.aliyun.com > /dev/null 2>&1
19 22 * * * md5sum -c /momo1/nfs-31_10.0.0.31_$(date +\%F)/all_data_md5.txt > /momo1/nfs-31_10.0.0.31_$(date +\%F)/check_md5sum_result.txt && mail -s "check_md5sum_result_$(date +\%F)" 1203978143@qq.com < /momo1/nfs-31_10.0.0.31_$(date +\%F)/check_md5sum_result.txt
错误示范
[root@rsync-41 ~]# md5sum -c /momo1/nfs-31_10.0.0.31_2024-09-02/all_data_md5.txt
md5sum: /backup/nfs-31_10.0.0.31_2024-09-02/etc.tgz: No such file or directory
/backup/nfs-31_10.0.0.31_2024-09-02/etc.tgz: FAILED open or read
md5sum: /backup/nfs-31_10.0.0.31_2024-09-02/log.tgz: No such file or directory
/backup/nfs-31_10.0.0.31_2024-09-02/log.tgz: FAILED open or read
md5sum: WARNING: 2 listed files could not be read

#在服务端进行验证时无法进行验证,通过排错发现路径与md5校验值文件中的路径不一致
#所以进行修改客户端传输地址,已达到路径一致,方便校验的结果

[root@nfs-31 ~]# sed 's#backup#momo1#g' my_rsyncd.sh
#!/bin/sh
dir=`hostname`_$(ifconfig eth0 | awk 'NR==2{print $2}')_`date "+%F"`
PATH=/usr/local/sbin:/usr/local/bin:/usr/sbin:/usr/bin:/root/bin

mkdir -p /momo1/$dir

cd / && tar -czf /momo1/$dir/etc.tgz etc
cd / && tar -czf /momo1/$dir/log.tgz var/log

md5sum /momo1/$dir/*.tgz >/momo1/$dir/all_data_md5.txt

rsync -az /momo1/$dir --password-file=/etc/rsync.momo momo01@rsync-41::momo_data1

find /momo1/ -type f mtime +7 -delete &>/dev/null

if [ `systemctl status crond | awk 'NR==3{print $2}'` != "active" ];then
  echo "crond is not open or exist."
fi

#将客户端路径修改为服务端的数据存输路径即可
[root@nfs-31 ~]# sed -i 's#backup#momo1#g' my_rsyncd.sh
[root@nfs-31 ~]# sh -x my_rsyncd.sh
++ hostname
++ ifconfig eth0
++ awk 'NR==2{print $2}'
++ date +%F
+ dir=nfs-31_10.0.0.31_2024-09-02
+ PATH=/usr/local/sbin:/usr/local/bin:/usr/sbin:/usr/bin:/root/bin
+ mkdir -p /momo1/nfs-31_10.0.0.31_2024-09-02
+ cd /
+ tar -czf /momo1/nfs-31_10.0.0.31_2024-09-02/etc.tgz etc
+ cd /
+ tar -czf /momo1/nfs-31_10.0.0.31_2024-09-02/log.tgz var/log
+ md5sum /momo1/nfs-31_10.0.0.31_2024-09-02/etc.tgz /momo1/nfs-31_10.0.0.31_2024-09-02/log.tgz
+ rsync -az /momo1/nfs-31_10.0.0.31_2024-09-02 --password-file=/etc/rsync.momo momo01@rsync-41::momo_data1
+ find /momo1/ -type f mtime +7 -delete
++ systemctl status crond
++ awk 'NR==3{print $2}'
+ '[' active '!=' active ']'

[root@nfs-31 ~]# ls /momo1/nfs-31_10.0.0.31_2024-09-02/
all_data_md5.txt  etc.tgz  log.tgz

#修改完后进行上传正常

#服务端校验成功
[root@rsync-41 ~]# md5sum -c /momo1/nfs-31_10.0.0.31_2024-09-02/all_data_md5.txt
/momo1/nfs-31_10.0.0.31_2024-09-02/etc.tgz: OK
/momo1/nfs-31_10.0.0.31_2024-09-02/log.tgz: OK
设置邮件告警
[root@rsync-41 ~]# yum -y install mailx
[root@rsync-41 ~]# cat /etc/mail.rc
set from=xxx@qq.com
set smtp=smtps://smtp.qq.com:465
set smtp-auth-user=xxx@qq.com
set smtp-auth-password=xxx				#登陆你的邮箱秘钥,此密码不可暴露,可以直接登录邮箱
set smtp-auth=login
set ssl-verify=ignore
set nss-config-dir=/etc/pki/nssdb/

[root@rsync-41 ~]# md5sum -c /momo1/nfs-31_10.0.0.31_2024-09-02/all_data_md5.txt
/momo1/nfs-31_10.0.0.31_2024-09-02/etc.tgz: OK
/momo1/nfs-31_10.0.0.31_2024-09-02/log.tgz: OK
[root@rsync-41 ~]# md5sum -c /momo1/nfs-31_10.0.0.31_2024-09-02/all_data_md5.txt > /momo1/nfs-31_10.0.0.31_2024-09-02/check_md5sum_result.txt
[root@rsync-41 ~]# mail -s "check_md5sum_result_$(date +%F)" 1203978143@qq.com < /momo1/nfs-31_10.0.0.31_2024-09-02/check_md5sum_result.txt


 454
454

 被折叠的 条评论
为什么被折叠?
被折叠的 条评论
为什么被折叠?
 到【灌水乐园】发言


