


1.Flume概述
1.1 Flume基本介绍
1.1.1 什么是Flume
Flume是一种分布式、高可靠且高可用的服务系统,用于有效地收集、聚合和移动海量日志数据。它具有基于流数据流的简单而灵活的体系结构。它是健壮的和容错的,具有可调的可靠性机制和许多故障转移和恢复机制。它使用一个简单的可扩展的数据模型,允许在线分析应用程序。
换句话说就是: 实时 读取服务器本地磁盘的 日志数据,将数据写到HDFS;

1.1.2为什么不使用put上传
实时上传,不需要手动.自动对接数据源和存储端(HDFS常用),方便快捷,(具体参数设置后面会讲到),要是上千台服务器自己put手动上传,那一天还工作个der啊!
知识点回顾:
linux 上传命令: hadoop fs -put 本地文件位置 上传至集群的目录
eg: hadoop fs -put /opt/Test/1.txt /input
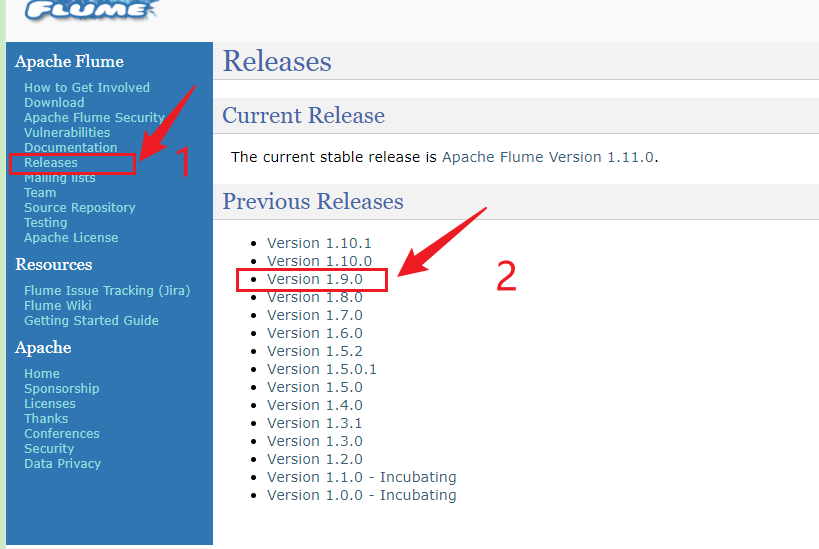
1.1.3官方文档使用说明
官网:https://flume.apache.org/
官网文档:https://flume.apache.org/releases/content/1.9.0/FlumeUserGuide.html
注:1. 根据自己的版本号对应选择,本次以version1.9为例
2.第三步一般情况下都用user guide 当需要自定义一些工具时选择developer guide
3.第四步的左右就是一些核心组件说明,根据需求自己配置(第五步黑色加粗字段的是必须要配置的内容),其余的不配置就是默认;


1.1.4学习本节内容需要掌握的单词
单词 | 释义 | 单词 | 释义 |
transaction capacity | 事务容量(条数) | sink | 下沉 |
channel | 管道 | capacity | 容量 |
bind | 绑定 | component | 组件 |
command | 命令 | Release | 版本 |
sequence | 序列 | current/previous | 当前/之前 |
inode | linux系统中文件的唯一标识 | interceptor | 拦截器 |
failover | 故障转移 | processor | 组 |
interval | 间隔时间 | priority | 优先级 |
backoff | 回避(先休息) | transaction | 事务 |
1.2 Flume架构
1.2.1架构图

1.2.2 Agent
Agent是一个JVM进程,以事件的形式将数据从源头送至目的地;
Agent主要有三部分组成: Source,Channel,Sink
1.2.3 Source
工作:接受源文件的组件,封装event,把数据传给channel
Source可以处理各种类型的日志数据,包括 avro、thrift、exec、jms、spooling directory、netcat、taildir、sequence generator、syslog、http、legacy等
常用source:
ExecSource:适用于监控一个实时追加的文件,不能实现断点续传;
SpoolingDirectorySource: 对一个目录进行监听,不可追加,不支持断点续传
TaildirSource: 对多个目录进行监听,可追加,支持断点续传
avro source: 用于Agent之间的连接
1.2.4 Channel
Channel是Source和Sink中间的一个缓冲区,相当于一条装数据的管道.
Flume自带两种Channel:Memory Channel 和 File Channel。
常用channel:
Memory Channel:数据在内存中,读写速度快,缺点是关机重启数据就丢失;
File Channel:数据存储在磁盘中,数据永久保存,缺点是频繁与磁盘进行IO,速度慢;
1.2.5 Sink
Sink 不断地轮询 Channel 中的事件且批量地移除它们,并将这些事件批量写入到存储
或索引系统、或者被发送到另一个 Flume Agent。
需要注意的是: 一个channel可以对应多个sink,一个sink只能对应一个channel
常用sink:
hdfs sink:将数据传输到集群
avro:avro sink配合avro source组件可实现agent的连接,二者配合使用,就是多个flume之间的传输
file sink:将数据写到linux系统本地磁盘中
1.2.6 Event
Flume数据的传输单元,它由Header和Body两部分组成,前者存放该event的一些属性,为K-V键值对,后者用来存放该数据内容,数据形式位字节数组;

2.Flume安装
2.1 安装准备
1. 配置好hadoop集群
2. 下载flume压缩包 下载地址:http://archive.apache.org/dist/flume/
注:Apache公司的所有安装包都在这个链接下载,
2.2 安装实操
1. 将flume压缩包拖进linux的/opt/software 目录下
2. 将其加压到/opt/module目录下
tar -zxvf /opt/software/apache-flume-1.9.0-bin.tar.gz -C /opt/module/
注意:-zcvf是压缩打包 -zxvf是解压缩,易混淆
3.将 lib 文件夹下的 guava-11.0.2.jar 删除以兼容 Hadoop
rm /opt/module/flume/lib/guava-11.0.2.jar
3. Flume入门(熟悉四个案例)
3.1 监控端口数据(案例一)
3.1.1需求
使用 Flume 监听一个端口,收集该端口数据,并打印到控制台。
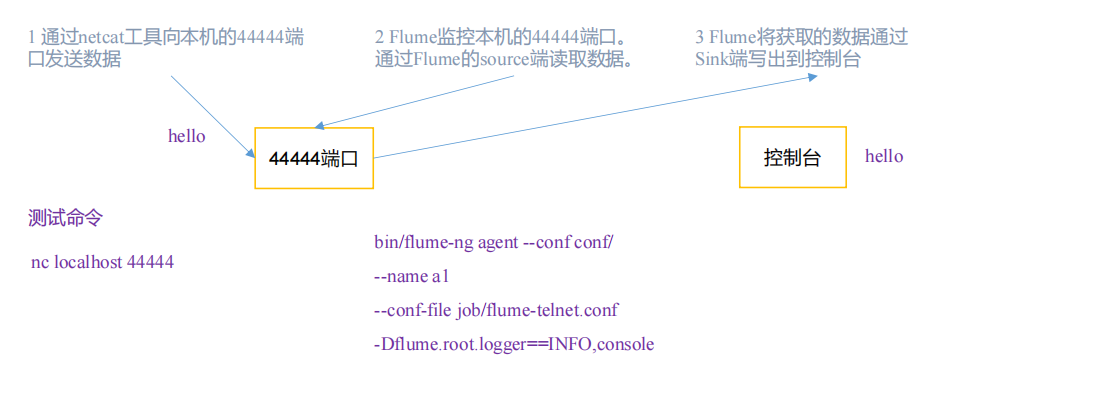
3.1.2 操作步骤
1. 安装netcat工具
sudo yum install -y nc2. 在 flume 目录下创建 job 文件夹并进入 job 文件夹
3.在 job 文件夹下手动创建 Flume Agent 配置文件 flume-netcat-logger.conf。
4. 在 flume-netcat-logger.conf 文件中添加如下内容(来自官网文档)
# example.conf: A single-node Flume configuration
# Name the components on this agent
a1.sources = r1
a1.sinks = k1
a1.channels = c1

# Describe/configure the source
a1.sources.r1.type = netcat
a1.sources.r1.bind = localhost
a1.sources.r1.port = 44444

# Describe the sink
a1.sinks.k1.type = logger

# Use a channel which buffers events in memory
a1.channels.c1.type = memory
a1.channels.c1.capacity = 1000
a1.channels.c1.transactionCapacity = 100

# Bind the source and sink to the channel
a1.sources.r1.channels = c1
a1.sinks.k1.channel = c1
5. 开启 flume 监听端口
bin/flume-ng agent --conf conf/ --name a1 --conf-file job/flume-netcat-logger.conf -Dflume.root.logger=INFO,console6. 使用 netcat 工具向本机的 44444 端口发送内容
 nc localhost 44444
hello
world
7. 在 Flume 监听页面观察接收数据情况
3.2实时监控单个追加文件(案例二)
3.2.1 需求
实时监控 Hive 日志,并上传到 HDFS 中,
运用组件:ExecSource, Memory Channel, HDFS Sink

3.2.2 操作步骤
1. 在job文件夹下创建 flume-file-hdfs.conf 文件
vim flume-file-hdfs.conf
# 文件中增加如下内容
# Name the components on this agent
a2.sources = r2
a2.sinks = k2
a2.channels = c2
# Describe/configure the source
a2.sources.r2.type = exec
a2.sources.r2.command = tail -F /opt/module/hive/logs/hive.log
# Describe the sink
a2.sinks.k2.type = hdfs
a2.sinks.k2.hdfs.path = hdfs://hadoop102:9820/flume/%Y%m%d/%H
#上传文件的前缀
a2.sinks.k2.hdfs.filePrefix = logs-
#是否按照时间滚动文件夹
a2.sinks.k2.hdfs.round = true
#多少时间单位创建一个新的文件夹
a2.sinks.k2.hdfs.roundValue = 1
#重新定义时间单位
a2.sinks.k2.hdfs.roundUnit = hour
#是否使用本地时间戳
a2.sinks.k2.hdfs.useLocalTimeStamp = true
#积攒多少个 Event 才 flush 到 HDFS 一次
a2.sinks.k2.hdfs.batchSize = 100
#设置文件类型,可支持压缩
a2.sinks.k2.hdfs.fileType = DataStream
#多久生成一个新的文件
a2.sinks.k2.hdfs.rollInterval = 60
#设置每个文件的滚动大小
a2.sinks.k2.hdfs.rollSize = 134217700
#文件的滚动与 Event 数量无关
a2.sinks.k2.hdfs.rollCount = 0
# Use a channel which buffers events in memory
a2.channels.c2.type = memory
a2.channels.c2.capacity = 1000
a2.channels.c2.transactionCapacity = 100
# Bind the source and sink to the channel
a2.sources.r2.channels = c2
a2.sinks.k2.channel = c2
2. 运行 Flume
bin/flume-ng agent --conf conf/ --name a2 --conf-file job/flume-file-hdfs.conf3. 开启 Hadoop 和 Hive 并操作 Hive 产生日志
# 启动hadoop
myhadoop.sh start
# 启动hive
bin/hive
4. 在 HDFS 上查看文件。
3.3 实时监控目录下多个新文件(案例三)
3.3.1 需求
使用 Flume 监听整个目录的文件,并上传至 HDFS,
运用组件:SpooldirSource, Memory Channel, HDFS Sink

3.3.2 操作步骤
1. 在job文件夹下创建flume-dir-hdfs.conf文件
vim flume-dir-hdfs.conf
# 在文件中增加如下内容
a3.sources = r3
a3.sinks = k3
a3.channels = c3
# Describe/configure the source
a3.sources.r3.type = spooldir
a3.sources.r3.spoolDir = /opt/module/flume/upload
a3.sources.r3.fileSuffix = .COMPLETED
a3.sources.r3.fileHeader = true
#忽略所有以.tmp 结尾的文件,不上传
a3.sources.r3.ignorePattern = ([^ ]*\.tmp)
# Describe the sink
a3.sinks.k3.type = hdfs
a3.sinks.k3.hdfs.path =
hdfs://hadoop102:9820/flume/upload/%Y%m%d/%H
#上传文件的前缀
a3.sinks.k3.hdfs.filePrefix = upload-
#是否按照时间滚动文件夹
a3.sinks.k3.hdfs.round = true
#多少时间单位创建一个新的文件夹
a3.sinks.k3.hdfs.roundValue = 1
#重新定义时间单位
a3.sinks.k3.hdfs.roundUnit = hour
#是否使用本地时间戳
a3.sinks.k3.hdfs.useLocalTimeStamp = true
#积攒多少个 Event 才 flush 到 HDFS 一次
a3.sinks.k3.hdfs.batchSize = 100
#设置文件类型,可支持压缩
a3.sinks.k3.hdfs.fileType = DataStream
#多久生成一个新的文件
a3.sinks.k3.hdfs.rollInterval = 60
#设置每个文件的滚动大小大概是 128M
a3.sinks.k3.hdfs.rollSize = 134217700
#文件的滚动与 Event 数量无关
a3.sinks.k3.hdfs.rollCount = 0
# Use a channel which buffers events in memory
a3.channels.c3.type = memory
a3.channels.c3.capacity = 1000
a3.channels.c3.transactionCapacity = 100
# Bind the source and sink to the channel
a3.sources.r3.channels = c3
a3.sinks.k3.channel = c3
2. 启动监控文件夹命令
bin/flume-ng agent --conf conf/ --name a3 --conf-file job/flume-dir-hdfs.conf3. 在/opt/module/flume 目录下创建 upload 文件夹
# 创建文件夹
mkdir upload
# 在新建的upload文件夹中添加文件
touch 111.txt
touch 222.txt
touch 333.log
4. 在 HDFS 上查看文件。
3.4 实时监控目录下的多个追加文件(案例四)
3.4.1 需求
使用 Flume 监听整个目录的文件,并上传至 HDFS,
运用组件:TailSource, Memory Channel, HDFS Sink

3.4.2 操作步骤
1. 在job文件夹下创建flume-taildir-hdfs.conf文件
vim flume-taildir-hdfs.conf
# 在文件中增加如下内容
a3.sources = r3
a3.sinks = k3
a3.channels = c3
# Describe/configure the source
a3.sources.r3.type = TAILDIR
a3.sources.r3.positionFile = /opt/module/flume/tail_dir.json
a3.sources.r3.filegroups = f1 f2
a3.sources.r3.filegroups.f1 = /opt/module/flume/files/.*file.*
a3.sources.r3.filegroups.f2 = /opt/module/flume/files2/.*log.*
# Describe the sink
a3.sinks.k3.type = hdfs
a3.sinks.k3.hdfs.path =
hdfs://hadoop102:9820/flume/upload2/%Y%m%d/%H
#上传文件的前缀
a3.sinks.k3.hdfs.filePrefix = upload-
#是否按照时间滚动文件夹
a3.sinks.k3.hdfs.round = true
#多少时间单位创建一个新的文件夹
a3.sinks.k3.hdfs.roundValue = 1
#重新定义时间单位
a3.sinks.k3.hdfs.roundUnit = hour
#是否使用本地时间戳
a3.sinks.k3.hdfs.useLocalTimeStamp = true
#积攒多少个 Event 才 flush 到 HDFS 一次
a3.sinks.k3.hdfs.batchSize = 100
#设置文件类型,可支持压缩
a3.sinks.k3.hdfs.fileType = DataStream
#多久生成一个新的文件
a3.sinks.k3.hdfs.rollInterval = 60
#设置每个文件的滚动大小大概是 128M
a3.sinks.k3.hdfs.rollSize = 134217700
#文件的滚动与 Event 数量无关
a3.sinks.k3.hdfs.rollCount = 0
# Use a channel which buffers events in memory
a3.channels.c3.type = memory
a3.channels.c3.capacity = 1000
a3.channels.c3.transactionCapacity = 100
# Bind the source and sink to the channel
a3.sources.r3.channels = c3
a3.sinks.k3.channel = c3
2. 启动监控文件夹命令
bin/flume-ng agent --conf conf/ --name a3 --conf-file job/flume-taildir-hdfs.conf3. 在/opt/module/flume 目录下创建 files 文件夹
# 创建文件夹
mkdir files
# 在upload文件夹中添加文件
echo hello >> file1.txt
echo atguigu >> file2.txt
4. 在 HDFS 上查看文件。
📊📊📊文本为学习之余,梳理的知识点,有初学的小伙伴可以慢慢研究,有疑惑的地方可在下方留言,欢迎大家随时交流.
📊📊📊如果有喜欢的小伙伴,欢迎点赞,收藏及留言,谢谢你们😘~
📊📊📊下期内容:Flume事务,Flume原理,拓扑结构.
📊📊📊如有错误之处,请随时指正!!!


 374
374


 被折叠的 条评论
为什么被折叠?
被折叠的 条评论
为什么被折叠?
 到【灌水乐园】发言


