


做企业内部系统开发时,“跨系统接口对接” 常常是个让人头疼的场景 —— 尤其是线下用印这类 “系统流程 + 实物操作” 结合的需求:合同审批完要调用印章系统发申请,用户领章后得同步状态,还得防止 “线下领了章、系统没记录” 的混乱。之前我踩过硬编码接口地址、没设超时导致线程阻塞、状态不同步手动对账的坑,后来用 Spring Boot 常用技术搭了套极简方案,今天把完整流程分享出来,新手也能照着跑通。
这个只是简单版的,未涉及到公司隐私
一、先理清:我们要解决什么问题?
在动手前,先明确两个核心:业务场景和技术边界,避免做无用功。
- 业务场景(线下用印全流程)
我们的合同管理系统(Spring Boot 单体)需要和公司统一的印章管理系统对接,完成 4 步关键操作:
- 发起申请:合同审批通过后,用户在合同系统点击 “线下用印申请”,系统调用印章系统接口提交申请;
- 查询审批:印章系统人工审核后,合同系统能查询到 “通过 / 驳回” 结果;
- 登记用印:用户领取实体印章并用印后,在合同系统确认,系统调用印章系统接口记录用印信息;
- 归还同步:用户归还印章时,印章系统调用合同系统回调接口,同步 “已归还” 状态。
核心诉求很简单:系统状态和线下实物操作严格对齐,接口调用稳定不翻车。
- 技术选型
不用引入 Feign、网关这些重量级组件,单体系统用 Spring Boot 自带工具足够:
- HTTP 调用:RestTemplate(Spring Web 自带,配置简单,满足跨系统接口需求);
- 数据库操作:MyBatis(写 SQL 灵活,适配合同状态的 CRUD,日常开发最顺手);
- 简化代码:Lombok(@Data、@Slf4j,少写 get/set 和日志声明);
- 可靠性保障:Spring 自带的 @Retryable(接口重试)、@Scheduled(定时核对状态)。
第一步:定接口规范
跨系统对接最忌讳 “各写各的”,必须和印章系统开发者一起约定好接口格式、参数含义、响应规范 —— 这一步没做好,后面改代码能改到崩溃。
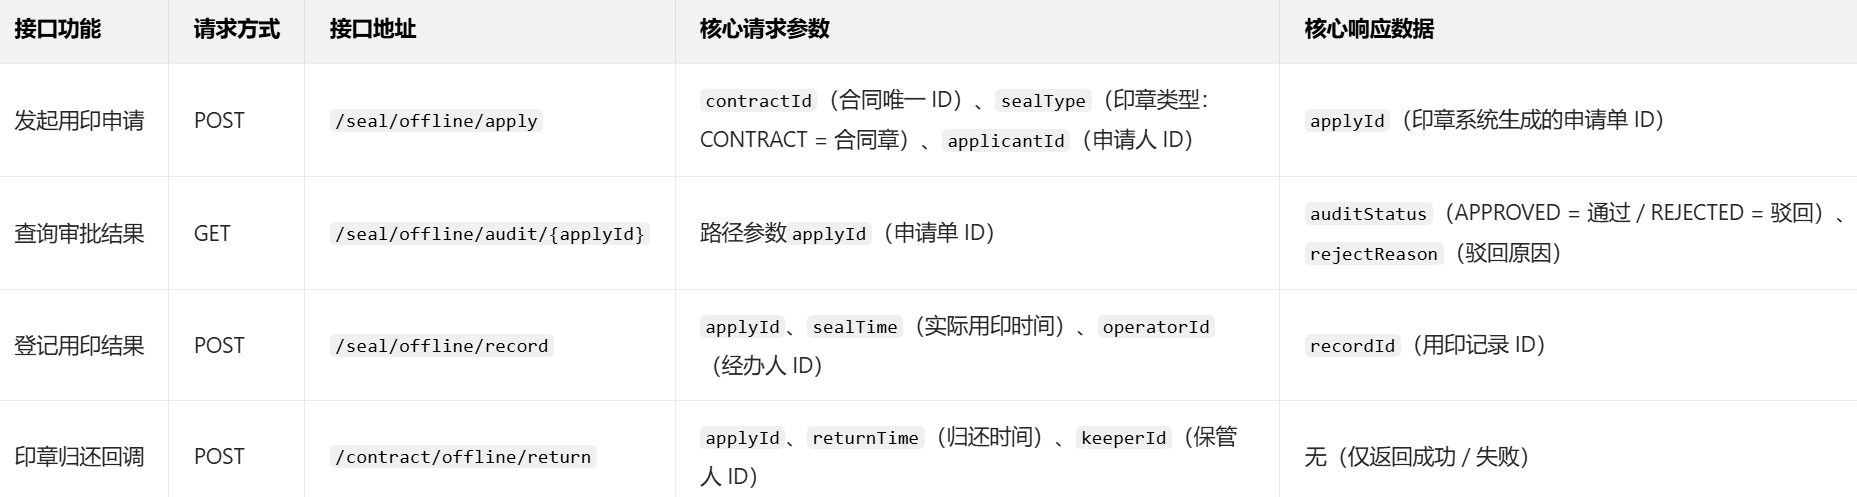
- 核心接口表(RESTful 风格)
我们约定了 4 个核心接口,参数和响应都用 JSON,响应统一带code(200 = 成功)、message(提示信息)、data(业务数据):
- 响应规范示例(错误处理要明确)
不管成功还是失败,响应格式必须统一,比如:
成功响应:
{
  "code": 200,
  "message": "申请成功",
  "data": "APPLY20240520001" // applyId
}
失败响应:
{
  "code": 500,
  "message": "合同已存在未完成的用印申请",
  "data": null
}
第二步:项目配置
接下来是 Spring Boot 项目的基础配置,都是日常开发的常规操作,复制粘贴改改参数就行。
- 依赖引入(pom.xml 核心部分)
只引必要的依赖,避免项目臃肿:
<!-- Spring Boot Web(含RestTemplate) -->
<dependency>
    <groupId>org.springframework.boot</groupId>
    <artifactId>spring-boot-starter-web</artifactId>
</dependency>
<!-- MyBatis -->
<dependency>
    <groupId>org.mybatis.spring.boot</groupId>
    <artifactId>mybatis-spring-boot-starter</artifactId>
    <version>2.3.0</version> <!-- 适配Spring Boot 2.x -->
</dependency>
<!-- MySQL驱动 -->
<dependency>
    <groupId>com.mysql</groupId>
    <artifactId>mysql-connector-j</artifactId>
    <scope>runtime</scope>
</dependency>
<!-- Lombok -->
<dependency>
    <groupId>org.projectlombok</groupId>
    <artifactId>lombok</artifactId>
    <optional>true</optional>
</dependency>
<!-- Spring重试机制(可选,用于接口重试) -->
<dependency>
    <groupId>org.springframework.retry</groupId>
    <artifactId>spring-retry</artifactId>
</dependency>
- 配置文件(application.yml)
把数据库地址、印章系统接口地址、MyBatis 配置都放这里,避免硬编码:
# 服务器端口
server:
  port: 8080

# 数据库配置(改成自己的库地址和账号密码)
spring:
  datasource:
    url: jdbc:mysql://localhost:3306/contract_db?useSSL=false&serverTimezone=UTC
    username: root
    password: 123456
    driver-class-name: com.mysql.cj.jdbc.Driver
  # 重试机制启用(可选)
  retry:
    enabled: true

# 印章系统接口地址(关键!改成实际部署的地址)
seal:
  system:
    url: http://192.168.1.100:8081


# MyBatis配置(mapper.xml文件路径)
mybatis:
  mapper-locations: classpath:mapper/*.xml
  type-aliases-package: com.example.contract.entity # 实体类包路径
- RestTemplate 配置(关键:设超时)
RestTemplate 默认没有超时时间,接口卡顿时会导致线程阻塞,必须配置超时:
import org.springframework.context.annotation.Bean;
import org.springframework.context.annotation.Configuration;
import org.springframework.http.client.SimpleClientHttpRequestFactory;
import org.springframework.web.client.RestTemplate;

@Configuration
public class RestTemplateConfig {

    @Bean
    public RestTemplate restTemplate() {
        SimpleClientHttpRequestFactory factory = new SimpleClientHttpRequestFactory();
        // 连接超时:5秒(超过5秒连不上印章系统,直接报错)
        factory.setConnectTimeout(5000);
        // 读取超时:5秒(超过5秒没拿到响应,直接报错)
        factory.setReadTimeout(5000);
        return new RestTemplate(factory);
    }
}
第三步:核心代码实现
这部分是实战核心,我们按 “发起申请→查询审批→登记用印→接收回调” 的流程写代码,每个步骤都加注释说明 “为什么这么写”。
- 实体类(Entity)
先定义合同实体和接口请求 / 响应实体,用 Lombok 的 @Data 简化代码:
// 合同实体(对应数据库contract表)
package com.example.contract.entity;

import lombok.Data;
import java.time.LocalDateTime;

@Data
public class Contract {
    private Long id;                 // 数据库自增ID
    private String contractId;       // 合同唯一编号(如HT20240520001)
    private String status;           // 合同状态(APPROVED=已审批,只有已审批才能申请用印)
    private String sealApplyId;      // 印章系统申请单ID(关联两个系统)
    private String sealStatus;       // 用印状态(APPLIED=已申请/AUDITED=已审批/SEALED=已用印/RETURNED=已归还)
    private LocalDateTime createTime;
    private LocalDateTime updateTime;
}

// 印章系统接口响应实体(通用,所有接口的响应都用这个)
package com.example.contract.entity;

import lombok.Data;

@Data
public class SealResponse<T> {
    private Integer code;    // 200=成功,其他=失败
    private String message;  // 提示信息
    private T data;          // 业务数据(泛型,适配不同接口的返回)
}

// 发起用印申请的请求实体
package com.example.contract.entity;

import lombok.Data;
import java.time.LocalDateTime;

@Data
public class SealApplyRequest {
    private String contractId;    // 合同ID
    private String sealType;      // 印章类型(CONTRACT=合同章)
    private String applicantId;   // 申请人ID
    private LocalDateTime applyTime; // 申请时间
}
- MyBatis Mapper(数据库操作)
用 MyBatis 写合同的查询和状态更新,Mapper 接口 + XML 文件分开,便于维护:
(1)Mapper 接口(ContractMapper.java)
java
运行
package com.example.contract.mapper;

import com.example.contract.entity.Contract;
import org.apache.ibatis.annotations.Mapper;
import org.apache.ibatis.annotations.Param;

@Mapper
public interface ContractMapper {
    // 根据合同编号查合同(申请用印前先校验合同状态)
    Contract selectByContractId(@Param("contractId") String contractId);

    // 根据印章申请单ID查合同(查询审批结果、登记用印时用)
    Contract selectBySealApplyId(@Param("sealApplyId") String sealApplyId);

    // 更新合同的用印状态(申请、审批、用印、归还后都要更状态)
    int updateSealStatus(Contract contract);
}
(2)Mapper XML(ContractMapper.xml)
放在resources/mapper目录下,写 SQL 时注意字段对应:
<?xml version="1.0" encoding="UTF-8"?>
<!DOCTYPE mapper PUBLIC "-//mybatis.org//DTD Mapper 3.0//EN"
"http://mybatis.org/dtd/mybatis-3-mapper.dtd">
<mapper namespace="com.example.contract.mapper.ContractMapper">

    <!-- 根据合同编号查合同 -->
    <select id="selectByContractId" resultType="com.example.contract.entity.Contract">
        SELECT id, contract_id, status, seal_apply_id, seal_status, create_time, update_time
        FROM contract
        WHERE contract_id = #{contractId}
    </select>

    <!-- 根据印章申请单ID查合同 -->
    <select id="selectBySealApplyId" resultType="com.example.contract.entity.Contract">
        SELECT id, contract_id, status, seal_apply_id, seal_status, create_time, update_time
        FROM contract
        WHERE seal_apply_id = #{sealApplyId}
    </select>

    <!-- 更新用印状态 -->
    <update id="updateSealStatus">
        UPDATE contract
        SET seal_apply_id = #{sealApplyId},
            seal_status = #{sealStatus},
            update_time = NOW()
        WHERE id = #{id}
    </update>

</mapper>
- Service 层(业务逻辑核心)
Service 层是 “大脑”,负责接口调用、业务校验、状态更新,我们分 4 个方法实现全流程:
package com.example.contract.service;

import com.example.contract.entity.Contract;
import com.example.contract.entity.SealApplyRequest;
import com.example.contract.entity.SealResponse;
import com.example.contract.mapper.ContractMapper;
import lombok.extern.slf4j.Slf4j;
import org.springframework.beans.factory.annotation.Autowired;
import org.springframework.beans.factory.annotation.Value;
import org.springframework.retry.annotation.Retryable;
import org.springframework.stereotype.Service;
import org.springframework.web.client.RestClientException;
import org.springframework.web.client.RestTemplate;

import java.time.LocalDateTime;
import java.util.HashMap;
import java.util.Map;

@Service
@Slf4j
public class OfflineSealService {

    // 注入RestTemplate(用于调用印章系统接口)
    @Autowired
    private RestTemplate restTemplate;

    // 注入Mapper(操作数据库)
    @Autowired
    private ContractMapper contractMapper;

    // 从配置文件拿印章系统接口地址
    @Value("${seal.system.url}")
    private String sealSystemUrl;

    /**
     * 1. 发起线下用印申请
     * 逻辑:先校验合同状态→组装参数→调用印章系统接口→更新本地状态
     */
    public String applySeal(String contractId, String applicantId) {
        // 第一步:校验合同状态(必须是“已审批”才能申请用印,早拦截早避免无效调用)
        Contract contract = contractMapper.selectByContractId(contractId);
        if (contract == null) {
            log.error("合同不存在:contractId={}", contractId);
            throw new RuntimeException("合同不存在,请检查合同编号");
        }
        if (!"APPROVED".equals(contract.getStatus())) {
            log.error("合同未审批通过:contractId={}, 当前状态={}", contractId, contract.getStatus());
            throw new RuntimeException("只有已审批的合同才能申请用印");
        }

        // 第二步:组装请求参数(传给印章系统)
        SealApplyRequest request = new SealApplyRequest();
        request.setContractId(contractId);
        request.setSealType("CONTRACT"); // 申请合同章
        request.setApplicantId(applicantId);
        request.setApplyTime(LocalDateTime.now());

        // 第三步:调用印章系统“发起申请”接口
        String applyUrl = sealSystemUrl + "/seal/offline/apply";
        SealResponse<String> response;
        try {
            response = restTemplate.postForObject(applyUrl, request, SealResponse.class);
        } catch (RestClientException e) {
            log.error("调用印章系统发起申请失败:contractId={}", contractId, e);
            throw new RuntimeException("调用印章系统失败,请稍后重试");
        }

        // 第四步:处理响应(必须判断code,避免空指针和业务失败)
        if (response == null || response.getCode() != 200) {
            String errMsg = response != null ? response.getMessage() : "印章系统无响应";
            log.error("发起用印申请业务失败:contractId={}, 错误信息={}", contractId, errMsg);
            throw new RuntimeException("申请用印失败:" + errMsg);
        }

        // 第五步:更新本地合同的用印状态(关联applyId,标记为“已申请”)
        String applyId = response.getData();
        contract.setSealApplyId(applyId);
        contract.setSealStatus("APPLIED");
        contractMapper.updateSealStatus(contract);

        log.info("发起用印申请成功:contractId={}, applyId={}", contractId, applyId);
        return applyId;
    }

    /**
     * 2. 查询审批结果(用户点击“刷新状态”时调用)
     * 加@Retryable:网络波动时重试3次,避免一次失败就返回
     */
    @Retryable(value = RestClientException.class, maxAttempts = 3, backoff = @Backoff(delay = 1000))
    public String queryAuditResult(String applyId) {
        // 第一步:调用印章系统“查询审批”接口
        String queryUrl = sealSystemUrl + "/seal/offline/audit/" + applyId;
        SealResponse<String> response;
        try {
            response = restTemplate.getForObject(queryUrl, SealResponse.class);
        } catch (RestClientException e) {
            log.error("查询审批结果失败:applyId={}", applyId, e);
            throw new RuntimeException("查询审批结果失败,请稍后重试");
        }

        // 第二步:处理响应
        if (response == null || response.getCode() != 200) {
            String errMsg = response != null ? response.getMessage() : "印章系统无响应";
            log.error("查询审批结果业务失败:applyId={}, 错误信息={}", applyId, errMsg);
            throw new RuntimeException("查询失败:" + errMsg);
        }

        // 第三步:若审批通过,更新本地状态为“已审批”
        String auditStatus = response.getData();
        if ("APPROVED".equals(auditStatus)) {
            Contract contract = contractMapper.selectBySealApplyId(applyId);
            if (contract != null && !"AUDITED".equals(contract.getSealStatus())) {
                contract.setSealStatus("AUDITED");
                contractMapper.updateSealStatus(contract);
                log.info("用印申请审批通过:applyId={}", applyId);
            }
        } else if ("REJECTED".equals(auditStatus)) {
            // 若驳回,记录驳回原因(这里简化,实际可更新到合同表)
            log.warn("用印申请被驳回:applyId={}, 原因={}", applyId, response.getMessage());
        }

        return auditStatus;
    }

    /**
     * 3. 登记用印结果(用户用印后点击“确认用印”时调用)
     */
    public void recordSeal(String applyId, String operatorId) {
        // 第一步:校验申请单状态(必须已审批通过,才能登记用印)
        Contract contract = contractMapper.selectBySealApplyId(applyId);
        if (contract == null) {
            throw new RuntimeException("申请单不存在:" + applyId);
        }
        if (!"AUDITED".equals(contract.getSealStatus())) {
            throw new RuntimeException("申请单未审批通过,无法登记用印");
        }

        // 第二步:组装请求参数(用Map传参,简单场景不用单独定义实体)
        Map<String, Object> requestMap = new HashMap<>();
        requestMap.put("applyId", applyId);
        requestMap.put("sealTime", LocalDateTime.now());
        requestMap.put("operatorId", operatorId);

        // 第三步:调用印章系统“登记用印”接口
        String recordUrl = sealSystemUrl + "/seal/offline/record";
        SealResponse<Void> response;
        try {
            response = restTemplate.postForObject(recordUrl, requestMap, SealResponse.class);
        } catch (RestClientException e) {
            log.error("登记用印结果失败:applyId={}", applyId, e);
            throw new RuntimeException("调用印章系统失败,请稍后重试");
        }

        // 第四步:处理响应并更新本地状态
        if (response == null || response.getCode() != 200) {
            String errMsg = response != null ? response.getMessage() : "印章系统无响应";
            throw new RuntimeException("登记用印失败:" + errMsg);
        }

        contract.setSealStatus("SEALED");
        contractMapper.updateSealStatus(contract);
        log.info("用印结果登记成功:applyId={}", applyId);
    }

    /**
     * 4. 处理印章归还回调(供印章系统调用)
     */
    public void handleSealReturn(String applyId, LocalDateTime returnTime) {
        // 第一步:查合同
        Contract contract = contractMapper.selectBySealApplyId(applyId);
        if (contract == null) {
            log.error("处理归还回调失败:申请单不存在,applyId={}", applyId);
            throw new RuntimeException("申请单不存在");
        }

        // 第二步:更新本地状态为“已归还”
        contract.setSealStatus("RETURNED");
        contractMapper.updateSealStatus(contract);
        log.info("印章归还成功:applyId={}, 归还时间={}", applyId, returnTime);
    }
}
- Controller 层(对外提供接口)
Controller 层负责接收前端请求,调用 Service 层处理,返回结果:
package com.example.contract.controller;

import com.example.contract.entity.SealResponse;
import com.example.contract.service.OfflineSealService;
import lombok.extern.slf4j.Slf4j;
import org.springframework.beans.factory.annotation.Autowired;
import org.springframework.web.bind.annotation.*;

import java.time.LocalDateTime;
import java.util.Map;

@RestController
@RequestMapping("/contract/offline/seal")
@Slf4j
public class OfflineSealController {

    @Autowired
    private OfflineSealService offlineSealService;

    // 1. 发起用印申请(前端调用)
    @PostMapping("/apply")
    public SealResponse<String> applySeal(@RequestParam String contractId, @RequestParam String applicantId) {
        String applyId = offlineSealService.applySeal(contractId, applicantId);
        SealResponse<String> response = new SealResponse<>();
        response.setCode(200);
        response.setMessage("申请成功");
        response.setData(applyId);
        return response;
    }

    // 2. 查询审批结果(前端调用)
    @GetMapping("/audit/{applyId}")
    public SealResponse<String> queryAuditResult(@PathVariable String applyId) {
        String auditStatus = offlineSealService.queryAuditResult(applyId);
        SealResponse<String> response = new SealResponse<>();
        response.setCode(200);
        response.setMessage("查询成功");
        response.setData(auditStatus);
        return response;
    }

    // 3. 登记用印结果(前端调用)
    @PostMapping("/record")
    public SealResponse<Void> recordSeal(@RequestParam String applyId, @RequestParam String operatorId) {
        offlineSealService.recordSeal(applyId, operatorId);
        SealResponse<Void> response = new SealResponse<>();
        response.setCode(200);
        response.setMessage("登记成功");
        return response;
    }

    // 4. 印章归还回调(印章系统调用)
    @PostMapping("/return")
    public SealResponse<Void> receiveSealReturn(@RequestBody Map<String, Object> requestMap) {
        String applyId = (String) requestMap.get("applyId");
        LocalDateTime returnTime = LocalDateTime.parse((String) requestMap.get("returnTime"));
        offlineSealService.handleSealReturn(applyId, returnTime);

        SealResponse<Void> response = new SealResponse<>();
        response.setCode(200);
        response.setMessage("处理成功");
        return response;
    }
}
第四步:可靠性保障
写代码时要想到 “接口可能失败、状态可能不同步”,这部分是区分 “能跑通” 和 “能上线” 的关键。
- 接口重试(避免网络波动导致的失败)
用@Retryable注解,网络临时故障时自动重试,比如查询审批结果时,重试 3 次,每次间隔 1 秒:
依赖:需要引入spring-retry依赖(前面 pom.xml 已加);
启用:在application.yml加spring.retry.enabled: true;
使用:在需要重试的方法上加@Retryable(value = RestClientException.class, maxAttempts = 3, backoff = @Backoff(delay = 1000))。
好了,这儿就是不同系统之前调用的流程,关键要注意配置信息,已经不同系统之间调用的坑


 613
613

 被折叠的 条评论
为什么被折叠?
被折叠的 条评论
为什么被折叠?
 到【灌水乐园】发言


