


 本文介绍了如何在Flask应用中集成YOLOv5进行对象检测,包括图片和视频的上传、识别功能,以及如何替换权重文件。开发者分享了相关的代码片段和实现步骤,供学习者参考和调试。
初学yolo flask时,需要此功能,Csdn、Github、B站找到许多代码,效果并不满意。
近期,再度尝试,实现简单功能。
实现功能:
-
上传图片并识别,可以点击图片放大查看
-
上传视频并识别
-
识别后的文件下载功能
-
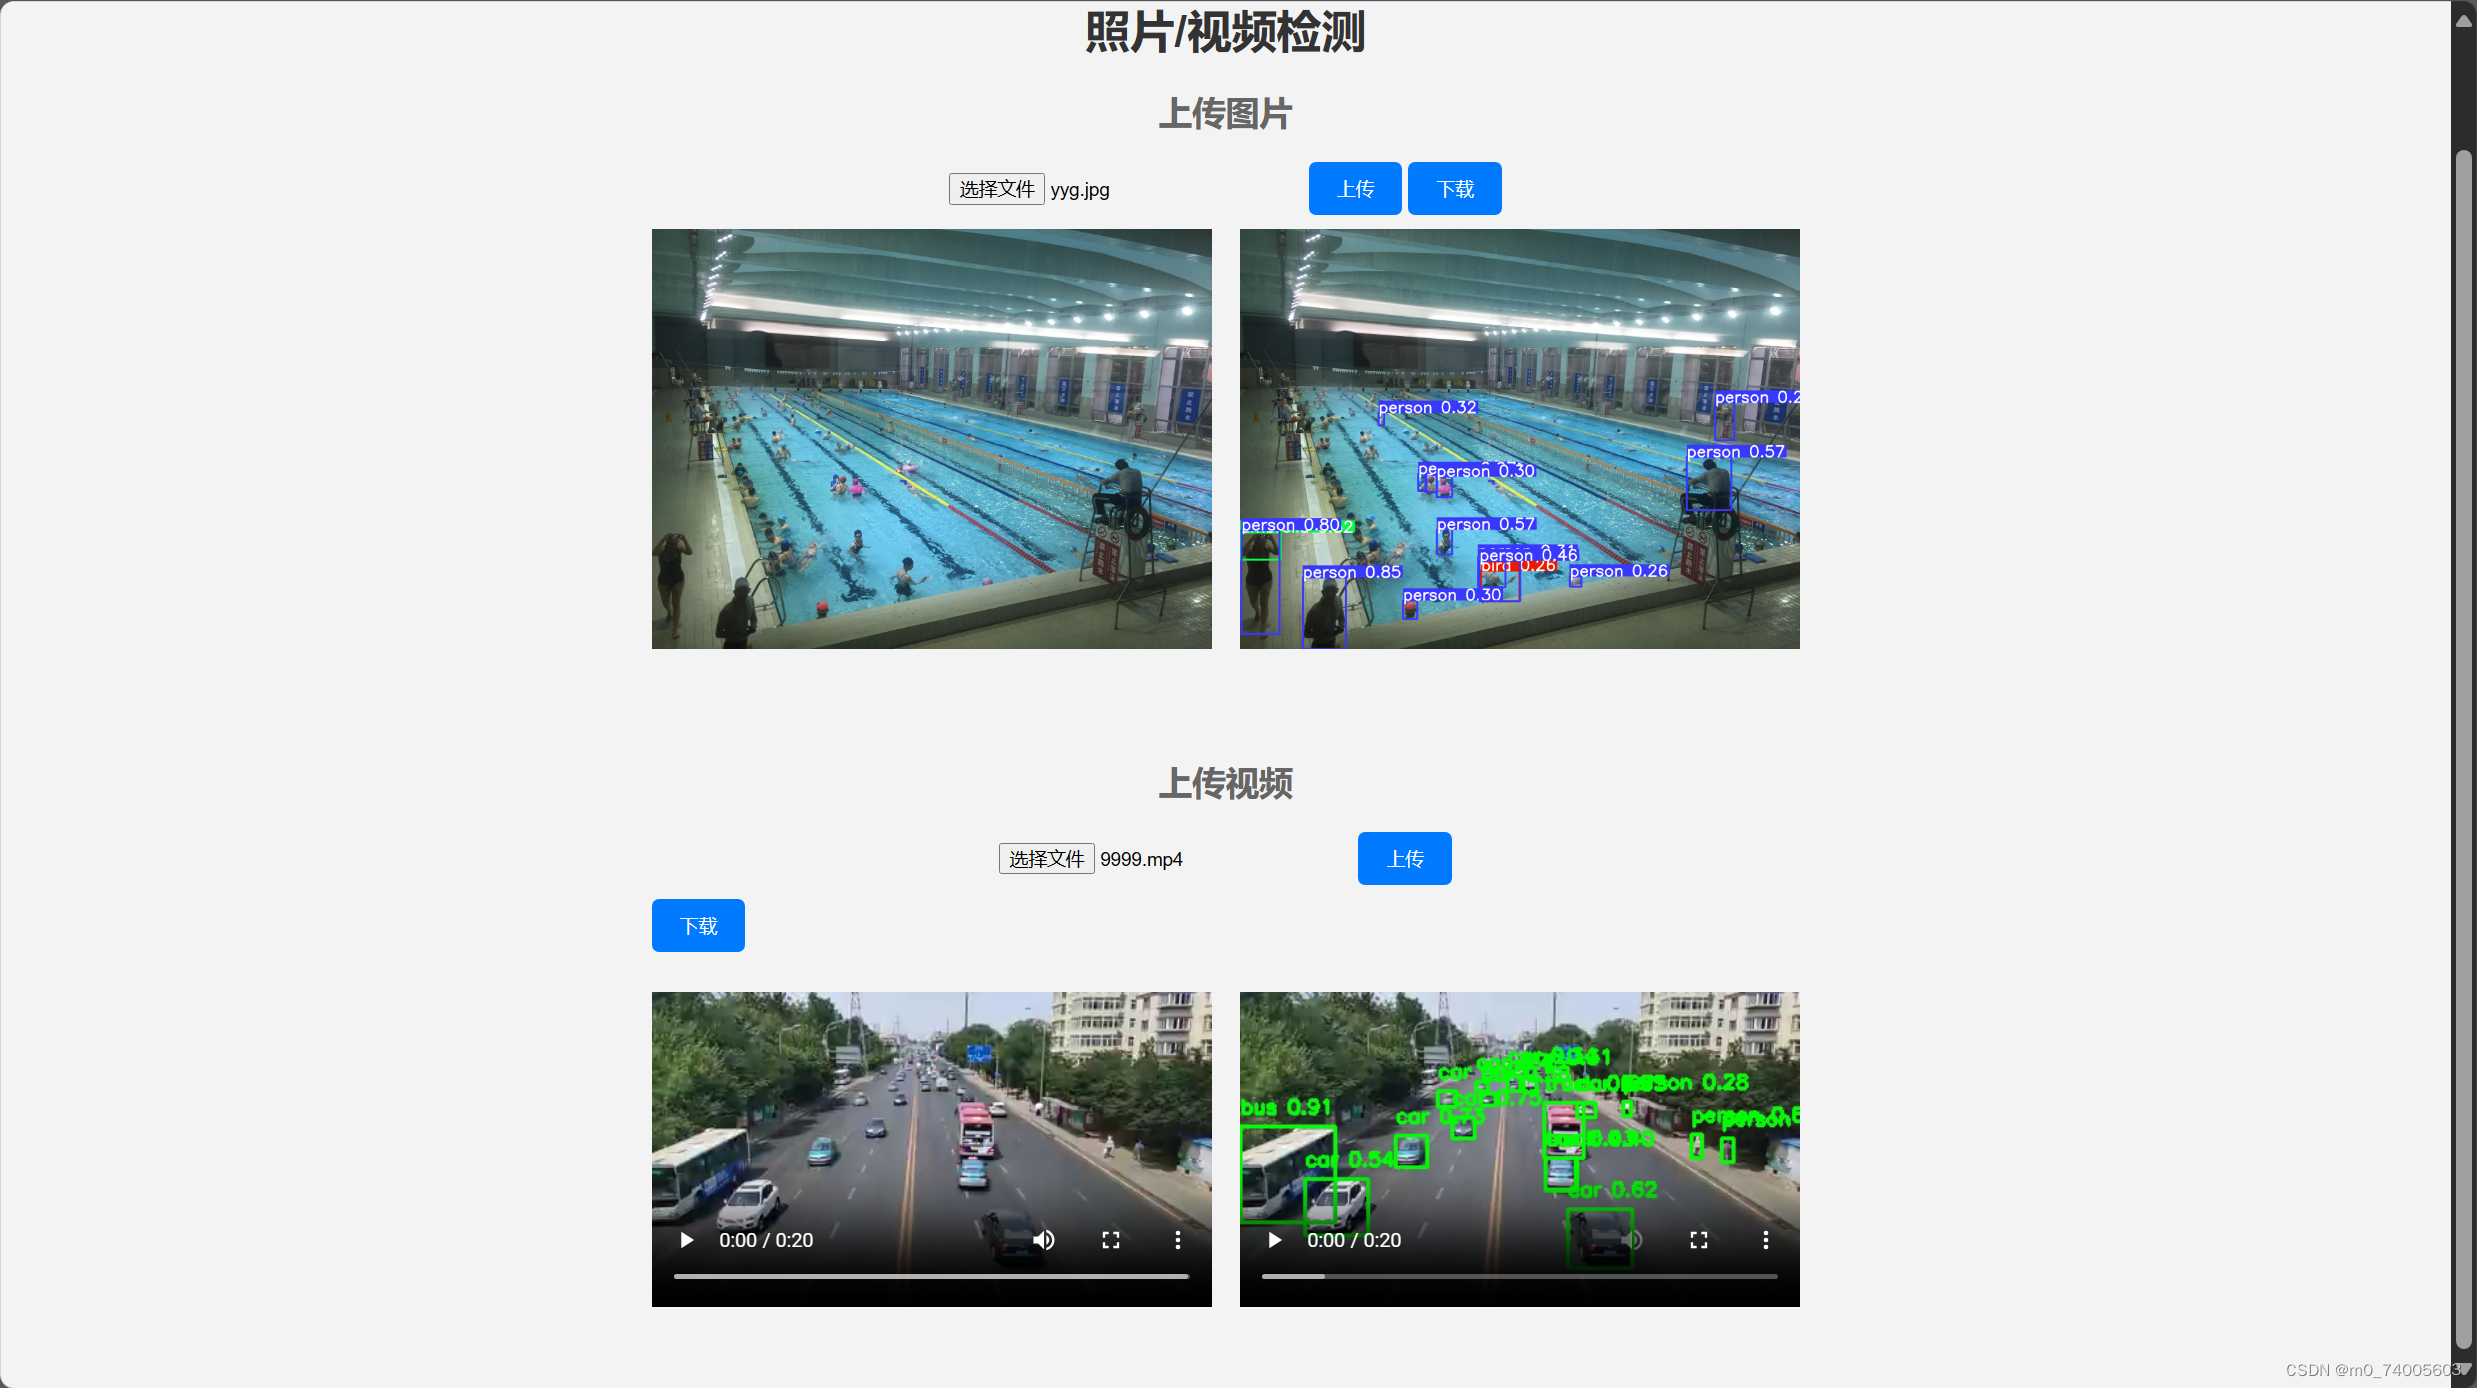
效果图如上
文件结构如下:
project/
static/空
templates/
index.html
app.py
相关代码:
app.py
import cv2
import numpy as np
import torch
from flask import Flask, request, jsonify, render_template
import base64
import os
from datetime import datetime

app = Flask(__name__)

# 全局变量:模型
model = None

# 提前加载模型
def load_model():
    global model
    model = torch.hub.load('', 'custom', path='yolov5s.pt', source='local')

# 路由处理图片检测请求
@app.route('/predict_image', methods=['POST'])
def predict_image():
    global model

    # 获取图像文件
    file = request.files['image']
    # 读取图像数据并转换为RGB格式
    image_data = file.read()
    nparr = np.frombuffer(image_data, np.uint8)
    image = cv2.imdecode(nparr, cv2.IMREAD_UNCHANGED)

    results = model(image)

    image = results.render()[0]

    # 将图像转换为 base64 编码的字符串
    _, buffer = cv2.imencode('.png', image)
    image_str = base64.b64encode(buffer).decode('utf-8')

    # 获取当前时间,并将其格式化为字符串
    current_time = datetime.now().strftime('%Y%m%d%H%M%S')
    # 构建保存路径
    save_dir = 'static'
    if not os.path.exists(save_dir):
        os.makedirs(save_dir)
    filename, extension = os.path.splitext(file.filename)  # 获取上传文件的文件名和扩展名
    save_filename = f'{filename}_{current_time}{extension}'
    save_path = os.path.join(save_dir, save_filename)
    cv2.imwrite(save_path, image)

    return jsonify({'image': image_str})

# 函数用于在视频帧上绘制检测结果
def detect_objects(frame, model):
    results = model(frame)
    detections = results.xyxy[0].cpu().numpy()  # 获取检测结果

    # 在帧上绘制检测结果
    for det in detections:
        # 获取边界框信息
        x1, y1, x2, y2, conf, class_id = det[:6]

        # 在帧上绘制边界框
        cv2.rectangle(frame, (int(x1), int(y1)), (int(x2), int(y2)), (0, 255, 0), 2)

        # 在帧上绘制类别和置信度
        label = f'{model.names[int(class_id)]} {conf:.2f}'
        cv2.putText(frame, label, (int(x1), int(y1) - 10), cv2.FONT_HERSHEY_SIMPLEX, 0.5, (0, 255, 0), 2)
    return frame

# 路由处理视频检测请求

@app.route("/predict_video", methods=["POST"])
def predict_video():
    global model

    # 从请求中获取视频文件
    video_file = request.files["video"]
    # 保存视频到临时文件
    temp_video_path = "temp_video.mp4"
    video_file.save(temp_video_path)

    # 逐帧读取视频
    video = cv2.VideoCapture(temp_video_path)

    # 获取视频的帧率和尺寸
    fps = video.get(cv2.CAP_PROP_FPS)
    width = int(video.get(cv2.CAP_PROP_FRAME_WIDTH))
    height = int(video.get(cv2.CAP_PROP_FRAME_HEIGHT))

    # 视频写入对象
    output_video_filename = f"output_video_{datetime.now().strftime('%Y%m%d%H%M%S')}.mp4"
    output_video_path = os.path.join("static", output_video_filename)
    fourcc = cv2.VideoWriter_fourcc(*"avc1")
    out_video = cv2.VideoWriter(output_video_path, fourcc, fps, (width, height))

    # 逐帧处理视频并进行目标检测
    while True:
        ret, frame = video.read()
        if not ret:
            break

        # 进行目标检测
        detection_result = detect_objects(frame, model)

        # 将处理后的帧写入输出视频
        out_video.write(detection_result)

    # 释放视频对象
    video.release()
    out_video.release()

    return jsonify({"output_video_path": output_video_filename})

@app.route('/')
def index():
    return render_template('index.html')

# 初始加载模型
load_model()

if __name__ == '__main__':
    app.run(debug=True)
index.html
<!DOCTYPE html>
<html lang="en">
<head>
<meta charset="UTF-8">
<meta name="viewport" content="width=device-width, initial-scale=1.0">
<title>Object Detection</title>
<style>
body {
font-family: Arial, sans-serif;
margin: 0;
padding: 0;
background-color: #f3f3f3;
display: flex;
justify-content: center;
align-items: center;
height: 100vh;
flex-direction: column;
}
#content {
text-align: center;
max-width: 820px;
margin-top: 20px;
}
h1 {
color: #333;
}
h2 {
color: #666;
}
input[type="file"] {
margin-bottom: 10px;
}
.media-container {
display: flex;
max-width: 100%;
margin-bottom: 20px;
}
.media-container:first-child {
margin-right: 20px; /* 在第一个容器的右侧添加间隔 */
}
.media-container img,
.media-container video {
max-width: 100%;
height: auto;
}
.original {
width: 400px;
overflow: hidden;
}
.processed {
flex: 2; /* 右边容器占据剩余空间 */
}
button {
padding: 10px 20px;
background-color: #007bff;
color: #fff;
border: none;
border-radius: 5px;
cursor: pointer;
margin-bottom: 10px;
}
/* 新增样式:模态框 */
.modal {
display: none; /* 默认隐藏 */
position: fixed;
z-index: 1;
left: 0;
top: 0;
width: 100%;
height: 100%;
overflow: auto;
background-color: rgba(0, 0, 0, 0.9); /* 半透明黑色背景 */
}
.modal-content {
margin: auto;
display: block;
width: 80%;
max-width: 800px;
position: absolute;
left: 50%;
top: 50%;
transform: translate(-50%, -50%);
text-align: center; /* 居中显示图片 */
}
.close {
color: #ccc;
font-size: 36px;
font-weight: bold;
cursor: pointer;
position: absolute;
top: 10px;
right: 10px;
}
.close:hover,
.close:focus {
color: #fff;
text-decoration: none;
}
#downloadButton {
padding: 10px 20px;
background-color: #007bff;
color: #fff;
border: none;
border-radius: 5px;
cursor: pointer;
margin-bottom: 10px;
}
/* 新增样式:响应式图片 */
.modal-content img,
.modal-content video {
max-width: 100%;
height: auto;
}
</style>
</head>
<body>
<!-- 新增模态框 -->
<div id="myModal" class="modal" onclick="closeModal()">
<div class="modal-content" id="modalContent" onclick="stopPropagation(event)">
<!-- 放大后的图片或视频将在这里显示 -->
<span class="close" onclick="closeModal()">×</span>
</div>
</div>
<div id="content">
<h1>照片/视频检测</h1>
<!-- 上传图片 -->
<h2>上传图片</h2>
<input type="file" id="imageFile" accept="image/*" onchange="displaySelectedImage()">
<button onclick="uploadImage()">上传</button>
<button id="downloadImageButton" onclick="downloadProcessedImage()">下载</button>
<br>
<div class="media-container">
<div class="original media-container" onclick="enlargeImage()">
<img id="uploadedImage" src="#" alt="Uploaded Image" style="display:none;">
<button id="zoomInButton" style="display:none;">Zoom In</button>
</div>
<div class="processed media-container" onclick="enlargeImage2()">
<img id="processedImage" src="#" alt="Processed Image" style="display:none;">
</div>
</div>
<br>
<!-- 上传视频 -->
<h2>上传视频</h2>
<input type="file" id="videoFile" accept="video/mp4,video/x-m4v,video/*" onchange="displaySelectedVideo()">
<button onclick="uploadVideo()">上传</button>
<button id="downloadButton" onclick="downloadProcessedVideo()">下载</button>
<br>
<div class="media-container">
<div class="original media-container" >
<video id="uploadedVideo" src="#" controls style="display:none;"></video>
</div>
<div class="processed media-container">
<video id="processedVideo" controls style="display:none;"></video>
</div>
</div>
<br>
</div>
<script>
// 显示选择的权重文件
// 显示选择的图片并添加点击放大功能
function displaySelectedImage() {
var fileInput = document.getElementById('imageFile');
var file = fileInput.files[0];
var imageElement = document.getElementById('uploadedImage');
imageElement.src = URL.createObjectURL(file);
imageElement.style.display = 'inline';
document.getElementById('zoomInButton').style.display = 'inline';
}
// 显示模态框并放大图片
function enlargeImage() {
var modal = document.getElementById('myModal');
var modalImg = document.getElementById('modalContent');
var img = document.getElementById('uploadedImage');
modal.style.display = 'block';
modalImg.innerHTML = '<img src="' + img.src + '">';
}
// 显示模态框并放大图片
function enlargeImage2() {
var modal = document.getElementById('myModal');
var modalImg = document.getElementById('modalContent');
var img = document.getElementById('processedImage');
modal.style.display = 'block';
modalImg.innerHTML = '<img src="' + img.src + '">';
}
// 显示选择的视频并添加点击放大功能
function displaySelectedVideo() {
var fileInput = document.getElementById('videoFile');
var file = fileInput.files[0];
var videoElement = document.getElementById('uploadedVideo');
videoElement.src = URL.createObjectURL(file);
videoElement.style.display = 'block';
}
// 上传图片并向后端发送请求
function uploadImage() {
var fileInput = document.getElementById('imageFile');
var file = fileInput.files[0];
var formData = new FormData();
formData.append('image', file);
fetch('/predict_image', {
method: 'POST',
body: formData
})
.then(response => response.json())
.then(data => {
var imageElement = document.getElementById('processedImage');
imageElement.src = 'data:image/png;base64,' + data.image;
imageElement.style.display = 'inline';
document.getElementById('downloadImageButton').style.display = 'inline';
})
.catch(error => console.error('Error:', error));
}
// 下载处理后的图片
function downloadProcessedImage() {
var imageElement = document.getElementById('processedImage');
var url = imageElement.src;
var a = document.createElement('a');
a.href = url;
a.download = 'processed_image.png';
document.body.appendChild(a);
a.click();
document.body.removeChild(a);
}
// 上传视频并向后端发送请求
function uploadVideo() {
var fileInput = document.getElementById('videoFile');
var file = fileInput.files[0];
var formData = new FormData();
formData.append('video', file);
fetch('/predict_video', {
method: 'POST',
body: formData
})
.then(response => response.json())
.then(data => {
var videoElement = document.getElementById('processedVideo');
// 修改路径为正确的 Flask url_for 生成的路径
videoElement.src = '{{ url_for("static", filename="") }}' + data.output_video_path;
videoElement.style.display = 'block';
var downloadButton = document.getElementById('downloadButton');
downloadButton.style.display = 'block';
})
.catch(error => console.error('Error:', error));
}
// 下载处理后的视频
function downloadProcessedVideo() {
var videoElement = document.getElementById('processedVideo');
var url = videoElement.src;
var a = document.createElement('a');
a.href = url;
a.download = 'processed_video.mp4';
document.body.appendChild(a);
a.click();
document.body.removeChild(a);
}
// 关闭模态框
function closeModal() {
var modal = document.getElementById('myModal');
modal.style.display = 'none';
}
</script>
</body>
</html>使用说明:
index.html放入templates文件夹中
运行app.py
注:此处加载模型路径更改为自己的
model = torch.hub.load('', 'custom', path='yolov5s.pt', source='local')
如果模型读取不到,显示
FileNotFoundError: [Errno 2] No such file or directory: 'hubconf.py'
去yolov5官网,下载yolov5-master到项目文件夹

并将yolov5s.pt文件复制到yolov5-master文件夹中,修改model路径
model = torch.hub.load('yolov5-master', 'custom', path='yolov5s.pt', source='local')
如有问题,可联系作者。


 1050
1050

 被折叠的 条评论
为什么被折叠?
被折叠的 条评论
为什么被折叠?
 到【灌水乐园】发言


