


最近闲来无事,偶尔刷到了移植LVGL的教程,今天肝完了机械原理又移植完LVGL库,真是收获满满的一天,先接一杯水去。
回来了,发个朋友圈高级一下,好困。
lvgl v8.3移植及组件使用_lvgl界面编辑器-CSDN博客![]() https://blog.csdn.net/weixin_45209978/article/details/127374115?spm=1001.2014.3001.5506LVGL - Light and Versatile Embedded Graphics Library
https://blog.csdn.net/weixin_45209978/article/details/127374115?spm=1001.2014.3001.5506LVGL - Light and Versatile Embedded Graphics Library![]() https://lvgl.io/tools/imageconverter以上的两个网址分别为野火霸天虎移植LVGL的教程,第二个是一个图片转C代码的一个在线网址。
https://lvgl.io/tools/imageconverter以上的两个网址分别为野火霸天虎移植LVGL的教程,第二个是一个图片转C代码的一个在线网址。
具体步骤大概就是,我总结一下。
获取LVGL源码
先从github获取lvgl的源码
地址:GitHub - lvgl/lvgl: Embedded graphics library to create beautiful UIs for any MCU, MPU and display type.
这里选择v8.3下载
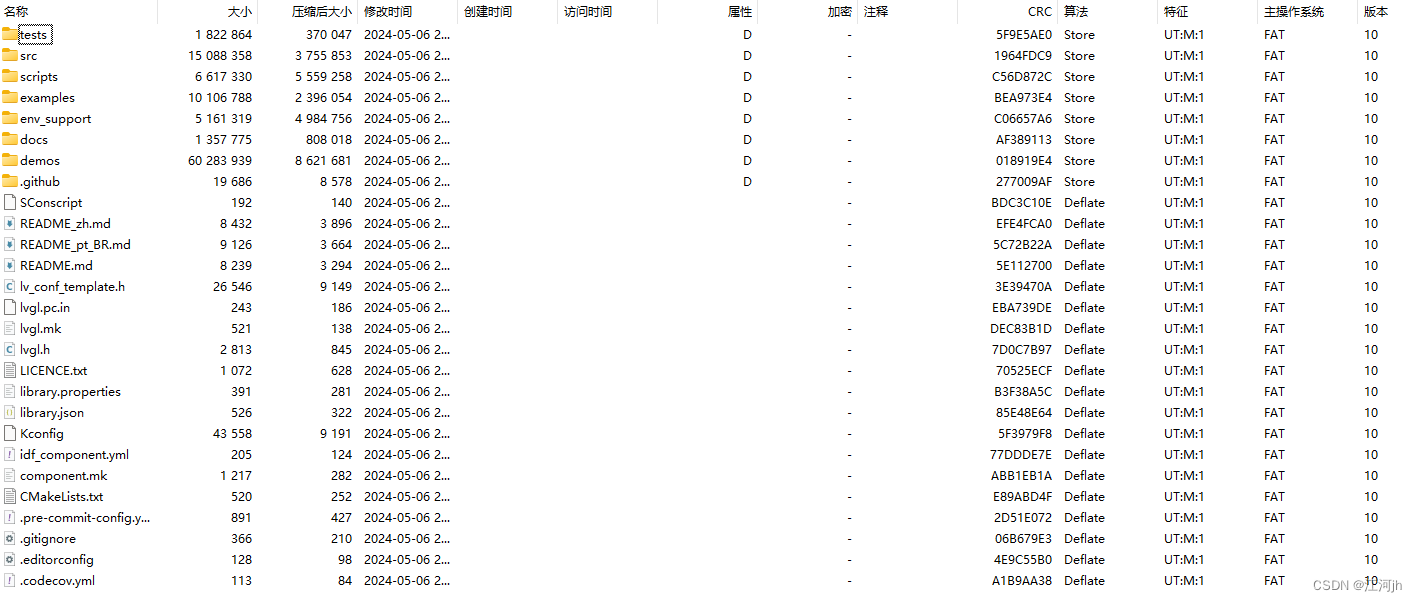
这是压缩包中含有的所有文件,接下来根据个人意愿进行修改。
删掉多余的东西 , 只保留以下部分。

为什么把其他的删掉,因为它们不包含我们需要的.c和.h文件。
顺便把留下的这五个东西介绍一下。
第一个demos
跟它的名字一样,存放的是官方的demo,因此实际上我们也是可以删掉的,留下来的原因就是等我们移植完LVGL之后可以调用一下demo看看效果。
第二个examples
存放的是一些关于示例代码,我们只需要留下里面的porting即可。

然后porting里的文件是三个(一对的.c和.h算一个)。

disp是显示相关的模板,fs是文件管理的模板,indev是输入相关的模板。
因为我的屏幕没有输入,也不需要文件管理,因此对于我来说只需要disp即可,但是其他没用到的最好也别删了,保不齐什么时候就用上了(没事的时候打算整个触摸屏再移植一下LVGL玩玩)。
然后就是src,这个就是核心的文件了,一个都不能少。
lv_conf_tempplate.h 这个文件是配置文件。
lvgl.h这个头文件里面包含了我们常用的其他头文件,因此我们只需要包含这个就等同于包含了其他很多头文件了,比较方便。
然后配置文件的名字我们需要把后面的_template给删掉,变成lv_conf.h。
修改名称的原因就在于LVGL里面源文件中包含的配置文件的名称就是lv_conf.h,
把所有的c文件加入到项目中
对的,就是所有。并且需要在

这个页面把所有的文件文件夹位置添加进去,(md,累死我了)。
在添加完所有文件之后就相当于移植进去了LVGL库。
根据实际情况修改 #include "lvgl\lvgl.h" 或者 #include "lvgl.h".
( 看编译器是否能找到文件位置 )
之后编译,一般有错就是xxx函数未定义,那肯定就是添加c文件的时候落东西了。
直到没有错误,一堆警告为止。(doghead)
工程文件修改
这里搬运一下大佬的。
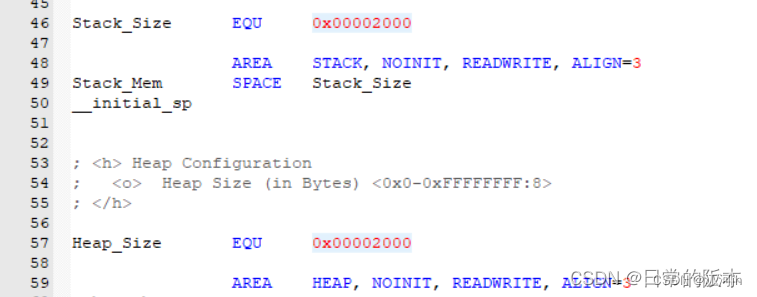
1.启动文件
注意在启动文件中修改堆、栈大小,建议各设置 8kB 空间:(大一些也没关系)
2.lvgl
在做这个之前最好先了解一下你的屏幕是怎么驱动的,然后再做下面的工作。
1.先打开 lv_conf.h
- 第27行,根据屏幕颜色数据类型修改
- 第52行,指定lvgl的动态内存可用大小
- 第96行,每英寸的像素,根据自己屏幕尺寸和像素算一下就好
- 第258行,开启style初始化断言
其他的浏览一下即可,用到的时候再去深究。
打开 lv_port_disp_template.h,将开头的 #if 0 条件编译取消 ,把0改成1
打开 lv_port_disp_template.c,将开头的 #if 0 条件编译取消,把0改成1,设置一下屏幕宽和高的像素。
#define MY_DISP_HOR_RES    480
#define MY_DISP_VER_RES    800
2.看下面的 void lv_port_disp_init(void)
LVGL缓冲区的图像写入有三种方式
- 第一种:一个缓冲区,默认存10行图像
- 第二种:两个缓冲区,默认每个缓冲区存10行图像
- 第三种:两个缓冲区,每个缓冲区存一整个屏幕的图像
这里我们用第二种,把第一种和第三种注释掉即可。
第二种是为存在DMA之类的数据传送机制的硬件设计的,可以把传送缓冲区的内容交给DMA处理,而cpu去执行其他工作(比如渲染),这里我暂时没用DMA,这样的话效果和第一种是一样的。(注:缓冲区大小为屏幕的1/10效果会比较好,这里为了节约一点RAM没有改大小)
也要记得把下面的 &draw_buf_dsc_1 改成 &draw_buf_dsc_2 。
void lv_port_disp_init(void)
{
    /*-------------------------
     * Initialize your display
     * -----------------------*/
    disp_init();

    /*-----------------------------
     * Create a buffer for drawing
     *----------------------------*/

    /**
     * LVGL requires a buffer where it internally draws the widgets.
     * Later this buffer will passed to your display driver's `flush_cb` to copy its content to your display.
     * The buffer has to be greater than 1 display row
     *
     * There are 3 buffering configurations:
     * 1. Create ONE buffer:
     *      LVGL will draw the display's content here and writes it to your display
     *
     * 2. Create TWO buffer:
     *      LVGL will draw the display's content to a buffer and writes it your display.
     *      You should use DMA to write the buffer's content to the display.
     *      It will enable LVGL to draw the next part of the screen to the other buffer while
     *      the data is being sent form the first buffer. It makes rendering and flushing parallel.
     *
     * 3. Double buffering
     *      Set 2 screens sized buffers and set disp_drv.full_refresh = 1.
     *      This way LVGL will always provide the whole rendered screen in `flush_cb`
     *      and you only need to change the frame buffer's address.
     */

    /* Example for 1) */
//    static lv_disp_draw_buf_t draw_buf_dsc_1;
//    static lv_color_t buf_1[MY_DISP_HOR_RES * 10];                          /*A buffer for 10 rows*/
//    lv_disp_draw_buf_init(&draw_buf_dsc_1, buf_1, NULL, MY_DISP_HOR_RES * 10);   /*Initialize the display buffer*/

    /* Example for 2) */
    static lv_disp_draw_buf_t draw_buf_dsc_2;
    static lv_color_t buf_2_1[MY_DISP_HOR_RES * 10];                        /*A buffer for 10 rows*/
    static lv_color_t buf_2_2[MY_DISP_HOR_RES * 10];                        /*An other buffer for 10 rows*/
    lv_disp_draw_buf_init(&draw_buf_dsc_2, buf_2_1, buf_2_2, MY_DISP_HOR_RES * 10);   /*Initialize the display buffer*/

    /* Example for 3) also set disp_drv.full_refresh = 1 below*/
//    static lv_disp_draw_buf_t draw_buf_dsc_3;
//    static lv_color_t buf_3_1[MY_DISP_HOR_RES * MY_DISP_VER_RES];            /*A screen sized buffer*/
//    static lv_color_t buf_3_2[MY_DISP_HOR_RES * MY_DISP_VER_RES];            /*Another screen sized buffer*/
//    lv_disp_draw_buf_init(&draw_buf_dsc_3, buf_3_1, buf_3_2,
//                          MY_DISP_VER_RES * LV_VER_RES_MAX);   /*Initialize the display buffer*/

    /*-----------------------------------
     * Register the display in LVGL
     *----------------------------------*/

    static lv_disp_drv_t disp_drv;                         /*Descriptor of a display driver*/
    lv_disp_drv_init(&disp_drv);                    /*Basic initialization*/

    /*Set up the functions to access to your display*/

    /*Set the resolution of the display*/
    disp_drv.hor_res = MY_DISP_HOR_RES;
    disp_drv.ver_res = MY_DISP_VER_RES;

    /*Used to copy the buffer's content to the display*/
    disp_drv.flush_cb = disp_flush;

    /*Set a display buffer*/
    disp_drv.draw_buf = &draw_buf_dsc_2;

    /*Required for Example 3)*/
    //disp_drv.full_refresh = 1;

    /* Fill a memory array with a color if you have GPU.
     * Note that, in lv_conf.h you can enable GPUs that has built-in support in LVGL.
     * But if you have a different GPU you can use with this callback.*/
    //disp_drv.gpu_fill_cb = gpu_fill;

    /*Finally register the driver*/
    lv_disp_drv_register(&disp_drv);
}
3.屏幕初始化
/*Initialize your display and the required peripherals.*/
static void disp_init(void)
{
	/*You code here*/
	NT35510_Init ();
}
4.刷新缓冲区
/*Flush the content of the internal buffer the specific area on the display
 *You can use DMA or any hardware acceleration to do this operation in the background but
 *'lv_disp_flush_ready()' has to be called when finished.*/
static void disp_flush(lv_disp_drv_t * disp_drv, const lv_area_t * area, lv_color_t * color_p)
{
    if(disp_flush_enabled) {

			uint32_t width = area->x2 - area->x1 + 1;
			uint32_t height = area->y2 - area->y1 + 1;
			NT35510_OpenWindow(area->x1,area->y1,width,height);

			NT35510_Write_Cmd ( CMD_SetPixel );
			for(uint32_t i = 0;i < width * height;i++)
			{
				NT35510_Write_Data ( color_p->full );
				color_p++;
			}

//        /*The most simple case (but also the slowest) to put all pixels to the screen one-by-one*/

//        int32_t x;
//        int32_t y;
//        for(y = area->y1; y <= area->y2; y++) {
//            for(x = area->x1; x <= area->x2; x++) {
//                /*Put a pixel to the display. For example:*/
//                /*put_px(x, y, *color_p)*/
//                color_p++;
//            }
//        }
    }

    /*IMPORTANT!!!
     *Inform the graphics library that you are ready with the flushing*/
    lv_disp_flush_ready(disp_drv);
}
5.接下来修改main函数
int main ( void )
{

  	LED_GPIO_Config();

	NT35510_Init ();
    TIM7_Configuration();
	DEBUG_USART_Config();

  	lv_init();
	lv_port_disp_init();


	lv_obj_t* btn = lv_btn_create(lv_scr_act());
	lv_obj_set_pos(btn, 100, 100);
	lv_obj_set_size(btn, 120, 50);
	lv_obj_t* label = lv_label_create(btn);
	lv_label_set_text(label, "Button");
	lv_obj_center(label);


//	GTP_Init_Panel();

	while ( 1 )
	{
		lv_timer_handler();
	}
}
6.在周期位1s定时器中断里添加函数给lvgl做时钟
void  BASIC_TIM7_IRQHandler (void)
{
  if ( TIM_GetITStatus( BASIC_TIM7, TIM_IT_Update) != RESET )
  {
    lv_tick_inc(1);
    TIM_ClearITPendingBit(BASIC_TIM7, TIM_IT_Update);
  }
}
上述的有些操作调用了其他文件的函数,记得要包含相应函数的头文件,
比如SysTick_Handler()调用了lv_tick_inc(),那么在stm32f4xx_it.c开头要 加上#include “lvgl/lvgl.h”
效果如图所示

图片显示
1.首先准备一张英文名字的图片(不能是数字或者字母)
之后在在线转换网站中
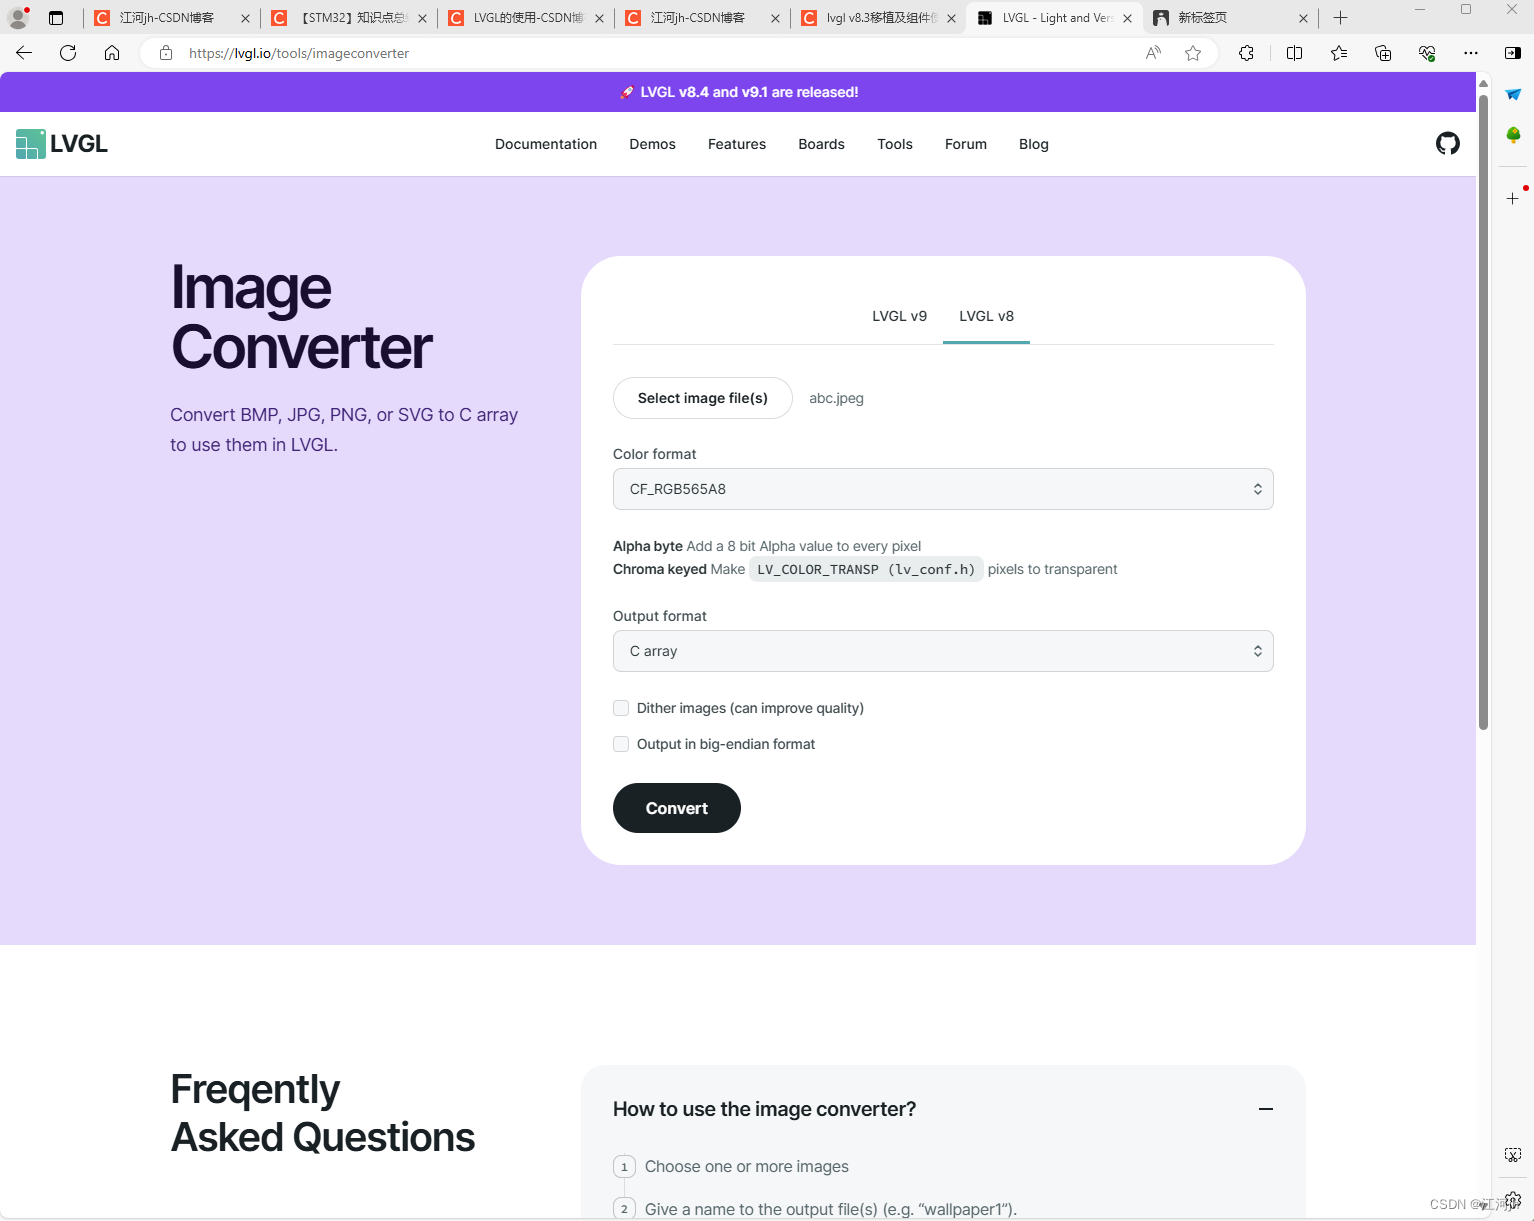
2.按图所示进行设置之后输入图片,生成C代码

3.把C文件加入到工程中

图片文件不能太大,要不然单片机的flash放不下(也许可以放在sd卡中)。
4.将以下代码放到main函数中。
	lv_obj_t * bg_top;
	LV_IMG_DECLARE(nahida);
	bg_top = lv_img_create(lv_scr_act());
	lv_img_set_src(bg_top, &nahida );
就可以对图片进行显示。效果如下:


 393
393


 被折叠的 条评论
为什么被折叠?
被折叠的 条评论
为什么被折叠?
 到【灌水乐园】发言


