


spring的配置
什么是spring
1、spring:是一个轻量级的开源框架,是为解决企业应用开发的复杂性而创建的;
2、是一个三层架构,也为J2EE应用程序开发提供集成的框架;
Web层:Spring MVC;
业务层 :Spring的IoC;
持久层 :Spring的JDBC、ORM、等持久层框架;</span></span>3、Spring的核心是:控制反转(IoC)和面向切面编程(AOP);
IOC:控制反转spring的配置环境
1、在pom.xml导入依赖
 xsi:schemaLocation="http://maven.apache.org/POM/4.0.0 http://maven.apache.org/xsd/maven-4.0.0.xsd">
    <modelVersion>4.0.0</modelVersion>

    <groupId>com.fs</groupId>
    <artifactId>spring-code422</artifactId>
    <version>1.0-SNAPSHOT</version>

    <properties>
        <spring.version>5.2.15.RELEASE</spring.version>
        <project.build.sourceEncoding>UTF-8</project.build.sourceEncoding>
        <project.reporting.outputEncoding>UTF-8</project.reporting.outputEncoding>
        <maven.compiler.encoding>UTF-8</maven.compiler.encoding>
        <maven.compiler.source>1.8</maven.compiler.source>
        <maven.compiler.target>1.8</maven.compiler.target>
    </properties>

    <dependencies>
        <dependency>
            <groupId>org.springframework</groupId>
            <artifactId>spring-context</artifactId>
            <version>${spring.version}</version>
        </dependency>
        <!--spring-test-->
        <dependency>
            <groupId>org.springframework</groupId>
            <artifactId>spring-test</artifactId>
            <version>${spring.version}</version>
        </dependency>
        <!--junit-->
        <dependency>
            <groupId>junit</groupId>
            <artifactId>junit</artifactId>
            <version>4.12</version>
            <scope>test</scope>
        </dependency>
        <!--lombok-->
        <dependency>
            <groupId>org.projectlombok</groupId>
            <artifactId>lombok</artifactId>
            <version>1.18.24</version>
        </dependency>
        <dependency>
            <groupId>org.mybatis</groupId>
            <artifactId>mybatis</artifactId>
            <version>3.5.7</version>
        </dependency>
    </dependencies>
</project>
2、在beans.xml配置文件
<?xml version="1.0" encoding="UTF-8"?>
<beans xmlns="http://www.springframework.org/schema/beans"
       xmlns:xsi="http://www.w3.org/2001/XMLSchema-instance"
       xsi:schemaLocation="http://www.springframework.org/schema/beans http://www.springframework.org/schema/beans/spring-beans.xsd">

     <bean class="com.fs.di.Dao.Impl.UserDaoImpl" id="userDao"></bean>
    <!--导入的文件-->
     <bean class="com.fs.di.Service.Impl.UserServiceImpl" id="userService">
        <property name="userDao" ref="userDao"></property>
    </bean>
</beans>
3、Spring容器对象:
ApplicationContext接口实现类
a、ClassPathXmlApplicationContext:加载类路径下xml文件创建spring容器
b、AnnotationConfigApplicationContext:基于注解的方法
c、FileSystemXmlApplicationContext:加载文件系统下xml文件创建spring容器
很少使用
面试题:
    ApplicationContext与BeanFactory关系

   Bean对象:由spring管理的Java对象
   Java对象:不由spring管理的Java对象

    BeanFactory:创建Bean对象工厂,创建Java对象工厂
    ApplicationContext:是BeanFactory子接口,有BeanFactory所有的功能,还有其他功能
IOC
IOC 的理解:控制反转(控制权反转)
正转:对象B使用A,对象B拥有对象A的控制权(所有权)
反转:对象B使用A,对象B没有对象A的控制权,对象A的控制权交给Spring
DI
对象依赖于spring,spring自动把对象需要的资源(对象、数据、外部资源)注入进来
IOC与DI的关系:IOC与DI都可以实现对象解耦的
Bean的管理
Bean的配置
1、id与name都可以作为Bean的标识,id具有唯一性,name属性值则没有要求(可以用name来替换id)
<bean id = "student" name = "student" class = "com.ljq.entity.student">
    <property name = "name" value = "zhangsan"/>//注入student的具体值
</bean>别名可以使用<alias>来使用
<alia name = "student" alias = "xuesheng"></alias>2、scope
singleton:默认值(单例)这个bean对象是全局共享的,通过getBean获取这个bean对象都是同一个对象(线程不安全)
生命周期:
bean的创建时期:在容器创建的时候,创建对象
bean的运行:只要容器一直存在,就一直运行
bean的销毁:容器关闭时销毁
init-method:配置bean创建完成之后,初始化操作,在bean对象创建之后执行
destrou-method:配置bean销毁之前,释放资源操作,在bean对象销毁之前执行
prototype:(多例)通过getBean获取这个bean对象,重新创建一个新的对象返回(线程安全)(每次拿到新对象都需要使用)
生命周期:
        bean的创建时期:在调用容器(getBean方法)时,才创建对象
        bean的运行:如果引用,存在
        bean的销毁:如果长期没有使用,会被当成垃圾标记销毁回收

    在实际开发中,大部分使用单例singleton
在老旧的版本中,Struts2中action(类似servlet)类对象一定设置为prototype
3、Bean的后置处理器(BeanPostProcessor)
对代码或程序进行定制化操作与个性化操作,是一个接口,是对像创建后缓存到sigletonObjects单例池之前,对Bean初始化过程的操作,包括属性的填充,初始化方法的执行等。
Bean的实例化方式
a、构造方法的方式,默认使用无参构造,后面使用有参构造
<bean id = "studentDao" class = "com.ljq.dao.Impl.StuderntDaoImpl(文件所在的路径名)"
</bean>
b、静态工厂方式,bean的实例化调用工厂类的静态方法
<bean id = "stu3" class = "(静态方法的路径)" factory-method = "(方法名称)">
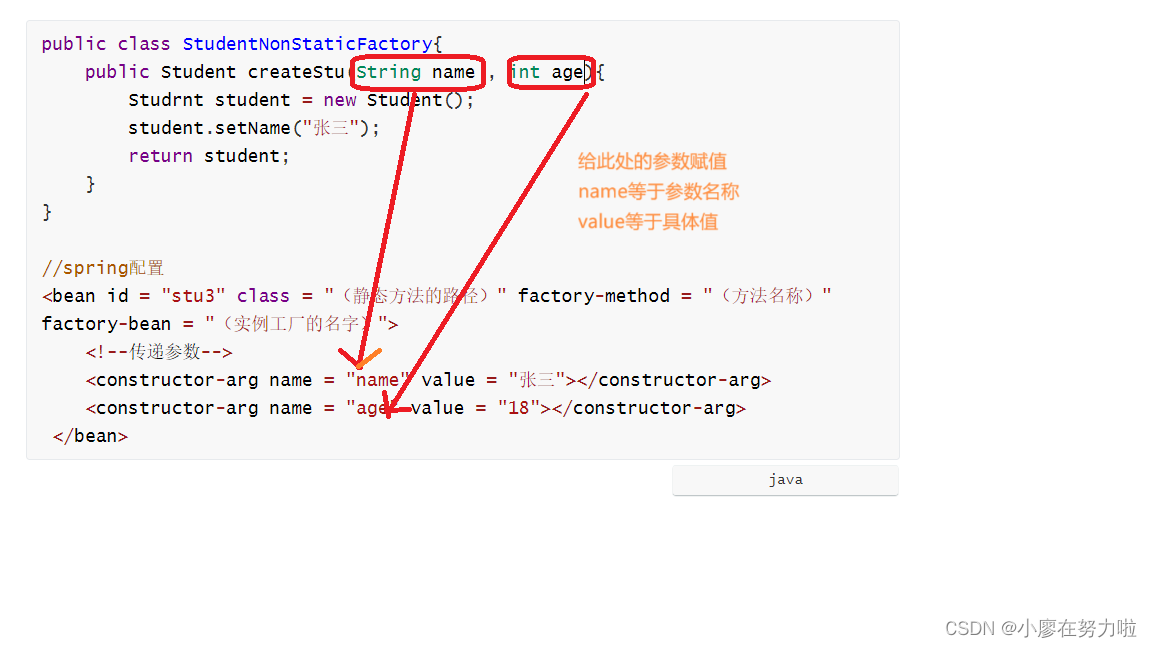
</bean>c、实力工厂方式:调用工厂类非静态方法(创建对象调用某个类非静态方式创建)
public class StudentNonStaticFactory{
    public Student createStu(String name , int age){
        Studrnt student = new Student();
        student.setName("张三");
        return student;
    }
}

//spring配置
<bean id = "stu3" class = "(静态方法的路径)" factory-method = "(方法名称)" factory-bean = "(实例工厂的名字)">
    <!--传递参数-->
    <constructor-arg name = "name" value = "张三"></constructor-arg>
    <constructor-arg name = "age" value = "18"></constructor-arg>
</bean>(如果构造函数需要参数赋值,使用<constructor-arg>传递参数)
Bean属性的注入方式
1、通过set方法注入
配置使用<property> bean对象所在的类提供对应属性的set方法
<bean class = "com.ljq.entity.Student" id = "student">
	<property name = "name" value = "zhangsan"/>
    <property name = "age" value = "20"/>
</bean>
2、在bean标签上使用p命名空间:p ---属性名
(p:属性名------简单数据类型 p:属性名-ref bean对象类型)
<bean class = "com.ljq.entity.Student" id = "student" p:name="zhangsan" p:sex="男" p:age="20" p:id="001"></bean>3、通过有参构造注入
需要bean所在的目录方法下提供有参构造
(在entity中User的有参构造)
Public Student(Integer id,String name,Integer age,String sex){
    this.id = id;
    this.name = name;
    this.age = age;
    this.sex = sex;
}
<bean class = "com.ljq.entity.Student" id = "Stu">
<constructor-arg name="name" value="张三">
<constructor-arg name="sex" value="男">
<constructor-arg name="age" value="18">
<constructor-arg name="id" value="1">
</bean>注意:定义的属性类型的个数依照方法体中有参构造的参数的个数决定(1对1)
4、集合与数组的注入
数组arry 集合list set都可以使用<value>标签直接注入属性值
map需要使用<entry>属性注入值
<property>
    <map>
    	<entry key||key-ref="" value=""></entry>
    </map>
</property>props需要使用
<property name = "props">
    <props>
        <prop key = "k1">1<prop>
        <prop key = "k2">2<prop>
    </props>
</property>
自动装配
Spring提供了一种机制,自动发现需要的属性,自动把需要的属性注入进来,这种机制称为自动装配
自动装配分为两种:
1、根据名字自动装配
 <bean id="userDao" class="com.ljq.di.Dao.Impl.UserDaoImpl"></bean>
    <bean autowire="byName"
     id="service"class="com.ljq.di.Service.Impl.UserServiceImpl"></bean>
注意:使用byName,要求bean的名字与属性名(set方法后面的名字)匹配
2、根据类型自动装配
 <bean id="userDao" class="com.ljq.di.Dao.Impl.UserDaoImpl"></bean>
    <bean autowire="byType"
     id="service"class="com.ljq.di.Service.Impl.UserServiceImpl"></bean>
注意:使用byType,要求同一个类型的bean只能有一个
注解方式
作用:使用注解方式替换xml配置
替换<bean>标签的注解 提供:@Component
为了区分不同层的类,spring在@Component提供其他几个类似的注解区分
*dao层类:@Repository
*service层:@Service
*web层:@Controller
*配置层类:@Configuration
替换<property>标签的注解
注入简单数据类型的值@Value("#{'值'}")
注入bean对像@Value("#{'Bean对象id'}")
根据bean类型注入bean对象:
@Autowried只能注入bean对象
注意:在使用注解前需要扫描注解
根据bean的名字注入bean对象:
@Autowried+@Qualifier注入对象
JDK提供:@Resource能根据属性与名字注入bean对象
Spring与web整合
1、整合目的:
自动创建Spring容器(监听tomcat启动行为,一旦tomcat启动触发执行代码【创建spring容器】,使用的是监听器)
把Spring容器保存起来,在其他类重复使用(保存在域中 page域 request域 session域 application域)
2、整合步骤:
a、创建maven的web项目
b、在pom.xml文件添加与web整合的依赖:spring-web
<dependency>
	<groupId>org.springframework</groupId>
	<artifactId>spring-web</artifactId>
	<version>${spring.version}</version>
</dependency>
c、在web.xml文件中配置监听器(spring-web中已经提供)(加在web.xml中)
<!--spring监听器-->
<listener>
    <listener-class>
        org.springframework.web.context.ContextLoaderListener
    </listener-class>
</listener>

<!--指定spring的配置文件-->
<context-param>
   <param-name>contextConfigLocation</param-name>
   <param-value>classpath:beans.xml</param-value>
</context-param>
输入发布网址报错500 需要手动getBean获取Service对象 Servlet一定不要交给spring管理
//获取spring容器的方法
//ServletContext application = this.getServletContext()
	//ApplicationContext applicationContext =(ApplicationContext)application.getAttribute(WebApplicationContext.ROOT_WEB_APPLICATION_CONTEXT_ATTRIBUTE);
	//提供一个工具类,获取Spring容器的工具类
	WebApplicationContext webApplicationContext=
WebApplicationContextUtils.getWebApplicationContext(this.getServletContext())


 8万+
8万+


 被折叠的 条评论
为什么被折叠?
被折叠的 条评论
为什么被折叠?
 到【灌水乐园】发言


