


这篇文章比较长,一共包含了三个部分:饮食记录-顶部搜索栏,饮食记录-统计卡片以及饮食记录-记录列表,接下来我们就一步一步开始看
一、整体页面布局
饮食记录页面的UI设计主要由三个部分组成,都是用Row容器包裹:
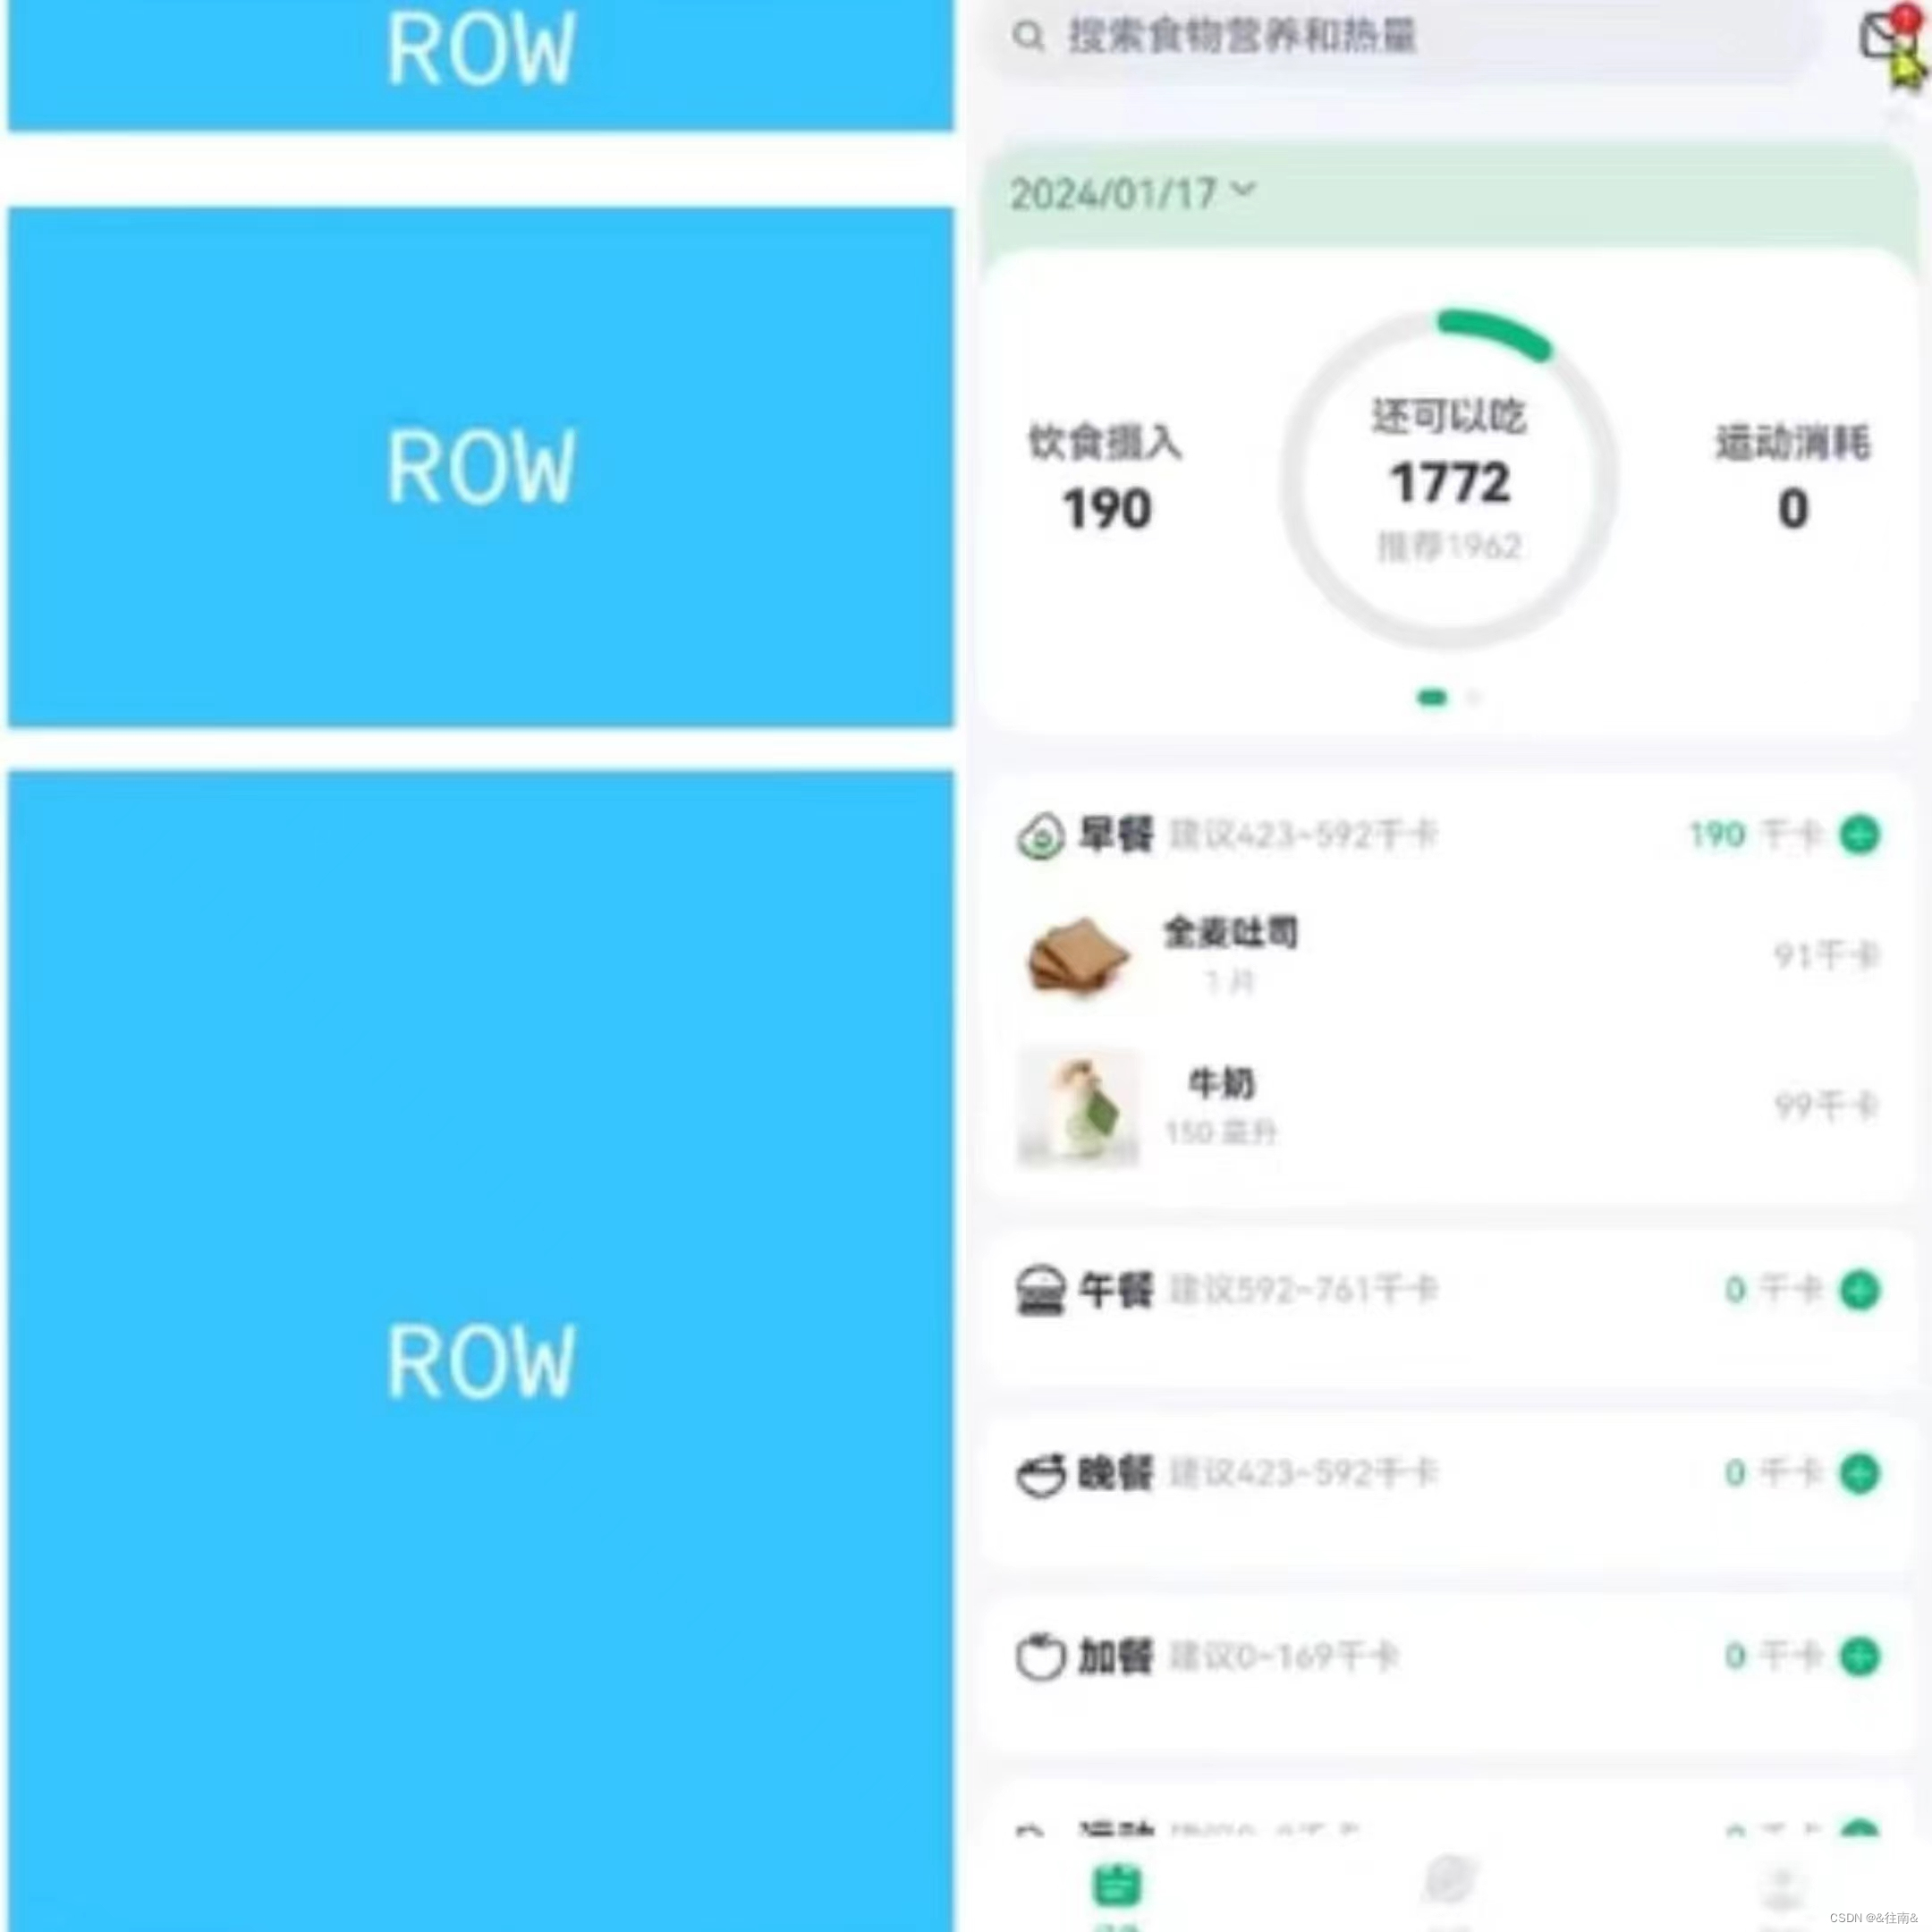
由上面的图我们也能够清晰的看出该页面的一个整体布局,那么接下来我i们就开始讲解这三大部分
1、首页组件代码
这部分代码就是将前面说的三部分都写成一个组件的形式,在这段代码中调用他们:
@Component
export default struct RecordIndex {

  build() {
    Column(){
      // 1.头部搜索栏
      SearchHeader()
      // 2.统计卡片
      StatsCard()
      // 3.记录列表
      RecordList()
    }
    .width('100%')
    .height('100%')
    .backgroundColor($r('app.color.index_page_background'))
  }
}
接下来我们就来看这三部分具体是如何实现的吧
二、具体内容讲解
(一)、顶部搜索栏
1、布局分析
顶部搜索栏也就是由两个部分组成,左边就是一个搜索栏文本框,右边是一张邮件的图片。
2、代码编写
(1)、搜索栏组件组件
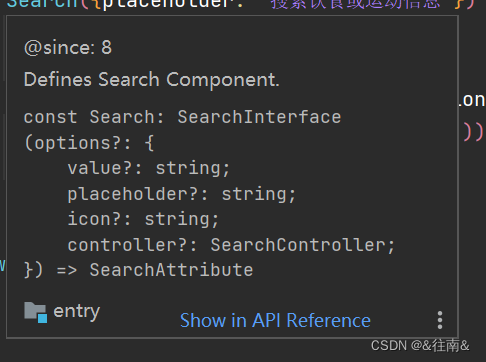
这个组件并不是一个单纯的文本输入框,而是一个搜索框还带有一个放大镜的小图标,我们可以查看鸿蒙提供的Search搜索栏的格式:
根据布局分析我们来完成这个搜索栏:
@Component
export default struct SearchHeader {
  build() {
    Row({space: CommonConstants.SPACE_6}){
      Search({placeholder: '搜索饮食或运动信息'})
        .textFont({size: 18})
        .layoutWeight(1)
    }
    .width(CommonConstants.THOUSANDTH_940)
  }
}
(2)、消息通知数量设置
这个设置也有一个专门的组件去实现:Badge这是一个容器型组件,也就是一个数字型角标在许多App上都会用到。在这个组件里面我们还可以通过position来设置角标的位置,用style来设置大小等等。
import { CommonConstants } from '../../common/constants/CommonConstants'
@Component
export default struct SearchHeader {
  build() {
    Row({space: CommonConstants.SPACE_6}){
      Search({placeholder: '搜索饮食或运动信息'})
        .textFont({size: 18})
        .layoutWeight(1)
      Badge({count: 1, position: BadgePosition.RightTop, style: {fontSize: 12}}){
        Image($r('app.media.ic_public_email'))
          .width(24)
      }
    }
    .width(CommonConstants.THOUSANDTH_940)
  }
}
3、最终效果展示

到这里我们的第一部分就完成了,接下来我们继续下一个部分
(二)、统计卡片
这部分看似简单但是是这个页面中最难的一部分了,在这个部分花费的时间可能要比另外两个部分加起来还要多
1、布局分析
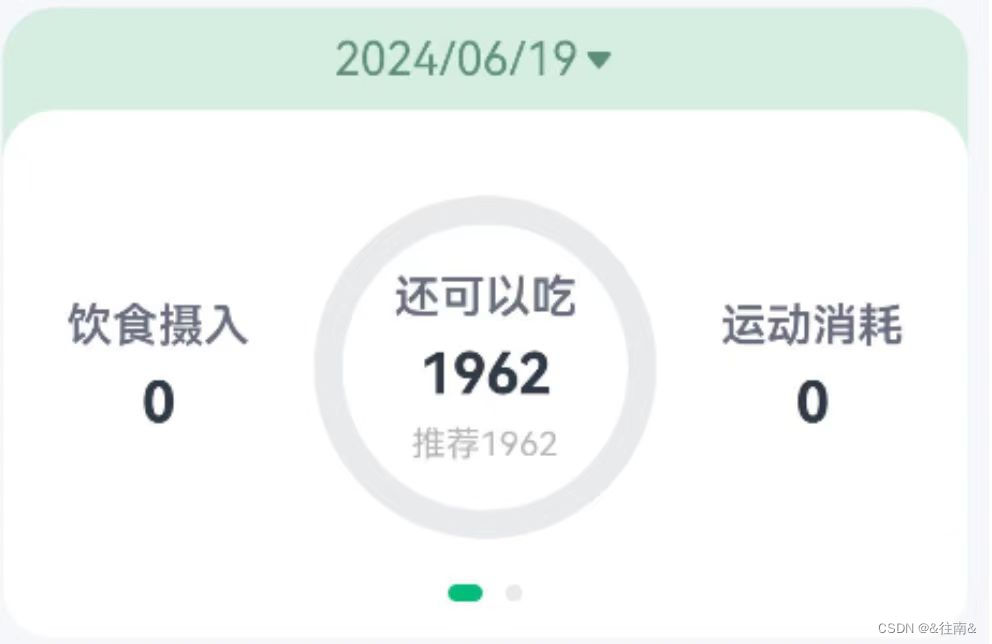
最上面是一个文字部分用于显示日期,其中添加了一个DatePicker组件用于选择日期,下面添加了一个Swiper组件用于滑动出现新的卡片。
在这个图片中我们也能够清楚的看到他的布局情况一共分为三小块,接下来我们来解释一下:
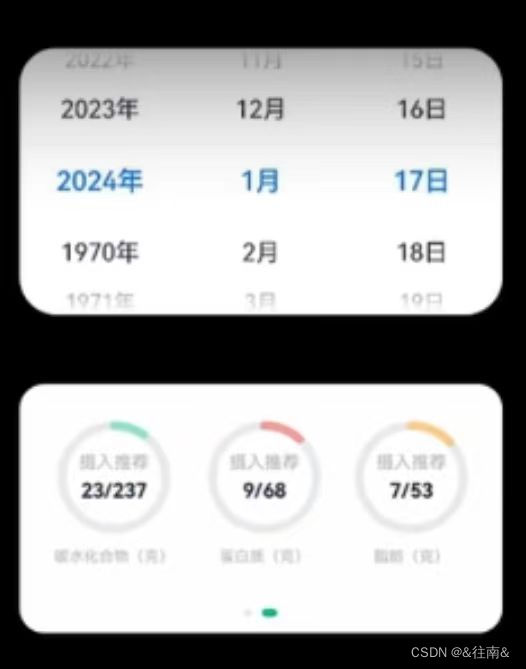
(1)、日期选择部分
这个部分里面有一个弹窗,在下拉时弹出窗口来进行日期的选择,当我们选择完日期之后接下来记录的内容就是在所选的这一天内所实际记录的内容。
(2)、统计信息部分
①热量统计部分
这个部分主要是统计了饮食摄入,运动消耗的卡路里以及推荐摄入的卡路里总量和生于还可以摄入的数量,其中推荐摄入这一部分还设置了一个环形进度条。
②营养素统计部分
这个部分主要记录了碳水,蛋白质和脂肪三种营养的摄入情况,每种营养素都设置了一个环形进度条。
(3)、穿梭切换卡片部分
这个操作可以帮助用户进行热量统计卡片和营养素卡片之间来回切换的操作
2、关键技术
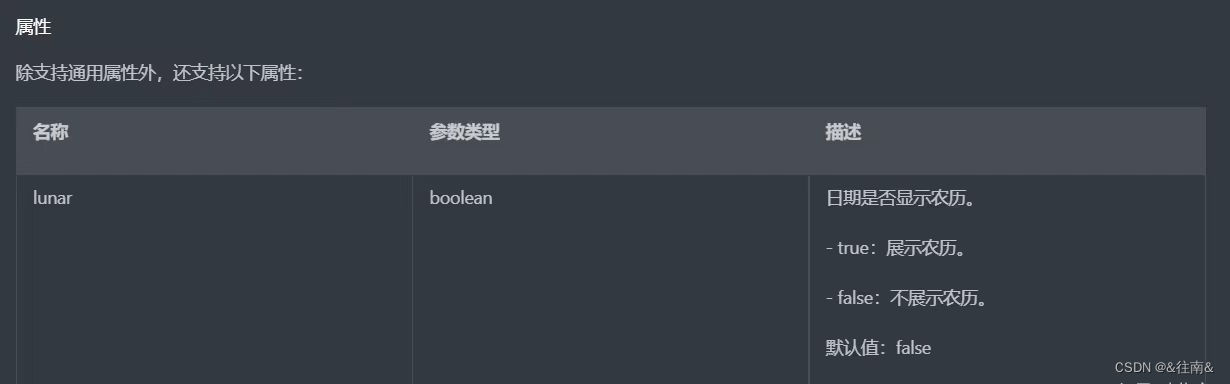
(1)、DatePicker日期选择器组件
关于这个组件我们通过查找API来了解一下他的使用方法:
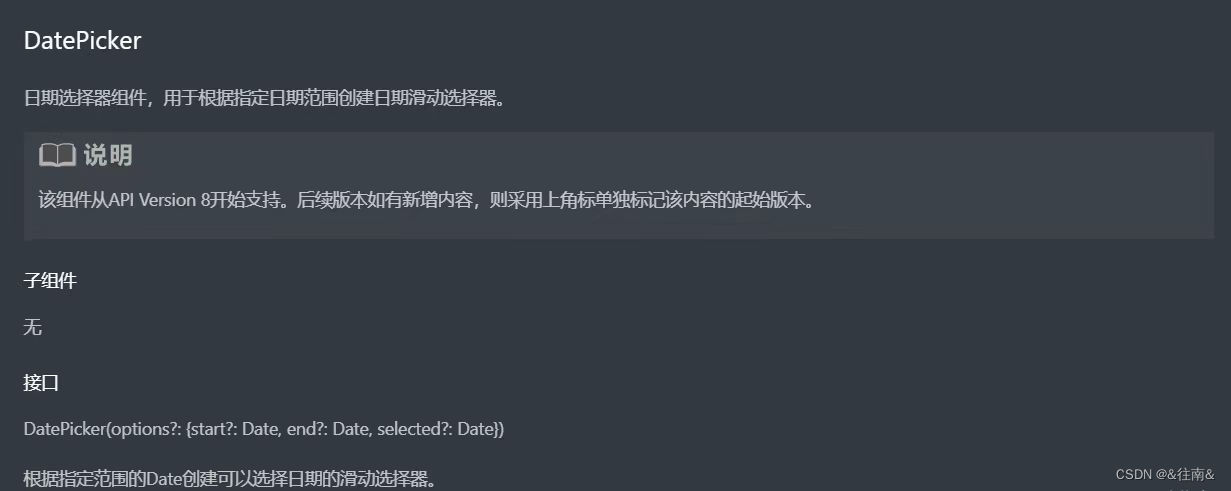
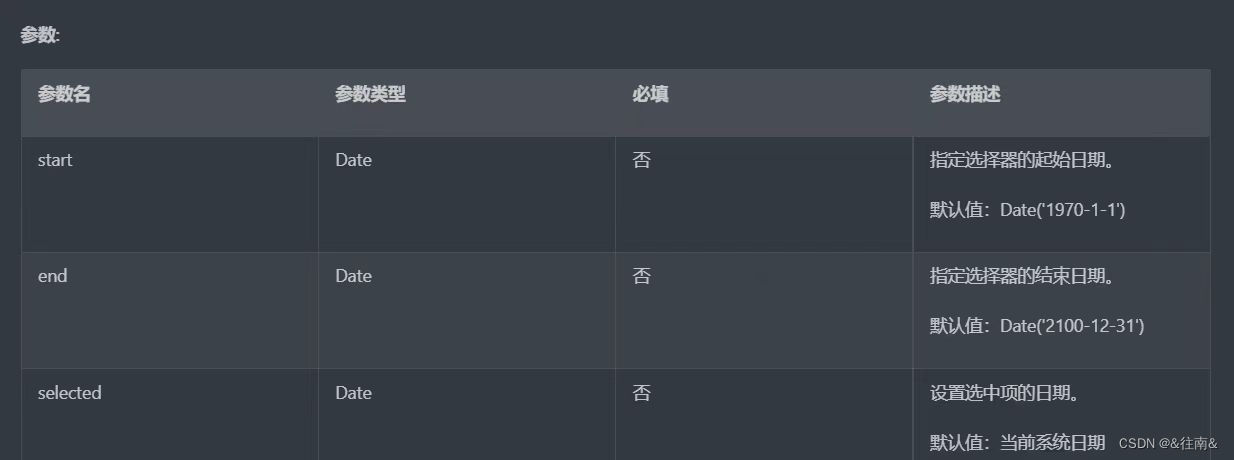

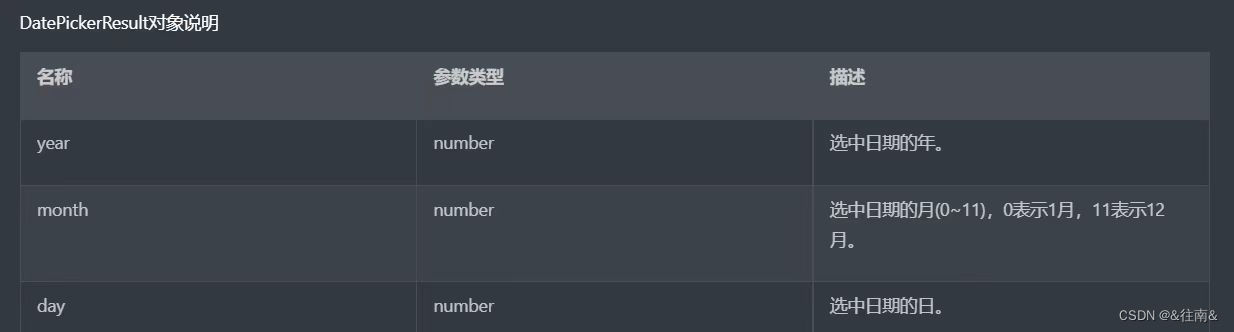
由于这个组件的日期设置是0到11月如果直接使用的话就会出现错误,所以在使用的时候我们需要在此基础上加1
(2)、Swiper穿梭切换组件
关于这个组件我们同样通过查找API来了解一下他的使用方法:
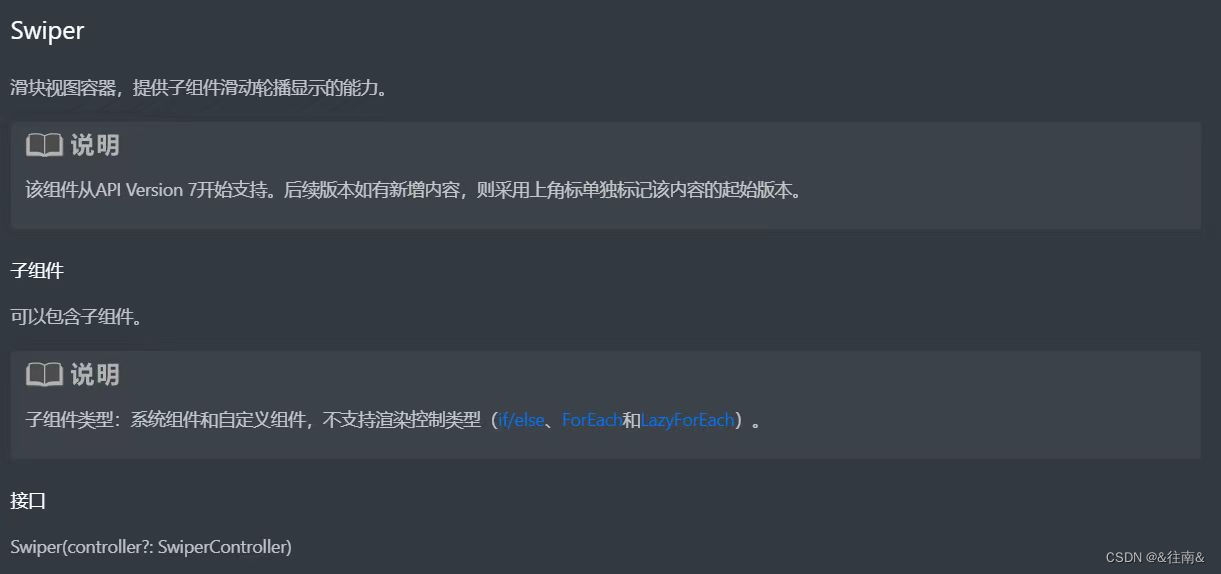
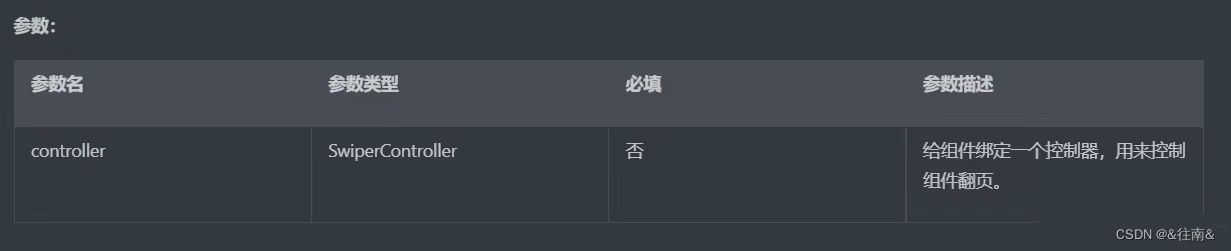
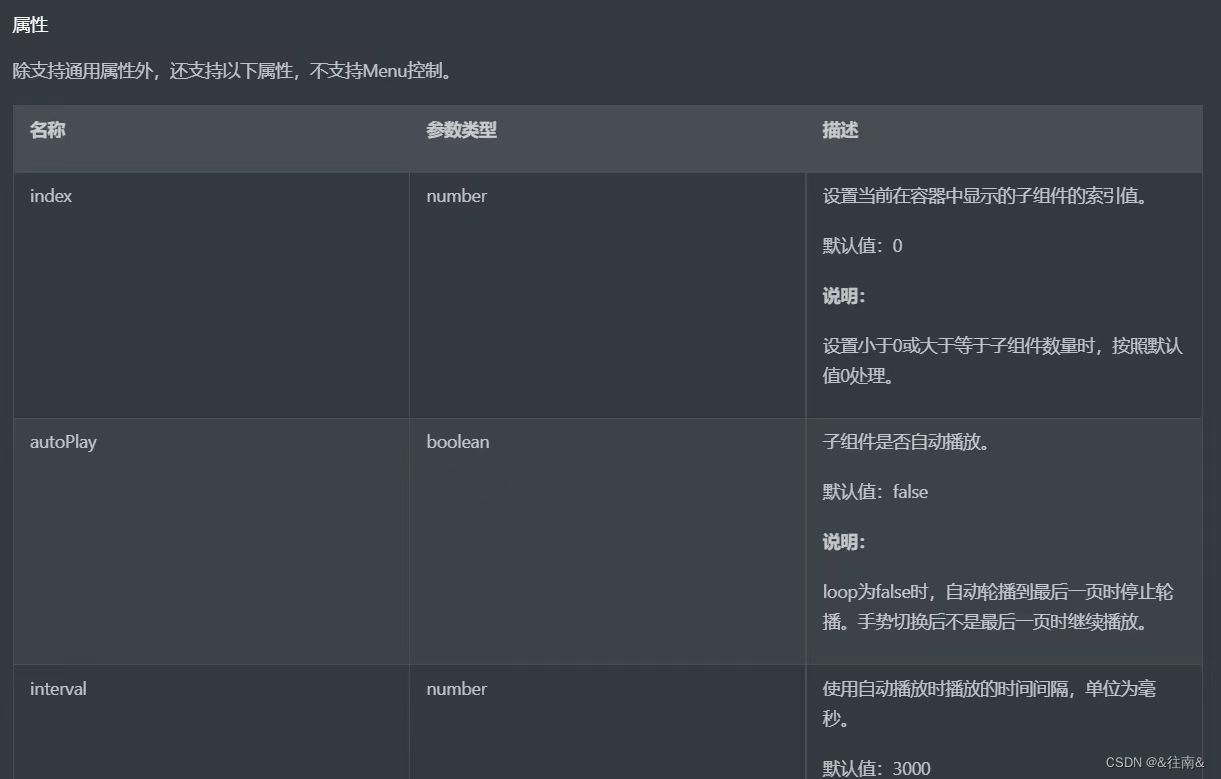
这个组件的属性功能很广泛,包括自动播放,已经自动播放的间隔时间等等
3、代码编写
(1)、总体布局代码
我们根据起那面分析的页面的布局来编写代码:
@Component
export default struct StatsCard {

  build() {
    Column(){
      // 1.日期信息
      Row(){
        Text('2024/01/25')
          .fontColor($r('app.color.secondary_color'))
        Image($r('app.media.ic_public_spinner'))
          .width(20)
          .fillColor($r('app.color.secondary_color'))
      }
      .padding(CommonConstants.SPACE_8)
      .onClick(() => this.controller.open())

      // 2.统计信息

    }
    .width(CommonConstants.THOUSANDTH_940)
    .backgroundColor($r('app.color.stats_title_bgc'))
    .borderRadius(CommonConstants.DEFAULT_18)
  }
}
(2)、日期选择弹窗
在弹窗部分中也是分为了两个小块日期选择器以及下面的按钮
@CustomDialog
export default struct DatePickDialog {
  controller: CustomDialogController
  selectedDate: Date = new Date()
  build() {
    Column({space: CommonConstants.SPACE_12}){
      // 1.日期选择器
      DatePicker({
        start: new Date('2004-02-29'),//用户注册时间
        end: new Date(),
        selected: this.selectedDate
      })
        .onChange((value: DatePickerResult) => {
          this.selectedDate.setFullYear(value.year, value.month, value.day)
        })
      // 2.按钮
      Row({space:CommonConstants.SPACE_12}){
        Button('取消')
          .width(120)
          .backgroundColor($r('app.color.light_gray'))
          .onClick(() => this.controller.close())
        Button('确定')
          .width(120)
          .backgroundColor($r('app.color.primary_color'))
          .onClick(() => {
            // 1.保存日期到全局存储
            AppStorage.SetOrCreate('selectedDate', this.selectedDate.getTime())
            // 2.关闭窗口
            this.controller.close()
          })
      }
    }
    .padding(CommonConstants.SPACE_12)
  }
}
其中有一个重要的技术就是保存到全局存储:AppStorage在这个应用的任意地方都可以来使用这个全局存储
其中要注意一定要使用getTime来转换为毫秒值
这个弹窗我们需要在卡片中却让他显示出来:
@Component
export default struct StatsCard {

  @StorageProp('selectedDate') selectedDate: number = DateUtil.beginTimeOfDay(new Date())

  controller: CustomDialogController = new CustomDialogController({
    builder: DatePickDialog({selectedDate: new Date(this.selectedDate)})//回写到弹窗
  })
  build() {
    Column(){
      // 1.日期信息
      Row(){
        Text(DateUtil.formatDate(this.selectedDate))
          .fontColor($r('app.color.secondary_color'))
        Image($r('app.media.ic_public_spinner'))
          .width(20)
          .fillColor($r('app.color.secondary_color'))
      }
      .padding(CommonConstants.SPACE_8)
      .onClick(() => this.controller.open())

      // 2.统计信息

    }
    .width(CommonConstants.THOUSANDTH_940)
    .backgroundColor($r('app.color.stats_title_bgc'))
    .borderRadius(CommonConstants.DEFAULT_18)
  }
}
还需要注意的一个点就是我们需要选择的是对话框中选中的日期,因此我们可以直接调用里面写好的DateUtil组件:
@Component
export default struct NutrientStats {
  carbon: number
  protein: number
  fat: number

  recommendCarbon: number = CommonConstants.RECOMMEND_CARBON
  recommendProtein: number = CommonConstants.RECOMMEND_PROTEIN
  recommendFat: number = CommonConstants.RECOMMEND_FAT

  build() {
    Row({space: CommonConstants.SPACE_6}){
      this.StatsBuilder({
        label: '碳水化合物',
        value: this.carbon,
        recommend: this.recommendCarbon,
        color: $r('app.color.carbon_color')
      })
      this.StatsBuilder({
        label: '蛋白质',
        value: this.protein,
        recommend: this.recommendProtein,
        color: $r('app.color.protein_color')
      })
      this.StatsBuilder({
        label: '脂肪',
        value: this.fat,
        recommend: this.recommendFat,
        color: $r('app.color.fat_color')
      })
    }
    .width('100%')
    .justifyContent(FlexAlign.SpaceEvenly)
    .padding({top: 30, bottom: 35})
  }

  @Builder StatsBuilder({label: string, value: number, recommend: number, color: ResourceStr}){
    Column({space: CommonConstants.SPACE_6}){
      Stack(){
        Progress({
          value: value,
          total: recommend,
          type: ProgressType.Ring
        })
          .width(95)
          .style({strokeWidth: CommonConstants.DEFAULT_6})
          .color(color)
        Column({space: CommonConstants.SPACE_6}){
          Text('摄入推荐')
            .fontSize(12)
            .fontColor($r('app.color.gray'))
          Text(`${value.toFixed(0)}/${$$.recommend.toFixed(0)}`)
            .fontSize(18)
            .fontWeight(CommonConstants.FONT_WEIGHT_600)
        }
      }
      Text(`${label}(克)`)
        .fontSize(12)
        .fontColor($r('app.color.light_gray'))
    }
  }
}
(3)、信息统计部分
①热量统计部分
@Component
export default struct CalorieStats {
  intake: number//摄入
  expend: number//消耗
  recommend: number = CommonConstants.RECOMMEND_CALORIE//推荐

  remainCalorie(){
    return this.recommend - this.intake + this.expend
  }

  build() {
    Row({space: CommonConstants.SPACE_6}){
      // 1.饮食摄入
      this.StatsBuilder({label: '饮食摄入', value: this.intake})
      // 2.还可以吃
      Stack(){
        // 2.1.进度条
        Progress({
          value: this.intake,
          total: this.recommend,
          type: ProgressType.Ring
        })
          .width(120)
          .style({strokeWidth: CommonConstants.DEFAULT_10})
          .color($r('app.color.primary_color'))
        // 2.2.统计数据
        this.StatsBuilder({label: '还可以吃', value: this.remainCalorie(),tips: `推荐${this.recommend}`})
      }
      // 3.运动消耗
      this.StatsBuilder({label: '运动消耗', value: this.expend})
    }
    .width('100%')
    .justifyContent(FlexAlign.SpaceEvenly)
    .padding({top: 30, bottom: 35})
  }

  @Builder StatsBuilder({label: string, value: number, tips?: string}){
    Column({space: CommonConstants.SPACE_6}){
      Text(label)
        .fontColor($r('app.color.gray'))
        .fontWeight(CommonConstants.FONT_WEIGHT_600)
      Text(value.toFixed(0))
        .fontSize(20)
        .fontWeight(CommonConstants.FONT_WEIGHT_700)
      if(tips){
        Text(tips)
          .fontSize(12)
          .fontColor($r('app.color.light_gray'))
      }
    }
  }
}
②营养素统计部分
@Component
export default struct NutrientStats {
  carbon: number
  protein: number
  fat: number

  recommendCarbon: number = CommonConstants.RECOMMEND_CARBON
  recommendProtein: number = CommonConstants.RECOMMEND_PROTEIN
  recommendFat: number = CommonConstants.RECOMMEND_FAT

  build() {
    Row({space: CommonConstants.SPACE_6}){
      this.StatsBuilder({
        label: '碳水化合物',
        value: this.carbon,
        recommend: this.recommendCarbon,
        color: $r('app.color.carbon_color')
      })
      this.StatsBuilder({
        label: '蛋白质',
        value: this.protein,
        recommend: this.recommendProtein,
        color: $r('app.color.protein_color')
      })
      this.StatsBuilder({
        label: '脂肪',
        value: this.fat,
        recommend: this.recommendFat,
        color: $r('app.color.fat_color')
      })
    }
    .width('100%')
    .justifyContent(FlexAlign.SpaceEvenly)
    .padding({top: 30, bottom: 35})
  }

  @Builder StatsBuilder({label: string, value: number, recommend: number, color: ResourceStr}){
    Column({space: CommonConstants.SPACE_6}){
      Stack(){
        Progress({
          value: value,
          total: recommend,
          type: ProgressType.Ring
        })
          .width(95)
          .style({strokeWidth: CommonConstants.DEFAULT_6})
          .color(color)
        Column({space: CommonConstants.SPACE_6}){
          Text('摄入推荐')
            .fontSize(12)
            .fontColor($r('app.color.gray'))
          Text(`${value.toFixed(0)}/${$$.recommend.toFixed(0)}`)
            .fontSize(18)
            .fontWeight(CommonConstants.FONT_WEIGHT_600)
        }
      }
      Text(`${label}(克)`)
        .fontSize(12)
        .fontColor($r('app.color.light_gray'))
    }
  }
}
在这里面添加了进度条Prograss并且添加了格式Ring也就是环形结构的进度条
到这里我们的代码部分就结束了,接下来就是要验证我们的结果了
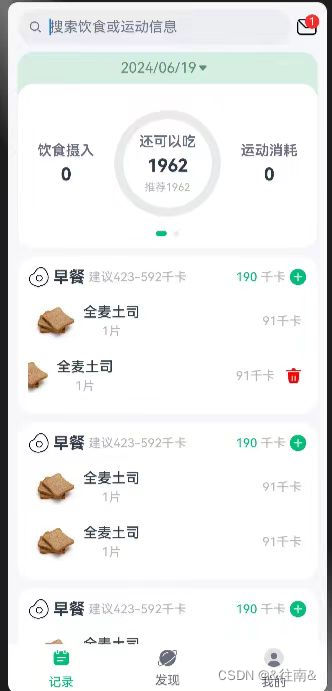
4、最终效果展示


到这里最难的第二部分我们就完成啦
(三)、记录列表
1、布局分析
这个部分的布局就比较简单了,就是一个list组件里面添加了文本,图片。

图片是在视频里面截出来的所以比较模糊,但是我们依旧能够辨认出是一个list布局
2、代码编写
我们依旧在recode下新建一个页面来封装这个部分
import router from '@ohos.router'
import { CommonConstants } from '../../common/constants/CommonConstants'
import RecordVO from '../../viewmodel/RecordVO'

@Extend(Text) function grayText(){
  .fontSize(14)
  .fontColor($r('app.color.light_gray'))
}

@Component
export default struct RecordList {

  build() {
    List({space: CommonConstants.SPACE_10}){
      ForEach([1,2,3,4,5], (item) => {
        ListItem(){
          Column({space: CommonConstants.SPACE_8}){
            // 1.分组的标题
            Row({space: CommonConstants.SPACE_4}){
              Image($r('app.media.ic_breakfast')).width(24)
              Text('早餐').fontSize(18).fontWeight(CommonConstants.FONT_WEIGHT_700)
              Text(`建议423-592千卡`).grayText()
              Blank()//空白
              Text('190').fontSize(14).fontColor($r('app.color.primary_color'))
              Text('千卡').grayText()
              Image($r('app.media.ic_public_add_norm_filled'))
                .width(20)
                .fillColor($r('app.color.primary_color'))
            }
            .width('100%')

            // 2.组内记录列表
            List(){
              ForEach([1,2], (item) => {
                ListItem(){
                  Row({space: CommonConstants.SPACE_6}){
                    Image($r('app.media.toast')).width(50)
                    Column({space: CommonConstants.SPACE_4}){
                      Text('全麦土司').fontWeight(CommonConstants.FONT_WEIGHT_500)
                      Text('1片').grayText()
                    }
                    Blank()
                    Text('91千卡').grayText()
                  }
                  .width('100%')
                  .padding(CommonConstants.SPACE_6)
                }.swipeAction({end: this.deleteButton.bind(this)})//滑动按钮
              })
            }
            .width('100%')
          }
          .width('100%')
          .backgroundColor(Color.White)
          .borderRadius(CommonConstants.DEFAULT_18)
          .padding(CommonConstants.SPACE_12)
        }
      })
    }
    .width(CommonConstants.THOUSANDTH_940)
    .height('100%')
    .margin({top: 10})
  }

  @Builder deleteButton(){
    Image($r('app.media.ic_public_delete_filled'))
      .width(20)
      .fillColor(Color.Red)
      .margin(5)
  }
}
到这里我们的代码也是完成了,接下来我们就来测试一下我们的最终效果
3、最终效果展示
那么到这里呢我们的整个饮食列表就完成了,这一部分我认为是其中最难的一个部分了。


 1004
1004

 被折叠的 条评论
为什么被折叠?
被折叠的 条评论
为什么被折叠?
 到【灌水乐园】发言


