


继上一篇长文章之后这又是一篇比较长的文章了,这个部分依旧是分了三大块:食物列表页,底部Panel和数字键盘,接下来就让我们一起看看吧
一、食物列表页
(一)、分析页面布局
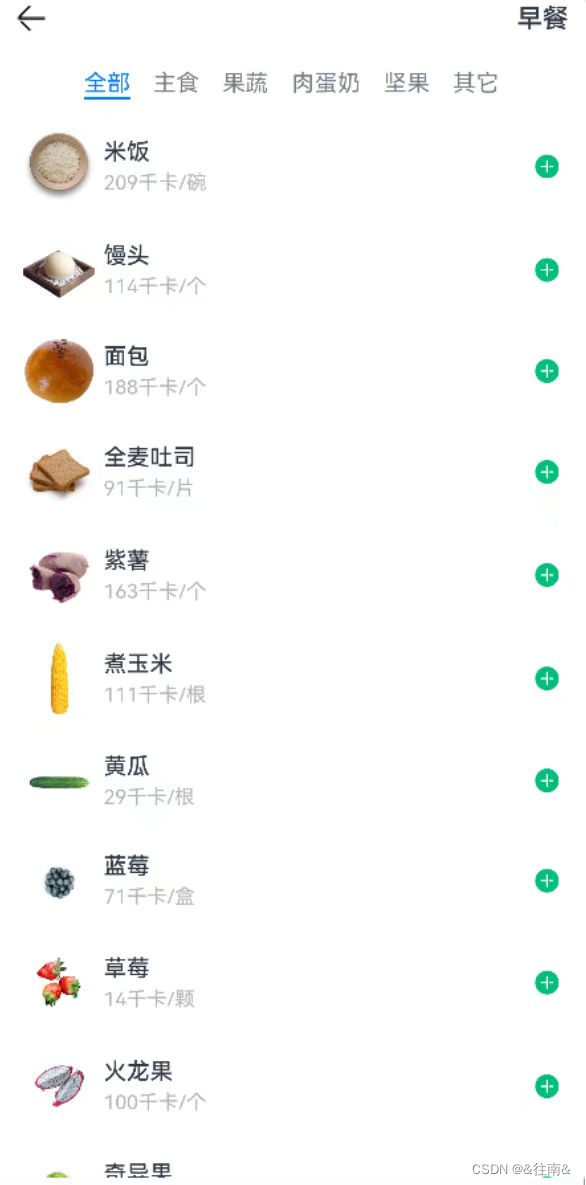
在这个图片中我们可以看出来最上面是一个导航条,下面就是一个Tabs组件我们前面都已经用过相关的组件
(二)、代码编写
由于这个是一个新的页面,所以我们在pages里面新建一个文件
1、记录条目首页
@Entry
@Component
struct ItemIndex {

  build() {
    Column() {
      // 1.头部导航
      this.Header()
      // 2.列表
      ItemList()

    }
    .width('100%')
    .height('100%')
  }


  @Builder Header() {
    Row() {
      Image($r('app.media.ic_public_back'))
        .width(24)
        .onClick(() => router.back())
      Blank()
      Text('早餐').fontSize(18).fontWeight(CommonConstants.FONT_WEIGHT_600)
    }
    .width(CommonConstants.THOUSANDTH_940)
    .height(32)
  }
}
2、食物列表
@Component
export default struct ItemList {

  build() {
    Tabs() {
      TabContent() {
        this.TabContentBuilder()
      }
      .tabBar('全部')

    }
    .width(CommonConstants.THOUSANDTH_940)
    .height('100%')
  }

  @Builder TabContentBuilder(){
    List({space:CommonConstants.SPACE_10}){
      ForEach([1,2,3,4,5,6,7,8], (item) => {
        ListItem(){
          Row({space: CommonConstants.SPACE_6}){
            Image($r('app.media.toast')).width(50)
            Column({space: CommonConstants.SPACE_4}){
              Text('全麦土司').fontWeight(CommonConstants.FONT_WEIGHT_500)
              Text('1片').fontSize(14).fontColor($r('app.color.light_gray'))
            }
            Blank()
            Image($r('app.media.ic_public_add_norm_filled'))
              .width(18)
              .fillColor($r('app.color.primary_color'))
          }
          .width('100%')
          .padding(CommonConstants.SPACE_6)
        }
      })
    }
    .width('100%')
    .height('100%')
  }
}
这一部分也是比较简单的,所以到这里我们的代码就编写完成了,让我们一起来看看效果吧
(三)、最终效果展示

可以看到这个页面还是比较简陋的不过没关系后面我们还会接着完善它
二、食物列表底部Panel
(一)、分析布局页面
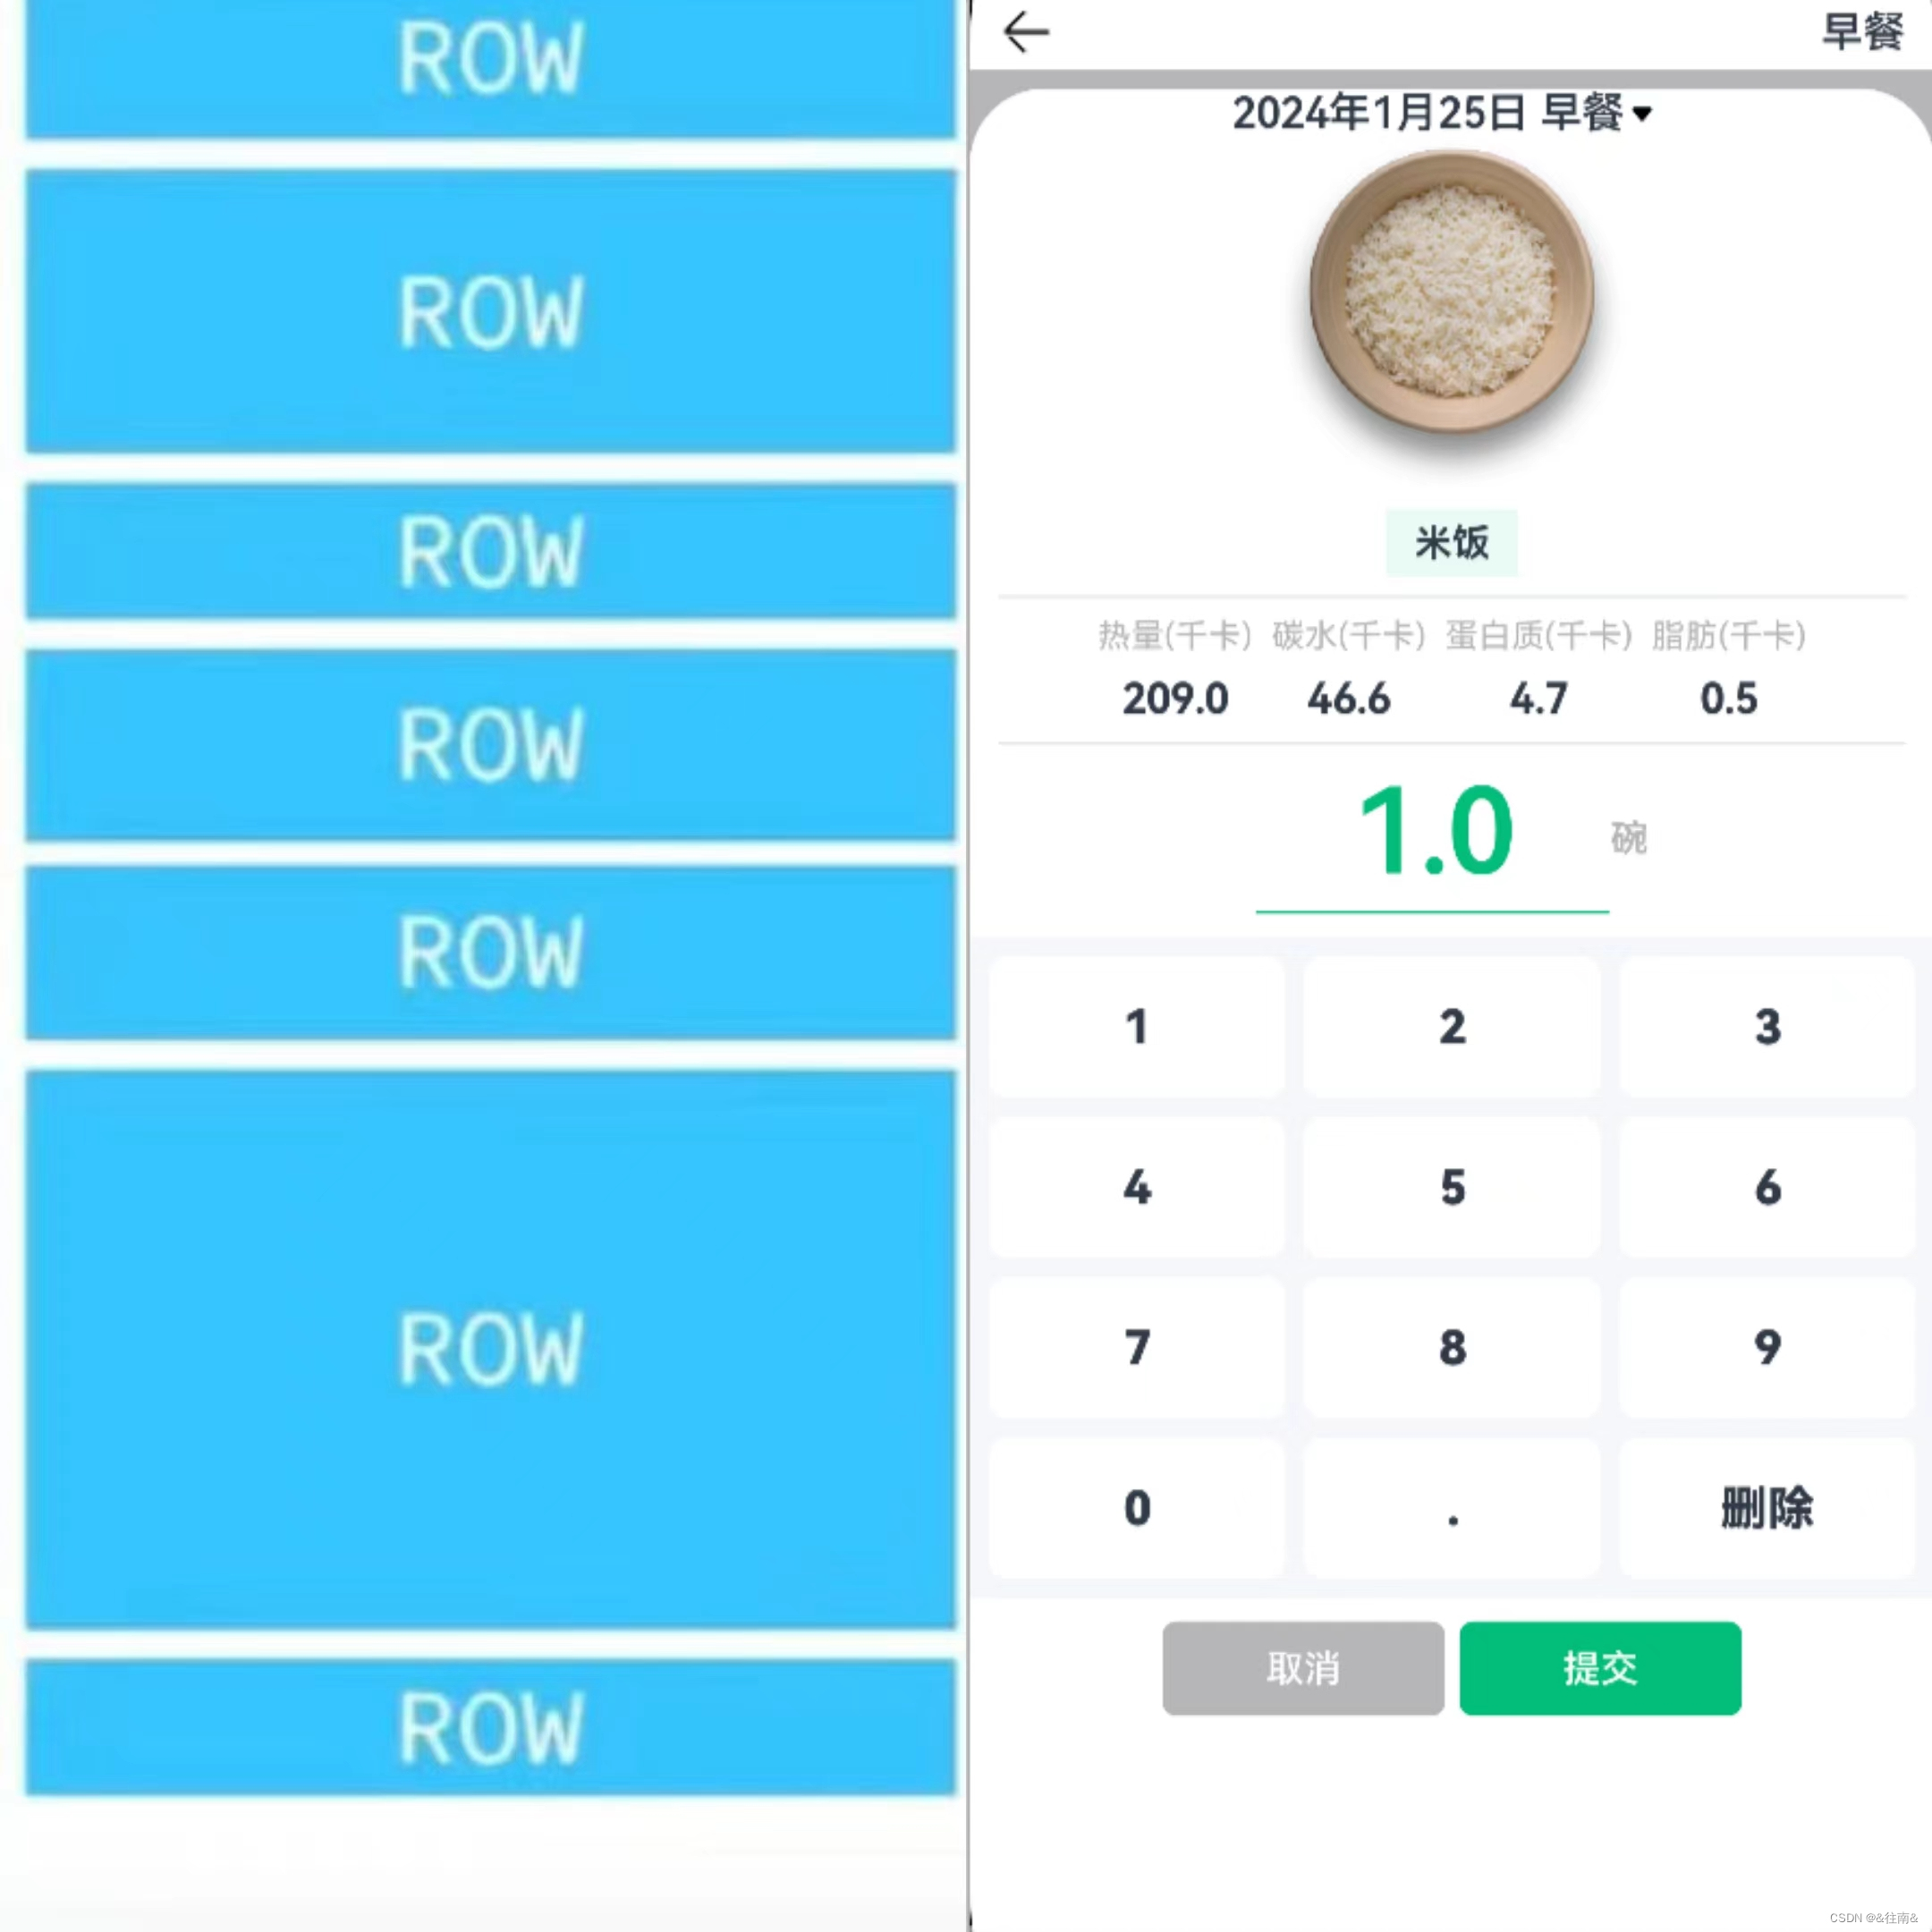
通过这个图我们可以轻易地看出这个页面的布局
(二)、关键技术
1、Panel面板
我们可以通过API来了解它,在Panel所在的容器里面的高度以及元素内的高度必须是固定的。
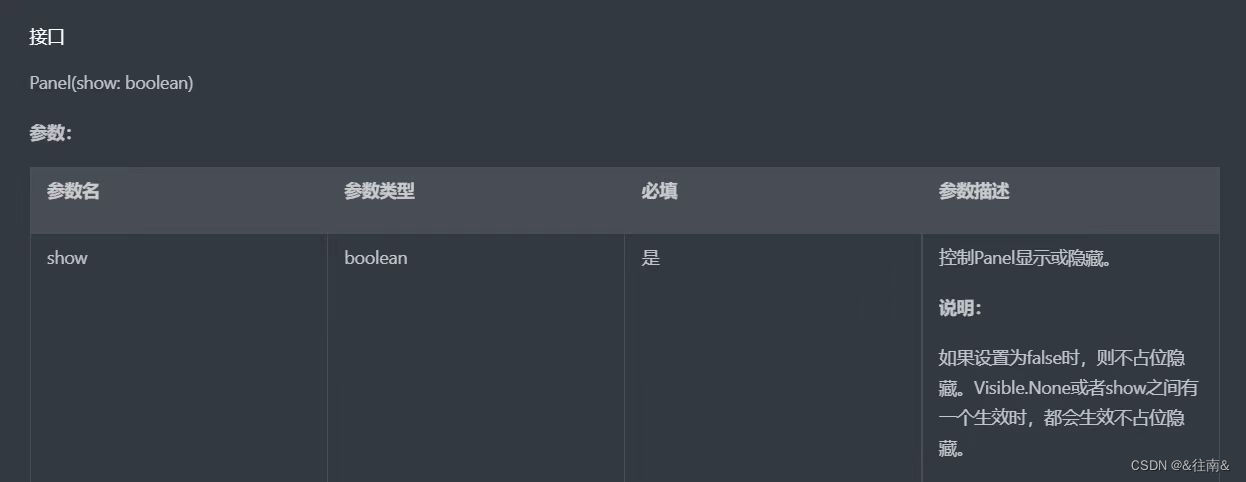

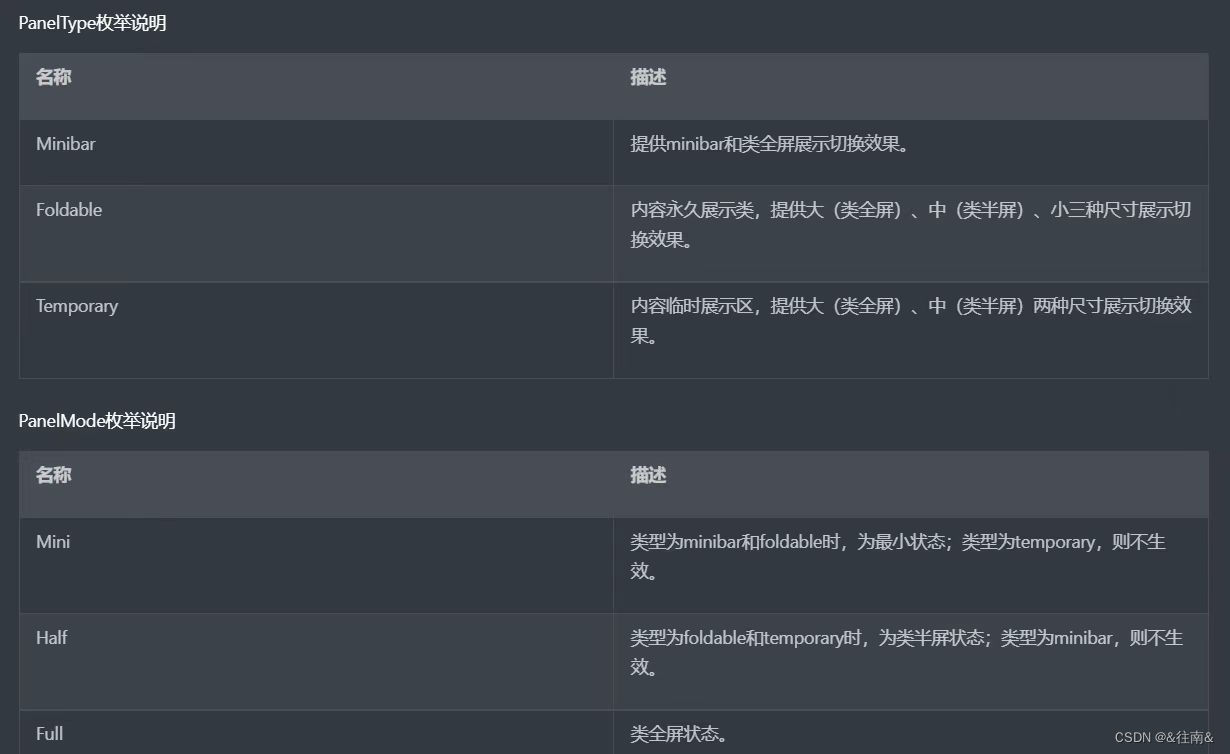
Panel组件就是一个可滑动面板,提供一种轻量的内容展示窗口,方便在不同的尺寸中切换
(三)、代码编写
1、声明Panel
首先我们需要在列表主页来声明他们
// 3.底部面板
      Panel(this.showPanel) {
        // 3.1.顶部日期
        ItemPanelHeader()
        // 3.2.记录项卡片
        if(this.item){
          ItemCard({amount: this.amount, item: $item})
        }
        // 3.3.数字键盘
        NumberKeyboard({amount: $amount, value: $value})
        // 3.4.按钮
        this.PanelButton()
      }
@State showPanel: boolean = false由于是我们在点击了加号之后再进行添加,所以我们需要给列表的每个项都加上点击事件,并且我们想要控制父组件中的元素弹出所以需要声明一个函数当父组件调用时来覆盖这个声明,我们在ItemList中完成这些操作
showPanel: () => void @Builder TabContentBuilder(){
List({space:CommonConstants.SPACE_10}){
ForEach([1,2,3,4,5,6,7,8], (item) => {
ListItem(){
Row({space: CommonConstants.SPACE_6}){
Image($r('app.media.toast')).width(50)
Column({space: CommonConstants.SPACE_4}){
Text('全麦土司').fontWeight(CommonConstants.FONT_WEIGHT_500)
Text('1片').fontSize(14).fontColor($r('app.color.light_gray'))
}
Blank()
Image($r('app.media.ic_public_add_norm_filled'))
.width(18)
.fillColor($r('app.color.primary_color'))
}
.width('100%')
.padding(CommonConstants.SPACE_6)
}
.onClick(() => this.showPanel())//点击事件
})
}
.width('100%')
.height('100%')接下来我们还需要声明一个函数,里面写面板展示时要做的事情:
onPageShow(){
this.showPanel = true
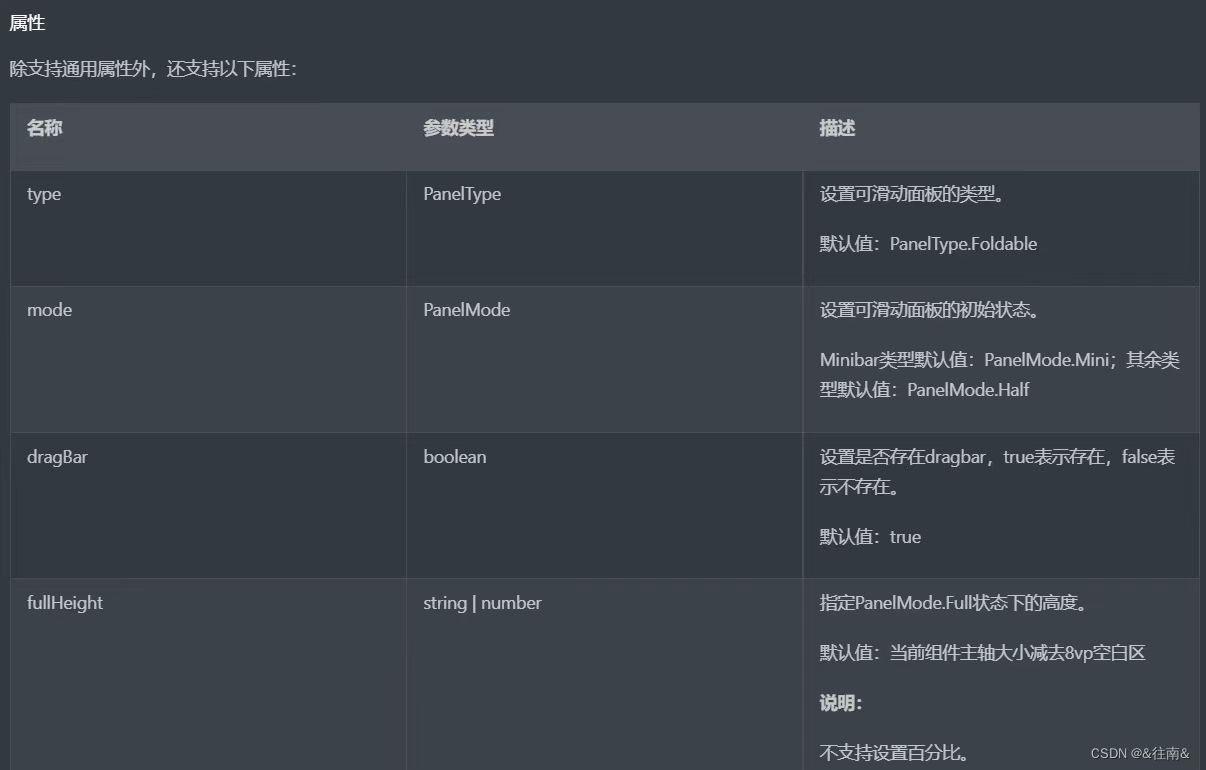
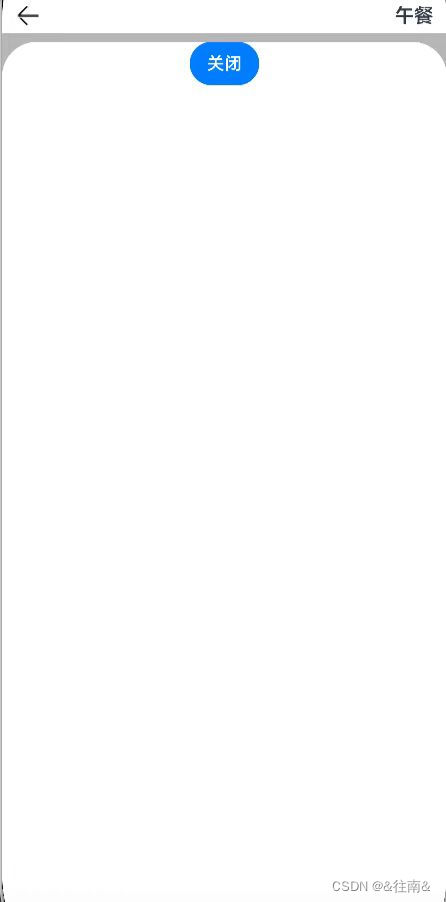
}2、面板样式
接下来哦我们就开始编写底部的面板啦:
      // 3.底部面板
      Panel(this.showPanel) {
        Button('关闭').onClick(()=>this.showPanel = false)
      }
      .mode(PanelMode.Full)//全部显示
      .dragBar(false)//不可调整高度
      .backgroundMask($r('app.color.light_gray'))//蒙版颜色浅灰
      .backgroundColor(Color.White)//背景颜色
这样我们就已经能够看到一个简单的样式了
3、面板内容
这个也就是我们前面所说的布局里面的内容
(1)、日期文本加弹窗
我们依旧新建一个est文件来调用
@Component
export default struct ItemPanelHeader {
build() {
Row(){
Text('2024年1月25日 早餐')
.fontSize(18).fontWeight(CommonConstants.FONT_WEIGHT_600)
Image($r('app.media.ic_public_spinner'))
.width(20)
.fillColor(Color.Black)
}
}
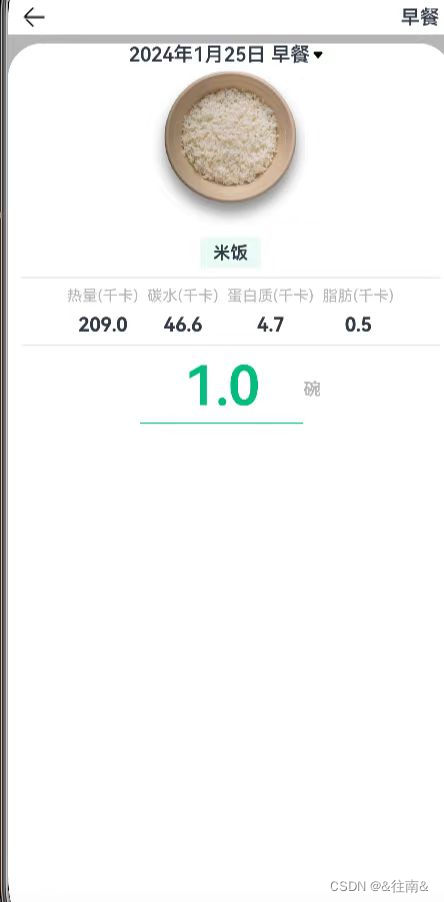
}(2)、食物信息
跟前面一样我们也需要新建一个文件
@Component
export default struct ItemCard {

  @Prop amount: number

  build() {
    Column({space: CommonConstants.SPACE_8}){
      // 1.图片
      Image($r('app.media.toast')).width(150)
      // 2.名称
      Row(){
        Text('全麦吐司').fontWeight(CommonConstants.FONT_WEIGHT_700)
      }
      .backgroundColor($r('app.color.lightest_primary_color'))
      .padding({top: 5, bottom: 5, left: 12, right: 12})
      Divider().width(CommonConstants.THOUSANDTH_940).opacity(0.6)//下划线
      // 3.营养素
      Row({space: CommonConstants.SPACE_8}){
        this.NutrientInfo('热量',91.0)
        this.NutrientInfo('热量',91.0)
        this.NutrientInfo('热量',91.0)
        this.NutrientInfo('热量',91.0)
      }
      Divider().width(CommonConstants.THOUSANDTH_940).opacity(0.6)
      // 4.数量
      Row(){
        Column({space: CommonConstants.SPACE_4}){
          Text(this.amount.toFixed(1))
            .fontSize(50).fontColor($r('app.color.primary_color'))
            .fontWeight(CommonConstants.FONT_WEIGHT_600)
          Divider().color($r('app.color.primary_color'))
        }
        .width(150)
        Text('片')
          .fontColor($r('app.color.light_gray'))
          .fontWeight(CommonConstants.FONT_WEIGHT_600)
      }
    }
  }

  @Builder NutrientInfo(label: string, value: number){
    Column({space: CommonConstants.SPACE_8}){
      Text(label).fontSize(14).fontColor($r('app.color.light_gray'))
      Text(value.toFixed(1)).fontSize(18).fontWeight(CommonConstants.FONT_WEIGHT_700)
    }
  }
}
到这里我们的代码编写算是基本完成了,我们来看看效果吧
(四)、最终效果展示
三、食物列表数字键盘
(一)、分析页面布局

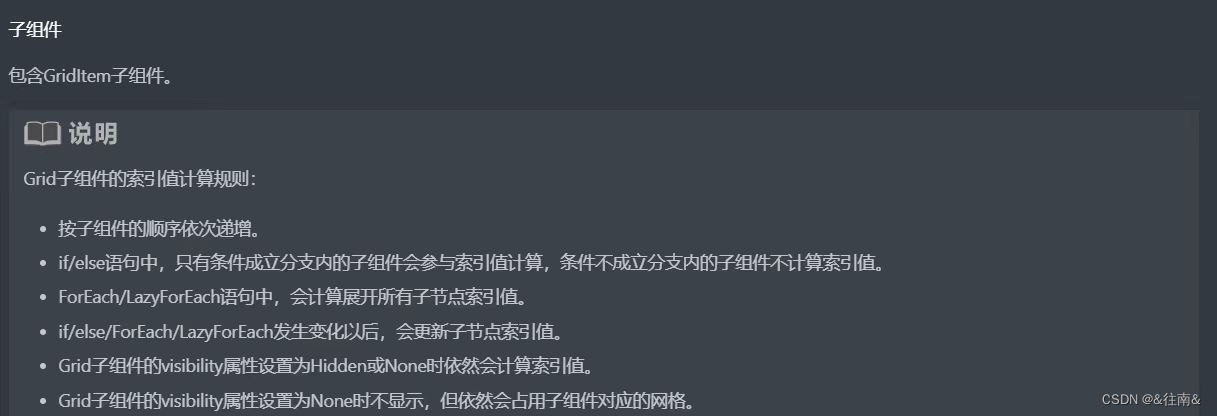
(二)、关键技术
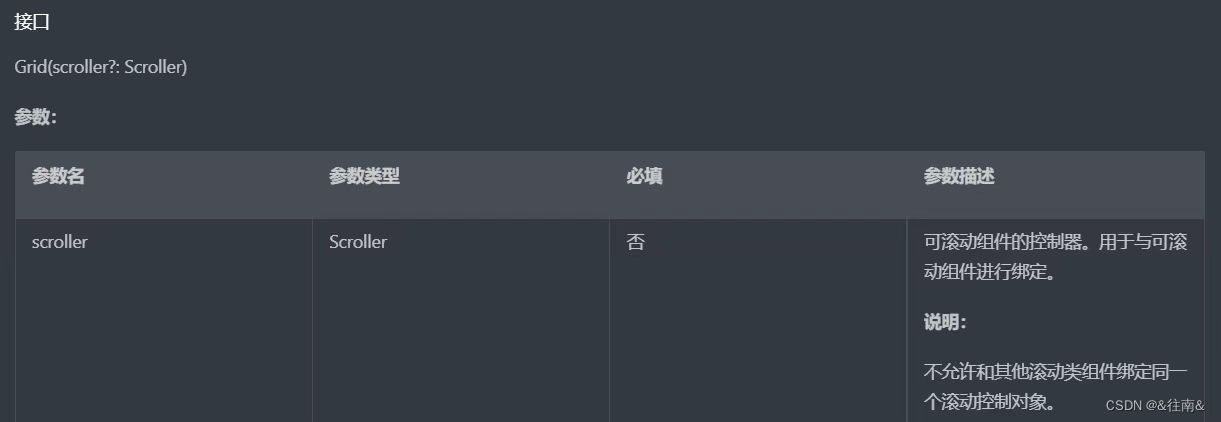
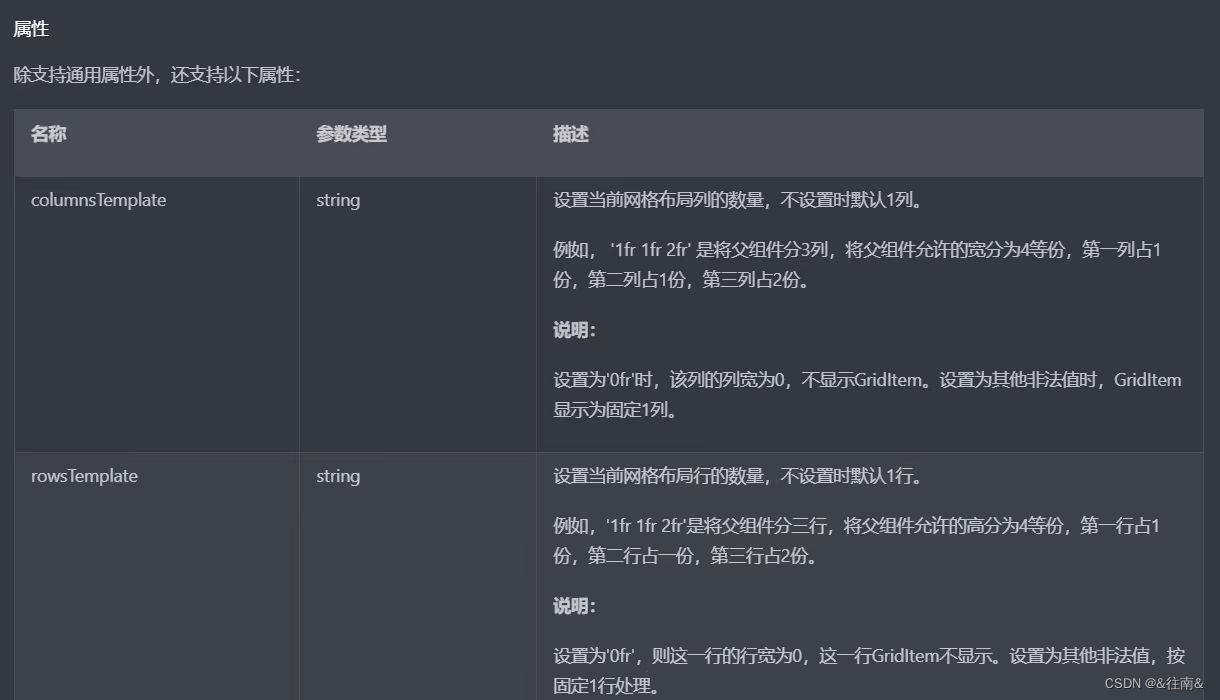
Grid
接下来让我们通过API去了解它:
(三)、代码编写
1、数字键盘
我们先在首页里面传参数
NumberKeyboard({amount: $amount, value: $value})跟前面一样我们依旧创建一个新的文件:
@Component
export default struct NumberKeyboard {

  numbers: string[] = ['1', '2', '3', '4', '5', '6', '7', '8', '9', '0', '.']
  @Link amount: number
  @Link value: string


  @Styles keyBoxStyle(){//点击样式
    .backgroundColor(Color.White)
    .borderRadius(8)
    .height(60)
  }
  build() {
    Grid(){
      ForEach(this.numbers, num => {
        GridItem(){
          Text(num).fontSize(20).fontWeight(CommonConstants.FONT_WEIGHT_900)
        }
        .keyBoxStyle()
        .onClick(() => this.clickNumber(num))
      })
      GridItem(){
        Text('删除').fontSize(20).fontWeight(CommonConstants.FONT_WEIGHT_900)
      }
      .keyBoxStyle()
      .onClick(() => this.clickDelete())
    }
    .width('100%')
    .height(280)
    .backgroundColor($r('app.color.index_page_background'))
    .columnsTemplate('1fr 1fr 1fr')//三列
    .columnsGap(8)
    .rowsGap(8)
    .padding(8)
    .margin({top: 10})
  }

  clickNumber(num: string){
    // 1.拼接用户输入的内容
    let val = this.value + num
    // 2.校验输入格式是否正确
    let firstIndex = val.indexOf('.')
    let lastIndex = val.lastIndexOf('.')//从后往前数小数点位置
    if(firstIndex !== lastIndex || (lastIndex != -1 && lastIndex < val.length - 2)){
      // 非法输入
      return
    }
    // 3.将字符串转为数值
    let amount = this.parseFloat(val)
    // 4.保存
    if(amount >= 999.9){//设置上限防止撑死
      this.amount = 999.0
      this.value = '999'
    }else{
      this.amount = amount
      this.value = val
    }
  }

  clickDelete(){//删除
    if(this.value.length <= 0){//从后往前删
      this.value = ''
      this.amount = 0
      return
    }
    this.value = this.value.substring(0, this.value.length - 1)
    this.amount = this.parseFloat(this.value)
  }

  parseFloat(str: string){
    if(!str){
      return 0
    }
    if(str.endsWith('.')){//检验是否以点结尾,如果是就去掉
      str = str.substring(0, str.length - 1)
    }
    return parseFloat(str)
  }
}
我们在改变了数量之后,食物的信息也会随之改变,所以我们需要在列表卡片中乘上数量
Text((value*this.amount).toFixed(1)).fontSize(18).fontWeight(CommonConstants.FONT_WEIGHT_700)2、按钮
这个界面也包含了两个按钮,我们还需要设置一个点击事件,用于关闭页面
  @Builder PanelButton(){
    Row({space: CommonConstants.SPACE_6}){
      Button('取消')
        .panelButtonStyle()
        .backgroundColor($r('app.color.light_gray'))
        .onClick(() => this.showPanel = false)
      Button('提交')
        .panelButtonStyle()
        .backgroundColor($r('app.color.primary_color'))
        .onClick(() => this.showPanel = false)
    }
    .margin({top: 10})
  }
好啦,到这里我们的代码就完成啦,我们来看看效果吧
(四)、最终效果展示

好啦,到这里我们的食物列表也完成了往后就没有这么长的文章啦耶耶耶


 被折叠的 条评论
为什么被折叠?
被折叠的 条评论
为什么被折叠?
 到【灌水乐园】发言


