


1.动态组件
1.定义动态组件
利用动态组件可以动态切换页面中显示的组件。使用<component>标签可以定义动态组件,语法格式如下。
<component is="要渲染的组件"></component>
上述语法格式中,<component>标签必须配合is属性一起使用,is属性的属性值表示要渲染的组件,当该属性值发生变化时,页面中渲染的组件也会发生变化。
is属性的属性值可以是字符串或组件,当属性值为组件时,如果要实现组件的切换,需要调用shallowRef()函数定义响应式数据,将组件保存为响应式数据。shallowRef()函数只处理对象最外层属性的响应,它比ref()函数更适合于将组件保存为响应式数据。
演示动态组件的使用方法:
打开命令提示符,切换到D:\vue\chapter04目录,在该目录下执行如下命令,创建项目。
步骤一:
 步骤二:项目创建完成后,执行如下命令进入项目目录,启动项目。

步骤三:


步骤四: 步骤五:
步骤五:

步骤六:

步骤七:

<template>
  <button @click="showComponent = MyLeft">展示MyLeft组件</button>
  <button @click="showComponent = MyRight">展示MyRight组件</button>
  <div><component :is="showComponent"></component></div>
</template>
<script setup >
import MyLeft from './MyLeft.vue'
import MyRight from './MyRight.vue'
import { shallowRef } from 'vue'
const showComponent  = shallowRef(MyLeft)
</script>
步骤八:


2 .利用KeepAlive组件实现组件缓存


演示KeepAlive组件的使用
步骤一:

<template>
MyLeft组件
<div>
count值为: {{ count }}
<button @click="count++">+1</button>
</div>
</template>
<script setup>
import { ref, onMounted, onUnmounted } from 'vue'
const count = ref(0)
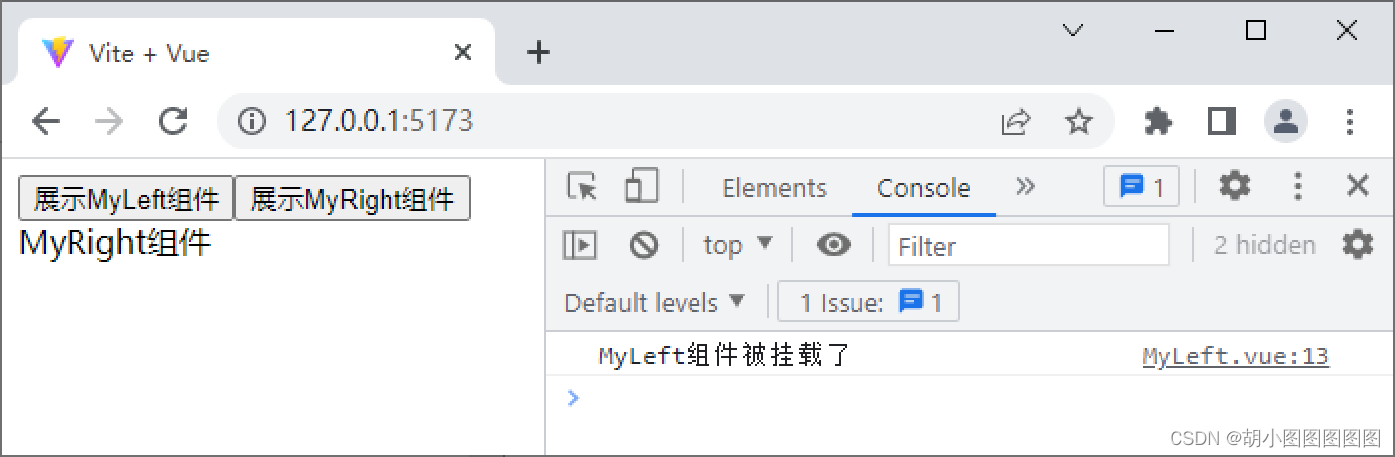
onMounted(() => {
console.log('MyLeft组件被挂载了')
})
onUnmounted(() => {
console.log('MyLeft组件被销毁了')
})
</script>


步骤二:
<div>
  <KeepAlive>
    <component :is="showComponent"></component>
  </KeepAlive>
</div>


3 .组件缓存相关的生命周期函数


 演示组件缓存相关的生命周期函数的使用
步骤一:
<script setup>
import { ref, onMounted, onUnmounted, onActivated, onDeactivated } from 'vue'
onActivated(() => {
  console.log('MyLeft组件被激活了')
})
onDeactivated(() => {
  console.log('MyLeft组件被缓存了')
})
</script>
步骤二:

<script setup>
import { onActivated, onDeactivated } from 'vue'
onActivated(() => {
  console.log('MyRight组件被激活了')
})
onDeactivated(() => {
  console.log('MyRight组件被缓存了')
})
</script>


4 . KeepAlive组件的常用属性


注意:


2.插槽
1 . 什么是插槽


1. 定义插槽


2. 使用插槽


演示插槽的使用方法
步骤一:


步骤二:

<template>
  父组件-----{{ message }}
  <hr>
  <SlotSubComponent>
    <p>{{ message }}</p>
  </SlotSubComponent>
</template>
<script setup>
import SlotSubComponent from './SlotSubComponent.vue'
const message = '这是组件的使用者自定义的内容'
</script>
步骤三:


演示插槽的默认内容:
步骤一:


步骤二:


2. 具名插槽


演示具名插槽的使用
步骤一:

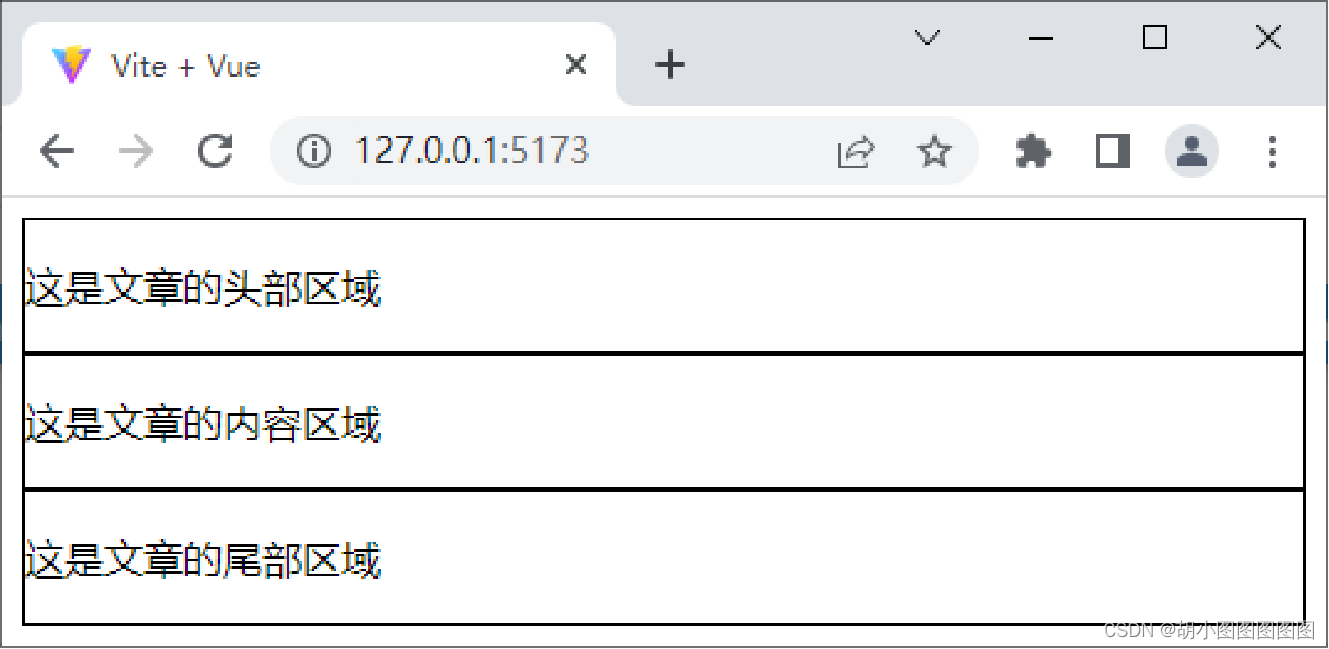
<template>
  <div class="article-container">
    <div class="header-box"><slot name="header"></slot></div>
    <div class="content-box"><slot name="content"></slot></div>
    <div class="footer-box"><slot name="footer"></slot></div>
  </div>
</template>
<style>
.article-container > div { border: 1px solid black; }
</style>
步骤二:

<template>
  <ArticleInfo>
    <template v-slot:header><p>这是文章的头部区域</p></template>
    <template v-slot:content><p>这是文章的内容区域</p></template>
    <template #footer><p>这是文章的尾部区域</p></template>
  </ArticleInfo>
</template>
<script setup>import ArticleInfo from './ArticleInfo.vue' </script>
步骤三:


3.作用域插槽


1. 定义数据


2. 接收数据


演示作用域插槽的使用
步骤一:

<template>
  <slot message="Hello 默认插槽"></slot>
  <hr>
  <slot message="Hello Vue.js" name="header"></slot>
  <hr>
  <slot :user="user" name="content"></slot>
</template>
<script setup>
import { reactive } from 'vue'
const user = reactive({ name: 'xiaoyuan', age: '15' })
</script>
步骤二:

<template>
  <SubScopeSlot>
    <template v-slot:default="scope"><p>{{ scope }}</p></template>
    <template v-slot:header="scope">
      <p>{{ scope }}</p><p>{{ scope.message }}</p>
    </template>
    <template #content="{ user }">
      <p>{{ user.name }}</p><p>{{ user.age }}</p></template>
  </SubScopeSlot>
</template>
<script setup>import SubScopeSlot from './SubScopeSlot.vue'</script>
步骤三:


3.自定义指令
1.什么是自定义指令


2.私有自定义指令的声明与使用


演示私有自定义指令的使用方法
步骤一:

<template>
  <p v-fontSize>DirectiveComponent组件</p>
</template>
<script setup>
const vFontSize = {}
</script>
步骤二:


步骤三:

const vFontSize = {
  mounted: el => {
    el.style.fontSize = '24px'
  }
}


3.全局自定义指令的声明与使用


import { createApp } from 'vue'
import './style.css'
import App from './components/DirectiveComponent.vue'
const app = createApp(App)
app.directive('fontSize', {
  mounted: el => {
    el.style.fontSize = '24px'
  }
})
app.mount('#app')
4.为自定义指令绑定参数


演示自定义指令参数的使用方法
步骤一:

<template>
  <p v-fontSize="fontSize">DirectiveComponent组件</p>
  <button @click=“fontSize = ‘24px’”>更改字号大小</button>
</template>
<script setup>
import { ref } from 'vue'
const fontSize = ref('12px')
const vFontSize = {
  mounted: (el, binding) => { el.style.fontSize = binding.value },
}
</script>
步骤二:


步骤三:

const vFontSize = {
  // 原有代码……
  updated: (el, binding) => {
    el.style.fontSize = binding.value
  }
}


5.自定义指令的函数形式


4.引用静态资源

1. 引用public目录中的静态资源


演示引用public目录中静态资源的方法
步骤一:


步骤二:


2. 引用src\assets目录中的静态资源

演示引用src\assets中静态资源的方法
步骤一:

<template>
  <img :src="icon">
</template>
<script setup>
import icon from '../assets/vue.svg'
</script>
步骤二:


 被折叠的 条评论
为什么被折叠?
被折叠的 条评论
为什么被折叠?
 到【灌水乐园】发言


