


第一章 例行性工作
1.单一执行的例行性工作:仅处理执行一次就行了
1.1at命令的工作过程:
/etc/at.allow---允许写在该文件里的人使用at命令(如果仅没有该文件,则都可以使用)
/etc/at.deny---(黑名单)不允许写在该文件里的人使用at命令
注意:两个文件都不存在,只有root能使用
#at 工作调度对应的系统服务[root@localhost ~] # systemctl status atd#at 的工作文件存放目录[root@localhost ~] # ll /var/spool/at#at 工作的日志文件[root@localhost ~] # ll /var/log/cron
1.2at命令详解
命令格式:at 【参数】 【时间】
例如:(一分钟后创建file.txt文件)
at now + 1 minutes
>touch file.txt
>(ctrl + d-结束)
参数:-m 当任务完成之后,即使没有标准输出,将给用户发送邮件-l atq 的别名,可列出目前系统上面的所有该用户的 at 调度-d atrm 的别名 , 可以取消一个在 at 调度中的工作(或者删除该at的工作文件,一样可以取消at调度中的工作)-v 使用较明显的时间格式,列出 at 调度中的任务列表-c 可以列出后面接的该项工作的实际命令内容-f 从文件中读取作作业时间格式:HH:MM 在今天的 HH 小时 MM 分钟执行,如果今天的这个时间点已经过了,则明天执行HH:MM YYYY-MM-DD 强制规定在某年某月的某一天的特殊时刻进行该工作now + 2 minutes 从现在开始几分钟 minutes, hours, days, or weeks
2.循环执行的例行性工作:每隔一定的周期就需要执行一次
2.1crontab的工作过程
/etc/cron.allow---允许写在该文件的人使用crontab命令
/etc/cron.deny---(黑名单)不允许写在该文件的人使用crontab命令
注意:两个文件如果都不存在,只有root能使用
#crontab 工作调度对应的系统服务[root@localhost ~] # systemctl status crond#crontab 工作的日志文件[root@localhost ~] # ll /var/log/cron# 用户定义计划任务的文件所在目录[root@localhost ~] # ll /var/spool/cron/
2.2crontab命令详解
[root@localhost ~] # crontab --helpcrontab: invalid option -- '-'crontab: usage error: unrecognized optionUsage:crontab [options] filecrontab [options]crontab -n [hostname]Options:-u <user> define user(定义用户)-e edit user 's crontab (编辑用户的crontab)-l list user 's crontab (列出用户的crontab)-r delete user 's crontab (删除用户的crontab)-i prompt before deleting (删除前提示)-n <host> set host in cluster to run users ' crontabs (设置集群中的主机运行用户的crontab)-c get host in cluster to run users ' crontabs (让集群中的主机运行用户的crontab)-s selinux context-V print version and exit (打印版本并退出)-x <mask> enable debugging (启用测试)
- crontab计划任务的时间格式:* * * * *
| 分 | 时 | 日 | 月 | 周 |
| 0-59 | 0-23 | 1-31 | 1-12 | 0-7 |
注意:日、月 同 周是或的关系
例如:
* * * * 3---周三执行
* * 15 10 3---十月十五的每分钟执行一次,or每周三的每分钟执行一次
- crontab计划任务的时间格式中的特殊符号:
| 特殊字符 | 含义 |
| * | 代表任何时刻 |
| , | 分隔时段,例如零四分,零六分进行,4,6 |
| - | 代表一段时间范围,例如四到十分进行,4-10 |
| /数字 | 指定时间的间隔频率,例如每三分钟进行一次,*/3 |
注:%在crontab里面有特殊含义,如果有命令里面需要使用%,需要使用\转义。
# 每天早上 9 点整说 good morning[root@server ~] # crontab -e0 9 * * * wall "good morning"注:wall 命令用于向系统当前所有打开的终端上输出信息。通过 wall 命令可将信息发送给每位同意接收公众信息的终端机用户,若不给予其信息内容,则 wall命令会从标准输入设备读取数据,然后再把所得到的数据传送给所有终端机用户。
2.3系统的计划任务
[root@localhost ~] # cat /etc/crontabSHELL = /bin/bashPATH = /sbin:/bin:/usr/sbin:/usr/binMAILTO = root# For details see man 4 crontabs# Example of job definition:# .---------------- minute (0 - 59)# | .------------- hour (0 - 23)# | | .---------- day of month (1 - 31)# | | | .------- month (1 - 12) OR jan,feb,mar,apr ...# | | | | .---- day of week (0 - 6) (Sunday=0 or 7) ORsun,mon,tue,wed,thu,fri,sat# | | | | |# * * * * * user-name command to be executed
第二章 时间服务器
- NTP 是网络时间协议(Network Time Protocol)的简称,通过 udp 123 端口进行网络时钟同步。
- Chrony是一个开源自由的网络时间协议 NTP 的客户端和服务器软件。它能让计算机保持系统时钟与时钟服务器(NTP)同步,因此让你的计算机保持精确的时间,Chrony也可以作为服务端软件为其他计算机提供时间同步服务。
- Chrony由两个程序组成,分别是chronyd和chronyc。
- chronyd是一个后台运行的守护进程,用于调整内核中运行的系统时钟和时钟服务器同步。它确定计算机增减时间的比率,并对此进行补偿。
- chronyc提供了一个用户界面,用于监控性能并进行多样化的配置。它可以在chronyd实例控制的计算机上工作,也可以在一台不同的远程计算机上工作。
# 设置当前时区[root@localhost ~] # timedatectl set-timezone Asia/Shanghai
1.软件安装
[root@localhost ~] # yum install -y chrony[root@localhost ~] # systemctl enable --now chronyd[root@server1 ~] # cat /etc/chrony.conf# 设置时间服务器的服务端名字pool ntp.aliyun.com iburst-----阿里的时间服务器
pool 2.centos.pool.ntp.org iburst
pool ntp.tencent.com iburst-----腾讯的时间服务器注:有些版本是server ntp.aliyun.com iburst# Allow NTP client access from local network.# 设置允许哪个客户端可以访问该服务器#allow 192.168.0.0/16
2.配置时间服务器服务端
[root@csa ~] # vim /etc/chrony.conf# Use public servers from the pool.ntp.org project.
# Please consider joining the pool (https://www.pool.ntp.org/join.html).
pool ntp.aliyun.com iburst
pool 2.centos.pool.ntp.org iburst
pool ntp.tencent.com iburst
# Allow NTP client access from local network.
allow 192.168.246.0/24----允许该网段的客户端访问服务端[root@csa ~]# systemctl restart chronyd ---重启chronyd服务
[root@csa ~]# chronyc sources
MS Name/IP address Stratum Poll Reach LastRx Last sample
===============================================================================
^* 203.107.6.88 2 9 377 465 +220us[ +429us] +/- 31ms
^? time.neu.edu.cn 0 9 0 - +0ns[ +0ns] +/- 0ns
^- ntp.ams1.nl.leaseweb.net 2 8 145 21m +51ms[ +52ms] +/- 204ms
^- a.chl.la 2 8 375 274 +10ms[ +10ms] +/- 102ms
^- ntp.wdc2.us.leaseweb.net 2 8 375 71 +65ms[ +65ms] +/- 332ms
^+ 106.55.184.199 2 9 333 76 +3143us[+3143us] +/- 41ms[root@csa ~]# systmctl disable --now firewalld ---关闭防火墙[root@csa ~]# ss -lntup | grep 123
udp UNCONN 0 0 0.0.0.0:123 0.0.0.0:* users:(("chronyd",pid=910,fd=7))
3.配置时间服务器客户端
# Use public servers from the pool.ntp.org project.
# Please consider joining the pool (https://www.pool.ntp.org/join.html).
# pool pool.ntp.org iburst
pool 192.168.246.128 iburst[root@localhost ~]# systemctl restart chronyd
[root@localhost ~]# chronyc sources
MS Name/IP address Stratum Poll Reach LastRx Last sample
===============================================================================
^* 192.168.246.128 3 6 377 44 +57us[ +131us] +/- 31ms
- 每周周一8点向时间服务器同步当前主机的时间
[root@csa ~] # grep chronyc /etc/crontab0 8 */7 * 1 root chronyc sources &> /dev/null
第三章 远程连接服务器
1、远程连接服务器简介
(1)远程连接服务器的功能
分享主机的运算能力
(2)远程连接服务器的类型(以登录的连接界面来分类)
- 文字接口
- 图形接口:XDMCP、VNC、XRDP等
2、连接加密技术简介
非对称加密算法在进行运算时需要使用不可逆的算法:
取模运算
加密和解密使用的是同一把密钥----使用的是一种双向函数,可逆的算法----异或算法(不进位加法)----相同为0,不同为1
带内传输---不安全
带外传输---不方便

发送方:Alice
1.Alice将原始数据通过Hash算法,得到信息摘要
2.用Alice的私钥签名,得到数字签名
3.将原始信息、数字签名、Alice的CA证书通过Alice和Bob之间的对称密钥进行加密,得到加密信息
4.用Bob的公钥加密对称密钥,得到密钥信封
5.将加密信息和密钥信封通过公网传输
接收方:Bob
1.将密钥信封用Bob的私钥进行解密得到对称密钥
2.用对称密钥将加密信息进行解密得到Alice的CA证书,数字签名、原始信息
3.用CA的公钥对Alice的CA证书进行解密,得到Alice的公钥---证明就是Alice的公钥;
将原始数据通过hash算法,得到信息摘要;
用Alice的公钥对数字签名进行解密,得到信息摘要2;
4.将两个信息摘要进行对比,相同则信息正确;不同则信息有误。
SSH工作过程:在整个通讯过程中,为实现SSH的安全连接,服务端与客户端要经历如下五个阶段:
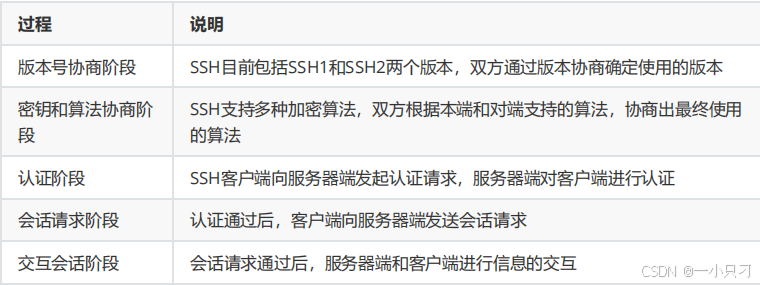
(1)版本协商阶段
1 、服务器端打开端口 22 ,等待客户端连接;2 、客户端向服务器端发起 TCP 初始连接请求, TCP 连接建立后,服务器向客户端发送第一个报文,包括版本标志字符串,格式为 “SSH-< 主协议版本号 >.< 次协议版本号 >.< 软件版本号 >” ,协议版本号由主版本号和次版本号组成,软件版本号主要是为调试使用。3 、客户端收到报文后,解析该数据包,如果服务器的协议版本号比自己的低,且客户端能支持服务器端的低版本,就使用服务器端的低版本协议号,否则使用自己的协议版本号。4 、客户端回应服务器一个报文,包含了客户端决定使用的协议版本号。服务器比较客户端发来的版本号,决定是否能同客户端一起工作。如果协商成功,则进入密钥和算法协商阶段,否则服务器断开TCP 连接。说明:上述报文都是采用明文方式传输。
(2)密钥和算法协商阶段
1 、服务器端和客户端分别发送算法协商报文给对端,报文中包含自己支持的公钥算法列表、加密算法列表、MAC ( Message Authentication Code ,消息验证码)算法列表、压缩算法列表等等。2 、服务器端和客户端根据对端和本端支持的算法列表得出最终使用的算法。3 、服务器端和客户端利用 DH 交换( Diffie-Hellman Exchange )算法、主机密钥对等参数,生成会话密钥和会话ID 。由此,服务器端和客户端就取得了相同的会话密钥和会话 ID 。对于后续传输的数据,两端都会使用会话密钥进行加密和解密,保证了数据传送的安全。在认证阶段,两端会使用会话用于认证过程。
会话密钥的生成:
1. 客户端需要使用适当的客户端程序来请求连接服务器,服务器将服务器的公钥发送给客户端。(服务器的公钥产生过程:服务器每次启动 sshd 服务时,该服务会主动去找/etc/ssh/ssh_host* 文件,若系统刚装完,由于没有这些公钥文件,因此 sshd 会主动去计算出这些需要的公钥文件,同时也会计算出服务器自己所需要的私钥文件。)2. 服务器生成会话 ID ,并将会话 ID 发给客户端。3. 若客户端第一次连接到此服务器,则会将服务器的公钥数据记录到客户端的用户主目录内的~/.ssh/known_hosts。若是已经记录过该服务器的公钥数据,则客户端会去比对此次接收到的与之前的记录是否有差异。客户端生成会话密钥,并用服务器的公钥加密后,发送给服务器。4. 服务器用自己的私钥将收到的数据解密,获得会话密钥。5. 服务器和客户端都知道了会话密钥,以后的传输都将被会话密钥加密。
(3)认证阶段
SSH 提供两种认证方法:1、基于口令的认证( password 认证):客户端向服务器发出 password 认证请求,将用户名和密码加密后发送给服务器,服务器将该信息解密后得到用户名和密码的明文,与设备上保存的用户名和密码进行比较,并返回认证成功或失败消息。2、基于密钥的认证( publickey 认证):客户端产生一对公共密钥,将公钥保存到将要登录的服务器上的那个账号的家目录的.ssh/authorized_keys 文件中。认证阶段:客户端首先将公钥传给服务器端。服务器端收到公钥后会与本地该账号家目录下的authorized_keys 中的公钥进行对比,如果不相同,则认证失败;否则服务端生成一段随机字符串,并先后用客户端公钥和会话密钥对其加密,发送给客户端。客户端收到后将解密后的随机字符串用会话密钥发送给服务器。如果发回的字符串与服务器端之前生成的一样,则认证通过,否则,认证失败。注:服务器端对客户端进行认证,如果认证失败,则向客户端发送认证失败消息,其中包含可以再次认证的方法列表。客户端从认证方法列表中选取一种认证方法再次进行认证,该过程反复进行。直到认证成功或者认证次数达到上限,服务器关闭连接为止。
3、ssh服务配置
#ssh 服务安装包 openssh-server[root@server1 ~] # vim /etc/ssh/sshd_config17 . #Port 22 # 监听端口,默认监听 22 端口 【默认可修改】18 . #AddressFamily any #IPV4 和 IPV6 协议家族用哪个, any 表示二者均有19 . #ListenAddress 0.0.0.0 # 指明监控的地址, 0.0.0.0 表示本机的所有地址 【默认可修改】20 . #ListenAddress :: # 指明监听的 IPV6 的所有地址格式28 .HostKey /etc/ssh/ssh_host_rsa_key # rsa 私钥认证 【默认】29 . #HostKey /etc/ssh/ssh_host_dsa_key # dsa 私钥认证30 .HostKey /etc/ssh/ssh_host_ecdsa_key # ecdsa 私钥认证31 .HostKey /etc/ssh/ssh_host_ed25519_key # ed25519 私钥认证43 .SyslogFacility AUTHPRIV # 当有人使用 ssh 登录系统的时候, SSH 会记录信息,信息保存在 /var/log/secure 里面48 . #LoginGraceTime 2m # 登录的宽限时间,默认 2 分钟没有输入密码,则自动断开连接49 . #PermitRootLogin yes # 是否允许管理员远程登录, 'yes' 表示允许51 . #MaxAuthTries 6 # 最大认证尝试次数,最多可以尝试 6 次输入密码。之后需要等待某段时间后才能再次输入密码52 . #MaxSessions 10 # 允许的最大会话数59 .AuthorizedKeysFile .ssh/authorized_keys # 选择基于密钥验证时,客户端生成一对公私钥之后,会将公钥放到 .ssh/authorizd_keys 里面79 .PasswordAuthentication yes # 是否允许支持基于口令的认证83 .ChallengeResponseAuthentication no # 是否允许使用键盘输入身份验证,也就是 xshell的第三个登录方式129 . #UseDNS yes # 是否反解 DNS ,如果想让客户端连接服务器端快一些,这个可以改为 no146 .Subsystem sftp /usr/libexec/openssh/sftp-server # 支持 SFTP ,如果注释掉,则不支持sftp 连接154 .AllowUsers user1 user2 # 登录白名单(默认没有这个配置,需要自己手动添加),允许远程登录的用户。如果名单中没有的用户,则提示拒绝登录
4、ssh免密登录(linux客户端通过密钥登录linux服务端root用户)
# 创建密钥对[root@localhost~] # ssh-keygen -t rsassh-keygen 生成、管理和转换认证密钥 -t 制定类型 RSA/root/.ssh/id_rsa 私钥文件/root/.ssh/id_rsa.pub 公钥文件# 复制该公钥文件到服务端的该目录下[root@localhost ~] # ssh-copy-id root@192.168.246.128# 在本地服务器上登陆对端服务器[root@localhost~] # ssh root@192.168.246.128
第四章 web服务器
1、web服务器简介

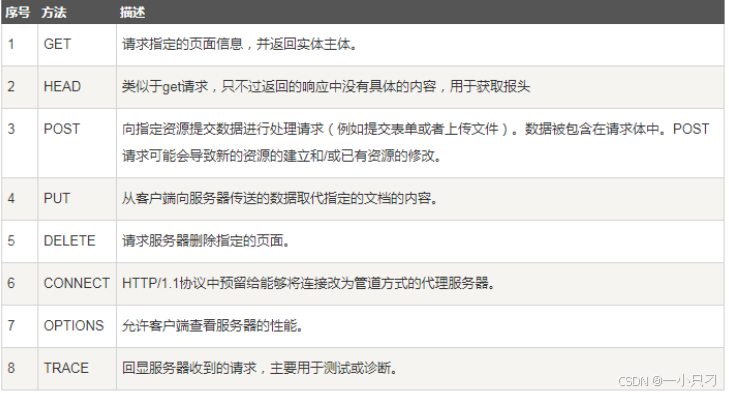
状态代码:由三位数字组成,第一个数字定义了响应的类别,且有五种可能取值。
( 1 )终端客户在 web 浏览器地址栏输入访问地址 http://www.ceshi.com:80/index.html( 2 ) web 浏览器请求 DNS 服务器把域名 www.ceshi.com 解析成 web 服务器的 IP 地址( 3 ) web 浏览器将端口号(默认是 80 )从访问地址( URL )中解析出来( 4 ) web 浏览器通过解析后的 ip 地址及端口号与 web 服务器之间建立一条 TCP 连接( 5 )建立 TCP 连接后, web 浏览器向 web 服务器发送一条 HTTP 请求报文( 6 ) web 服务器响应并读取浏览器的请求信息,然后返回一条 HTTP 响应报文。( 7 ) web 服务器关闭 HTTP 连接,关闭 TCP 连接, web 浏览器显示访问的网站内容到屏幕上。
3、web服务器基本配置
服务器端:此处使用nginx提供web服务,RPM包获取:http://nginx.org/packages/
[root@localhost ~] # dnf install nginx -y[root@localhost ~] # nginx -v[root@localhost ~] # nginx -V[root@localhost ~] # rpm -ql nginx[root@localhost httpd] # tree /etc/nginx[root@localhost ~] # tree /etc/nginx//etc/nginx/├── conf.d # 子配置文件目录├── default.d├── fastcgi.conf├── fastcgi.conf.default├── fastcgi_params # 用以翻译 nginx 的变量供 php 识别├── fastcgi_params.default├── koi-utf├── koi-win├── mime.types # 用以配置支持的媒体文件类型├── mime.types.default├── nginx.conf # 主配置文件├── nginx.conf.default├── scgi_params├── scgi_params.default├── uwsgi_params # 用以配置 nginx 的变量供 python 识别├── uwsgi_params.default└── win-utf[root@localhost ~] # tree /usr/share/nginx/html/ # 默认的 nginx 网站根目录[root@localhost ~] # tree /var/log/nginx/ #nginx 的日志文件所在目录
#nginx 服务主配置文件 nginx.conf 的结构[root@localhost nginx] # grep ^[^#] /etc/nginx/nginx.conf========= 全局配置(无 {} 标志) =======================user nginx; # 进程所属用户worker_processes auto; #worker 数量
error_log /var/log/nginx/error.log; # 错误日志存放路径pid /run/nginx.pid; #pid 文件路径include /usr/share/nginx/modules/*.conf; #include 导入的功能模块配置文件========= 全局配置(无 {} 标志) ================================= 性能配置(有 {} 标志) =================events {worker_connections 1024 ; #TCP 连接数}========== 性能配置(有 {} 标志) ========================== http 模块配置(有 {} 标志) ==================http { #http 区块开始log_format main '$remote_addr - $remote_user [$time_local] "$request"''$status $body_bytes_sent "$http_referer" ''"$http_user_agent" "$http_x_forwarded_for"' ; # 错误日志格式access_log /var/log/nginx/access.log main; # 访问日志路径sendfile on; # 开启高效文件传输模式tcp_nopush on; # 性能优化参数tcp_nodelay on; # 性能优化参数keepalive_timeout 65 ; # 持久连接时间或超时时间types_hash_max_size 4096 ; # 性能优化参数include /etc/nginx/mime.types; # 可解析的静态资源类型default_type application/octet-stream;# Load modular configuration files from the /etc/nginx/conf.d directory.# See http://nginx.org/en/docs/ngx_core_module.html#include# for more information.include /etc/nginx/conf.d/*.conf; # 子配置文件存放路径server { #server 区块开始listen 80 ; # 监听端口listen [::]:80;server_name _; # 服务器的名字root /usr/share/nginx/html; # 主页存放路径# Load configuration files for the default server block.include /etc/nginx/default.d/*.conf; # 子配置文件存放路径error_page 404 /404.html; #404 错误返回的页面location = /40x.html { # 使用 location 定义用户请求的 uri}error_page 500 502 503 504 /50x.html; #500 、 502 、 503 、 504 返回的页面location = /50x.html {}} #server 区块结束} #http 区块结束========= http 模块配置(有 {} 标志) ==================
[root@localhost ~] #systemctl disable firewalld --now[root@localhost ~] # setenforce 0[root@localhost ~] # getenforcePermissive[root@localhost ~] # systemctl restart nginx# 测试可以使用 curl 命令访问 web 服务器或者使用浏览器访问[root@localhost ~] # curl -I localhostHTTP/1.1 200 OKServer: nginx/1.21.5Date: Fri, 17 Nov 2023 08 :40:28 GMT
Content-Type: text/htmlContent-Length: 3510Last-Modified: Mon, 23 Oct 2023 15 :48:29 GMTConnection: keep-aliveETag: "653695cd-db6"Accept-Ranges: bytes
4、虚拟主机配置
[root@localhost ~] # echo "hello world" > /usr/share/nginx/html/index.html[root@localhost ~] # curl localhosthello world[root@localhost ~] # curl 192.168.246.128hello world
# 添加 ip 地址[root@localhost ~] # nmcli connection modify ens160 +ipv4.addresses192.168.246.100/24 +ipv4.gateway 192.168.168.2 ipv4.dns 114.114.114.114ipv4.method manual autoconnect yes[root@localhost ~] # nmcli connection modify ens160 +ipv4.addresses192.168.168.200/24[root@localhost ~] # nmcli connection up ens160# 创建两个网页文件根目录,并定义网页内容[root@localhost ~] # mkdir -pv /www/ip/{100,200}[root@localhost ~] # echo this is 100 > /www/ip/100/index.html[root@localhost ~] # echo this is 200 > /www/ip/200/index.html# 设置 selinux ,必须设置,否则无法看到网页页面内容[root@server html] # setenforce 0[root@server html] # getenforcePermissive# 定义基于不同 ip 地址来访问网站的配置文件# 新建文件,写入如下配置[root@localhost ~] # vim /etc/nginx/conf.d/test_ip.confserver {listen 192 .168.246.100:80;root /www/ip/100;location / {}}server {listen 192 .168.246.200:80;root /www/ip/200;location / {}}[root@localhost ~] # systemctl restart nginx[root@localhost ~] # curl 192.168.246.100this is 100[root@localhost ~] # curl 192.168.246.200this is 200
[root@localhost ~] # mkdir -pv /www/port/{80,10000}[root@localhost ~] # echo the port is 80 > /www/port/80/index.html[root@localhost ~] # echo the port is 10000 > /www/port/10000/index.html[root@localhost ~] # nmcli connection modify ens160 +ipv4.addresses192.168.246.123/24[root@localhost ~] # nmcli connection up ens160[root@localhost ~] # cat /etc/nginx/conf.d/test_port.confserver {listen 192 .168.168.153:80;root /www/port/80;location / {}}server {listen 192 .168.168.153:10000;root /www/port/10000;location / {}}[root@localhost ~] # systemctl restart nginx[root@localhost ~] # curl 192.168.246.123:10000the port is 10000[root@localhost ~] # curl 192.168.246.123the port is 80
基于域名的网站,需要用到域名解析。 域名 ------->ip 地址浏览器如何通过域名去查询 URL 对应的 IP (对应服务器地址):1 、浏览器缓存:浏览器会按照一定的频率缓存 DNS 记录。2 、操作系统缓存:如果浏览器缓存中找不到需要的 DNS 记录,那就去操作系统中的 hosts 文件找。hosts 是一个没有扩展名的系统文件,其作用就是将一些常用的网址域名与其对应的 IP 地址建立一个关联" 数据库 " ,当用户在浏览器中输入一个需要登录的网址时,系统会首先自动从 Hosts 文件中寻找对应的IP 地址,一旦找到,系统会立即打开对应网页,如果没有找到,则系统会再将网址提交DNS 域名解析服务器进行 IP 地址的解析。windows 下的 hosts 文件路径: C:\Windows\System32\drivers\etc\hostsLinux 下的 hosts 文件路径 :/etc/hosts3 、路由缓存:路由器也有 DNS 缓存。4 、 ISP 的 DNS 服务器: ISP 是互联网服务提供商 (Internet Service Provider) 的简称, ISP 有专门的DNS服务器应对 DNS 查询请求。5 、根服务器: ISP 的 DNS 服务器还找不到的话,它就会向根服务器发出请求,进行递归查询( DNS 服务器先问根域名服务器 .com 域名服务器的 IP 地址,然后再问 .com 域名服务器,依次类推)[root@localhost conf.d] # nmcli connection modify ens160 +ipv4.addresses192.168.246.124/24[root@localhost conf.d] # nmcli connection up ens160[root@localhost ~] # mkdir /www/{name,ce}[root@localhost ~] # echo this is test > /www/name/index.html[root@localhost ~] # echo today is first day of class > /www/ce/index.html[root@localhost ~] # vim /etc/nginx/conf.d/test_servername.confserver {listen 192 .168.246.124:80;server_name www.ceshi.com;root /www/name;location / {}}server {listen 192 .168.246.124:80;server_name rhce.first.day ce.first.day;root /www/ce;location / {}}[root@localhost ~] # vim /etc/hosts192 .168.246.124 www.ceshi.com rhce.first.day ce.first.day[root@localhost ~] # systemctl restart nginx[root@localhost ~] # curl www.ceshi.comthis is test[root@localhost ~] # curl rhce.first.daytoday is first day of class[root@localhost ~] # curl ce.first.daytoday is first day of class
实验5:基于虚拟目录和用户控制的web网站
# 虚拟目录实现[root@localhost conf.d] # nmcli connection modify ens160 +ipv4.addresses192.168.246.124/24[root@localhost conf.d] # nmcli connection up ens160[root@localhost ~] # vim /etc/nginx/conf.d/test_virtualdir.confserver {listen 192 .168.246.124:80;root /usr/share/nginx/html;location /real {alias /www/real;}}[root@localhost ~] # mkdir /www/real/[root@localhost ~] # echo real-virtual > /www/real/index.html[root@localhost ~] # systemctl restart nginx[root@localhost ~] # curl 192.168.246.124/real/real-virtual# 用户访问控制[root@localhost ~] # vim /etc/nginx/conf.d/test_virtualdir.confserver {listen 192 .168.246.124:80;root /usr/share/nginx/html;location /real {alias /www/real;auth_basic on;auth_basic_user_file /etc/nginx/conf.d/auth-password;}}[root@localhost ~] # dnf install httpd-tools -y[root@localhost ~] # htpasswd -cb /etc/nginx/conf.d/auth-password user1 123456[root@localhost ~] # systemctl restart nginx[root@localhost ~] # curl 192.168.246.124/real/ -u user1Enter host password for user 'user1' :real-virtual[root@localhost ~] # curl user1:123456@192.168.246.124/real/real-virtual
#https 功能由 ngx_http_ssl_module 模块提供[rootlocalhost ~] # nmcli connection modify ens33 +ipv4.addresses192.168.168.156/24[root@localhost ~] # nmcli connection up ens33[root@localhost ~] # mkdir -pv /www/https/[root@localhost ~] # echo https > /www/https/index.html[root@localhost conf.d] # cd /etc/pki/tls/certs/#key 是私钥文件[root@localhost certs] # openssl genrsa -out https.key#crt 是由证书颁发机构( CA )签名后的证书,或者是开发者自签名的证书,包含证书持有人的信息,持有人的公钥,以及签署者的签名等信息[root@localhost certs] # openssl req -utf8 -new -key https.key -x509 -days 100 -out https.crt[[root@localhost ~] # cat /etc/nginx/conf.d/test_https.confserver {# listen 80;listen 192 .168.168.156:443 ssl;root /www/https;ssl_certificate /etc/pki/tls/certs/https.crt;ssl_certificate_key /etc/pki/tls/certs/https.key;location / {}}[root@localhost ~] # systemctl restart nginx[root@localhost ~] # curl --insecure https://192.168.168.156https[root@localhost ~] # curl -k https://192.168.168.156https
[root@localhost nginx] # nmcli connection modify ens33 +ipv4.addresses192.168.168.157/24[root@localhost nginx] # nmcli connection up ens33[root@localhost ~] # dnf install php php-fpm -y[root@localhost ~] # systemctl restart nginx php-fpm[root@ntp-server ~] # echo "<?php phpinfo(); ?>" >/usr/share/nginx/html/index.php# 使用浏览器访问
第五章 nfs服务器
1、简介
2、nfs配置
[root@localhost ~] # yum install rpcbind[root@localhost ~] # yum install nfs-utils/etc/exports 主配置文件(文件不一定存在)/usr/sbin/showmount 该命令主要用在 client 端。这个命令可以查看 NFS 共享出来的目录资源# 服务端 (192.168.246.128)[root@server data] # mkdir /data[root@server data] # vim /etc/exports[root@server data] # cat /etc/exports/data 192 .168.246.129(rw)# 共享目录 主机名(权限)# 可以使用完整的 IP 或者是网络号,例如 172.24.8.128 或 172.24.8.0/24 或者172.24.8.128/255.255.255.0 ;也可以使用 * 表示所有主机# 权限相关参数可以写多个,多个参数之间用逗号隔开,具体相关参数说明如下:
| 参数值 | 说明 |
| rw,ro | 该目录共享的权限是可读写还是只读,但最终能否读写,还是与文件系统的rwx有关 |
|
sync,
async
|
sync
代表数据会同步写入到内存与硬盘中,
async
则代表数据会先暂存于内存当中,而非直接写入硬盘
|
|
no_root_squash
root_squash
|
若客户端在共享目录里创建的文件的所属者和所属组是
root
用户 和
root
组,那么显示文件的属主和属组时有以下两种情况: no_root_squash
表示,文件的所属者和所属组是root
用户和
root
组;
root_squash
表示将
root
用户和组映射为匿名用户和组 (默认设置)。
|
|
all_squash
no_all_squash
|
all_squash:
客户端所有用户创建文件时,客户端会将文件的用户 和组映射为匿名用户和组no_all_squash:
客户端普通用户创建的 文件的
UID
和
GID
是多少,服务端就显示为多少(默认设置)
|
|
anonuid=
anongid=
|
将文件的用户和组映射为指定的
UID
和
GID
,若不指定默认为65534(
nfsnobody
)
|
[root@server data] # chmod o+w /data/[root@server data] # systemctl disable firewalld --now[root@server data] # getenforceEnforcing[root@server data] # setenforce 0[root@server data] # systemctl restart nfs-server[root@server data] # showmount -e 192.168.246.128Export list for 192 .168.246.128:/data 192 .168.246.129
# 客户端( 192.168.246.129 )[root@client ~] # showmount -e 192.168.246.128Export list for 192 .168.246.128:/data 192 .168.246.129[root@client ~] # mkdir -p /nfsclient/client-data/[root@client ~] # mount 192.168.246.128:/data /nfsclient/client-data/[root@client ~] # df -hFilesystem Size Used Avail Use% Mounted ondevtmpfs 898M 0 898M 0 % /devtmpfs 910M 0 910M 0 % /dev/shmtmpfs 910M 9 .6M 901M 2 % /runtmpfs 910M 0 910M 0 % /sys/fs/cgroup/dev/mapper/centos-root 37G 1 .8G 36G 5 % //dev/sda1 1014M 150M 865M 15 % /boottmpfs 182M 0 182M 0 % /run/user/0192 .168.168.128:/data 40G 6 .2G 34G 16 % /nfsclient/client-data
3、配置autofs自动挂载
# 客户端配置 autofs[root@client ~] # yum install autofs -y[root@client ~] # grep suibian /etc/auto.master/client /etc/auto.suibian# 本地端目录 具体挂载配置文件[root@client ~] # cat /etc/auto.suibianupload 192 .168.168.128:/nfs/upload# 本地端子目录 挂载参数 服务器 : 服务器对应目录[root@client ~] # systemctl restart autofs# 触发自动挂载[root@client ~] # cd /client[root@client ~] # cd upload
第七章selinux
1.selinux的工作原理
#查看文件的安全上下文
[root@localhost ~]# ls -z
安全上下文用冒号分为四个字段:
ldentify: role:type:
- 身份标识(ldentify):相当于账号方面的身份标识,主要有以下三种常见的类型:
root:表示root的账号身份;
system_u:表示程序方面的标识,通常就是进程;
unconfined_u:代表的是一般用户账号相关的身份。
- 角色(role):通过角色字段,可知道这个数据是属于程序、文件资源还是代表用户。一般角色有:
object_r:代表的是文件或者目录等文件资源;
system_r:代表的是进程。
- 类型(type):在默认的targeted策略中,ldentiify与role字段基本上是不重要的,重要的是在于这个类型字段。而类型字段在文件与进程的定义不太相同,分别是:
type:在文件资源上面称为类型。
domain:在主体程序中则称为域。
domain需要与type搭配,则该程序才能够顺利读取文件资源。
- 最后一个字段是和MLS和MCS相关的东西,代表灵敏度,一般用s0、s1、s2来命名,数字代表灵敏度的分级。数值越大、灵敏度越高。
[root@localhost ~]# ll -Zd /usr/sbin/httpd /var/www/html/ -rwxr-xr-x. root root system_u:object_r:httpd_exec_t:s0 /usr/sbin/httpd drwxr-xr-x. root root system_u:object_r:httpd_sys_content_t:s0 /var/www/html/ 以上两个文件的角色字段都是object_r,代表都是文件,/usr/sbin/httpd属于httpd_exec_t类 型,/var/www/html/则属于httpd_sys_content_t类型。访问过程:( 1 )首先,触发具有 httpd_exec_t 这个类型的 /usr/sbin/httpd 这个可执行文件;( 2 )该文件的类型会让这个文件所造成的主体进程具有 httpd 这个域,我们的策略已经针对这个域制定了许多规则,其中包括这个域可以读取的目标资源类型;( 3 )由于 httpd domain 被设置为可读取 httpd_sys_content_t 这个类型的目标文件,因此 httpd 进程就能够读取在/var/www/html/ 目录下面的文件了;( 4 )最终能否读到 /var/www/html/ 目录下面的数据,还要看 rwx 是否符合 linux 权限的规范。
2.selinux的启动、关闭与查看
(1)SElinux三种模式
#查看目前的模式
[root@localhost ~]# getenforce
#查看目前的selinux使用的策略
[root@localhost ~]# sestatus
SELinux status: enabled # 是否启用selinux
SELinuxfs mount: /sys/fs/selinux #selinux的相关文件数据挂载点
SELinux root directory: /etc/selinux
Loaded policy name: targeted #目前的策略
Current mode: enforcing
Mode from config file: enforcing
Policy MLS status: enabled
Policy deny_unknown status: allowed
Max kernel policy version: 31

#查看selinux的策略:
[root@localhost ~]# vim /etc/selinux/config
改变策略之后需要重新启动;
如果由enforcing或permissive改成disabled,或由disabled改为其它两个,也必须要重新启动。
将selinux模式在enforcing和permissive之间切换的方法为:
setenforce 0 转换成permissive宽容模式
setenforce 1转换成enforcing强制模式
(2)修改安全上下文
chcon [-R] [-t type] [-u user] [-r role] 文件-R :连同该目录下的子目录也同时修改;-t :后面接安全上下文的类型字段;-u :后面接身份识别;-r :后面接角色chcon [-R] --reference = 范例文件 文件 将文件的安全上下文按照范例文件修改
restorecon [-Rv] 文件或目录
-R :连同子目录一起修改;-v :将过程显示到屏幕上restorecon 怎么会知道每个目录记载的默认 selinux type 类型呢?因为系统将每个目录的默认selinux type 类型记录在 /etc/selinux/targeted/contexts/ 目录内。但是该目录内有很多不同的数据,所以我们可以用semanage 这个命令的功能来查询与修改。semanage { login|user|port|interface|fcontext|translation } -lsemanage fcontext - {a|d|m} [-frst] file_spec-l 为查询;-a :增加一些目录的默认安全上下文的设置;-m :修改;-d :删除。
3、selinux对linux服务的影响
实验一:使用web服务器演示安全上下文值的设定
[root@csa ~]# systemctl disable firewalld --now
[root@csa ~]# getenforce
Enforcing
[root@csa ~]# cat /etc/nginx/conf.d/text_ip.conf
server {
	listen 192.168.246.100:80;
	root /www/ip/100;
	location / {
      	}
}

server {
	listen 192.168.246.200:80;
	root /www/ip/200;
	location / {
	}
}
[root@csa ~]# mkdir -pv /www/ip/{100,200}
[root@csa ~]# echo this is 100 > /www/ip/100/index.html
[root@csa ~]# echo this is 200 > /www/ip/200/index.html
[root@csa ~]# systemctl restart nginx
通过客户端测试,出现403状态码
#修改自定义目录的安全上下文的值:
[root@csa ~]# chcon -t httpd_sys_content_t /www/ -R
也可以将自定义目录的安全上下文的值按照/var/www/html文件修改:
[root@csa ~]# chcon -R --reference=/usr/share/nginx/html/index.html
/www
修改之后即可成功访问。
实验二:使用web服务端口的改变来演示端口的设定
[root@csa ~]# vim /etc/nginx/conf.d/text_port.conf
[root@csa ~]# cat /etc/nginx/conf.d/text_port.conf
server {
	listen 192.168.246.123:80;
	root /www/port/80;
	location / {
      	}
}

server {
	listen 192.168.246.123:10000;
	root /www/port/10000;
	location / {
	}
}
[root@csa ~]# mkdir -pv /www/port/{80,10000}
[root@csa ~]# echo the port is 80 > /www/port/80/index.html
[root@csa ~]# echo the port is 10000 > /www/port/10000/index.html
[root@csa ~]# systemctl restart nginx
#服务重启失败,查看日志
[root@csa ~]# tail -f /var/log/messages
#添加10000端口为服务端口:
[root@csa ~]# semanage port -a -t http_port_t -p tcp 10000
[root@csa ~]# systemctl restart nginx
[root@csa ~]# curl 192.168.168.153:10000
the port is 10000
#测试可以访问成功
第八章 防火墙
1、iptables
(1)iptables介绍
[root@localhost ~]# yum install iptables -y
[root@localhost ~]# systemctl stop firewalld
[root@localhost ~]# systemctl start iptables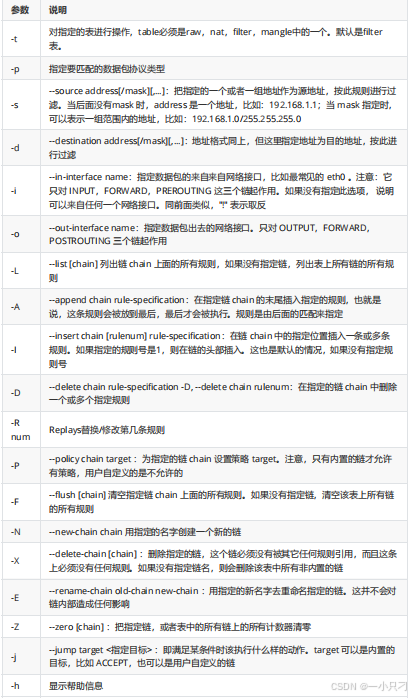
[root@server ~]# iptables -F #清空所有的规则表,清空之后客户端可以访问ssh和http服务语法格式: iptables -t 表名 <-A/I/D/R> 规则链名 [ 规则号 ] <-i/o 网卡名 > -p 协议名 <-s 源IP/ 源子网 > --sport 源端口 <-d 目标 IP/ 目标子网 > --dport 目标端口 -j 动作
(2)实验
实验一:搭建web服务器,设置任何人能后通过80端口访问
[root@localhost ~]# iptables -I INPUT -p tcp --dport 80 -j ACCEPT
[root@localhost ~]# iptables -L --line-numbers
[root@localhost ~]# iptables -D INPUT 1
实验二:禁止所有人ssh远程登录该服务器
[root@localhost ~]# iptables -I INPUT -p tcp --dport 22 -j REJECT
#删除设置的拒绝ssh连接:
[root@localhost Desktop]# iptables -D INPUT 1
实验三:禁止某个主机地址ssh远程登录该服务器,允许该主机访问服务器的web服务。服务器地址为192.168.246.128
拒绝192.168.246.128通过ssh远程连接服务器:
[root@localhost ~]# iptables -I INPUT -p tcp -s 192.168.246.128 --dport 22 -j
REJECT
允许192.168.246.128访问服务器的web服务:
[root@localhost ~]# iptables -I INPUT -p tcp -s 192.168.246.128 --dport 80 -j
ACCEPT
3、firewalld
(1)firewalld介绍
[root@csa ~]# rpm -qa | grep firewall
firewall-config-0.3.9-14.el7.noarch
firewalld-0.3.9-14.el7.noarch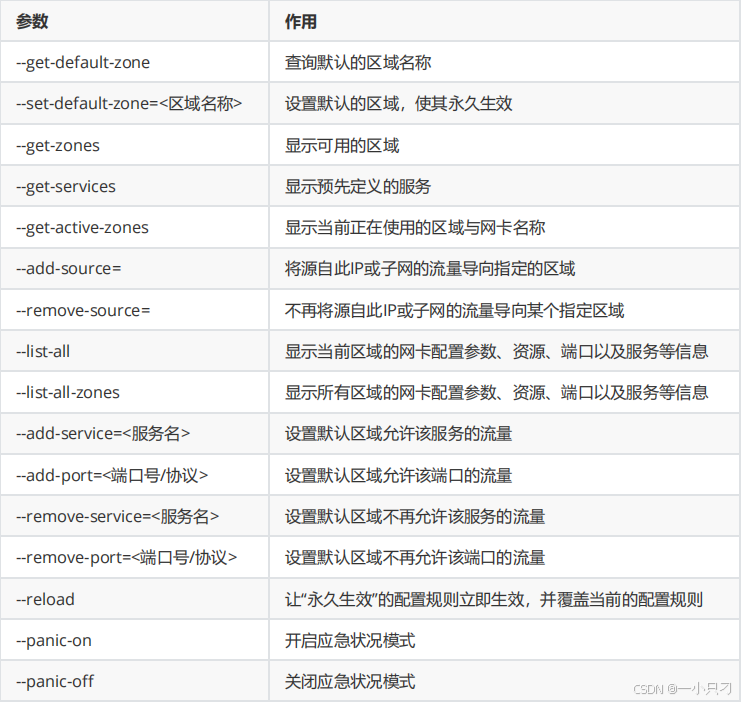
[root@localhost ~]# systemctl stop iptables
[root@localhost ~]# systemctl restart firewalld
[root@localhost ~]# firewall-cmd --help #查看帮助
[root@localhost ~]# firewall-cmd --list-all #查看所有的规则
[root@localhost ~]#firewall-cmd --permanent --add-service=服务名
使用firewalld配置的防火墙策略默认为当前生效,会随着系统的重启而失效。如果想让策略一直存在,
就需要使用永久模式了,即在使用firewall-cmd命令设置防火墙策略时添加--permanent参数,这样
配置的防火墙策略就可以永久生效了,最后想要使用这种方式设置的策略生效,只能重启或者输入命令:
firewall-cmd --reload。
#禁止某个ip地址进行ssh访问,应该写成ip/32
#配置端口转发(在172.24.8.0网段的主机访问该服务器的5423端口将被转发到80端口)
[root@system1 ~]# firewall-cmd --permanent --add-rich-rule='rule
family="ipv4" source address="172.24.8.0/24" forward-port port="5423"
protocol="tcp" toport="80"'


 被折叠的 条评论
为什么被折叠?
被折叠的 条评论
为什么被折叠?
 到【灌水乐园】发言


