


栈和队列的实现
引言
在计算机科学的世界里,数据结构是我们构建各种复杂算法和解决问题的基石。其中,栈(Stack)和队列(Queue)作为两种经典的数据结构,在解决实际问题时发挥着不可或缺的作用。
栈和队列的概念或许在我们的日常生活中并不陌生。例如,当你在超市排队结账时,你就是处于一个队列中;而当你使用浏览器的“返回”按钮时,实际上就是在操作一个栈。然而,虽然我们可以轻松地理解这些概念在日常生活中的应用,但是了解它们在计算机科学中的实现和应用,则能为我们打开全新的认知世界。
本篇博客将深入探讨栈和队列的实现原理以及它们在C语言中的实现方式。我们将从基本概念开始,逐步深入,通过代码示例和实际应用场景,带领读者领略这两种数据结构的魅力所在。
让我们一起踏上这段关于数据结构之美的探索之旅吧!
1. 栈
1.1 栈的概念
栈:一种特殊的线性表,其只允许在固定的一端进入插入和删除元素操作。进行数据插入和删除操作的一端叫做栈顶,另一端叫做栈底。 栈中的数据元素遵守后进先出LIFO(Last In First Out)的原则。
压栈:栈的插入操作叫做进栈/压栈/入栈,入数据在栈顶。
出栈:栈的删除操作叫做出栈,出数据也在栈顶。

示例 栈的压栈和出栈规则(此图TOP指向栈顶元素,我们现实时,使用TOP指向栈顶元素的下一个元素位置)

1.2 栈的实现——数组结构
栈的实现一般可以使用数组或者链表实现,相对而言数组的结构实现更优一些。因为数组在尾上插入数据的代价比较小。
1.2.1 数组实现栈的结构
typedef int STDateType;

typedef struct Stack
{
	STDataType* a;//指针 指向数组
	int top;	  //栈顶
	int capacity; //容量
}ST;
1.2.2 栈的初始化
void STInit(ST* pst)	//传入一个指向栈结构的指针
{
	//首先先判断给的栈指针是否为NULL
	assert(pst);
	//初始化
	pst->a = NULL;		//将指向数组的指针置为空
	pst->top = 0;		//top指向的是栈顶数据的下一个位置
	//pst->top = -1;      top指向的是栈顶数据
	pst->capacity = 0;
}
1.2.3 栈的销毁
void STDestory(ST* pst)
{
	assert(pst);
	free(pst->a);	//free掉指向数组的指针
	pst->a = NULL;  //并将指针置为空
	pst->capacity = pst->top = 0;	//计数和栈顶标记都置为0
}
1.2.4 栈的插入
void STPush(ST* pst, STDataType x)	//传入一个指向栈结构的指针,和要插入的数据
{
	assert(pst);

	//如果没有空间插入需要申请空间扩容
	if (pst->capacity == pst->top)
	{
		int newcapacity = pst->capacity == 0 ? 4 : pst->capacity * 2;	//调大计数范围
		STDataType* tmp = (STDataType*)realloc(pst->a, newcapacity * sizeof(STDataType));	//运用realloc函数扩大栈里的空间
		//检查是否申请成功
		if (tmp == NULL)
		{
			perror("realloc fail");
			return;
		}
		pst->a = tmp;	//将(数组)空间赋给指向数组的指针
		pst->capacity = newcapacity;
	}
	pst->a[pst->top] = x;	//插入第一个元素
	pst->top++;	//栈顶++
}
1.2.5 栈的删除
void STPop(ST* pst)
{
	assert(pst);
	assert(pst->top > 0);//要删除数据需先确保有数据

	pst->top--;	//栈顶指针向下移动一个位置,表示弹出一个元素
				//这里的指针并不是真的指针,依然是变量,只是为了更好理解栈顶的变化
				//下面涉及到类似的也是同理
}
1.2.6 栈顶元素的获取
STDataType STTop(ST* pst)	//传入一个指向栈结构的指针,并返回栈顶元素
{
	assert(pst);
	assert(pst->top > 0);	//要获取数据需先确保有数据
	return pst->a[pst->top - 1];	//通过指向数组的指针调取数组,并用栈顶-1获取下标,实现数组元素的访问
}
1.2.7 栈的判空
bool STEmpty(ST* pst)   //判空返回值应为TRUE FALSE
{
	assert(pst);
	if (pst->top == 0)	//如果栈顶指针指向0,说明栈空间没有元素了
	{
		return true;
	}
	return false;
	//return pst->a[pst->top - 1];	//法二:如果有数据就会返回TRUE,没有则返回FALSE
}
1.2.8 获取栈中元素个数
int STSize(ST* pst)
{
	assert(pst);
	return pst->top;
}
代码总览
//Stack.h 文件
#pragma once
#define _CRT_SECURE_NO_WARNINGS 1
#include<stdio.h>
#include<stdlib.h>
#include<stdbool.h>
#include<assert.h>

//#define 定义宏尽量不要加;
//typedef 重命名需要加;

//用数组来实现栈
typedef int STDataType;

typedef struct Stack
{
	STDataType* a;//指针 指向数组
	int top;	  //栈顶
	int capacity; //容量
}ST;


//栈的初始化
void STInit(ST * pst);

//栈的销毁
void STDestory(ST* pst);

//栈的插入
void STPush(ST* pst,STDataType x);

//栈的删除
void STPop(ST* pst);

//栈顶元素的获取
STDataType STTop(ST* pst);

//栈的判空
bool STEmpty(ST* pst);   //判空返回值应为TRUE FALSE

//获取栈中元素个数
int STSize(ST* pst);
//Stack.c文件
#include"Stack.h"


//栈的初始化
void STInit(ST* pst)
{
	//首先先判断给的栈指针是否为NULL
	assert(pst);
	//初始化
	pst->a = NULL;		//将指向数组的指针置为空
	pst->top = 0;		//top指向的是栈顶数据的下一个位置
	//pst->top = -1;      top指向的是栈顶数据
	pst->capacity = 0;
}

//栈的销毁
void STDestory(ST* pst)
{
	assert(pst);
	free(pst->a);	//free掉指向数组的指针
	pst->a = NULL;  //并将指针置为空
	pst->capacity = pst->top = 0;	//计数置为0
}

//栈的插入
void STPush(ST* pst, STDataType x)
{
	assert(pst);

	//如果没有空间插入需要申请空间扩容
	if (pst->capacity == pst->top)
	{
		int newcapacity = pst->capacity == 0 ? 4 : pst->capacity * 2;	//调大计数范围
		STDataType* tmp = (STDataType*)realloc(pst->a, newcapacity * sizeof(STDataType));	//调大栈里的空间
		//检查是否申请成功
		if (tmp == NULL)
		{
			perror("realloc fail");
			return;
		}
		pst->a = tmp;	//将(数组)空间赋给指向数组的指针
		pst->capacity = newcapacity;
	}
	pst->a[pst->top] = x;	//插入第一个元素
	pst->top++;	//栈顶++
}

//栈的删除
void STPop(ST* pst)
{
	assert(pst);
	assert(pst->top > 0);//要删除数据需先确保有数据

	pst->top--;
}

//栈顶元素的获取
STDataType STTop(ST* pst)
{
	assert(pst);
	assert(pst->top > 0);
	return pst->a[pst->top - 1];	//通过指向数组的指针调取数组,并用栈顶-1获取下标,实现数组元素的访问
}

//栈的判空
bool STEmpty(ST* pst)   //判空返回值应为TRUE FALSE
{
	assert(pst);
	if (pst->top == 0)
	{
		return true;
	}
	return false;
	//return pst->a[pst->top - 1];	//如果有数据就会返回TRUE,没有则返回FALSE
}
//获取栈中元素个数
int STSize(ST* pst)
{
	assert(pst);
	return pst->top;
}
//tast.c 文件
#include"Stack.h"
//栈的接口
int main()
{
	ST s;
	STInit(&s);
	STPush(&s, 1);
	STPush(&s, 2);
	STPush(&s, 3);
	STPush(&s, 4);

	printf("%d\n",STTop(&s));

	STPop(&s);
	STPop(&s);
	printf("%d\n", STTop(&s));

	STDestory(&s);

	return 0;
}
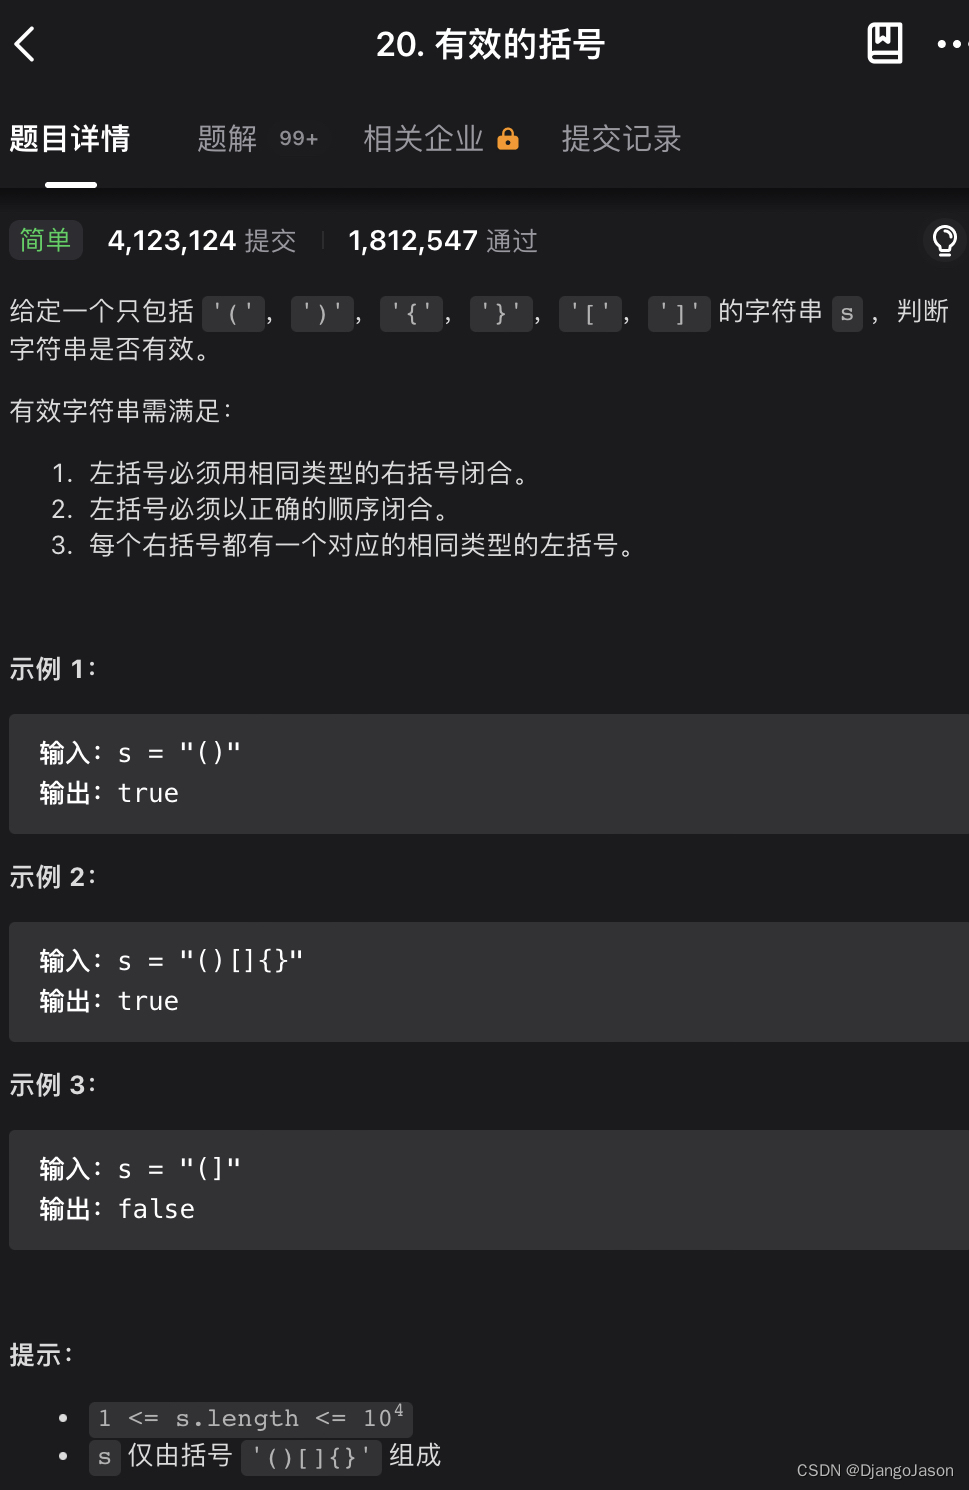
1.3 栈的OJ题
1.3.1 括号匹配问题
#define _CRT_SECURE_NO_WARNINGS 1
#include<stdio.h>
#include<stdlib.h>

#include"Stack.h"

//用栈先进后出的特性来实现括号匹配的判定
//遇到左括号就入栈,直到遇到右括号,就输出栈顶括号进行匹配
bool isValid(char* s) {
    //初始化栈
    ST st;
    STInit(&st);

    //while循环来读数据
    while (*s)
    {
        //如果读到的数据是左括号就进栈
        if (*s == '('
            || *s == '['
            || *s == '{')
        {
            STPush(&st, *s);
            ++s;    //字符串指针++
        }
        else
        {
            //遇到右括号,但是栈里没有数据,说明不匹配,返回FALSE
            if (STEmpty(&st))
            {
                STDestory(&st);
                return false;
            }
            //如果栈里有数据,就读一个数据对比一下是否不同,然后扔掉配对成功的。
            STDataType top = STTop(&st);
            STPop(&st);
            if ((*s == '}' && top != '{')
                || (*s == ']' && top != '[')
                || (*s == ')' && top != '('))
            {
                STDestory(&st);
                return false;
            }
            else
            {
                ++s;
            }
        }

    }

    //如果栈不是空,说明栈中还有左括号未出
    //没有匹配,返回false
    bool ret = STEmpty(&st);
    STDestory(&st);
    return ret;
}

int main()
{
    char s = '(';
    bool ret = isValid(&s);
    printf("%d",ret);
	return 0;
}
2.队列
2.1 队列的概念
队列:只允许在一端进行插入数据操作,在另一端进行删除数据操作的特殊线性表,队列具有先进先出FIFO(First In First Out)的原则。
入队列:进行插入操作的一端称为队尾。
出队列:进行删除操作的一端称为队头。

示例 队列的进队和出队规则

2.2 队列的实现——链表结构
队列也可以使用数组和链表来实现,使用链表的结构实现更优一些,因为如果使用数组结构,出队列在数组头上出数据,效率会比较低。
2.2.1 链表实现队列结构
//定义数据类型和结构体(节点)(双指针+计数)
typedef int QuDataType;

typedef struct QueueNode	//第一个结构体来实现链表节点结构
{
	struct QueueNode* next;
	QuDataType val;
}QNode;

typedef struct QueueP	//第二个结构体来实现两个指针,一个指向链表头,一个指向链表尾
{
	struct QueueNode* phead;
	struct QueueNode* ptail;
	int size;	//记录队列中元素的个数
}Queue;
2.2.2 队列的初始化
void QueueInit(Queue* pq)
{
	assert(pq);
	pq->phead = NULL;
	pq->ptail = NULL;
	pq->size = 0;
}
2.2.3 队列的增(尾插)
void QueuePush(Queue* pq, QuDataType x)
{
	assert(pq);

	//为新节点申请空间
	QNode* newnode = (QNode*)malloc(sizeof(QNode));	//melloc函数只需要传要开辟的空间大小(变量大小而不是指针大小)即可
	//判断节点是否申请成功
	if (newnode == NULL)
	{
		perror("malloc fail");
		return;
	}
	//对新节点进行初始化
	newnode->next = NULL;
	newnode->val = x;

	//如果原链表为空
	if (pq->ptail == NULL)
	{
		pq->phead = pq->ptail = newnode;
	}
	else
	{
		pq->ptail->next = newnode;  //让新节点与原链表建立关系
		pq->ptail = newnode;
	}

	pq->size++;
}
2.2.4 队列的删(头删)
void QueuePop(Queue* pq)
{
	assert(pq);
	assert(pq->ptail != NULL);

	//如果链表只有一个节点
	if (pq->size == 1)
	{
		free(pq->phead);
		pq->phead = pq->ptail = NULL;
	}
	//如果链表有多个节点
	else
	{
		QNode* Next = pq->phead->next;	//为了free掉phead之后还能找到phead->next
		free(pq->phead);
		pq->phead = Next;
	}

	pq->size--;
}
2.2.5 队列返回对头
QuDataType QueueHead(Queue* pq)
{
	assert(pq);
	assert(pq->ptail != NULL);
	return pq->phead->val;	//返回队头的值
}
2.2.6 队列返回队尾
QuDataType Queuetail(Queue* pq)
{
	assert(pq);
	assert(pq->ptail != NULL);
	return pq->ptail->val;	//返回队尾的值

}
2.2.7 队列的判空
bool QueueEmpty(Queue* pq)
{
	assert(pq);
	return pq->size == 0;	//队列为空返回TRUE 不为空返回FALSE
}
2.2.8 队列的销毁
void QueueDestroy(Queue* pq)
{
	assert(pq);
	QNode* cur = pq->phead;
	while(cur)
	{
		QNode* Next = cur->next;	//为了free掉cur之后还能找到cur->next
		free(cur);
		cur = Next;
	}
	pq->phead = NULL;
	pq->ptail = NULL;
	pq->size = 0;
}
2.2.9 队列的大小
int QueueSize(Queue* pq)
{
	assert(pq);
	return pq->size;
}
代码总览
//queue.h 文件
#pragma once
#define _CRT_SECURE_NO_WARNINGS 1
#include<stdio.h>
#include<stdlib.h>
#include<assert.h>
#include<stdbool.h>

//使用链表实现队列

//定义数据类型和结构体(节点)(双指针+计数)
typedef int QuDataType;

typedef struct QueueNode
{
	struct QueueNode* next;
	QuDataType val;
}QNode;

typedef struct QueueP
{
	struct QueueNode* phead;
	struct QueueNode* ptail;
	int size;	//记录队列中元素的个数
}Queue;

//队列的初始化
void QueueInit(Queue * pq);

//队列的增(尾插)
void QueuePush(Queue* pq, QuDataType x);

//队列的删(头删)
void QueuePop(Queue* pq);

//队列返回对头
QuDataType QueueHead(Queue* pq);

//队列返回队尾
QuDataType Queuetail(Queue* pq);

//队列的判空
bool QueueEmpty(Queue* pq);

//队列的销毁
void QueueDestroy(Queue* pq);

//队列的大小
int QueueSize(Queue* pq);
//queue.c 文件
#include"queue.h"


//队列的初始化
void QueueInit(Queue* pq)
{
	assert(pq);
	pq->phead = NULL;
	pq->ptail = NULL;
	pq->size = 0;

}


//队列的增(尾插)
void QueuePush(Queue* pq, QuDataType x)
{
	assert(pq);

	//为新节点申请空间
	QNode* newnode = (QNode*)malloc(sizeof(QNode));	//melloc函数只需要传要开辟的空间大小(变量大小而不是指针大小)即可
	//判断节点是否申请成功
	if (newnode == NULL)
	{
		perror("malloc fail");
		return;
	}
	//对新节点进行初始化
	newnode->next = NULL;
	newnode->val = x;

	//如果原链表为空
	if (pq->ptail == NULL)
	{
		pq->phead = pq->ptail = newnode;
	}
	else
	{
		pq->ptail->next = newnode;  //让新节点与原链表建立关系
		pq->ptail = newnode;
	}

	pq->size++;
}


//队列的删(头删)
void QueuePop(Queue* pq)
{
	assert(pq);
	assert(pq->ptail != NULL);

	//如果链表只有一个节点
	if (pq->size == 1)
	{
		free(pq->phead);
		pq->phead = pq->ptail = NULL;
	}
	//如果链表有多个节点
	else
	{
		QNode* Next = pq->phead->next;
		free(pq->phead);
		pq->phead = Next;
	}

	pq->size--;
}


//队列返回队头
QuDataType QueueHead(Queue* pq)
{
	assert(pq);
	assert(pq->ptail != NULL);
	return pq->phead->val;	//返回队头的值
}


//队列返回队尾
QuDataType Queuetail(Queue* pq)
{
	assert(pq);
	assert(pq->ptail != NULL);
	return pq->ptail->val;	//返回队尾的值

}


//队列的判空
bool QueueEmpty(Queue* pq)
{
	assert(pq);
	return pq->size == 0;	//队列为空返回TRUE 不为空返回FALSE
}

//队列的销毁
void QueueDestroy(Queue* pq)
{
	assert(pq);
	QNode* cur = pq->phead;
	while(cur)
	{
		QNode* Next = cur->next;	//为了free掉cur之后还能找到cur->next
		free(cur);
		cur = Next;
	}
	pq->phead = NULL;
	pq->ptail = NULL;
	pq->size = 0;
}

//队列的大小
int QueueSize(Queue* pq)
{
	assert(pq);
	return pq->size;
}
//test.c 文件
#define _CRT_SECURE_NO_WARNINGS 1
#include<stdio.h>
#include<stdlib.h>
#include"queue.h"

int main()
{
	Queue q;	//定义一个双指针结构体
	QueueInit(&q);
	QueuePush(&q, 1);
	QueuePush(&q, 2);
	printf("%d ", QueueHead(&q));
	QueuePop(&q);

	QueuePush(&q, 3);
	QueuePush(&q, 4);

	while (!QueueEmpty(&q))
	{
		printf("%d ", QueueHead(&q));
		QueuePop(&q);
	}
	printf("\n");


	return 0;
}
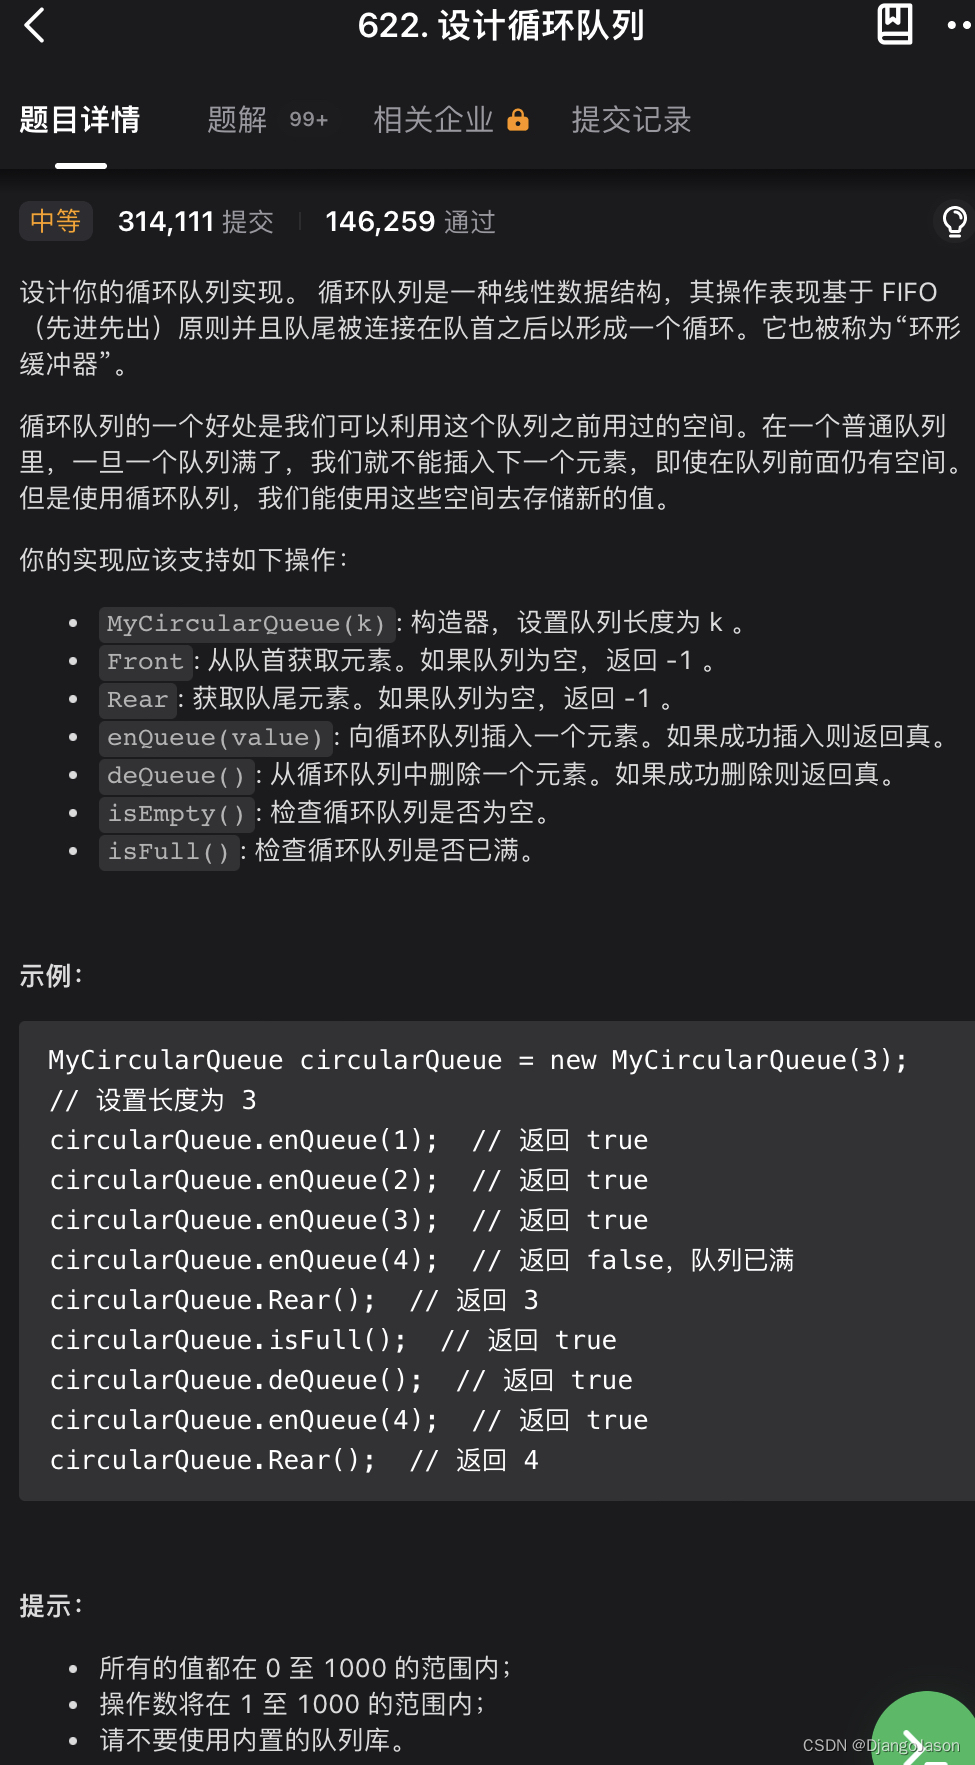
环形队列
实际中我们还有一种队列叫循环队列。如操作系统课程讲解生产者消费者模型时,就会使用循环队列。环形队列可以使用数组实现,也可以使用循环列表实现。


#include <stdio.h>
#include <stdlib.h>

#define MAX_SIZE 10 // 定义环形队列的最大容量

typedef struct {
    int *queue; // 队列数组指针
    int capacity; // 队列容量
    int head; // 队头指针
    int tail; // 队尾指针
    int size; // 队列当前元素个数
} CircularQueue;

// 初始化环形队列
CircularQueue* initQueue(int capacity) {
    CircularQueue *cq = (CircularQueue*)malloc(sizeof(CircularQueue));
    cq->queue = (int*)malloc(capacity * sizeof(int));
    cq->capacity = capacity;
    cq->head = 0;
    cq->tail = 0;
    cq->size = 0;
    return cq;
}

// 入队操作
void enqueue(CircularQueue *cq, int item) {
    if (cq->size == cq->capacity) { // 如果队列已满
        printf("队列已满,无法添加元素\n");
        return;
    }
    cq->queue[cq->tail] = item; // 将元素添加到队尾
    cq->tail = (cq->tail + 1) % cq->capacity; // 更新队尾指针,考虑环形结构
    cq->size++; // 更新队列大小
}

// 出队操作
int dequeue(CircularQueue *cq) {
    if (cq->size == 0) { // 如果队列为空
        printf("队列为空,无法删除元素\n");
        return -1;
    }
    int item = cq->queue[cq->head]; // 获取队头元素
    cq->head = (cq->head + 1) % cq->capacity; // 更新队头指针,考虑环形结构
    cq->size--; // 更新队列大小
    return item;
}

// 判空操作
int isEmpty(CircularQueue *cq) {
    return cq->size == 0;
}

// 判满操作
int isFull(CircularQueue *cq) {
    return cq->size == cq->capacity;
}

// 打印队列元素
void printQueue(CircularQueue *cq) {
    printf("队列元素: ");
    int i = cq->head;
    for (int count = 0; count < cq->size; count++) {
        printf("%d ", cq->queue[i]);
        i = (i + 1) % cq->capacity;
    }
    printf("\n");
}

// 主函数
int main() {
    CircularQueue *cq = initQueue(MAX_SIZE);

    // 示例:入队
    enqueue(cq, 1);
    enqueue(cq, 2);
    enqueue(cq, 3);
    printQueue(cq); // 预期输出: 队列元素: 1 2 3

    // 示例:出队
    int item = dequeue(cq); // 出队一个元素
    printf("出队元素: %d\n", item); // 预期输出: 出队元素: 1
    printQueue(cq); // 预期输出: 队列元素: 2 3

    // 示例:判空和判满
    printf("队列是否为空: %s\n", isEmpty(cq) ? "是" : "否"); // 预期输出: 队列是否为空: 否
    printf("队列是否已满: %s\n", isFull(cq) ? "是" : "否"); // 预期输出: 队列是否已满: 否

    // 示例:继续入队
    enqueue(cq, 4);
    enqueue(cq, 5);
    printQueue(cq); // 预期输出: 队列元素: 2 3 4 5

    free(cq->queue);
    free(cq);
    return 0;
}
在环形队列中,我们使用取模运算来实现队列指针的循环移动。下面我将详细解释一下取模运算在环形队列中的原理:
循环队列的结构:
在普通的线性队列中,队列指针(如队头指针和队尾指针)的范围是从 0 到队列容量减一。而在循环队列中,队尾指针在达到队列容量时不再继续增加,而是从队列的开头重新开始,形成了一个环形结构。
取模运算的作用:
在循环队列中,我们使用取模运算(%)来实现队列指针的循环移动。具体来说,当队尾指针需要向后移动时,我们计算新的队尾位置为 (tail + 1) % capacity,其中 tail 是当前队尾指针的位置,capacity 是队列的容量。这样可以保证当队尾指针达到队列容量时,取模运算会使其重新回到队列的开头,实现了环形结构。
示例:
假设队列容量为 5,当前队尾指针 tail 为 4,即指向队列的最后一个位置。如果此时需要再入队一个元素,按照普通的线性队列逻辑,下一个位置应该是 tail + 1,即 5,但这个位置超出了队列的范围。而在环形队列中,我们使用取模运算:5 % 5 = 0,因此新的队尾指针位置为 0,指向队列的开头,实现了循环移动。
取模运算的这种特性使得循环队列的操作更加高效,并且不需要额外的移动操作来处理队列指针达到边界的情况,因为取模运算会自动将其映射回队列的有效范围内。
2.3 队列的OJ题
2.3.1 设计循环队列
#include <stdbool.h>
#include <stdio.h>
#include <stdlib.h>

// 定义循环队列的结构体
typedef struct {
    int *array;     // 队列数组指针
    int capacity;   // 队列容量
    int size;       // 队列当前元素个数
    int front;      // 队头指针
    int rear;       // 队尾指针
} MyCircularQueue;

// 创建一个新的循环队列
MyCircularQueue* myCircularQueueCreate(int k) {
    // 分配循环队列结构体的内存空间
    MyCircularQueue* obj = (MyCircularQueue*)malloc(sizeof(MyCircularQueue));
    // 分配队列数组的内存空间
    obj->array = (int*)malloc(k * sizeof(int));
    obj->capacity = k;  // 设置队列容量
    obj->size = 0;      // 初始化队列当前元素个数为 0
    obj->front = 0;     // 初始化队头指针为 0
    obj->rear = -1;     // 初始化队尾指针为 -1
    return obj;
}

// 向循环队列中插入一个元素
bool myCircularQueueEnQueue(MyCircularQueue* obj, int value) {
    // 如果队列已满,则返回 false
    if (myCircularQueueIsFull(obj)) {
        return false;
    }
    // 队尾指针后移一位,考虑到环形结构,使用取模运算确保指针位置在合法范围内
    obj->rear = (obj->rear + 1) % obj->capacity;
    // 将元素值插入到队尾指针所指向的位置
    obj->array[obj->rear] = value;
    obj->size++;  // 更新队列的当前元素个数
    return true;
}

// 从循环队列中删除一个元素
bool myCircularQueueDeQueue(MyCircularQueue* obj) {
    // 如果队列为空,则返回 false
    if (myCircularQueueIsEmpty(obj)) {
        return false;
    }
    // 队头指针后移一位,考虑到环形结构,使用取模运算确保指针位置在合法范围内
    obj->front = (obj->front + 1) % obj->capacity;
    obj->size--;  // 更新队列的当前元素个数
    return true;
}

// 获取循环队列的队首元素
int myCircularQueueFront(MyCircularQueue* obj) {
    // 如果队列为空,则返回 -1
    return myCircularQueueIsEmpty(obj) ? -1 : obj->array[obj->front];
}

// 获取循环队列的队尾元素
int myCircularQueueRear(MyCircularQueue* obj) {
    // 如果队列为空,则返回 -1
    return myCircularQueueIsEmpty(obj) ? -1 : obj->array[obj->rear];
}

// 检查循环队列是否为空
bool myCircularQueueIsEmpty(MyCircularQueue* obj) {
    return obj->size == 0;  // 如果队列当前元素个数为 0,则为空
}

// 检查循环队列是否已满
bool myCircularQueueIsFull(MyCircularQueue* obj) {
    return obj->size == obj->capacity;  // 如果队列当前元素个数等于容量,则已满
}

// 释放循环队列的内存空间
void myCircularQueueFree(MyCircularQueue* obj) {
    free(obj->array);
    free(obj);
}

int main() {
    // 创建一个容量为 3 的循环队列
    MyCircularQueue* circularQueue = myCircularQueueCreate(3);
    printf("%d\n", myCircularQueueEnQueue(circularQueue, 1));  // 返回 true
    printf("%d\n", myCircularQueueEnQueue(circularQueue, 2));  // 返回 true
    printf("%d\n", myCircularQueueEnQueue(circularQueue, 3));  // 返回 true
    printf("%d\n", myCircularQueueEnQueue(circularQueue, 4));  // 返回 false,队列已满
    printf("%d\n", myCircularQueueRear(circularQueue));  // 返回 3
    printf("%d\n", myCircularQueueIsFull(circularQueue));  // 返回 true
    printf("%d\n", myCircularQueueDeQueue(circularQueue));  // 返回 true
    printf("%d\n", myCircularQueueEnQueue(circularQueue, 4));  // 返回 true
    printf("%d\n", myCircularQueueRear(circularQueue));  // 返回 4
    myCircularQueueFree(circularQueue);
    return 0;
}


 2816
2816

 被折叠的 条评论
为什么被折叠?
被折叠的 条评论
为什么被折叠?
 到【灌水乐园】发言


