包含编程资料、学习路线图、源代码、软件安装包等!【[点击这里] 】! from urllib. request
import urlopen
def download_with_urllib ( url) :
"""使用urllib下载数据"""
with urlopen( url) as response:
return response. read( ) . decode( 'utf-8' )
import requests
def download_with_requests ( url) :
"""使用requests下载数据"""
response = requests. get( url)
return response. text
import aiohttp
import asyncio
async def download_with_aiohttp ( url) :
"""使用aiohttp异步下载数据"""
async with aiohttp. ClientSession( ) as session:
async with session. get( url) as response:
return await response. text( )
import re
def parse_with_re ( html) :
"""使用正则表达式解析HTML"""
pattern = re. compile ( r'<title>(.*?)</title>' , re. IGNORECASE)
return pattern. findall( html)
from lxml import etree
def parse_with_lxml ( html) :
"""使用lxml解析HTML"""
tree = etree. HTML( html)
return tree. xpath( '//title/text()' )
from bs4
import BeautifulSoup
def parse_with_bs4 ( html) :
"""使用BeautifulSoup解析HTML"""
soup = BeautifulSoup( html, 'html.parser' )
return soup. find( 'title' ) . get_text( )
from pyquery
import PyQuery
def parse_with_pyquery ( html) :
"""使用PyQuery解析HTML"""
doc = PyQuery( html)
return doc( 'title' ) . text( )
import pymysql
def save_to_mysql ( data) :
"""将数据存储到MySQL数据库"""
conn = pymysql. connect( host= 'localhost' , port= 3306 ,
database= 'crawler' , user= 'root' ,
password= '123456' , charset= 'utf8' )
try :
with conn. cursor( ) as cursor:
cursor. execute( 'INSERT INTO tb_data VALUES (default, %s)' , ( data, ) )
conn. commit( )
finally :
conn. close( )
from sqlalchemy import create_engine, Column, Integer, String
from sqlalchemy. ext. declarative import declarative_base
from sqlalchemy. orm import sessionmaker
Base = declarative_base( )
classData( Base) :
__tablename__ = 'tb_data'
id = Column( Integer, primary_key= True )
content = Column( String( 255 ) )
defsave_with_sqlalchemy( data) :
"""使用SQLAlchemy存储数据"""
engine = create_engine( 'mysql+pymysql://root:123456@localhost:3306/crawler' )
Base. metadata. create_all( engine)
Session = sessionmaker( bind= engine)
session = Session( )
new_data = Data( content= data)
session. add( new_data)
session. commit( )
session. close( )
import redis
def save_to_redis ( data) :
"""将数据存储到Redis"""
r = redis. Redis( host= 'localhost' , port= 6379 , db= 0 )
r. set ( 'data' , data)
from pymongo import MongoClient
def save_to_mongo ( data) :
"""将数据存储到MongoDB"""
client = MongoClient( 'localhost' , 27017 )
db = client[ 'crawler' ]
collection = db[ 'data' ]
collection. insert_one( { 'content' : data} )
import hashlib
def generate_signature ( data) :
"""生成数字签名"""
return hashlib. sha256( data. encode( ) ) . hexdigest( )
import pickle
def serialize_with_pickle ( data) :
"""使用pickle序列化数据"""
return pickle. dumps( data)
import json
def serialize_with_json ( data) :
"""使用json序列化数据"""
return json. dumps( data)
import zlib
def compress_with_zlib ( data) :
"""使用zlib压缩数据"""
return zlib. compress( data. encode( ) )
from multiprocessing import Process
defworker( ) :
"""工作函数"""
print ( "Worker process is running" )
defstart_multiprocessing( ) :
"""启动多进程"""
processes = [ Process( target= worker) for _ inrange( 3 ) ]
for p in processes:
p. start( )
for p in processes:
p. join( )
from threading import Thread
defworker( ) :
"""工作函数"""
print ( "Worker thread is running" )
defstart_multithreading( ) :
"""启动多线程"""
threads = [ Thread( target= worker) for _ inrange( 3 ) ]
for t in threads:
t. start( )
for t in threads:
t. join( )
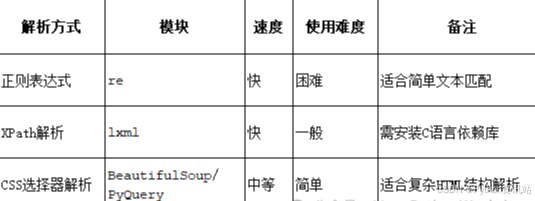
HTML页面通常由三部分构成:用来承载内容的Tag(标签)、负责渲染页面的CSS(层叠样式表)以及控制交互式行为的JavaScript。在爬虫开发中,解析HTML页面是获取数据的关键步骤。 Python提供了多种工具和库来解析HTML页面,例如BeautifulSoup和lxml。以下是一个简单的HTML页面解析案例,展示如何使用Python解析HTML并提取有用信息。 HTML标签 :用来承载内容。CSS样式表 :负责渲染页面。JavaScript :控制交互式行为。< !DOCTYPE html>
< html>
< head>
< title> Home< / title>
< style type = "text/css" > / * 此处省略层叠样式表代码 * / < / style>
< / head>
< body>
< div class = "wrapper" >
< header>
< h1> Yoko's Kitchen< / h1>
< nav>
< ul>
< li> < a href= "" class = "current" > Home< / a> < / li>
< li> < a href= "" > Classes< / a> < / li>
< li> < a href= "" > Catering< / a> < / li>
< li> < a href= "" > About< / a> < / li>
< li> < a href= "" > Contact< / a> < / li>
< / ul>
< / nav>
< / header>
< section class = "courses" >
< article>
< figure>
< img src= "images/bok-choi.jpg" alt= "Bok Choi" / >
< figcaption> Bok Choi< / figcaption>
< / figure>
< hgroup>
< h2> Japanese Vegetarian< / h2>
< h3> Five week course in London< / h3>
< / hgroup>
< p> A five week introduction to traditional Japanese vegetarian meals,
teaching you a selection of rice and noodle dishes. < / p>
< / article>
< article>
< figure>
< img src= "images/teriyaki.jpg" alt= "Teriyaki sauce" / >
< figcaption> Teriyaki Sauce< / figcaption>
< / figure>
< hgroup>
< h2> Sauces Masterclass< / h2>
< h3> One day workshop< / h3>
< / hgroup>
< p> An intensive one- day course looking at how to create the most delicious sauces
for use in a range of Japanese cookery. < / p>
< / article>
< / section>
< aside>
< section class = "popular-recipes" >
< h2> Popular Recipes< / h2>
< a href= "" > Yakitori ( grilled chicken) < / a>
< a href= "" > Tsukune ( minced chicken patties) < / a>
< a href= "" > Okonomiyaki ( savory pancakes) < / a>
< a href= "" > Mizutaki ( chicken stew) < / a>
< / section>
< section class = "contact-details" >
< h2> Contact< / h2>
< p> Yoko's Kitchen< br>
27 Redchurch Street< br>
Shoreditch< br>
London E2 7DP< / p>
< / section>
< / aside>
< footer>
& copy; 2011 Yoko's Kitchen
< / footer>
< / div>
< script> // 此处省略JavaScript代码 < / script>
< / body>
< / html>
requests是Python中最流行的HTTP库之一,用于发送各种HTTP请求,如GET和POST。它简单易用,功能强大,支持会话管理、Cookie操作、代理设置等。以下是requests库的常见用法和代码示例,帮助你快速掌握如何使用requests进行网络请求。 import requests
response = requests. get( 'https://httpbin.org/get' )
print ( f"Status Code: { response. status_code} " )
print ( f"Content: { response. text} " )
data = { 'key1' : 'value1' , 'key2' : 'value2' }
response = requests. post( 'https://httpbin.org/post' , data= data)
print ( f"Status Code: { response. status_code} " )
print ( f"Content: { response. text} " )
params = { 'key1' : 'value1' , 'key2' : 'value2' }
response = requests. get( 'https://httpbin.org/get' , params= params)
print ( f"URL: { response. url} " )
print ( f"Content: { response. text} " )
headers = { 'user-agent' : 'my-app/0.0.1' }
response = requests. get( 'https://httpbin.org/get' , headers= headers)
print ( f"Content: { response. text} " )
files = { 'file' : open ( 'example.txt' , 'rb' ) }
response = requests. post( 'https://httpbin.org/post' , files= files)
print ( f"Content: { response. text} " )
response = requests. get( 'https://httpbin.org/cookies' )
print ( f"Cookies: { response. cookies} " )
cookies = { 'key1' : 'value1' }
response = requests. get( 'https://httpbin.org/cookies' , cookies= cookies)
print ( f"Content: { response. text} " )
proxies = {
'http' : 'http://10.10.1.10:3128' ,
'https' : 'http://10.10.1.10:1080' , }
response = requests. get( 'https://httpbin.org/get' , proxies= proxies)
print ( f"Content: { response. text} " )
requests库提供了简单而强大的接口,用于发送HTTP请求。通过上述代码示例,你已经掌握了如何使用requests发送GET和POST请求、处理URL参数和请求头、上传文件、操作Cookie以及设置代理服务器。
正则表达式(Regular Expression)是一种强大的文本处理工具,广泛用于字符串匹配、查找和替换等操作。在爬虫开发中,正则表达式常用于从HTML页面中提取特定信息。 如果你对正则表达式不太熟悉,推荐先阅读《正则表达式30分钟入门教程》,然后再结合Python中的re模块进行学习。 假设我们有一个简单的HTML页面,需要提取其中的标题内容。 < !DOCTYPE html>
< html>
< head>
< title> Sample Page< / title>
< / head>
< body>
< h1> Welcome to My Page< / h1>
< / body>
< / html>
import re
html_content = """
<!DOCTYPE html>
<html>
<head>
    <title>Sample Page</title>
</head>
<body>
    <h1>Welcome to My Page</h1>
</body>
</html>
"""
pattern = r'<title>(.*?)</title>'
match= re. search( pattern, html_content, re. IGNORECASE)
ifmatch:
title = match. group( 1 )
print ( f"Title: { title} " )
else :
print ( "No title found." )
pattern = r'<a[^>]+href=["\'](.*?)["\']'
links = re. findall( pattern, html_content, re. IGNORECASE)
for link in links:
print ( f"Link: { link} " )
re.search用于在字符串中搜索第一个匹配的模式。
pattern = r'<h1>(.*?)</h1>'
match = re. search( pattern, html_content, re. IGNORECASE)
if match:
heading = match. group( 1 )
print ( f"Heading: { heading} " )
re.findall用于查找字符串中所有匹配的模式。
pattern = r'<a[^>]+href=["\'](.*?)["\']'
links = re. findall( pattern, html_content, re. IGNORECASE)
for link in links:
print ( f"Link: { link} " )
cleaned_content = re. sub( r'<[^>]+>' , '' , html_content)
print ( f"Cleaned Content: { cleaned_content} " )
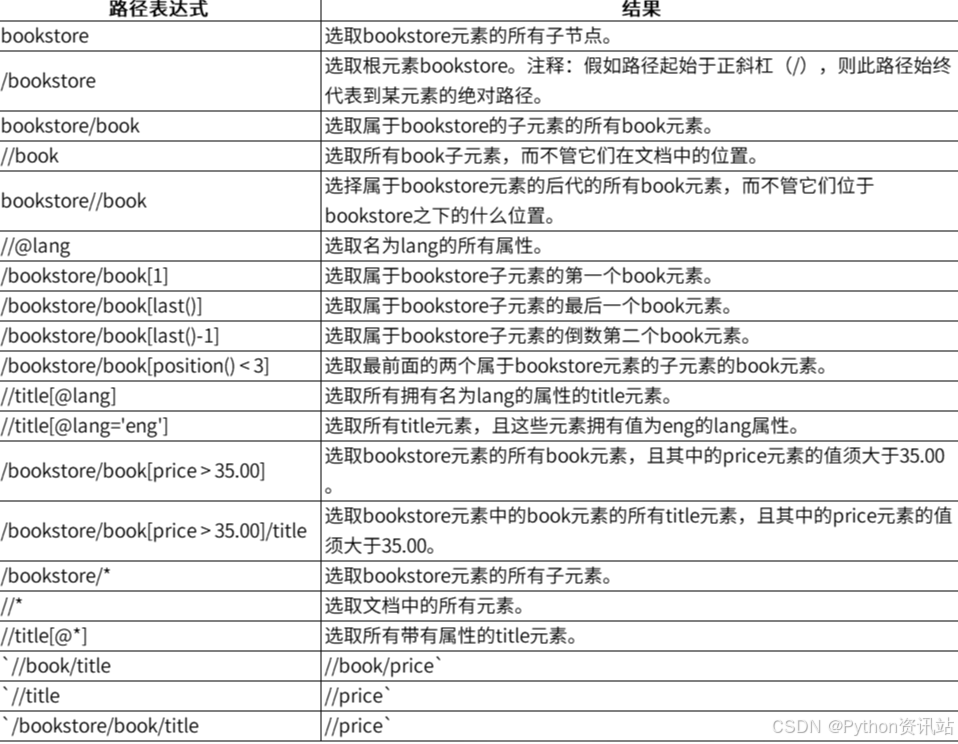
默认情况下,正则表达式是贪婪的,会尽可能多地匹配字符。例如,.*会匹配尽可能多的字符。 使用.*?可以切换到非贪婪模式,只匹配尽可能少的字符。 使用re.IGNORECASE或re.I标志可以忽略大小写。 使用re.DOTALL或re.S标志可以让.匹配换行符。 正则表达式是文本处理的强大工具,通过合理使用re模块的方法,可以高效地从HTML页面中提取所需信息。希望本文能帮助你更好地理解和应用正则表达式。 XPath是一种在XML和HTML文档中查找信息的语言,它使用路径表达式来选取文档中的节点或节点集。lxml是一个高效的XML和HTML解析库,支持XPath表达式,可以快速提取页面中的数据。 以下是一个简单的XPath解析案例,展示如何使用lxml解析HTML或XML文档并提取有用信息。 XPath使用路径表达式来选取文档中的节点或节点集。以下是一些常见的XPath表达式及其含义: < ?xml version= "1.0" encoding= "UTF-8" ?>
< bookstore>
< book>
< title lang= "eng" > Harry Potter< / title>
< price> 29.99 < / price>
< / book>
< book>
< title lang= "eng" > Learning XML< / title>
< price> 39.95 < / price>
< / book>
< / bookstore>
pip install lxml
from lxml import etree
xml_content = """
<?xml version="1.0" encoding="UTF-8"?>
<bookstore>
    <book>
      <title lang="eng">Harry Potter</title>
      <price>29.99</price>
    </book>
    <book>
      <title lang="eng">Learning XML</title>
      <price>39.95</price>
    </book>
</bookstore>
"""
root = etree. fromstring( xml_content)
books = root. xpath( '//book' )
for book in books:
title = book. xpath( './/title/text()' ) [ 0 ]
price = book. xpath( './/price/text()' ) [ 0 ]
print ( f"Title: { title} , Price: { price} " )
first_book = root. xpath( '/bookstore/book[1]' )
if first_book:
title = first_book[ 0 ] . xpath( './/title/text()' ) [ 0 ]
print ( f"First Book Title: { title} " )
titles_with_lang = root. xpath( '//title[@lang="eng"]' )
for title in titles_with_lang:
print ( f"Title with lang='eng': { title. text} " )
expensive_books = root. xpath( '/bookstore/book[price>35.00]' )
for book in expensive_books:
title = book. xpath( './/title/text()' ) [ 0 ]
price = book. xpath( './/price/text()' ) [ 0 ]
print ( f"Expensive Book: Title: { title} , Price: { price} " ) 总结
通过上述代码,我们展示了如何使用lxml和XPath解析XML文档并提取有用信息。 XPath提供了强大的路径表达式语法,可以方便地选取文档中的节点或节点集。 lxml库支持XPath表达式,使得解析XML和HTML文档变得非常简单。 BeautifulSoup是一个强大的HTML解析库,支持多种解析器(如html.parser、lxml)。例如,提取所有链接:from bs4 import BeautifulSoup
html = "<a href='link1'>Link 1</a>"
soup = BeautifulSoup( html, 'lxml' )
links = [ a[ 'href' ] for a in soup. find_all( 'a' ) ]
print ( links)
BeautifulSoup是一个可以从HTML或XML文件中提取数据的Python库。 它能够通过你喜欢的转换器实现惯用的文档导航、查找、修改文档的方式。以下是如何使用BeautifulSoup进行HTML解析和数据提取的详细指南。 首先,需要安装BeautifulSoup库以及推荐的解析器lxml: pip install beautifulsoup4
pip install lxml
from bs4 import BeautifulSoup
html_content = """
<html>
<head>
<title>Sample Page</title>
</head>
<body>
<h1>Welcome to My Page</h1>
</body>
</html>
"""
soup = BeautifulSoup( html_content, 'lxml' )
title_tag = soup. title
print ( f"Title Tag: { title_tag} " )
link_tag = soup. find( 'a' )
print ( f"Link Tag Attributes: { link_tag. attrs} " )
print ( f"Title Text: { title_tag. string} " )
body_tag = soup. body
for child in body_tag. children:
print ( child)
h1_tag = soup. h1
print ( f"Parent of h1: { h1_tag. parent. name} " )
for sibling in h1_tag. next_siblings:
print ( sibling)
h1_tag = soup. find( 'h1' )
print ( f"h1 Tag: { h1_tag} " )
p_tags = soup. find_all( 'p' )
for p in p_tags:
print ( p)
h1_tag = soup. select_one( 'h1' )
print ( f"h1 Tag: { h1_tag} " )
p_tags = soup. select( 'p' )
for p in p_tags:
print ( p
BeautifulSoup是一个功能强大的库,适用于从HTML和XML文档提取数据。 它支持多种解析器,如html.parser和lxml,提供了简单易用的API来导航、搜索和修改文档。 PyQuery类似于jQuery,适合快速解析HTML。例如from pyquery import PyQuery
html = "<a href='link1'>Link 1</a>"
pq = PyQuery( html)
links = pq( 'a' ) . attr( 'href' )
print ( links)
PyQuery是一个强大的Python库,它提供了类似于jQuery的API,用于解析和操作HTML文档。 如果你熟悉jQuery,那么PyQuery将非常容易上手。以下是如何使用PyQuery进行HTML解析和数据提取的详细指南。 pip install pyquery
from pyquery import PyQuery as pq
html_content = """
<html>
<head>
<title>Sample Page</title>
</head>
<body>
<h1>Welcome to My Page</h1>
<p>This is a paragraph.</p>
</body>
</html>
"""
doc = pq( html_content)
title = doc( 'title' ) . text( )
print ( f"Title: { title} " )
h1 = doc( 'h1' ) . text( )
print ( f"H1: { h1} " )
html_content = """
<a href="http://example.com">Example</a>
"""
doc = pq( html_content)
link = doc( 'a' ) . attr( 'href' )
print ( f"Link: { link} " )
html_content = """
<ul>
<li>Item 1</li>
<li>Item 2</li>
<li>Item 3</li>
</ul>
"""
doc = pq( html_content)
for item in doc( 'ul > li' ) . items( ) :
print ( item. text( ) )
html_content = """
<div>
<p>Original paragraph.</p>
</div>
"""
doc = pq( html_content)
doc( 'div' ) . append( '<p>New paragraph.</p>' )
doc( 'div > p:first' ) . remove( )
print ( doc)
PyQuery支持CSS选择器,可以方便地选择和操作HTML元素。 html_content = """
<div class="container">
<p id="main">Main paragraph.</p>
<p class="info">Info paragraph.</p>
</div>
"""
doc = pq( html_content)
main_paragraph = doc( '#main' ) . text( )
info_paragraph = doc( '.info' ) . text( )
print ( f"Main Paragraph: { main_paragraph} " )
print ( f"Info Paragraph: { info_paragraph} " )
html_content = """
<div>
<p>Paragraph 1</p>
<p>Paragraph 2</p>
</div>
"""
doc = pq( html_content)
paragraphs = doc( 'p' ) . map ( lambda i, el: pq( el) . text( ) )
print ( f"Paragraphs: { paragraphs} " )
html_content = """
<div>
<p>Original content.</p>
</div>
"""
doc = pq( html_content)
doc( 'p' ) . text( 'New content' )
print ( doc)
PyQuery是一个功能强大的库,提供类似于jQuery的API,用于解析和操作HTML文档。它支持CSS选择器,可以方便地选择和操作HTML元素。 希望本文能帮助你更好地理解和应用PyQuery进行网页数据抓取。如果你熟悉jQuery,那么PyQuery将非常容易上手。 在本实例中,我们将通过Python编写一个简单的爬虫,用于获取知乎发现页面的问题链接。我们将使用requests库发送HTTP请求,并使用BeautifulSoup解析HTML内容。 以下是详细的代码实现和注释。 from urllib. parse import urljoin
import re
import requests
from bs4 import BeautifulSoup
defmain( ) :
headers = { 'user-agent' : 'Baiduspider' }
proxies = {
'http' : 'http://122.114.31.177:808' ,
}
base_url = 'https://www.zhihu.com'
seed_url = urljoin( base_url, 'explore' )
try :
resp = requests. get( seed_url, headers= headers, proxies= proxies)
resp. raise_for_status( )
except requests. RequestException as e:
print ( f"请求失败: { e} " )
print ( "请检查网页链接的合法性,适当重试。" )
return
soup = BeautifulSoup( resp. text, 'lxml' )
href_regex = re. compile ( r'^/question' )
link_set = set ( )
for a_tag in soup. find_all( 'a' , { 'href' : href_regex} ) :
if'href' in a_tag. attrs:
href = a_tag. attrs[ 'href' ]
full_url = urljoin( base_url, href)
link_set. add( full_url)
print ( f"Total { len ( link_set) } question pages found." )
for link in link_set:
print ( link)
if __name__ == '__main__' :
main( )
通过上述代码,我们实现一个简单的爬虫,用于获取知乎页面上的问题链接。在实际应用中,可以根据需要进一步优化和扩展爬虫的功能,例如处理分页、提取更多问题信息等。 通过以上技术,你可以轻松实现数据采集和解析,为后续的数据处理和分析打下坚实基础。
总结 最后希望你编程学习上不急不躁,按照计划有条不紊推进,把任何一件事做到极致,都是不容易的,加油,努力!相信自己! 文末福利 最后这里免费分享给大家一份Python全套学习资料,希望能帮到那些不满现状,想提升自己却又没有方向的朋友,也可以和我一起来学习交流呀。 包含编程资料、学习路线图、源代码、软件安装包等!【[点击这里] 】领取! ① Python所有方向的学习路线图,清楚各个方向要学什么东西 ② 100多节Python课程视频,涵盖必备基础、爬虫和数据分析 ③ 100多个Python实战案例,学习不再是只会理论 ④ 华为出品独家Python漫画教程,手机也能学习 可以扫描下方二维码领取【保证100%免费 】


 3588
3588

 被折叠的 条评论
为什么被折叠?
被折叠的 条评论
为什么被折叠?
 到【灌水乐园】发言


