


前言
ArkUI出来一段时间了,官方给我们提供了很多好用的组件,但部分组件还是不够尽善尽美。比如我想实现下面类似大众点评首页效果,就发现目前提供的Swiper滑动翻页组件因缺少页面滑动过程的监听,不能达到边滑动,边改变组件高度的需求;系统也提供了Tabs通过页签进行内容视图切换的容器组件,但用过的都知道,它对自定义样式支持的不太好。所以,本demo就通过自定义翻页组件、横向滑动tab组件来达到类似大众点评首页效果。
效果图
代码结构解读

-
component
header.ets : 头部九宫格菜单及下标区域
horizontalTabs.ets:水平滚动tab标签组件
searchBar.ets:头部搜索栏
waterfalllayout.ets:瀑布流内容展示组件
-
model
imageListDataModel.ets: 瀑布流数据工具类
menuListDataModel.ets:头部九宫格数据获取工具类
-
pages
index.ets:首页容器
preview.ets: 图片展示页
实现过程
界面上主要分为4块:顶部固定的搜索栏、九宫格菜单展示、滚动吸顶tab标签、瀑布流内容展示。
搜索栏
搜索栏比较简单,最外层用的Row包裹,中间的垂直轮播用的Swiper组件。直接贴代码吧!
@Component
export struct SearchBar {
  @Prop searchBarHeight: number
  private hotSearchKeywords: string[] = ['烤肉', '火锅', '海底捞', '东北菜']

  build() {
    Row() {
      Text('西安').fontSize(16).padding({ left: 15 }).height('100%')
      Image($r('app.media.arrow_down')).width(20).height('100%').padding(3).objectFit(ImageFit.ScaleDown)
      // 搜索框
      Swiper() {
        ForEach(this.hotSearchKeywords, item => {
          Flex({ direction: FlexDirection.Row, justifyContent: FlexAlign.Center, alignItems: ItemAlign.Center, }) {
            // 搜索图标
            Image($r('app.media.search'))
              .width(15).height(15)

            Text(item)
              .height('100%')
              .fontSize(12)
              .fontColor('#505050')
              .margin({ left: 10 })
          }.width('100%')

        }, item => item)
      }
      .layoutWeight(1)
      .height('60%')
      .margin({ left: 15, right: 15 })
      .backgroundColor('#F1F1F1')
      .borderRadius(15)
      .vertical(true) // 方向:纵向
      .autoPlay(true) // 自动播放
      .indicator(false) // 隐藏指示器
      .interval(3000) // 切换间隔时间3秒

      Image($r('app.media.dot')).height('100%').width(30).margin({right:40}).padding(3).objectFit(ImageFit.ScaleDown)

    }.width('100%').height(this.searchBarHeight)
  }
}
滑动翻页切换九宫格菜单
看到这个效果,第一反应就是应该使用Swiper来实现,但查阅相关API后发现,监听不到滑动状态的改变,就无法动态的改变菜单区域的高度。遂采用了可横向滑动的Scroll来实现。
大体实现思路分为以下几步:
1、采用Scroll包裹两个宽度100%的Flex布局,使其可左右滑动
2、监听滚动事件,计算滑动比,改变组件高度
Scroll(this.scroller)
.onScroll((xOffset: number, yOffset: number) => {
        // 计算当前滑动的距离百分比 360是屏幕的宽度(与config.json中window的配置有关)
        this.slidPercent = this.scroller.currentOffset().xOffset / 360
        this.headerHeight = this.pageHeight + (this.pageHeight - this.indicatorHeight) * this.slidPercent
        if (this.onSlidChange instanceof Function) {
          this.onSlidChange(this.slidPercent)
        }
      })
3、监听滚动结束事件,实现翻页效果
Scroll组件有onScrollEnd监听,但一些情况下,该回调会不停的被执行,故采用Scroll外包一层Flex布局,来监听手势结束状态,处理滚动逻辑。
// 处理手势,在手指抬起时处理展示页面
handTouchEvent(event: TouchEvent): void{
  if (event.type === TouchType.Down) {
    this.lastX = event.touches[0].x
  } else if (event.type === TouchType.Move) {
  } else if (event.type === TouchType.Up || event.type === TouchType.Cancel) {
    // 滑动的距离
    let dis: number = px2vp(event.touches[0].x - this.lastX)
    let needChangePage: boolean = Math.abs(dis) > 120
    if (needChangePage) { // 需要切换
      this.scroller.scrollTo({
        xOffset: dis > 0 ? 0 : 360,
        yOffset: 0,
        animation: { duration: 200, curve: Curve.EaseOut }
      })
    } else { // 不需切换页面
      let showFirstPage: boolean = this.scroller.currentOffset().xOffset < 120
      this.scroller.scrollTo({
        xOffset: showFirstPage ? 0 : 360,
        yOffset: 0,
        animation: { duration: 200, curve: Curve.EaseOut }
      })
    }
  }
}
4、利用Flex布局特性,实现九宫格菜单
5、添加下标指示器
// 指示器
Row() {
  Column()
    .width(10)
    .height(10)
    .backgroundColor(Color.Orange)
    .borderRadius(5)
    .opacity((1 - this.slidPercent) < 0.3 ? 0.3 : (1 - this.slidPercent))

  Progress({ value: this.slidPercent * 100, total: 100, style: ProgressStyle.Linear })
    .color(Color.Orange)
    .value(this.slidPercent * 100)
    .cricularStyle({ strokeWidth: 10 })
    .width(30)
    .height(10)
    .borderRadius(5)
  //          .backgroundColor(Color.Grey)
    .margin({ left: 5 })
完整代码:
import {getFirstMenuList, getSecondMenuList, MenuData} from '../model/menuListDataModel.ets'

@Component
export struct MenuLayout {
  // 第一页九宫格数据
  private firstMenuList = getFirstMenuList()
  // 第二页九宫格数据
  private secondMenuList = getSecondMenuList()
  // 指示器的高度
  private indicatorHeight = 20
  // 页面滑动的百分比
  private slidPercent: number = 0
  private scroller: Scroller = new Scroller()
  // 容器的高度
  @Link headerHeight: number
  // 容器的高度因为headerHeight在滑动时会不断变化,所以放在aboutToAppear中初始化
  private pageHeight: number
  // 上次手指按下的位置
  private lastX: number;

  // 滑动监听
  private onSlidChange: (slidPercent: number) => void = (slidPercent: number) => {
    console.log('onSlidChange slidPercent = ' + slidPercent)
  }

  aboutToAppear() {
    this.pageHeight = this.headerHeight
  }

  @Builder genMenuLayout(menuList: MenuData[]) {
    Flex({ direction: FlexDirection.Row, wrap: FlexWrap.Wrap }) {
      ForEach(menuList, (item: MenuData) => {
        Column() {
          Image(item.src).width(45).height(45).objectFit(ImageFit.Cover).borderRadius(5)
          Text(item.name).height(20)
        }.width('20%')
        .height((this.pageHeight - this.indicatorHeight) / 2)
        .onClick(() => {
          console.log('=======onClick  item.name ===' + item.name)

        })
      }, item => item.id)
    }.width('100%')
  }

  build() {
    Flex({ direction: FlexDirection.Column, alignItems: ItemAlign.Center }) {
      Scroll(this.scroller) {
        Flex({ direction: FlexDirection.Row, wrap: FlexWrap.NoWrap }) {
          this.genMenuLayout(this.firstMenuList)
          this.genMenuLayout(this.secondMenuList)
        }.height('100%')
      }
      .scrollable(ScrollDirection.Horizontal)
      .height(this.headerHeight - this.indicatorHeight)
      .onScroll((xOffset: number, yOffset: number) => {
        // 计算当前滑动的距离百分比
        this.slidPercent = this.scroller.currentOffset().xOffset / 360
        this.headerHeight = this.pageHeight + (this.pageHeight - this.indicatorHeight) * this.slidPercent
        if (this.onSlidChange instanceof Function) {
          this.onSlidChange(this.slidPercent)
        }
      })

      // 指示器
      Row() {
        Column()
          .width(10)
          .height(10)
          .backgroundColor(Color.Orange)
          .borderRadius(5)
          .opacity((1 - this.slidPercent) < 0.3 ? 0.3 : (1 - this.slidPercent))

        Progress({ value: this.slidPercent * 100, total: 100, style: ProgressStyle.Linear })
          .color(Color.Orange)
          .value(this.slidPercent * 100)
          .cricularStyle({ strokeWidth: 10 })
          .width(30)
          .height(10)
          .borderRadius(5)
        //          .backgroundColor(Color.Grey)
          .margin({ left: 5 })
      }.height(this.indicatorHeight)
    }.onTouch((event: TouchEvent) => {
      this.handTouchEvent(event)
    }).width('100%')
  }

  // 处理手势,在手指抬起时处理展示页面
  handTouchEvent(event: TouchEvent): void{
    if (event.type === TouchType.Down) {
      this.lastX = event.touches[0].x
    } else if (event.type === TouchType.Move) {

    } else if (event.type === TouchType.Up || event.type === TouchType.Cancel) {
      // 滑动的距离
      let dis: number = px2vp(event.touches[0].x - this.lastX)

      let needChangePage: boolean = Math.abs(dis) > 120

      if (needChangePage) { // 需要切换
        this.scroller.scrollTo({
          xOffset: dis > 0 ? 0 : 360,
          yOffset: 0,
          animation: { duration: 200, curve: Curve.EaseOut }
        })
      } else { // 不需切换页面
        let showFirstPage: boolean = this.scroller.currentOffset().xOffset < 120
        this.scroller.scrollTo({
          xOffset: showFirstPage ? 0 : 360,
          yOffset: 0,
          animation: { duration: 200, curve: Curve.EaseOut }
        })
      }
    }
  }
}
横向滑动tab标签 吸顶的实现
实现可横向滚动的tab标签很简单,利用scroll很容易就实现了。但要实现点击某个标签,让其滚动到中间位置如何做到呢?我们无法拿到该tab相对父布局的位置,就不能计算出应该滚动的距离。这里 我使用了投机的方式来估算出每个tab所需的宽度,即:字体的大小*文本的长度+左右边距和
说说currentIndex为什么要用@Link 修饰,这是因为为了和父组件的Swipe关联,达到点击tab标签,切换Swipe页面,滑动切换Swipe页面,也能动态改变选中标签.
horizontalTabs.ets 完整代码:
@Component
export struct TabLayout {
// 字体大小
  private fontSizeNormal = 16
// tab左右margin
  private tabMargin = 15
// 标题列表,由父组件初始化
  @Link titleArr: string[]
// tab标签选中position
  @Link currentIndex: number
  private left: number= 0
// tab标签选中监听 父类可重写
  private tabSelected: (position: number, title: string) => void = (position: number, title: string) => {
    console.log('tabSelected position = ' + position + ', title = ' + title)
  }
  @State private tabDataArr: TabModel[] = []
  private scroller: Scroller = new Scroller()

  aboutToAppear() {
    this.tabDataArr = this.titleArr.map((title, index) => {
      let tabModel = new TabModel()
      tabModel.index = index
      tabModel.content = title
      tabModel.left = this.left
      let width = title.length * this.fontSizeNormal + this.tabMargin * 2
      tabModel.width = width
      tabModel.left = this.left
      this.left += width
      return tabModel
    })
  }

  build() {
    Scroll(this.scroller) {
      Flex({ direction: FlexDirection.Row }) {
        ForEach(this.tabDataArr, (item: TabModel) => {
          Flex({ direction: FlexDirection.Column, justifyContent: FlexAlign.Center, alignItems: ItemAlign.Center }) {
            Text(item.content)
              .fontSize(this.currentIndex == item.index ? this.fontSizeNormal + 3 : this.fontSizeNormal)
              .fontColor(this.currentIndex == item.index ? Color.Red : Color.Black)
              .fontWeight(this.currentIndex == item.index ? FontWeight.Bold : FontWeight.Normal)
              .textAlign(TextAlign.Center)

            Column()
              .height(3)
              .width(item.width - this.tabMargin * 2)
              .margin({ top: 10 })
              .backgroundColor(Color.Red)
              .visibility(this.currentIndex == item.index ? Visibility.Visible : Visibility.Hidden)
          }
          .width(item.width)
          .height('100%')
          .backgroundColor(0xFFFFFF)
          .onClick((event: ClickEvent) => {
            this.currentIndex = item.index
            this.scrollToCenter(item.left, item.width)
            console.log('tabSelected--------  ' + typeof (this.tabSelected))
            if (this.tabSelected instanceof Function) {
              this.tabSelected(item.index, item.content)
            }
          })
        }, item => item.index)
      }
    }.scrollable(ScrollDirection.Horizontal)

  }
// 滚动至中间位置
  scrollToCenter(itemLeft: number, itemWidth: number): void{
    console.log('scrollToCenter  itemLeft = ' + itemLeft)
    let targetOffset: number = itemLeft + itemWidth / 2 - 180
    console.log('scrollToCenter  targetOffset = ' + targetOffset)
    this.scroller.scrollTo({ xOffset: targetOffset, yOffset: 0, animation: { duration: 200, curve: Curve.EaseInOut } })
  }
}

export class TabModel {
  index: number
  content: string
  left: number
  width: number
}
tab吸顶的原理也比较简单,监听页面滚动,计算tab组件应处的position即可,同时,还监听headerHeight的变化。可利用@Watch实现监听
index的完整代码:
import {WaterFallLayout} from '../component/waterfalllayout.ets'
import {TabLayout} from '../component/horizontalTabs.ets'
import {SearchBar} from '../component/searchBar.ets'
import {MenuLayout} from '../component/header.ets'


@Entry
@Component
struct Index {
  @State titleArr: string[] = ['关注', '附近', '达人探店', '优惠', '家居生活', '美食', '遛娃', '医美', '宠物', '运动健康', '教培']
  @State currentIndex: number  = 1
  private swiperController: SwiperController = new SwiperController()
// 头部banner高度
  @State @Watch("onHeaderHeightUpdated") headerHeight: number = 160
// tab标签栏的高度
  private tabHeight = 50
// 搜索栏高度
  @State searchBarHeight: number = 50
  private scrollY: number = 0
  @State tabPosY: number = vp2px(this.headerHeight + this.searchBarHeight)

  build() {
    Stack({ alignContent: Alignment.Top }) {
      SearchBar({ searchBarHeight: this.searchBarHeight })
      Row() {
        TabLayout({
          titleArr: $titleArr,
          currentIndex: $currentIndex,
          tabSelected: (position: number, title: string) => {
            this.currentIndex = position
            console.log('onTabSelected position = ' + position + ', title = ' + title)
//            this.swiperController.showNext()
          },
        })
      }
      .width('100%')
      .height(this.tabHeight)
      .markAnchor({ x: 0, y: 0 })
      .position({ y: this.tabPosY + 'px', x: 0 })
      .zIndex(10)

      Scroll() {
        Column() {
          MenuLayout({ headerHeight: $headerHeight })

          Swiper(this.swiperController) {
            ForEach(this.titleArr, (item) => {
              Column() {
                Text('Page ' + item).fontSize(25).margin(10)
                WaterFallLayout()
              }
            }, item => item)
          }
          .index(0)
          .autoPlay(false)
          .indicator(false) // 默认开启指示点
          .loop(false) // 默认开启循环播放
          .vertical(false) // 默认横向切换
          .itemSpace(0)
          .index(this.currentIndex)
          .margin({ top: this.tabHeight })
          .flexGrow(1)
          .width('100%')
          .onChange((index: number) => {
            console.info(index.toString())
            this.currentIndex = index
          })

        }
      }
      .scrollBar(BarState.Off)
      .margin({ top: this.searchBarHeight })
      .backgroundColor('#F4F4F4')
      .onScroll((xOffset: number, yOffset: number) => {
        this.scrollY += yOffset
        this.tabPosY = vp2px(this.headerHeight) - this.scrollY <= 0
          ? vp2px(this.searchBarHeight) : vp2px(this.headerHeight + this.searchBarHeight) - this.scrollY
      })


    }.width('100%')
  }

  onHeaderHeightUpdated() {
    this.tabPosY = vp2px(this.headerHeight + this.searchBarHeight)
  }
}
瀑布流内容展示:
瀑布流布局的具体实现不是本文的重点,如有需要,请看我的另篇文章:基于ArkUI实现瀑布流布局
遗留的问题:
Swiper组件提供的swiperController只有showNext和showPrevious方法,切换指定页面是通过改变index属性。但在子组件切换时,会有重影出现,暂不知是何原因。
为了能让大家更好的学习鸿蒙(HarmonyOS NEXT)开发技术,这边特意整理了《鸿蒙开发学习手册》(共计890页),希望对大家有所帮助:https://qr21.cn/FV7h05
《鸿蒙开发学习手册》:
如何快速入门:https://qr21.cn/FV7h05
- 基本概念
- 构建第一个ArkTS应用
- ……
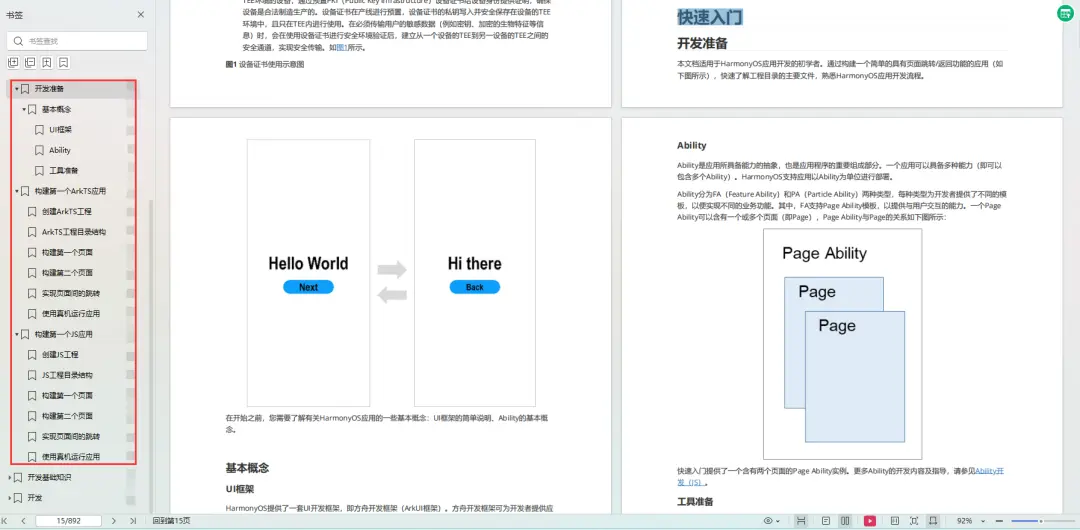
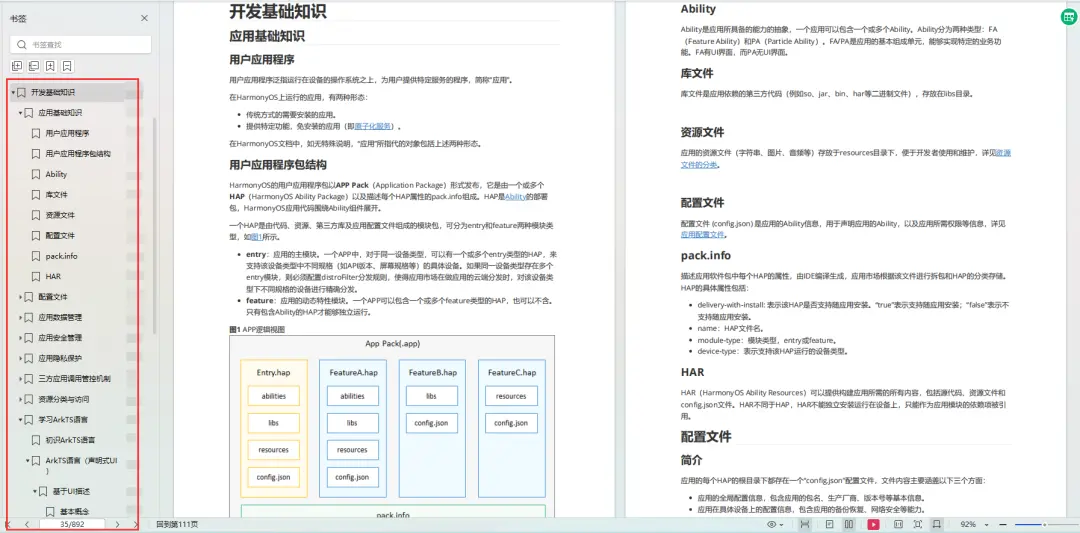
开发基础知识:https://qr21.cn/FV7h05
- 应用基础知识
- 配置文件
- 应用数据管理
- 应用安全管理
- 应用隐私保护
- 三方应用调用管控机制
- 资源分类与访问
- 学习ArkTS语言
- ……
基于ArkTS 开发:https://qr21.cn/FV7h05
- Ability开发
- UI开发
- 公共事件与通知
- 窗口管理
- 媒体
- 安全
- 网络与链接
- 电话服务
- 数据管理
- 后台任务(Background Task)管理
- 设备管理
- 设备使用信息统计
- DFX
- 国际化开发
- 折叠屏系列
- ……

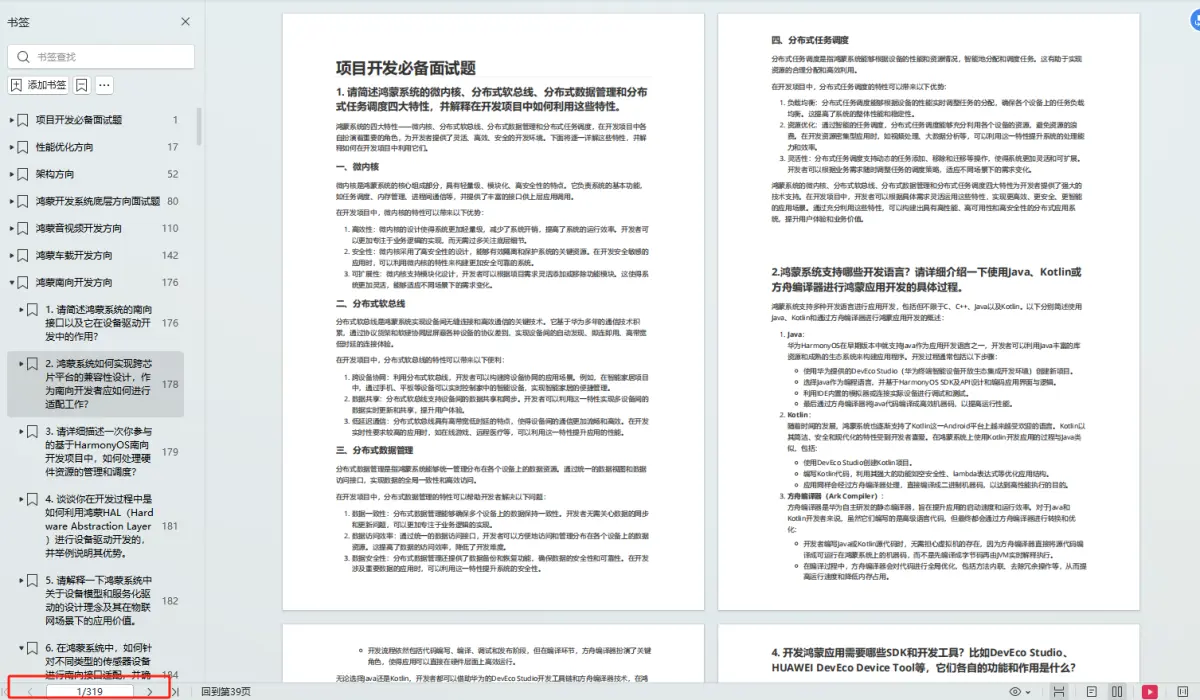
鸿蒙开发面试真题(含参考答案):https://qr18.cn/F781PH

鸿蒙开发面试大盘集篇(共计319页):https://qr18.cn/F781PH
1.项目开发必备面试题
2.性能优化方向
3.架构方向
4.鸿蒙开发系统底层方向
5.鸿蒙音视频开发方向
6.鸿蒙车载开发方向
7.鸿蒙南向开发方向


 411
411


 被折叠的 条评论
为什么被折叠?
被折叠的 条评论
为什么被折叠?
 到【灌水乐园】发言


