


1.Python实现fast-Neural-Style-Transfer
Python环境
Pyhton3.8+Pytorch1.7
预训练模型下载链接:
style-transfer-models - Google 云端硬盘
在Python代码中我们只调试图像的风格迁移,视频的风格迁移需要自己安装
skvideo库,因为要配置ffmpeg比较麻烦或者用opencv中的视频流,所以这里不再赘述。
打开test_on_image.py,把parser改成如下格式:

在image_path里面输入ContentImage的路径,checkPoint_model输入预训练模型的路径。
pth文件转pt文件,由于C++的Libtorch只能读入Torch训练好的pt文件类型,因此我们将作者提供的pth文件,通过python语法转为pt文件:
traced_script_module = torch.jit.trace(transformer, torch.ones(1, 3, 504, 813).to(device))
torch.jit.save(traced_script_module,"starry_night.pt")
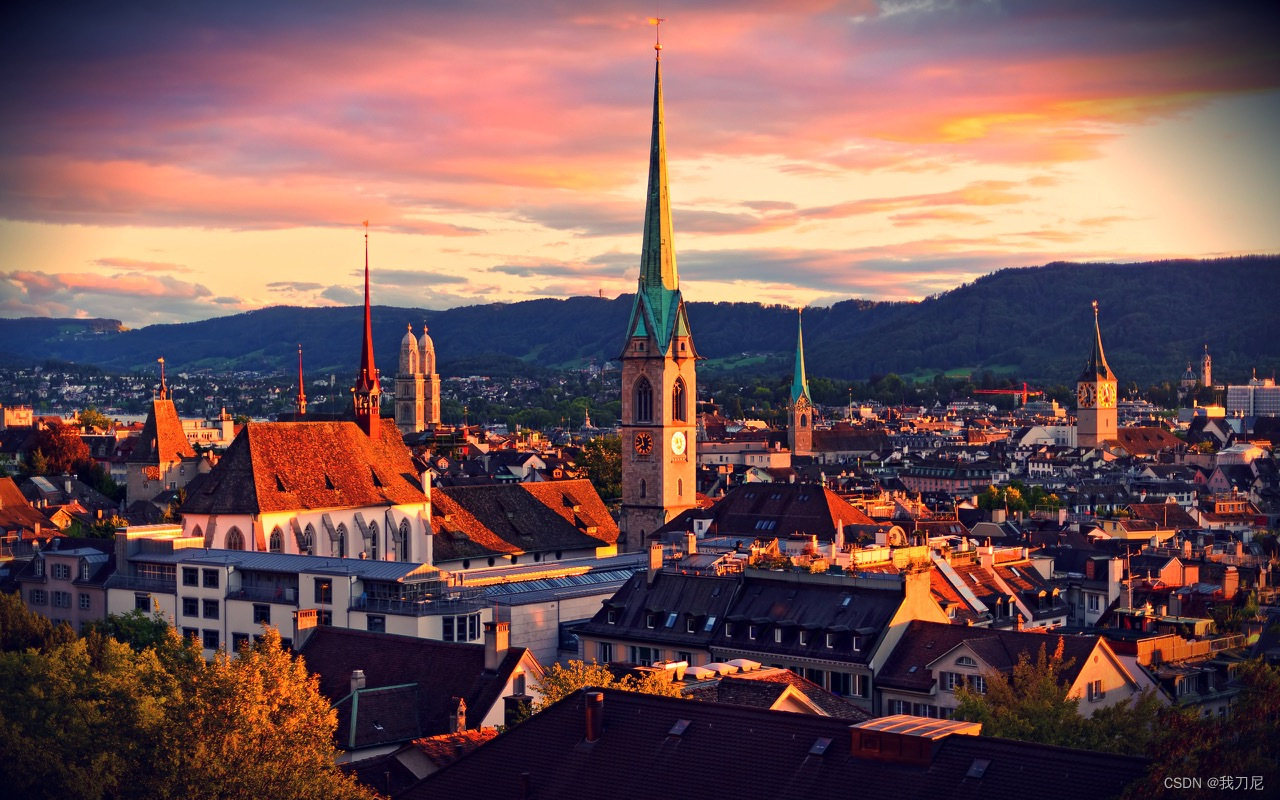
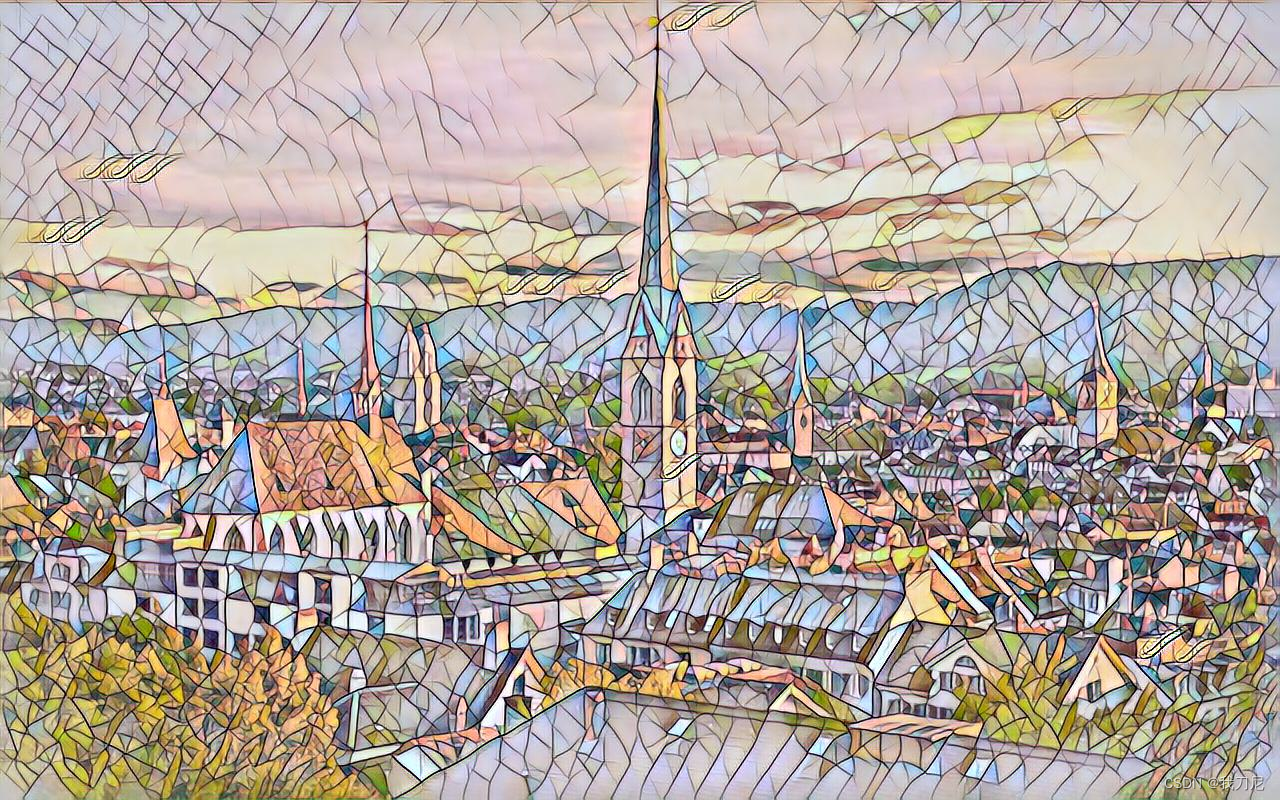
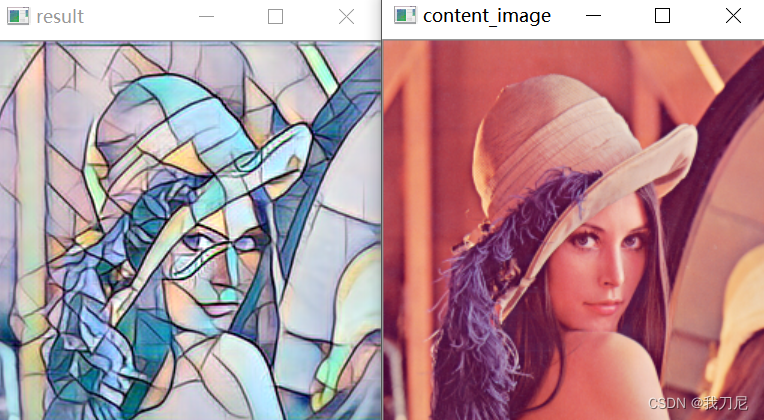
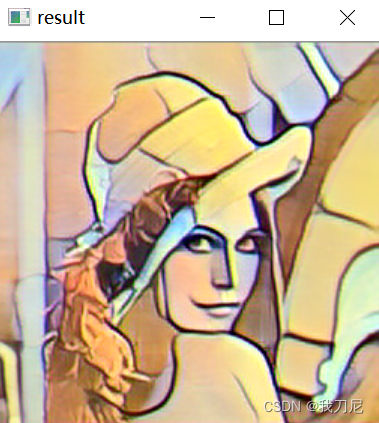
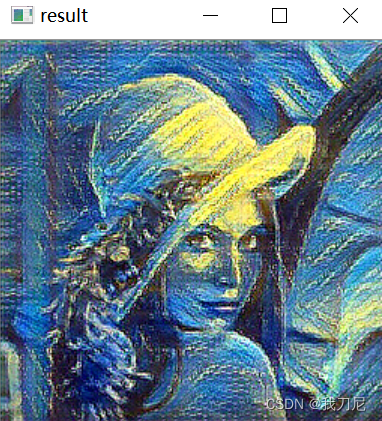
实现结果看一下吧:
content_image:
style_image:

transfer_image:
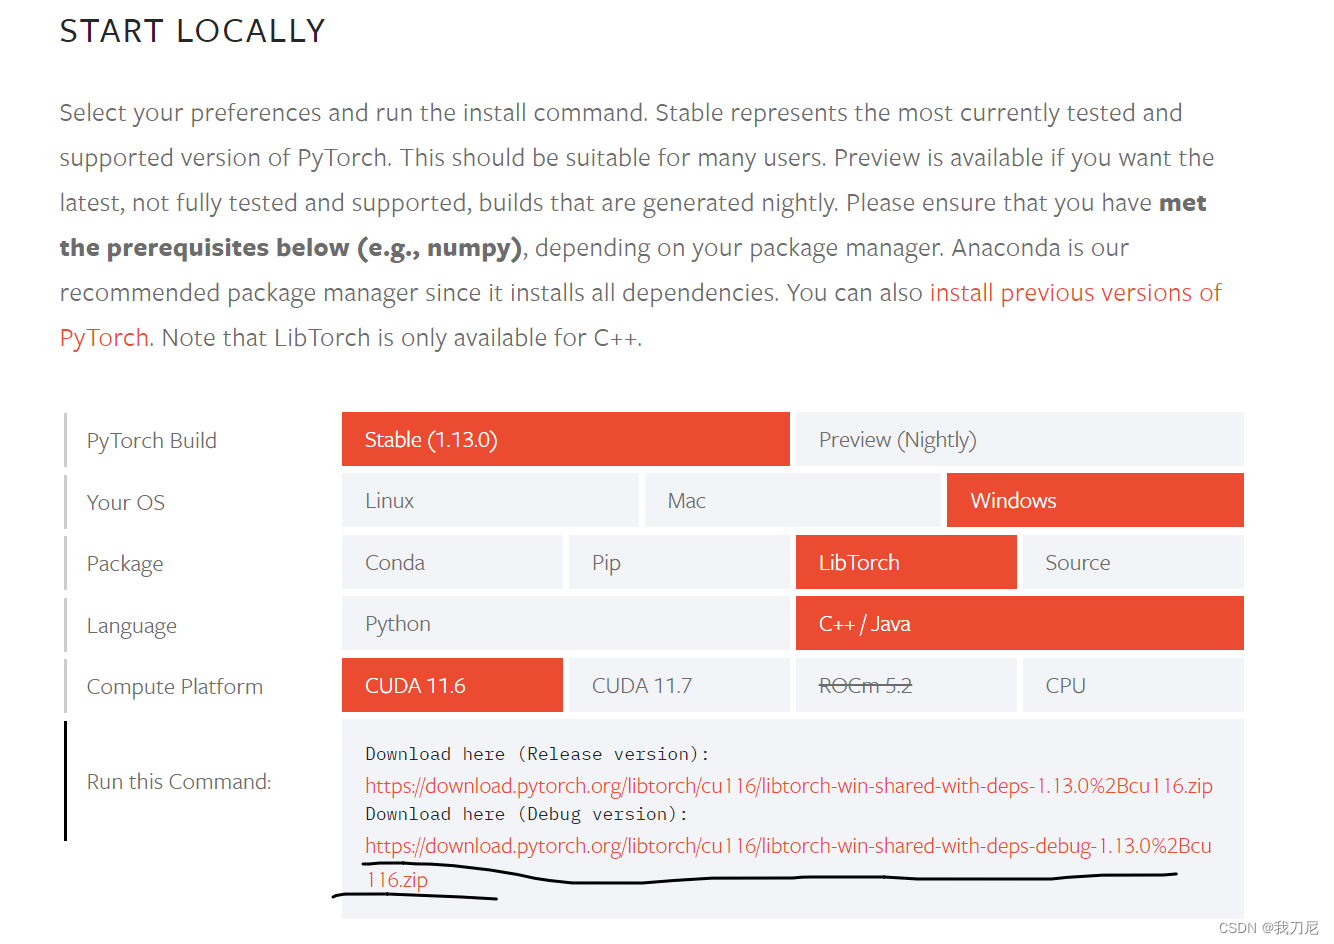
2.安装LibTorch
去官网下载:
Start Locally | PyTorch
本文只配置Debug版本,Release按需下载
下载完成后解压。
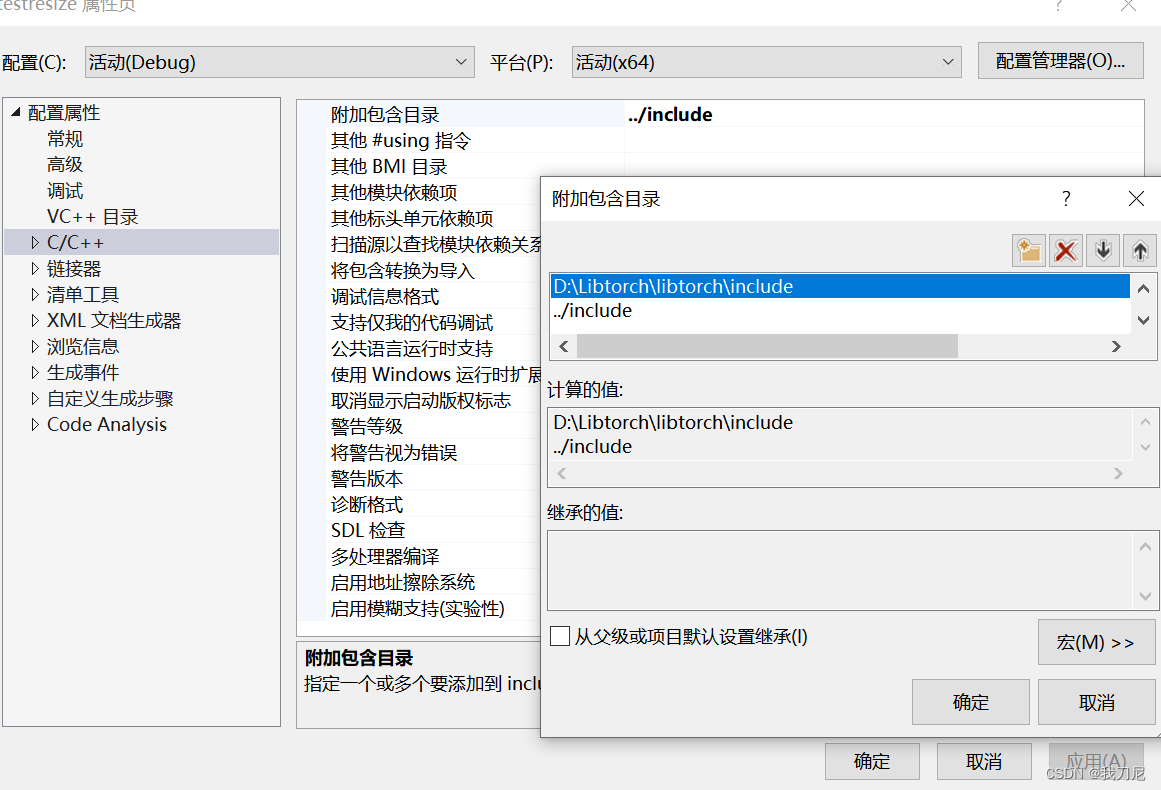
打开你的VSProject
包含目录中添加include目录:
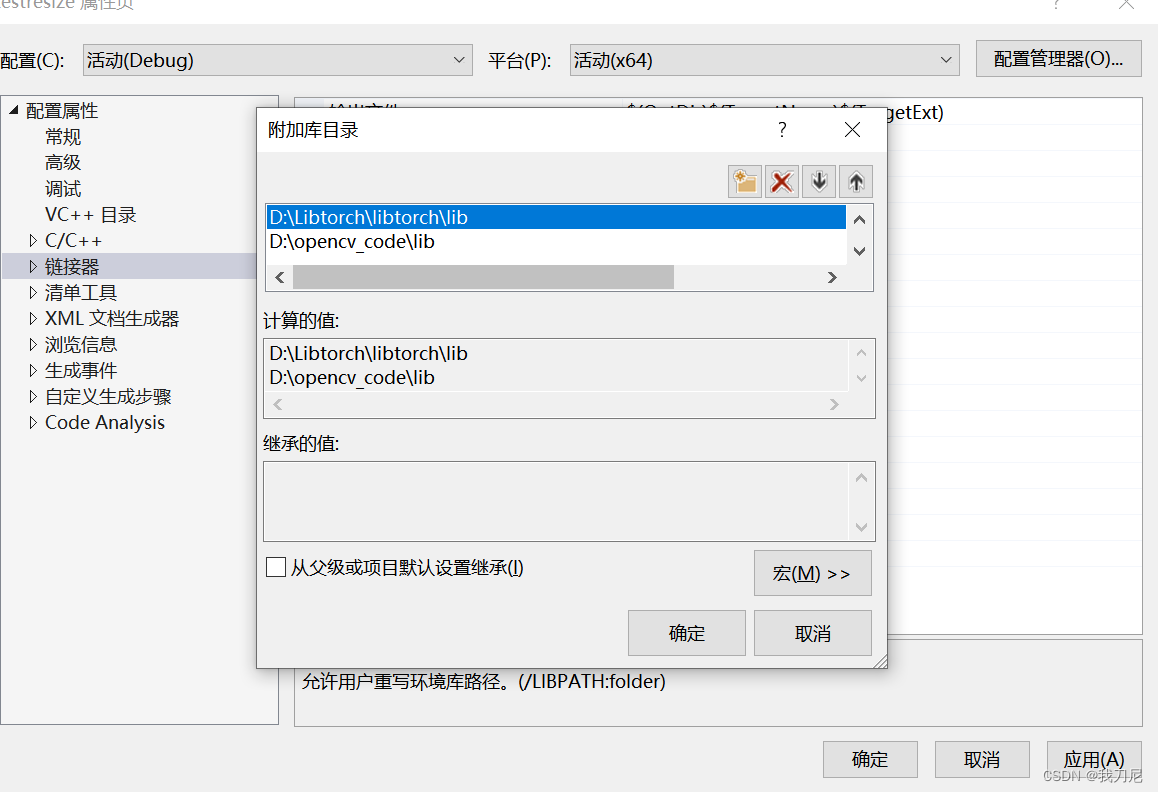
附加库目录中添加lib目录:
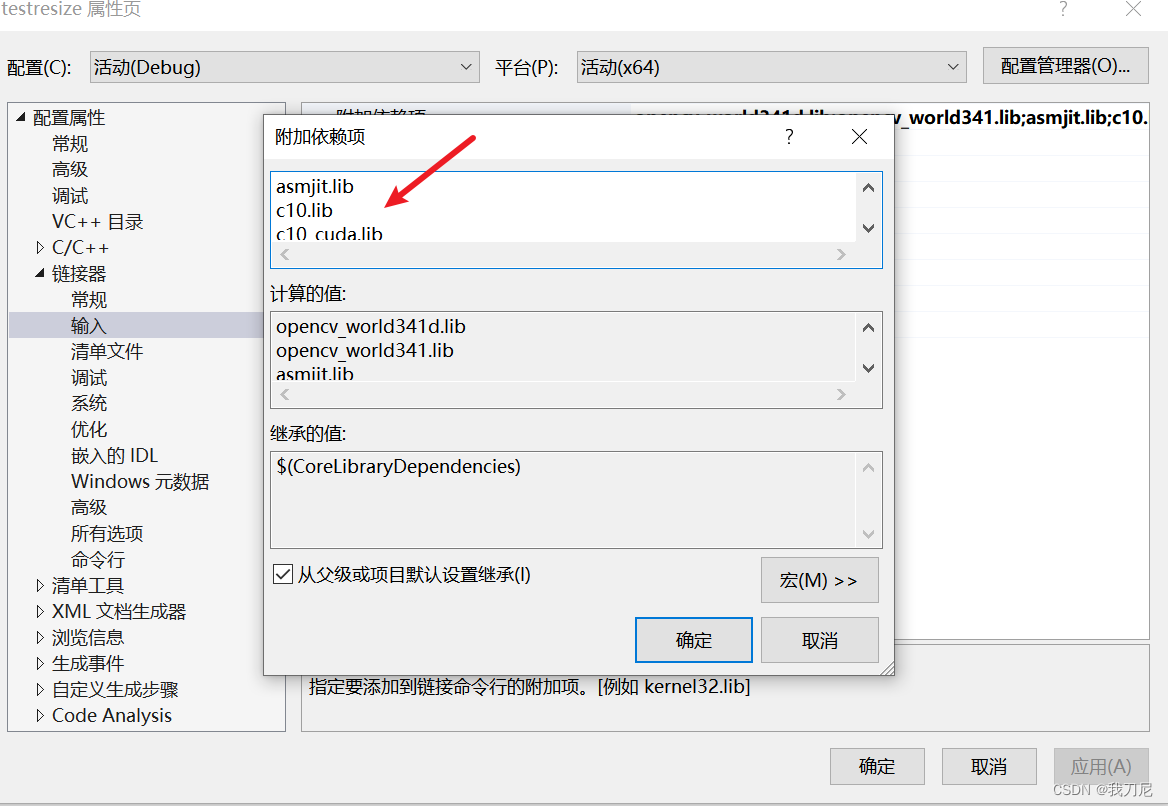
在动态链接文件中输入以下:
asmjit.lib
c10.lib
c10_cuda.lib
caffe2_nvrtc.lib
clog.lib
cpuinfo.lib
dnnl.lib
fbgemm.lib
kineto.lib
libprotobufd.lib
libprotobuf-lited.lib
libprotocd.lib
pthreadpool.lib
torch.lib
torch_cpu.lib
torch_cuda.lib
torch_cuda_cpp.lib
torch_cuda_cu.lib
XNNPACK.lib
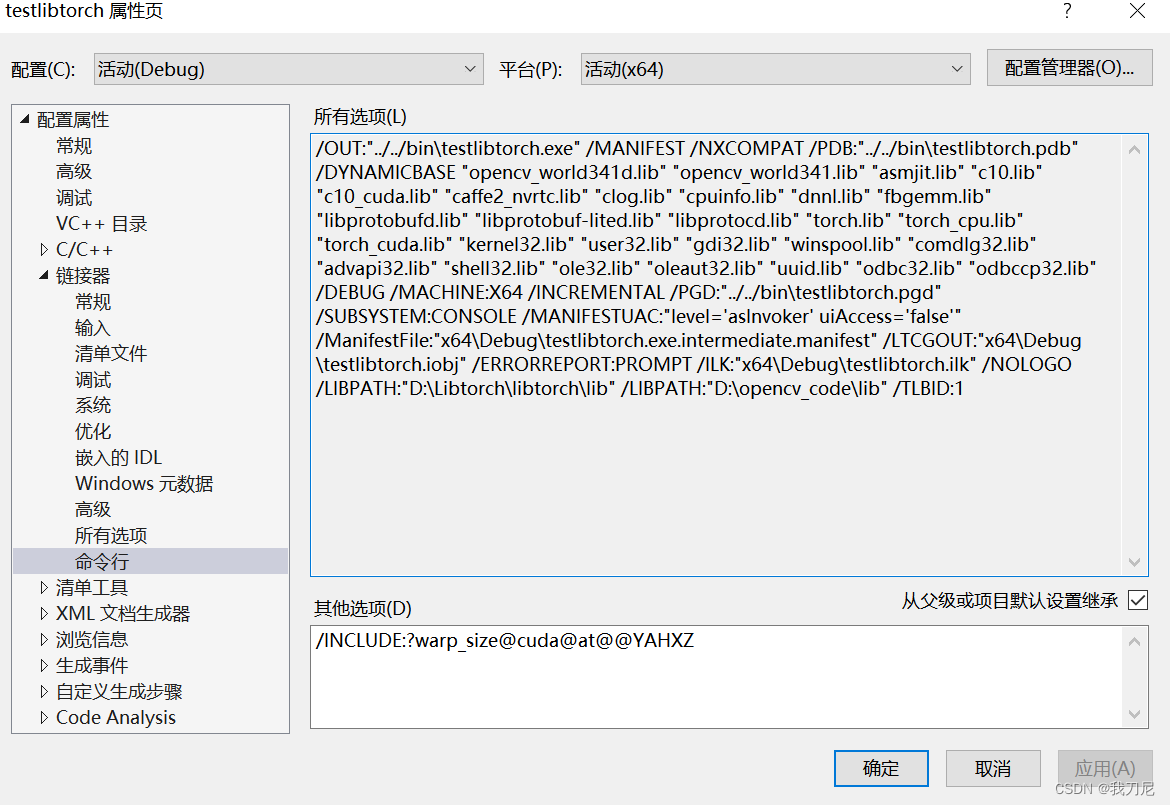
链接器的命令行加入以下:
/INCLUDE:?warp_size@cuda@at@@YAHXZ
将缺乏的dll动态链接库都加载在调试目录下。
#include <torch/torch.h>
#include <torch/script.h>
int main(int argc,char *argv)
{
    std::cout << "cuda::is_available():" << torch::cuda::is_available() << std::endl;
    std::cout << "torch::cuda::cudnn_is_available():" <<  torch::cuda::cudnn_is_available() << std::endl;
    std::cout << "torch::cuda::device_count():" << torch::cuda::device_count() <<  std::endl;
    torch::Tensor tensor = torch::rand({ 5,3 });
    auto device = torch::Device(torch::kCUDA);
    std::cout << tensor << std::endl;
    //torch::jit::script::Module module = torch::jit::load("starry_night.pt",device);
    return 0;
}
如果以上代码没有问题,代表配置成功,并得到以下结果:
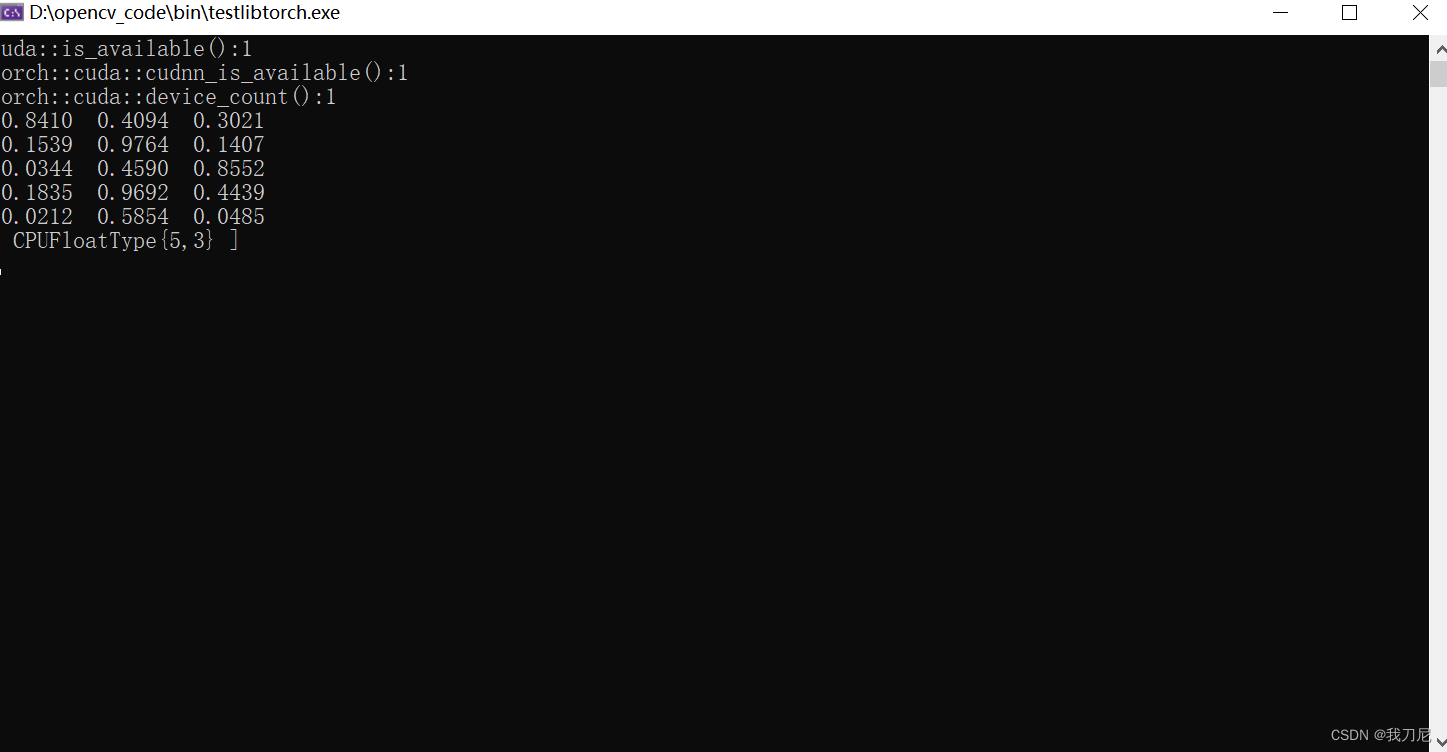
cuda::is_available():1
torch::cuda::cudnn_is_available()::1
cuda及cudnn都显示可用,可以调用GPU。
3.使用Libtorch在C++上实现风格迁移(默认大家已经配置过Opencv)
#include <torch/torch.h>
#include <torch/script.h>
#include<opencv2/core.hpp>
#include<opencv2/imgproc.hpp>
#include<opencv2/highgui.hpp>
using namespace cv;
using namespace std;
using namespace torch::indexing;
void process(Mat &img, torch::Tensor &tensor)
{
    //cvtColor(img, img,COLOR_BGR2RGB);
    //模型均值和方差
    float mean[3] = { 0.485,0.456,0.406 };
    float std[3] = {0.229,0.224,0.225};
    //tensor= torch::from_blob(img.data, { img.rows, img.cols, 3 }, torch::kByte);  //opencv format H*W*C
    //Mat resultImg(img.rows, img.cols, CV_8UC3, tensor.data_ptr()); // 将Tensor数据拷贝至Mat
    std::cout << output.slice(/*dim=*/1, /*start=*/0, /*end=*/5) << '\n';
    //namedWindow("result");
    //imshow("result", resultImg);
    //waitKey(0);
    tensor = torch::from_blob(img.data, { 1, img.rows, img.cols, 3 },torch::kByte);  //opencv format H*W*C
    tensor = tensor.permute({ 0, 3, 1, 2 }).to(torch::kFloat) / 255.0; //pytorch  format N*C*H*W
    for (int i = 0; i < 3; i++)
    {
        tensor.index({ 0,i,Slice(None),Slice(None) }) = (tensor.index({  0,i,Slice(None),Slice(None) }) - mean[i]) / std[i];
    }
    cout << "图像预处理完成!" << endl;
}
void denormalize(torch::Tensor& tensor)
{
    float mean[3] = { 0.485,0.456,0.406 };
    float std[3] = { 0.229,0.224,0.225 };
    for (int i = 0; i < 3; i++)
    {
        tensor.index({ 0,i,Slice(None),Slice(None) }) = (tensor.index({  0,i,Slice(None),Slice(None) }) *std[i]) + mean[i];
    }
    cout << "图像反归一化完成!" << endl;
}
void transfer(Mat& img, Size img_size, torch::Tensor tensor)
{
    img.create(img_size, CV_8UC3);
    for (int r=0;r<img.rows;r++)
    {
        for (int c=0;c<img.cols;c++)
        {
            for (int k=0;k<3;k++)
            {
                //cout << tensor.index({r,c,k}).to(torch::kU8);
                img.at<Vec3b>(r, c)[k] = tensor.index({ r,c,k }).to(torch::kU8);
                img.at<Vec3b>(r, c)[k] = tensor[r][c][k].item<uchar>();
            }
        }
    }
}
int main(int argc,char *argv)
{
    std::cout << "cuda::is_available():" << torch::cuda::is_available() << std::endl;
    std::cout << "torch::cuda::cudnn_is_available():" <<  torch::cuda::cudnn_is_available() << std::endl;
    std::cout << "torch::cuda::device_count():" << torch::cuda::device_count() <<  std::endl;
    auto device = torch::Device(torch::kCUDA);
    /*torch::Tensor tensor = torch::rand({ 5,3 },device);
    std::cout << tensor << std::endl;*/
    torch::jit::script::Module model = torch::jit::load("mosaic.pt",device);
    //读入content_image
    Mat content_image = imread("1.jpg");
    namedWindow("content_image");
    imshow("content_image",content_image);
    //图像预处理
    torch::Tensor img_tensor;
    process(content_image, img_tensor);
    std::vector<torch::jit::IValue> inputs;
    inputs.push_back(img_tensor.to(device));
    torch::Tensor output = model.forward(inputs).toTensor();
    denormalize(output);
    //output = output.to(torch::kCPU).squeeze().detach().permute({ 1, 2, 0 });
    output = output.squeeze().mul(255).add(0.5).clamp(0, 255).permute({ 1, 2, 0  }).to(torch::kCPU).to(torch::kU8); //s3:*255,转uint8
    output.print();
    Mat resultImg;
    transfer(resultImg,content_image.size(),output);
    //Mat resultImg(content_image.rows, content_image.cols,CV_8UC3, output.data_ptr());  // 将Tensor数据拷贝至Mat
    //std::cout << output.slice(/*dim=*/1, /*start=*/0, /*end=*/5) << '\n';
    namedWindow("result");
    imshow("result",resultImg);
    waitKey(0);
    return 0;
}
一开始我是用:
Mat resultImg(content_image.rows, content_image.cols,CV_8UC3, output.data_ptr()); // 将Tensor数据拷贝至Mat
来实现网路输出Tensor到Mat的时候,出现了奇怪的现象:
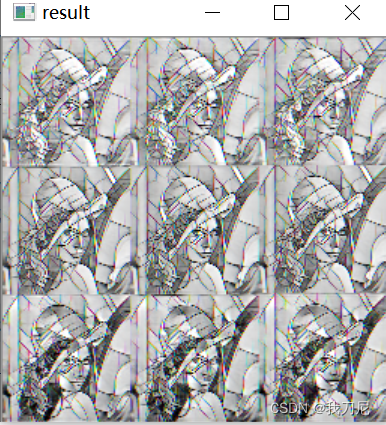
所以我还是自己写了一个transfer函数,保证图像通道和tensor的索引是一致的,这个BUG还是需要尽快修复,因为逐像素索引的话,处理速度会大打折扣,后续想应用在视频处理上的话,难度太大。
不管怎么说最后还是实现了,如果有额外的内容,后续会跟进。
实验效果:


 3621
3621


 被折叠的 条评论
为什么被折叠?
被折叠的 条评论
为什么被折叠?
 到【灌水乐园】发言


