


Point 1 --------五大布局
1、相对布局(RelativeLayout)
顾名思义,通过组件之间的相对位置来进行布局,使用在此布局时,理清各个组件之间的位置关系非常重要。
相对布局按个子元素之间的位置关系完成布局。在该布局中,子元素中与位置相关的属性将生效,如:android:layout_below等。由于其灵活性,适用于一些复杂界面的布局。
常用位置属性(来自网络):
android:layout_toLeftOf —— 该组件位于引用组件的左方
android:layout_toRightOf —— 该组件位于引用组件的右方
android:layout_above —— 该组件位于引用组件的上方
android:layout_below —— 该组件位于引用组件的下方
android:layout_alignParentLeft —— 该组件是否对齐父组件的左端
android:layout_alignParentRight —— 该组件是否齐其父组件的右端
android:layout_alignParentTop —— 该组件是否对齐父组件的顶部
android:layout_alignParentBottom —— 该组件是否对齐父组件的底部
android:layout_centerInParent —— 该组件是否相对于父组件居中
android:layout_centerHorizontal —— 该组件是否横向居中
android:layout_centerVertical —— 该组件是否垂直居中
2、线性布局(LinearLayout)
线性布局中,所有的组件按照垂直或水平方向排列,使用orientation属性来决定是按照水平方向(horizontal)或是垂直方向(vertical)进行排列。
以QQ登录界面为例:
<LinearLayoutxmlns:android="http://schemas.android.com/apk/res/android"
xmlns:tools="http://schemas.android.com/tools"
android:layout_width="match_parent"
android:layout_height="match_parent"
android:orientation="vertical">
<LinearLayout
android:layout_width="fill_parent"
android:layout_height="wrap_content"
android:orientation="horizontal" >
<TextView
android:layout_width="wrap_content"
android:layout_height="wrap_content"
android:text="账号" />
<EditText
android:layout_width="fill_parent"
android:layout_height="wrap_content" />
</LinearLayout>
<LinearLayout
android:layout_width="fill_parent"
android:layout_height="wrap_content"
android:orientation="horizontal" >
<TextView
android:layout_width="wrap_content"
android:layout_height="wrap_content"
android:text="密码" />
<EditText
android:layout_width="fill_parent"
android:layout_height="wrap_content" />
</LinearLayout>
<LinearLayout
android:layout_width="fill_parent"
android:layout_height="wrap_content"
android:gravity="center"
android:orientation="horizontal" >
<Button
android:layout_width="wrap_content"
android:layout_height="wrap_content"
android:text="登录" />
<Button
android:layout_width="wrap_content"
android:layout_height="wrap_content"
android:text="注册" />
</LinearLayout>
</LinearLayout>
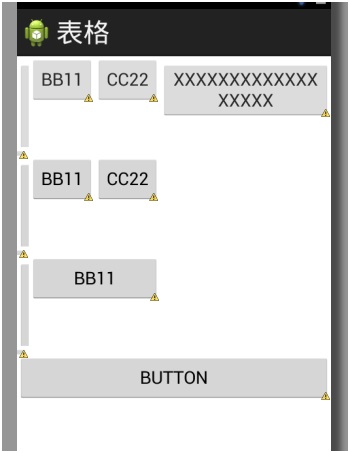
3、表格布局(TableLayout)
采用表格的方式来进行布局,需要注意的是可以用<TableRow></TableRow>来标记一行,在一行中可以通过设置权重(android:layout_weight=“”),通过比例来设置控件的宽度,在不适用TableRow时,一个组件会独占一行,值得注意的是TableLayout继承LinearLayout。
例:
<?xmlversion="1.0" encoding="utf-8"?>
<TableLayoutxmlns:android="http://schemas.android.com/apk/res/android"
android:layout_width="fill_parent"
android:layout_height="wrap_content"
android:collapseColumns="3,4,5" //可以被隐藏的列(第一列实际是第0列)
android:stretchColumns="1,2" //可以被拉伸的列
android:shrinkColumns="0,6" //可以被收缩的列
>
<TableRow >
<Button android:text="AA00"/>
<Button android:text="BB11"/>
<Button android:text="CC22"/>
<Button android:text="DD33"/>
<Button android:text="EE44"/>
<Button android:text="FF55"/>
<Button android:text="XXXXXXXXXXXXXXXXXX"/>
<TableRow >
<Button android:text="AA00"/>
<Button android:text="BB11"/>
<Button android:text="CC22"/>
<Button android:text="XXXXXXXXXXXXXXXXXX"/>
</TableRow>
<TableRow >
<Button android:text="AA00"/>
<Button android:text="BB11"android:layout_span="2"/> //layout_span属性设置控件所跨列数)
<Button android:text="CC22"/>
</TableRow>
<Button android:text="BUTTON"
android:layout_width="wrap_content"
android:gravity="center"/>
</TableLayout>
结果图:
4、帧布局(FrameLayout)
组件间进行层叠排序,后面的组件覆盖前面的组件。
例:
<FrameLayoutxmlns:android="http://schemas.android.com/apk/res/android"
xmlns:tools="http://schemas.android.com/tools"
android:layout_width="match_parent"
android:layout_height="match_parent"
>
<TextView
android:layout_width="fill_parent"
android:layout_height="100dip"
android:background="#ff0000"
android:text="@string/hello_world"/>
<TextView
android:layout_width="105dp"
android:layout_height="50dip"
android:background="#00ff00"
android:text="@string/hello_world" />
</FrameLayout>
5.绝对布局(AbsoluteLayout)
以界面左上角为原点,向左为正X轴,向下为正Y轴,通过坐标来确定组件位置。
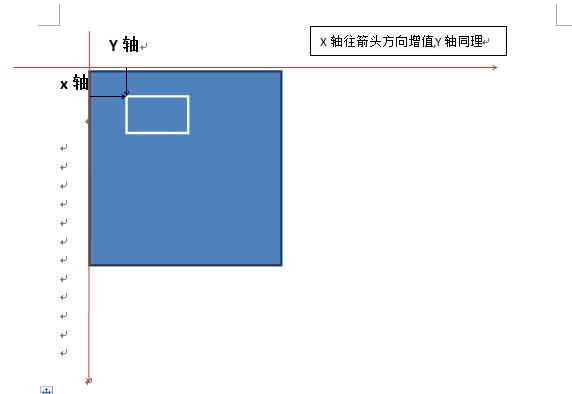
例:
<AbsoluteLayoutxmlns:android="http://schemas.android.com/apk/res/android"
xmlns:tools="http://schemas.android.com/tools"
android:layout_width="match_parent"
android:layout_height="match_parent"
>
<TextView
android:layout_x="20dip"
android:layout_y="20dip"
android:layout_width="wrap_content"
android:layout_height="wrap_content"
android:background="#ff0000"
android:text="@string/hello_world" />
</AbsoluteLayout>
Point2------常用控件
1、textview
<TextView
android:id="@+id/tv_example"
android:layout_height="wrap_content"
android:layout_width="fill_parent"
android:text="@string/hello_world"
android:textSize="12sp"
android:gravity="center"/>
2、editview
<EditText
android:id="@+id/et_example"
android:layout_height="50dip"
android:layout_width="fill_parent"
android:hint="请输入内容"
android:background="#ffffbb"/>
3、button
<Button
android:id="@+id/bt_example"
android:layout_height="wrap_content"
android:layout_width="wrap_content"
android:text="@string/app_name"/>
4、checkbox
<CheckBox
android:id="@+id/cb_hobby1"
android:layout_height="wrap_content"
android:layout_width="wrap_content"
android:text="@string/hobby1"
android:layout_below="@id/tv_hobby"
android:textSize="12sp"/>
<CheckBox
android:id="@+id/cb_hobby2"
android:layout_height="wrap_content"
android:layout_width="wrap_content"
android:text="@string/hobby2"
android:textSize="12sp"
android:layout_below="@id/tv_hobby"
android:layout_toRightOf="@id/cb_hobby1"/>
5、radioButton/radioGroup
<RadioGroup
android:id="@+id/rg_gender"
android:layout_width="wrap_content"
android:layout_height="wrap_content"
android:orientation="horizontal"
android:layout_below="@id/et_name"
android:layout_toRightOf="@id/tv_gender"
>
<RadioButton
android:id="@+id/rb_male"
android:layout_width="wrap_content"
android:layout_height="30dip"
android:text="@string/male"
android:checked="true"
android:textSize="12sp"/>
<RadioButton
android:id="@+id/rb_female"
android:layout_width="wrap_content"
android:layout_height="30dip"
android:text="@string/female"
android:textSize="12sp"/>
</RadioGroup>
6、mageView
<ImageView
android:id="@+id/iv_pic"
android:layout_height="150dip"
android:layout_width="100dip"
android:layout_toRightOf="@id/et_bg"
android:layout_below="@id/tv_title"
android:src="@drawable/tu"/>
7.spinner
<Spinner
android:id="@+id/sp_specialty"
android:layout_width="wrap_content"
android:layout_height="wrap_content"
android:prompt="@string/choose_specialty" //提示文字
android:entries="@array/specalties"
android:layout_toRightOf="@id/tv_specialty"
android:layout_below="@id/et_marriage"/>
<stringname="choose_specialty">选择专业</string>
<string-arrayname="specalties">
<item >人文</item>
<item >社科</item>
<item >理科</item>
<item >工科</item>
</string-array>
8、datePicker 和timePicker
<DatePicker
android:id="@drawable/dp_example"
android:layout_width="wrap_content"
android:layout_height="wrap_content"/>
<TimePicker
android:id="@drawable/dp_example"
android:layout_width="wrap_content"
android:layout_height="wrap_content"/>
Point3------事件初识(仅在此放置一段代码)
public classMainActivity extends Activity {
private Button btn;
private TextView tv_show;
@Override
protected void onCreate(BundlesavedInstanceState) {
super.onCreate(savedInstanceState);
setContentView(R.layout.activity_main);
btn = (Button)findViewById(R.id.btn);
tv_show = (TextView)findViewById(R.id.tv_show);
//第一种匿名内部类
btn.setOnClickListener(newOnClickListener() {
@Override
public void onClick(View v) {
tv_show.setText("好啦,马上到!!");
}
});
}
}
首先来介绍Android布局中Layout_weight的属性,它是用来分配剩余空间的一个属性,通过该属性可以设置布局的权重。说到剩余空间,想必很多人都不是特别的明白,下面我就先介绍一下剩余空间究竟为何方神圣:
首先来看一段代码:
运行结果如下图:

我们来分析一下上面的代码:只有Button2使用了Layout_weight属性,并赋值为了1,而Button1和Button3没有设置Layout_weight这个属性,根据API,可知,他们默认则是赋值为0。下面我就来讲,Layout_weight这个属性的真正的意思:Android系统先按照你设置的3个Button高度Layout_height值wrap_content,给你分配好他们3个的高度,然后会把剩下来的屏幕空间全部赋给Button2,因为只有他的权重值是1,这也是为什么Button2占了那么大的一块空间。
接下来分析这段代码:
效果图如下:

下面我们来重点分析一下这一块:在上述代码里面,我们将三个文本框的 layout_width全部设置成了wrap_content ,这就说明这三块内容分别占了他们自己内容的大小再加上(将剩余空间分成1:2:3的比例)的部分,就是上图显示的空间大小。
而当layout_width=“fill_parent”时,如果分别给三个TextView设置他们的Layout_weight为1、2、2的话,就会出现下面的效果:

这时候我们会发现,权重越小,反而分配的空间越多,这时产生的原因就是layout_width=“fill_parent”导致的,具体原因如下
依照上面理解我们来分析:系统先给3个textview分配他们所要的宽度fill_parent,也就是说每一都是填满他的父控件,这里就死屏幕的宽度那么这时候的剩余空间=1个parent_width-3个parent_width=-2个parent_width (parent_width指的是屏幕宽度 )那么第一个TextView的实际所占宽度应该=fill_parent的宽度,即parent_width + 他所占剩余空间的权重比列1/5 * 剩余空间大小(-2 parent_width)=3/5parent_width同理第二个TextView的实际所占宽度=parent_width + 2/5*(-2parent_width)=1/5parent_width;第三个TextView的实际所占宽度=parent_width + 2/5*(-2parent_width)=1/5parent_width;所以就是3:1:1的比列显示了。
这样你也就会明白为什么当你把三个Layout_weight设置为1、2、3的话,会出现下面的效果了:

第三个直接不显示了,为什么呢?一起来按上面方法算一下吧:
系统先给3个textview分配他们所要的宽度fill_parent,也就是说每一都是填满他的父控件,这里就死屏幕的宽度那么这时候的剩余空间=1个parent_width-3个parent_width=-2个parent_width (parent_width指的是屏幕宽度 )那么第一个TextView的实际所占宽度应该=fill_parent的宽度,即parent_width + 他所占剩余空间的权重比列1/6 * 剩余空间大小(-2 parent_width)=2/3parent_width同理第二个TextView的实际所占宽度=parent_width + 2/6*(-2parent_width)=1/3parent_width;第三个TextView的实际所占宽度=parent_width + 3/6*(-2parent_width)=0parent_width;所以就是2:1:0的比列显示了。第三个就直接没有空间了。


 2360
2360

 被折叠的 条评论
为什么被折叠?
被折叠的 条评论
为什么被折叠?
 到【灌水乐园】发言


