


启动过程分析
了解下Spring的BeanFactory之间的关系:
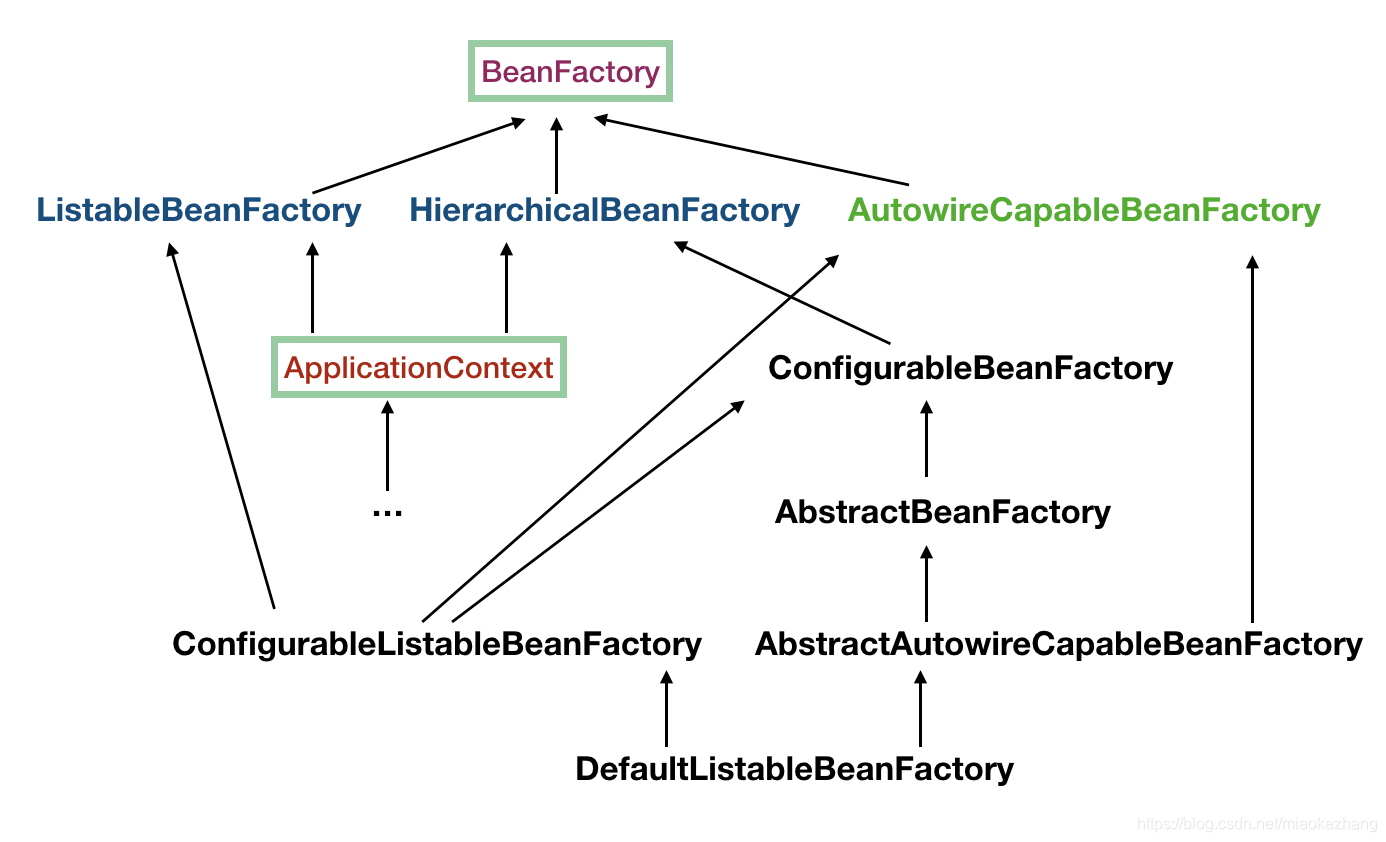
- 比较关键的地方是DefaultListableBeanFactory这个类,首先他是最低级的一个类,而且都直接与间接的关联了所有的BeanFactory,所以DefaultListableBeanFactory是内容最丰富的一个类。
- BeanFactory是根容器,生产 bean 的工厂,它负责生产和管理各个 bean 实例
启动过程
public class SpringStartTests {

    public static void main(String[] args) {
//        ClassPathResource resource = new ClassPathResource("springAnalysis.xml");
//        DefaultListableBeanFactory factory = new DefaultListableBeanFactory();
//        XmlBeanDefinitionReader reader = new XmlBeanDefinitionReader(factory);
//        reader.loadBeanDefinitions(resource);
//        MasAdminParam masAdminParam = (MasAdminParam) factory.getBean("masAdminParam");
//        System.out.println(masAdminParam.getUserName());

        ApplicationContext context = new ClassPathXmlApplicationContext("classpath:springAnalysis.xml");
        System.out.println("context 启动成功");

        // 从 context 中取出我们的 Bean,而不是用 new MessageServiceImpl() 这种方式
        MasAdminParam messageService = context.getBean(MasAdminParam.class);
        // 这句将输出: hello world
        System.out.println(messageService.getUserName());
    }
}
进行断点调试:
首先进入到父类AbstractApplicationContext,执行static体,类的加载机制,先加载然后链接、初始化,链接中的过程会执行static方法、变量、方法体,赋给其默认值,初始化会赋正确值…
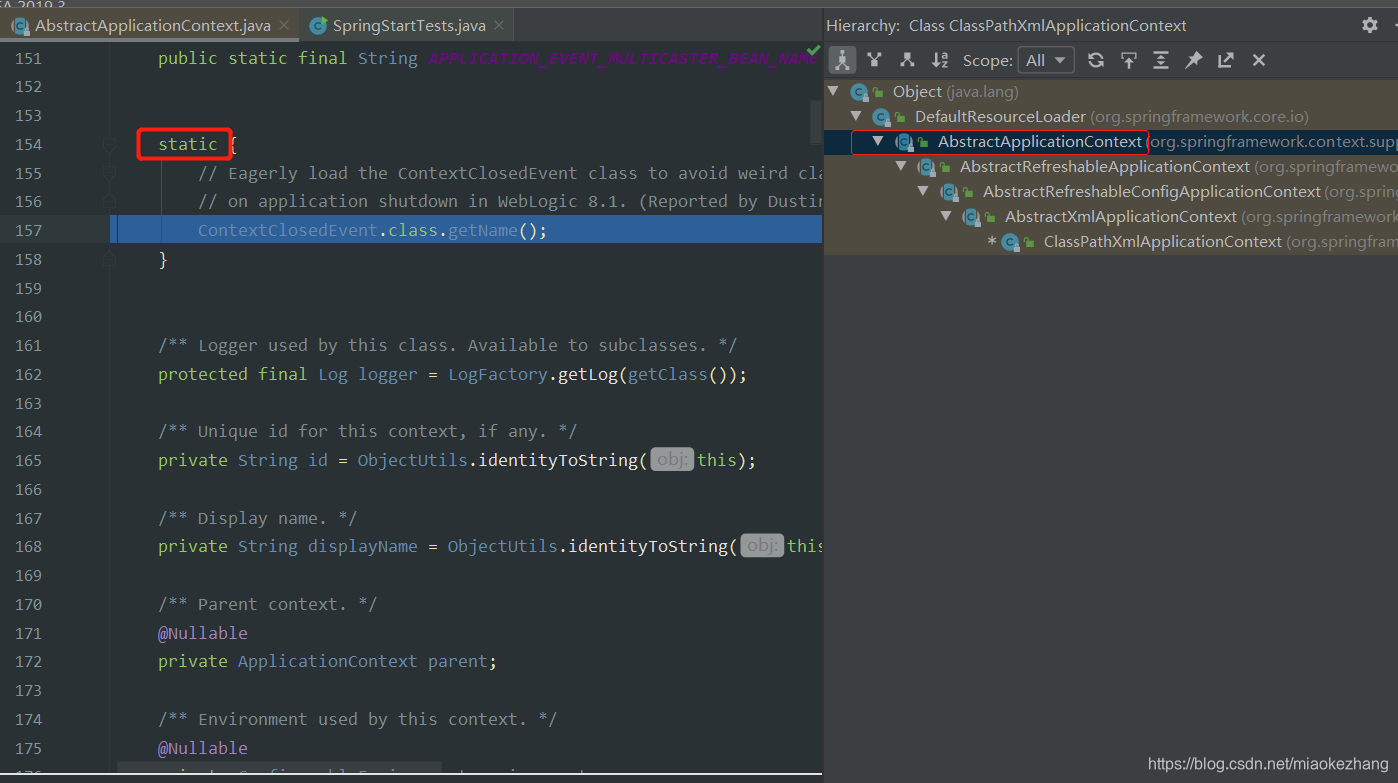
随后进入到了初始化,实例化状态,执行构造方法:
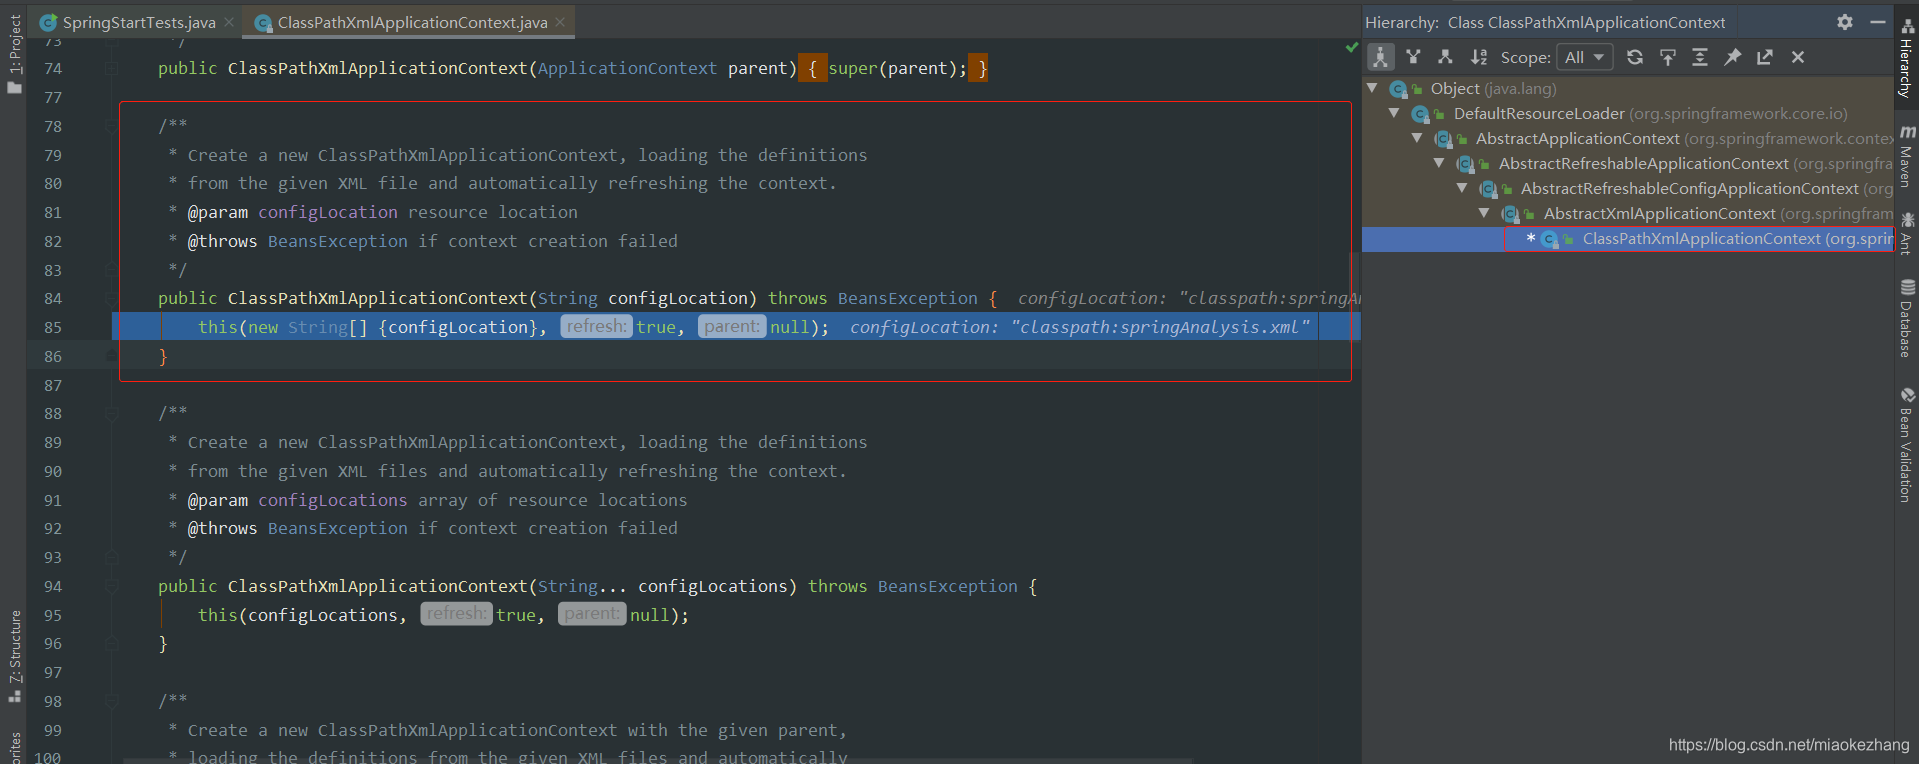
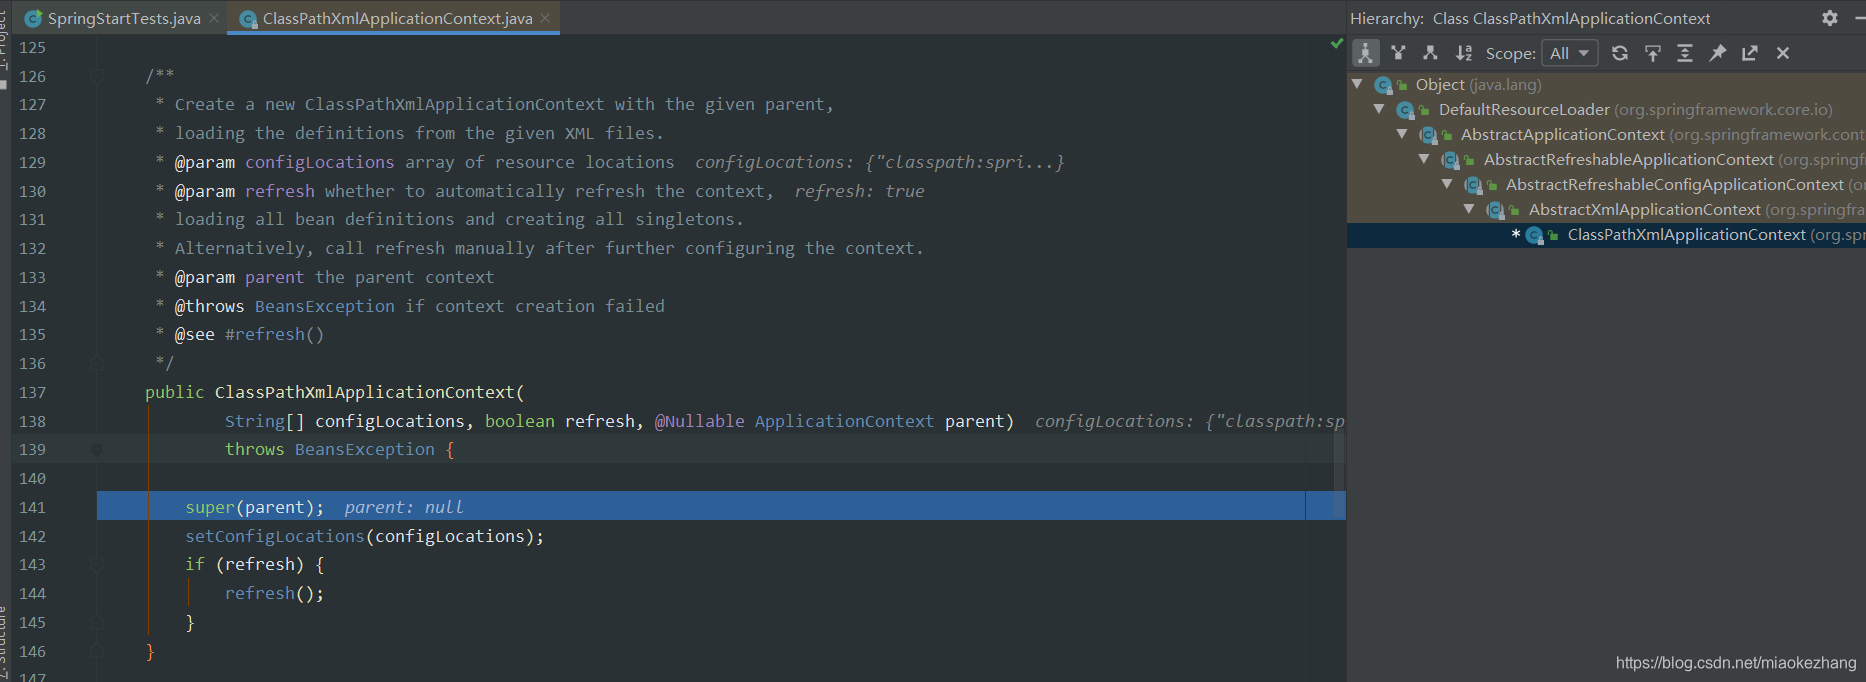
这个方法的作用:
Create a new ClassPathXmlApplicationContext, loading the definitions from the given XML file and automatically refreshing the context.
创建一个ClassPathXmlApplicationContext,用来加载xml文件的definitions,以及自动刷新IOC容器。
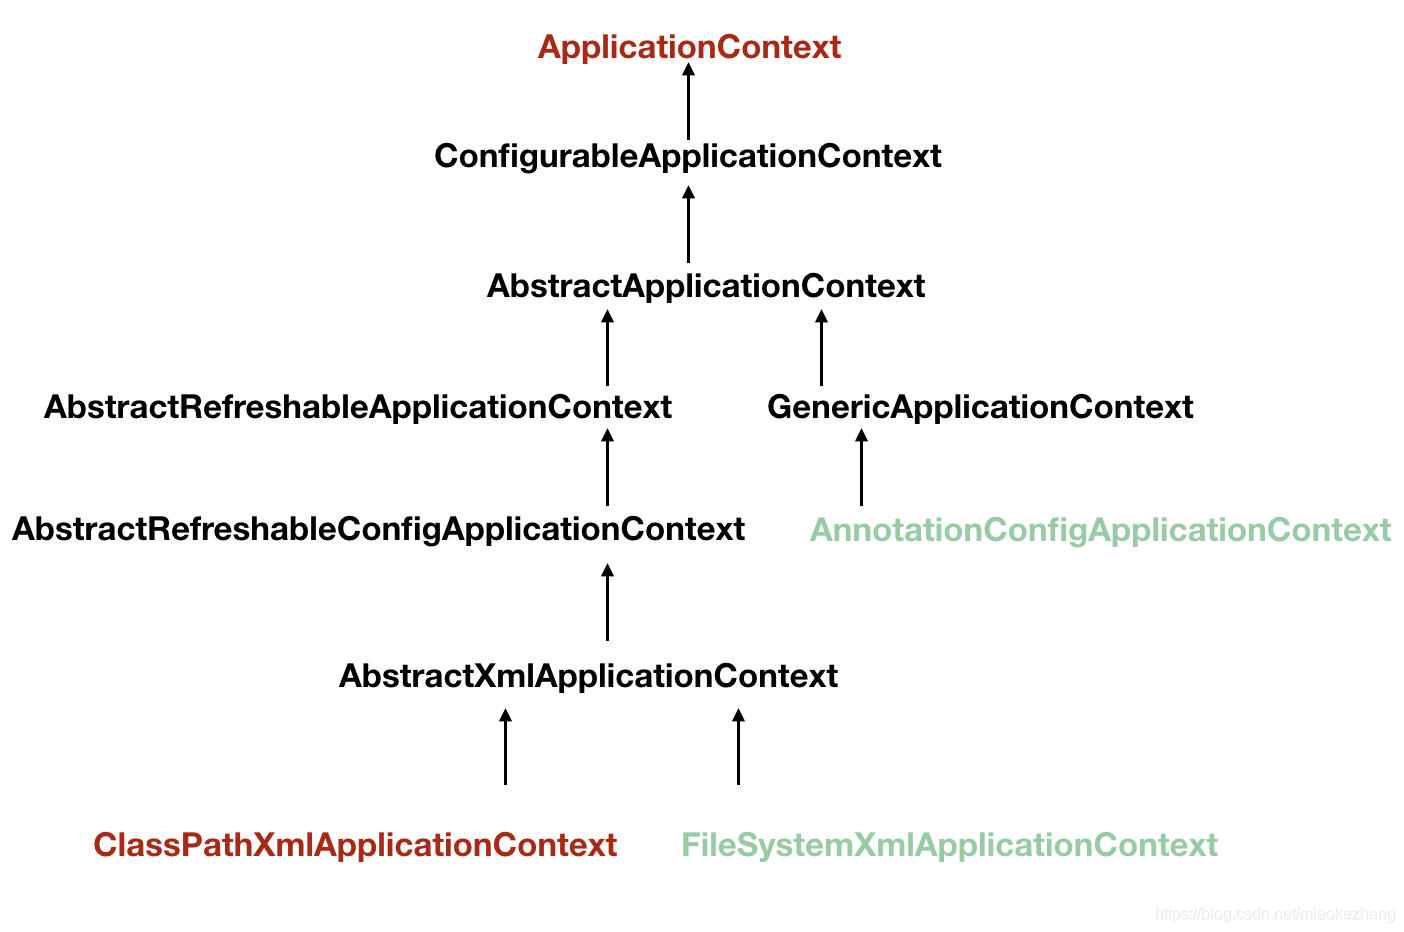
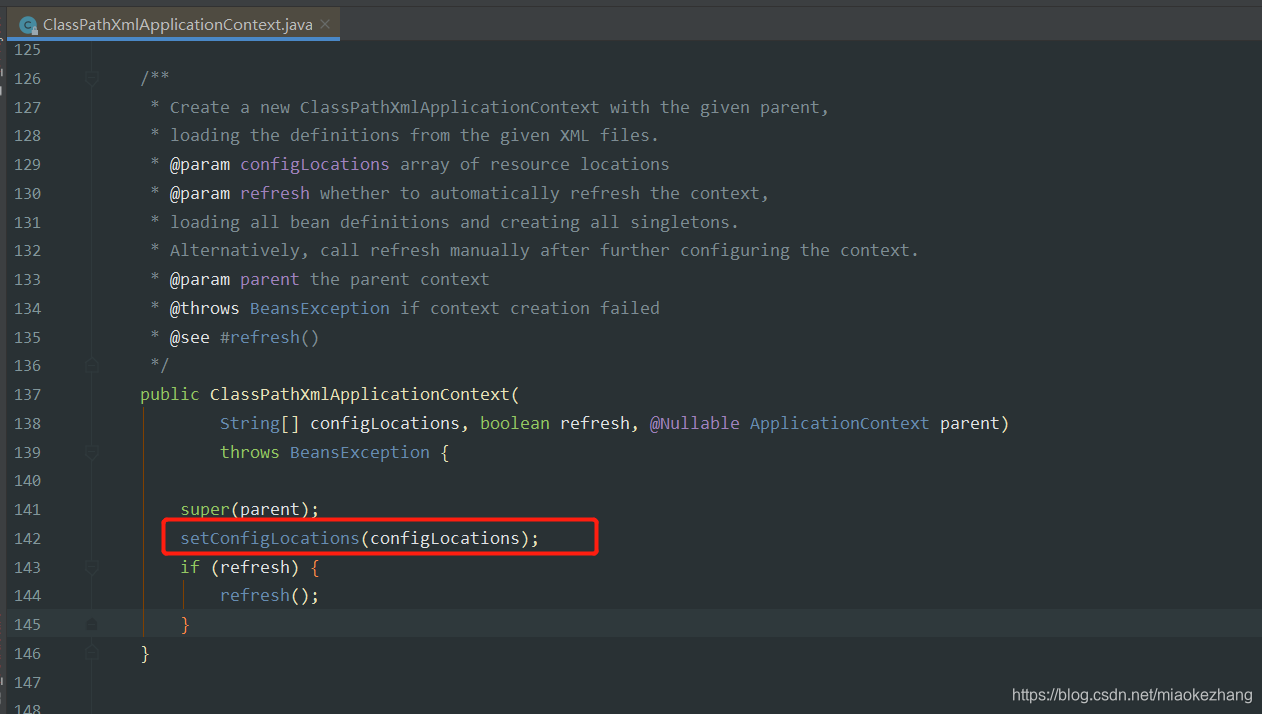
F7后进入ClassPathXmlApplicationContext另一个构造函数,进入父类的构造函数
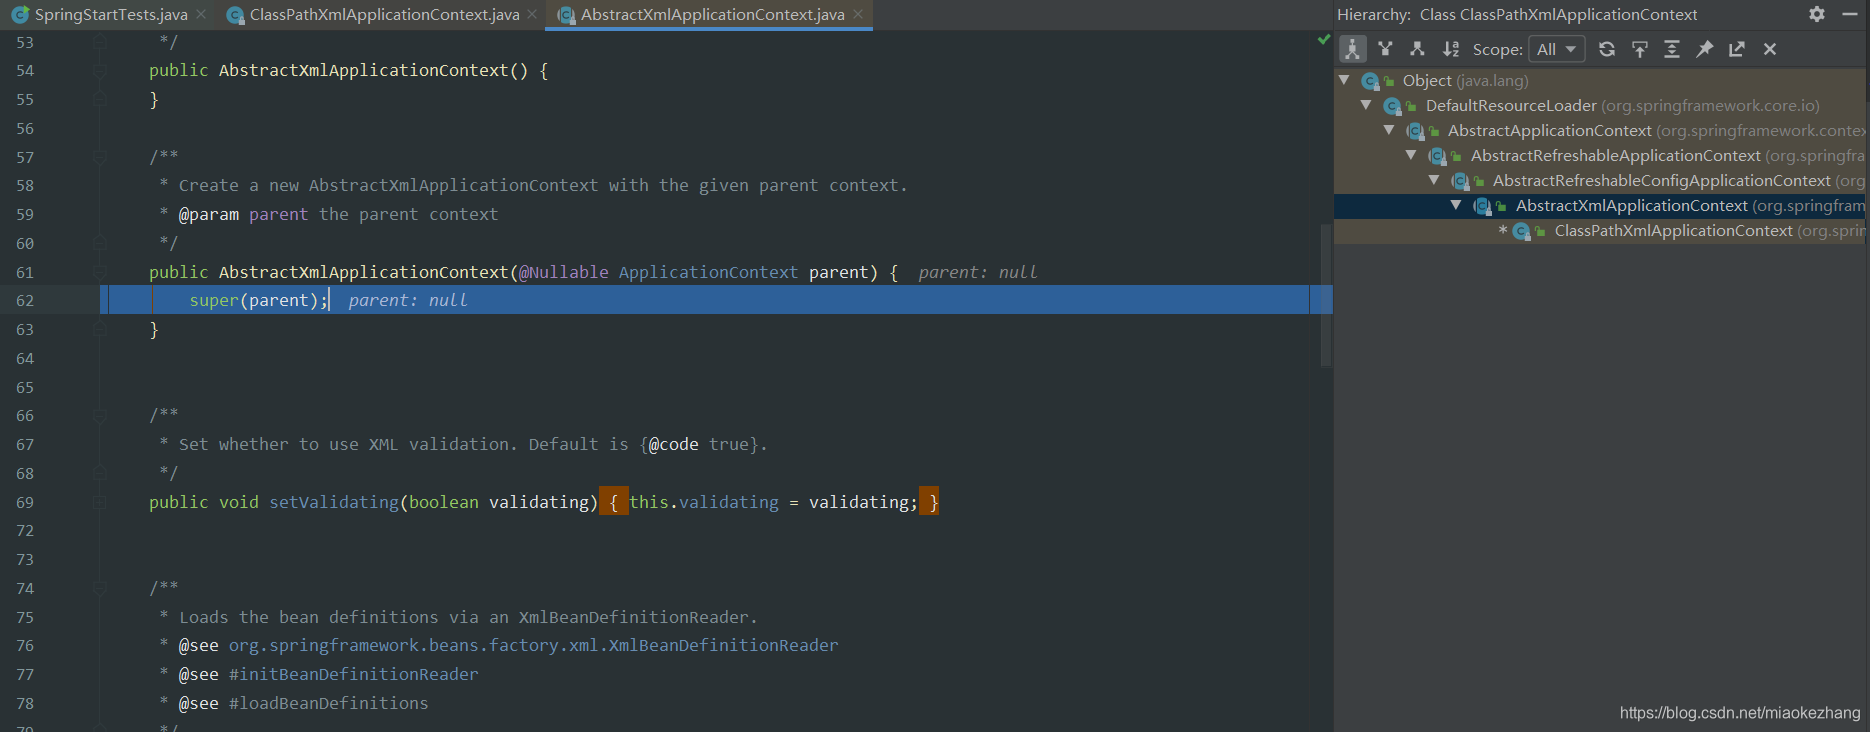
AbstractXmlApplicationContext的构造方法,通过给定的父context,创建自己这样的AbstractXmlApplicationContext,这里parent是null。
然后后面的都一样,一值执行到DefaultResourceLoader的构造方法执行。
分析一下ClassPathXmlApplicationContext及其父类的内容:
- ClassPathXmlApplicationContext:
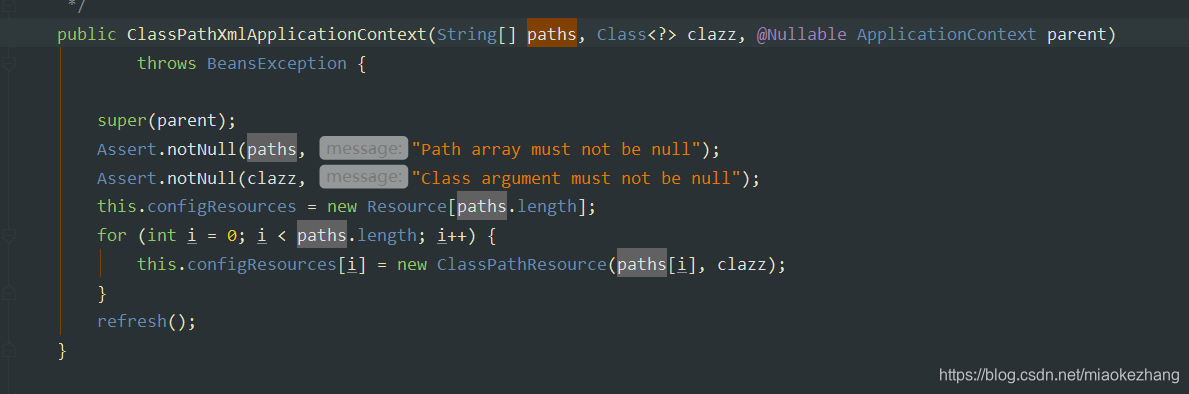
private Resource[] configResources;
configResources知识在后面的构造函数里,将xml的paths转为Resource,这里并没有经过这里的构造函数,后面加载、解析的时候,是用另一个代替了这个Resource
- AbstractXmlApplicationContext
private boolean validating = true;
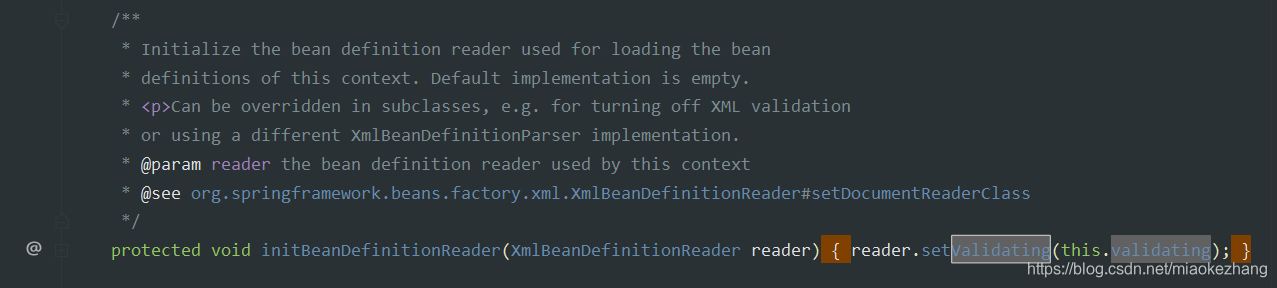
这个validating主要是在后面的initBeanDefinitionReader,初始化BeanDefinition读取器的时候用到,这个reder用来加载context里的BeanDefinition,默认这里是没有实现的,估计是Spring后续扩展使用。
- AbstractRefreshableConfigApplicationContext
private String[] configLocations;
private boolean setIdCalled = false;
setIdCalled 暂时不知道啥用。
setConfigLocations()方法将xml的路径分配给了configLocations:
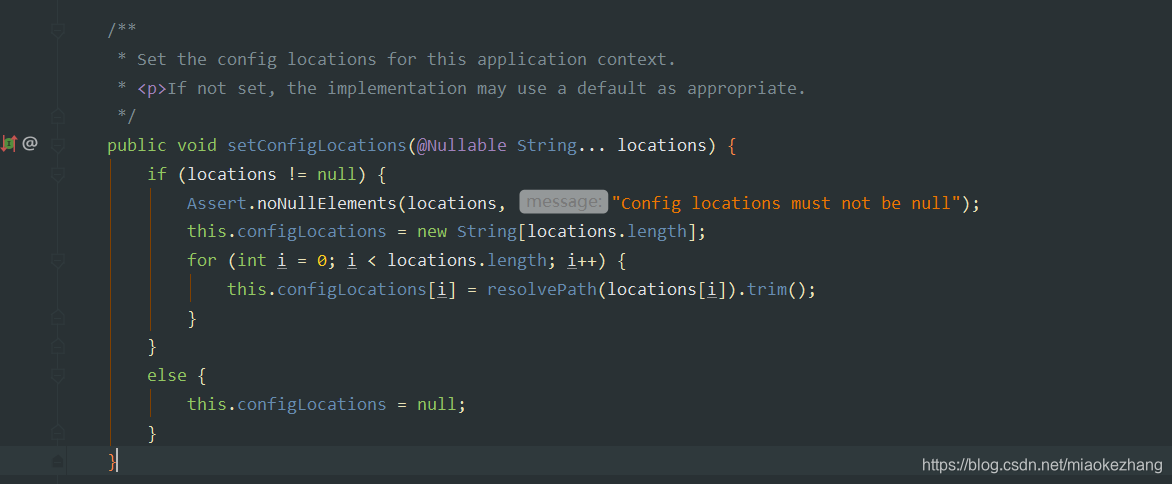
这里的setConfigLocations在ClassPathXmlApplicationContext的构造方法里得到了调用:
- AbstractRefreshableApplicationContext
@Nullable
private Boolean allowBeanDefinitionOverriding;
@Nullable
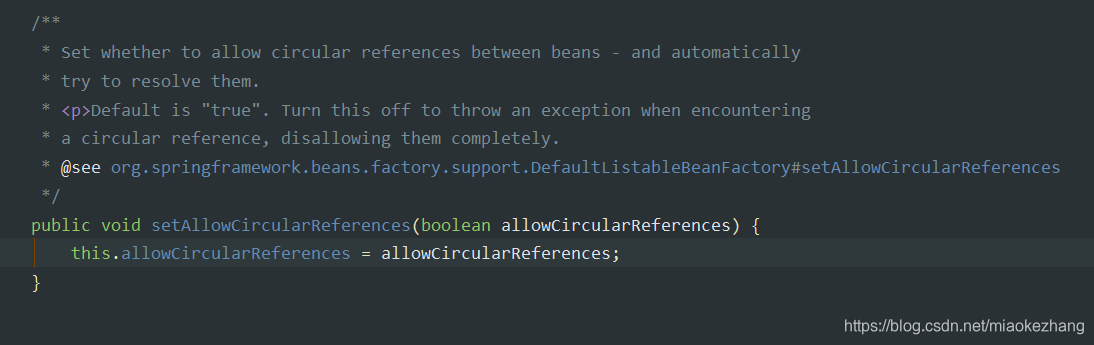
private Boolean allowCircularReferences;
/** Bean factory for this context. */
@Nullable
private DefaultListableBeanFactory beanFactory;
/** Synchronization monitor for the internal BeanFactory. */
private final Object beanFactoryMonitor = new Object();
allowBeanDefinitionOverriding,这个boolean变量,判断bean重名时是否允许被重写,默认是true,发生重写bean就会覆盖后者的bean,如果不允许,就会报错

allowCircularReferences:是否在bean之间允许循环引用
beanFactory:这个DefaultListableBeanFactory ,里面的一个concurrentHashMap的beanDefinitionMap,就是用来存xml里面bean的 BeanDifinition
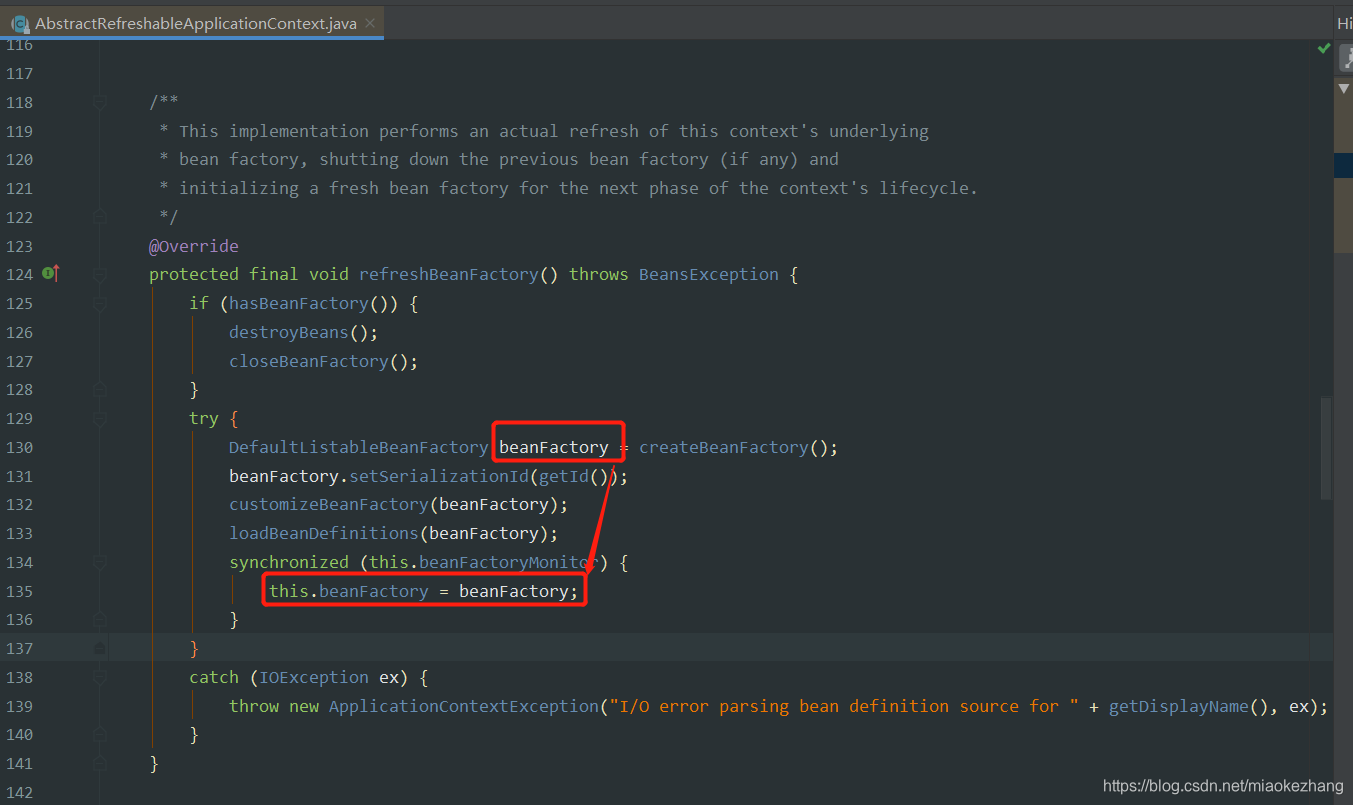
beanFactoryMonitor,一个锁,保证AbstractRefreshableApplicationContext的DefaultListableBeanFactory beanFactory设置线程安全
- AbstractApplicationContext
/**
* Name of the MessageSource bean in the factory.
* If none is supplied, message resolution is delegated to the parent.
* @see MessageSource
*/
public static final String MESSAGE_SOURCE_BEAN_NAME = “messageSource”;
/**
* Name of the LifecycleProcessor bean in the factory.
* If none is supplied, a DefaultLifecycleProcessor is used.
* @see org.springframework.context.LifecycleProcessor
* @see org.springframework.context.support.DefaultLifecycleProcessor
*/
public static final String LIFECYCLE_PROCESSOR_BEAN_NAME = “lifecycleProcessor”;
/**
* Name of the ApplicationEventMulticaster bean in the factory.
* If none is supplied, a default SimpleApplicationEventMulticaster is used.
* @see org.springframework.context.event.ApplicationEventMulticaster
* @see org.springframework.context.event.SimpleApplicationEventMulticaster
*/
public static final String APPLICATION_EVENT_MULTICASTER_BEAN_NAME = “applicationEventMulticaster”;
咋也不知道。
实例化后,其他的全局变量都赋予了正确值,其他的还是null:
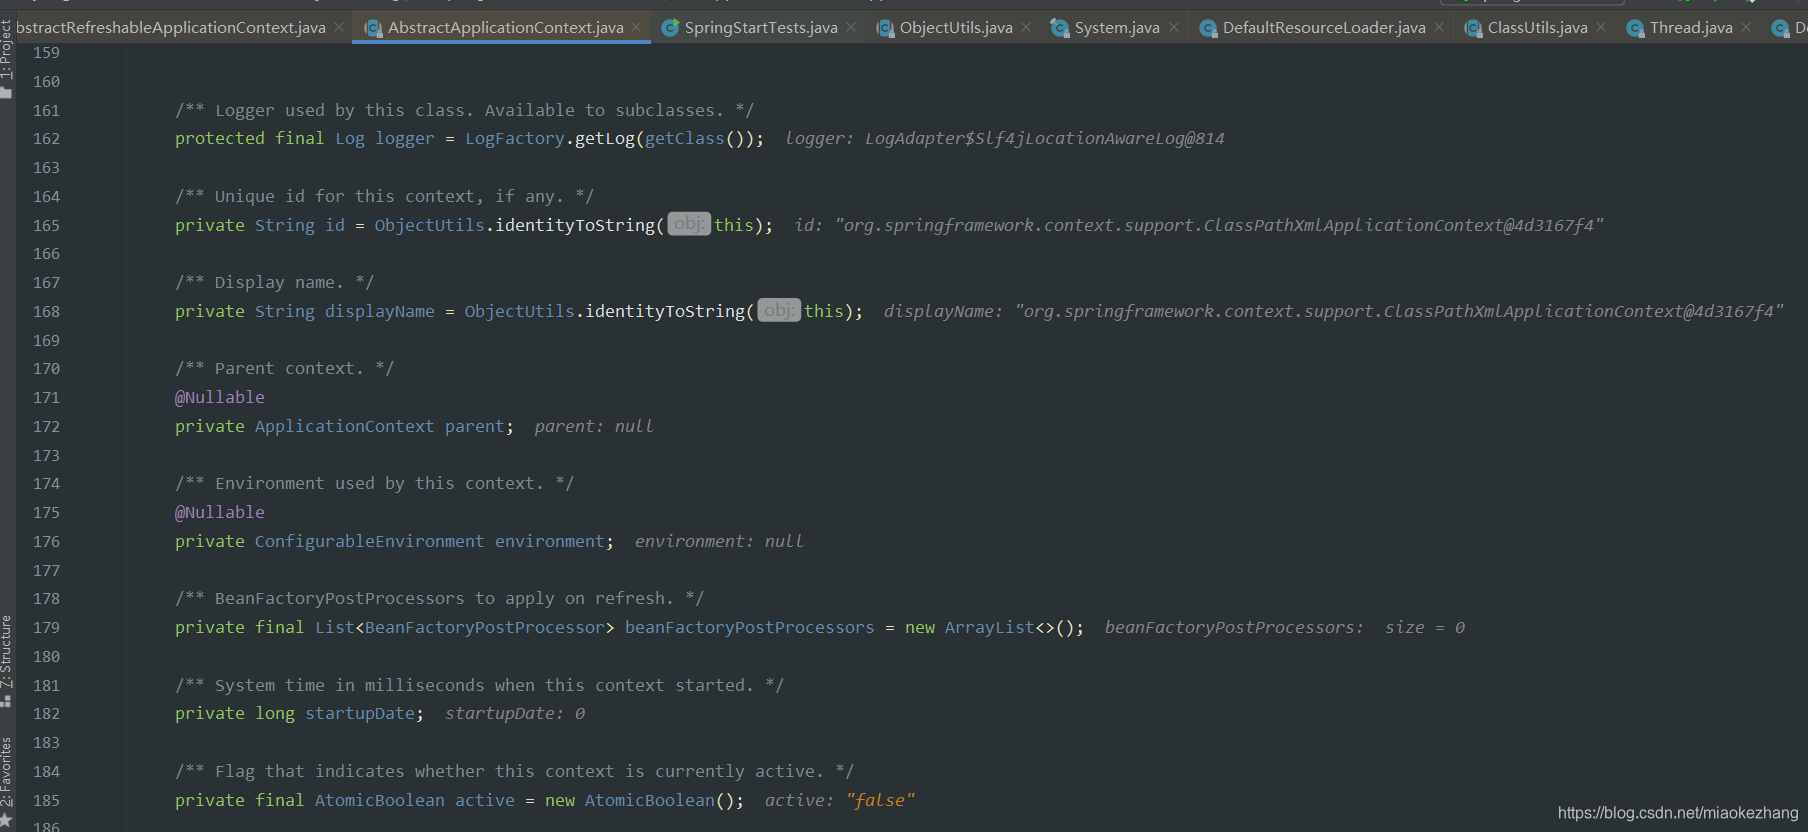
id:
org.springframework.context.support.ClassPathXmlApplicationContext@4d3167f4
displayName
org.springframework.context.support.ClassPathXmlApplicationContext@4d3167f4
startupShutdownMonitor:
Object@882
- DefaultResourceLoader
@Nullable
private ClassLoader classLoader;
private final Set《ProtocolResolver》 protocolResolvers = new LinkedHashSet<>(4);
private final Map《Class《?》, Map《Resource, ?》》 resourceCaches = new ConcurrentHashMap<>(4);
classLoader在DefaultResourceLoader实例化的时候,进行了赋值:AppClassLoader。
protocolResolvers 、resourceCaches 都是默认值
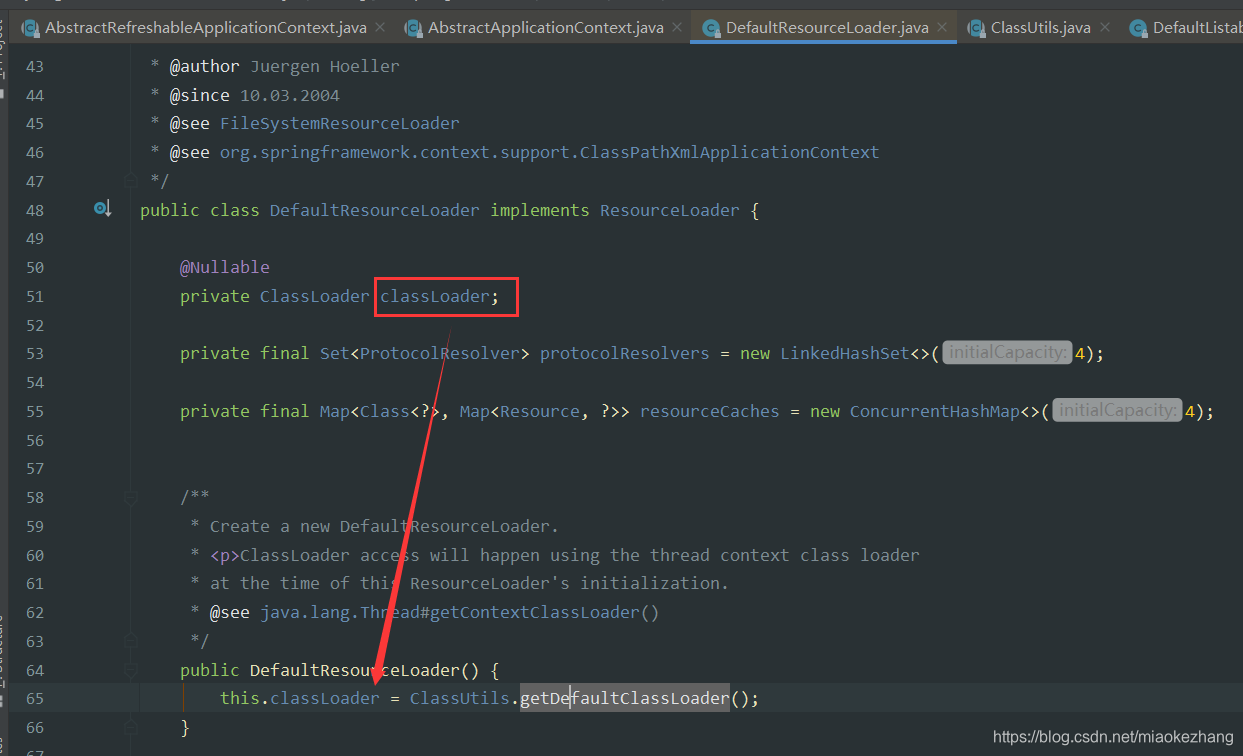

上面就算是对父类的实例化完成。

把父类的AbstractRefreshableConfigApplicationContext的configLocations设值。
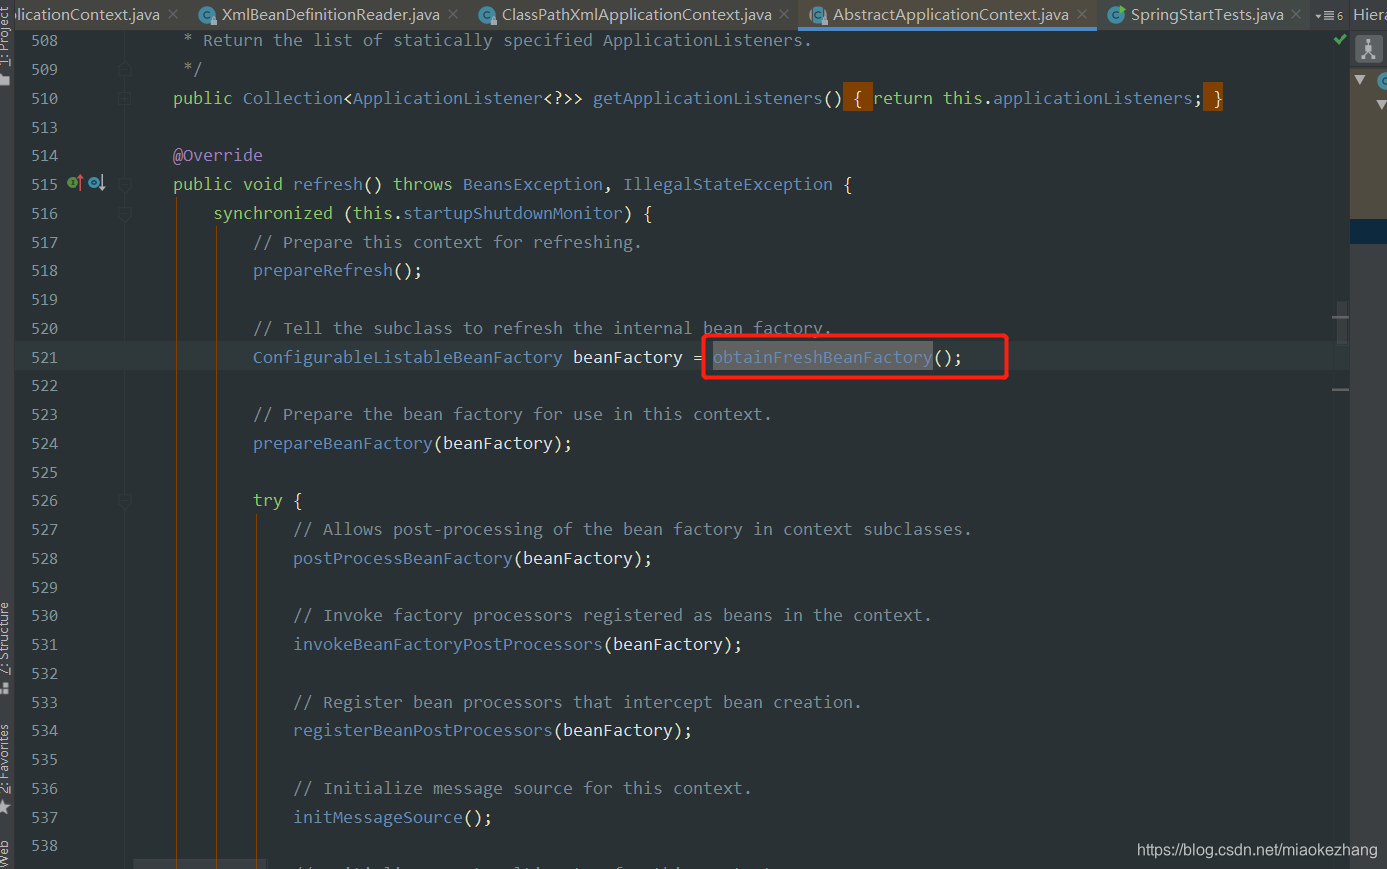
然后进入到了AbstractApplicationContext的refresh()方法,prepareRefresh()方法主要是初始化的动作,主要是obtainFreshBeanFactory()方法,然后找到loadBeanDefinitions()这个主要方法:

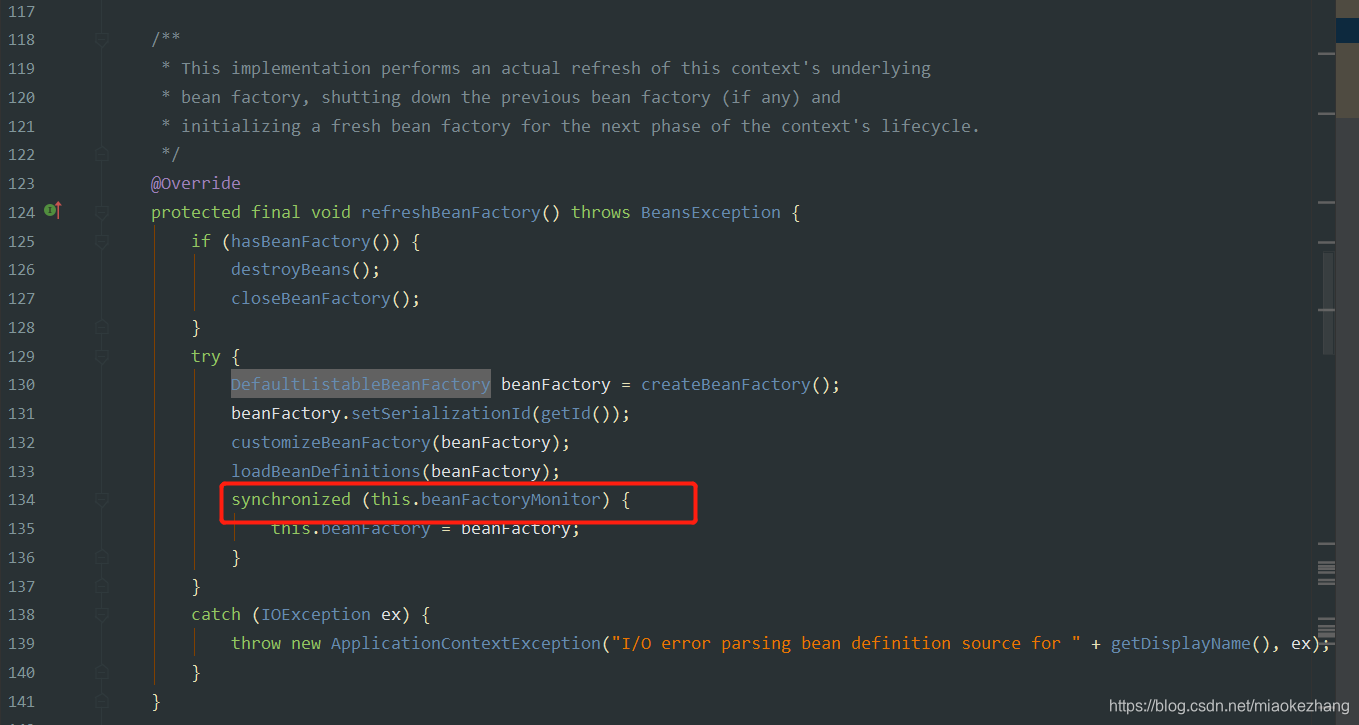
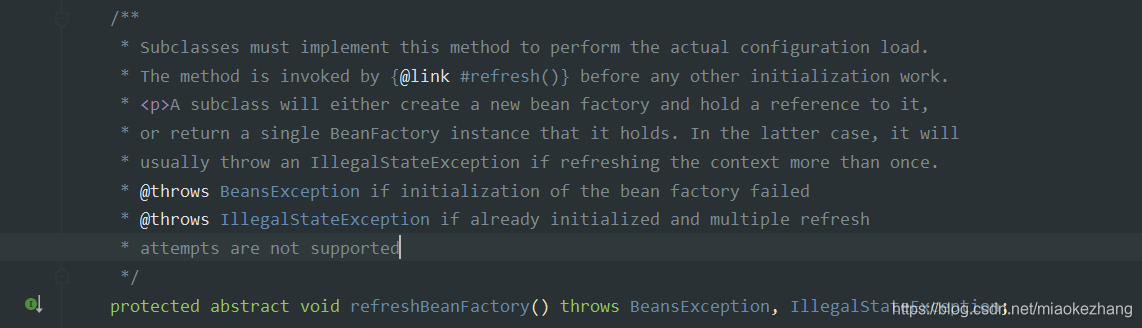
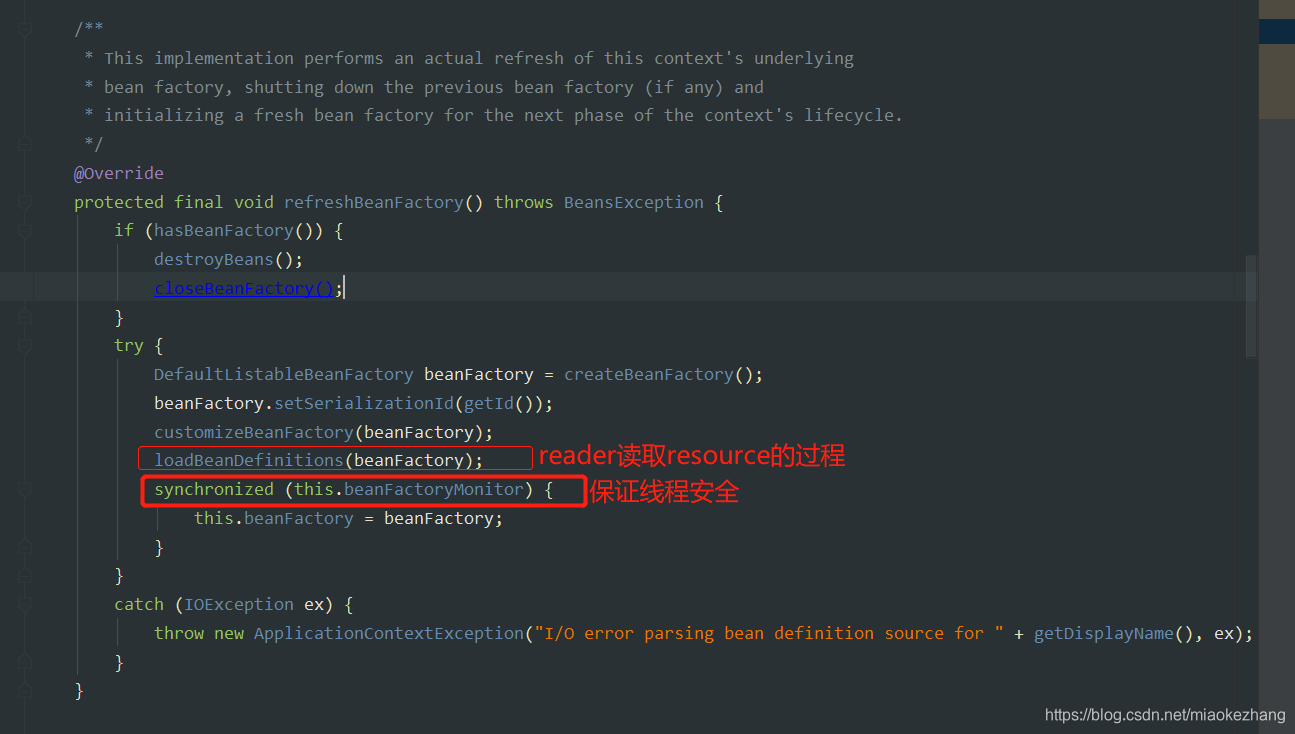
然后进入到这个refreshBeanFactory()方法,子类必须实现他,用来实现真正的配置加载,这个方法通过refresh()调用,必须在其他初始化工作之前执行,子类实现这个方法主要是创建一个BeanFactory,如何创建了多个BeanFactory(多线程的情况),就会报错,子类的实现方法也用了synchronize
然后进入到loadBeanDefinitions()方法,这个方法就是通过reader加载beanDefinition,声明了一个reader:XmlBeanDefinitionReader
XmlBeanDefinitionReader beanDefinitionReader = new XmlBeanDefinitionReader(beanFactory);
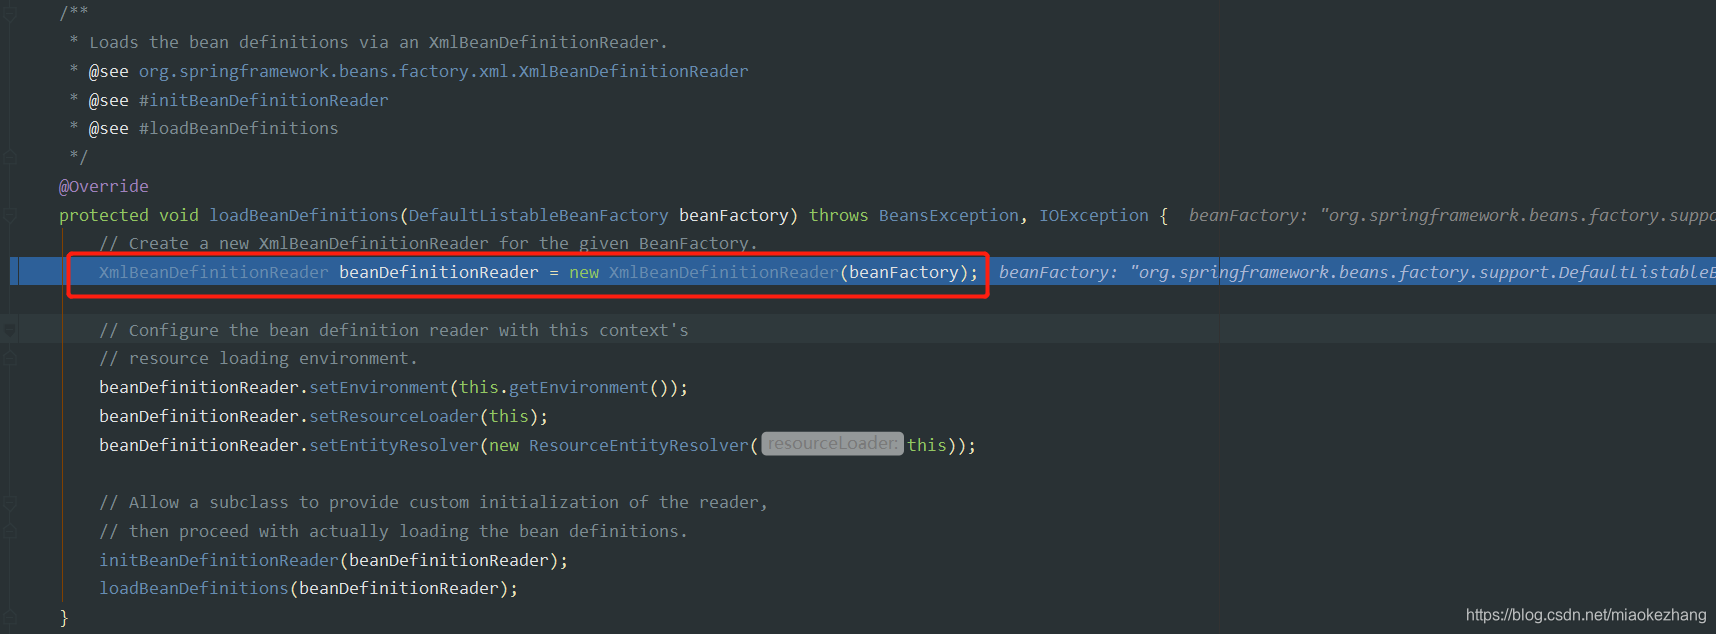
XmlBeanDefinitionReader的doc:
Bean definition reader for XML bean definitions. Delegates the actual XML document reading to an implementation of the BeanDefinitionDocumentReader interface.
Typically applied to a org.springframework.beans.factory.support.DefaultListableBeanFactory or a org.springframework.context.support.GenericApplicationContext.
This class loads a DOM document and applies the BeanDefinitionDocumentReader to it. The document reader will register each bean definition with the given bean factory, talking to the latter’s implementation of the BeanDefinitionRegistry interface.xml的beanDefinition的reader,将实际的XML文档读取委托给BeanDefinitionDocumentReader接口的实现。reader会注册每一个xml里的bean定义到BeanFactory里去,
然后进入到下面的loadBeanDefinitions(beanDefinitionReader)方法:
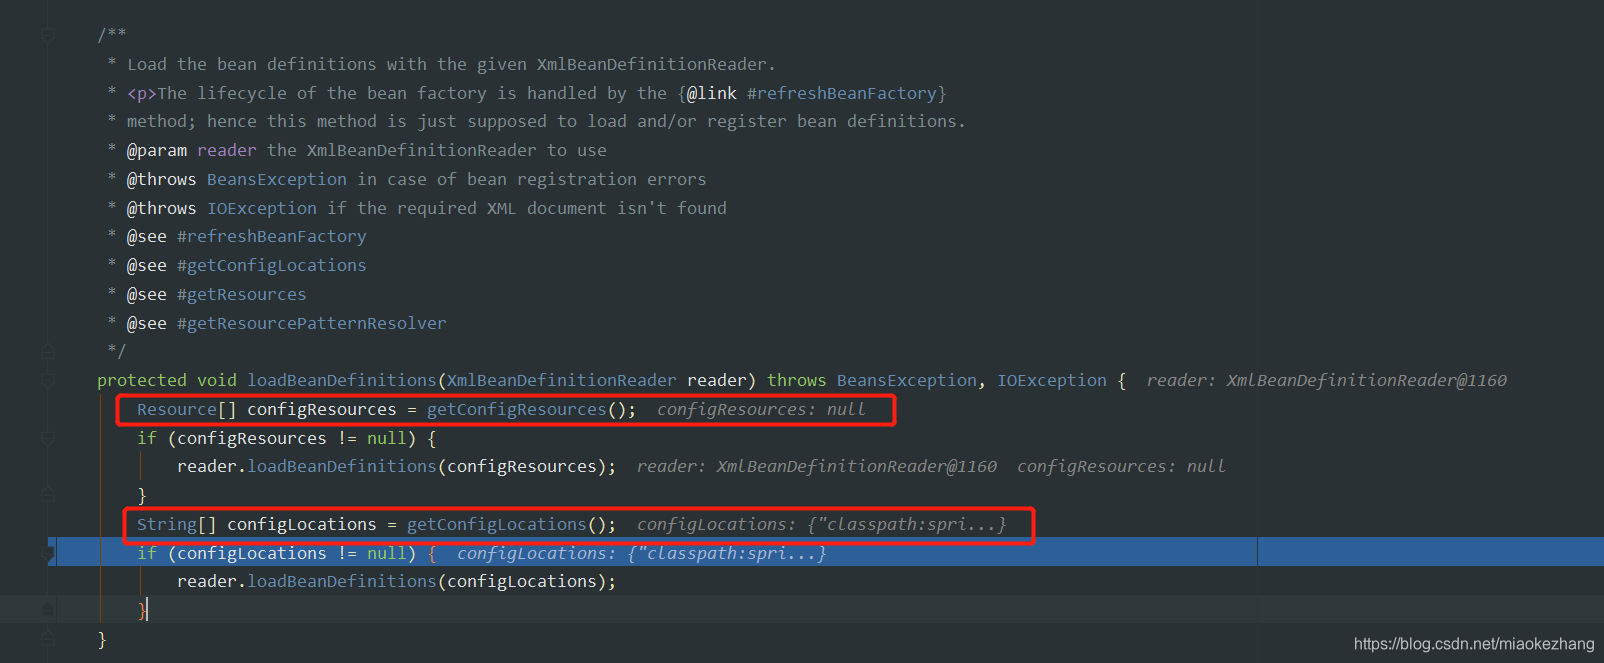
一开始就知道,configResources并未设值,configLocations通过传进来的xml路径设置了值,所有reader就会加载configLocations。
然后进入到下面的加载地方,到这里,defaultListableBeanFactory还是刚创建的状态,下面加载完后,就会有xml里面的bean的内容了

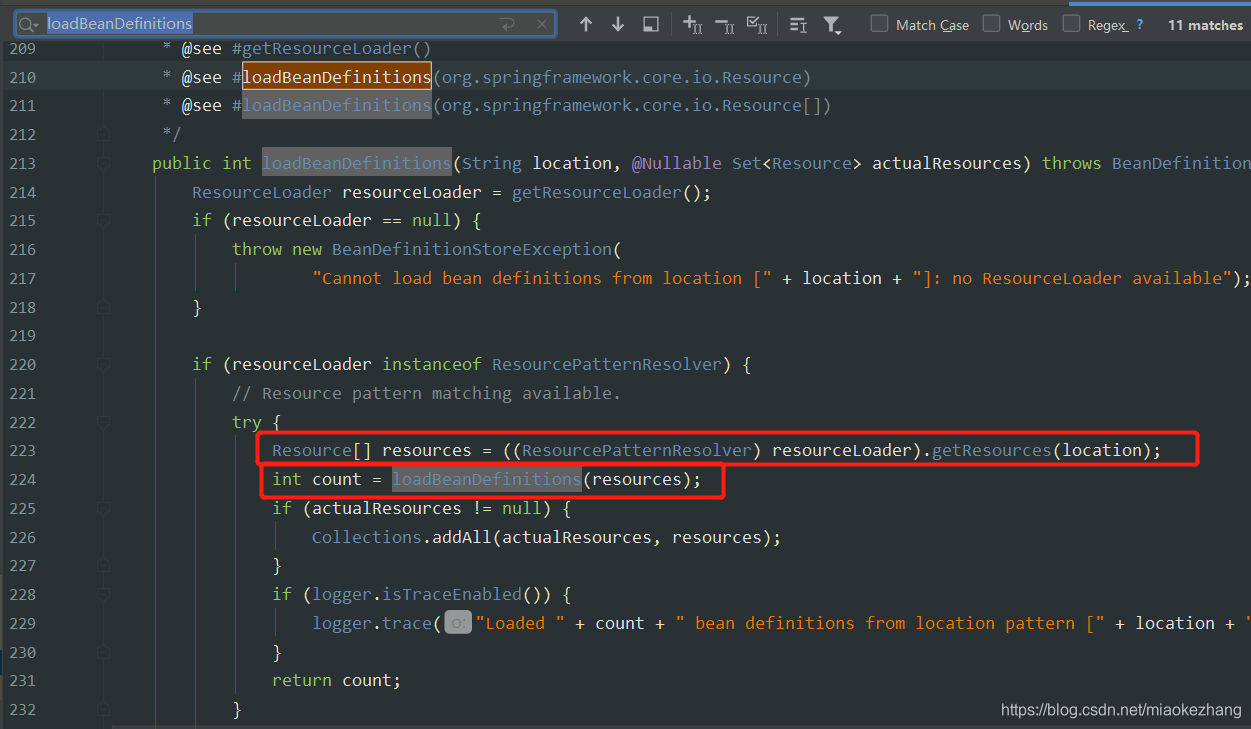
由此看来,configLocations最终还是转为Resource类了

这个方法似曾相识,参数由String… locations变为了Resource… resources,resources就是xml的路径+classLoader,即springAnalysis.xml+AppClassLoader。
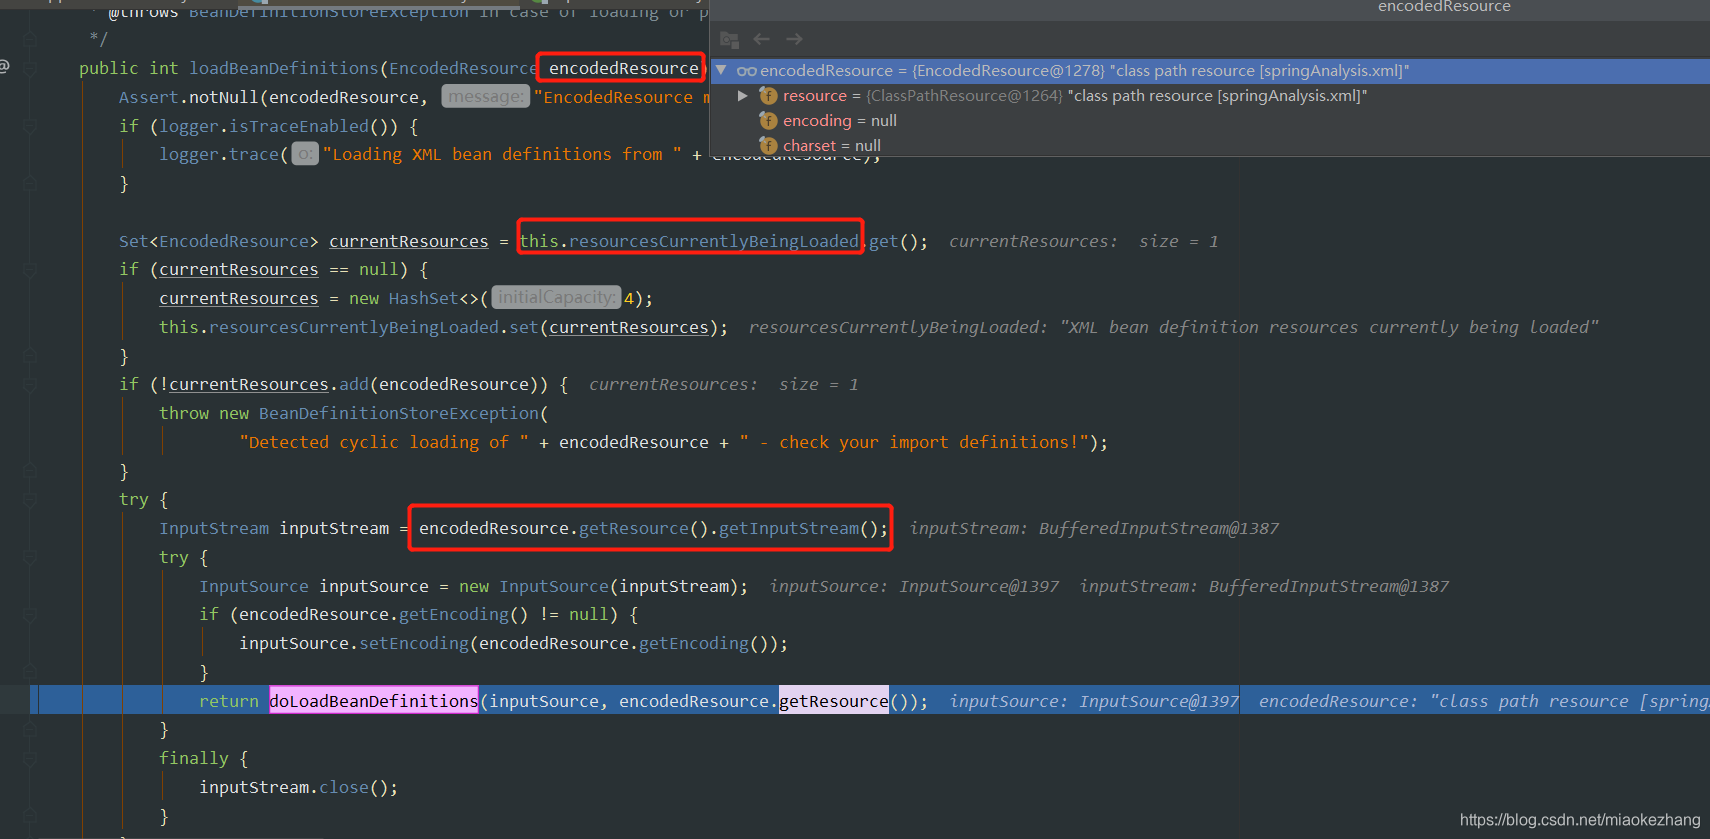
- 然后继续加载,得到了一个EncodedResource encodedResource,也就是resource+encoding(null)+charset(null)。
- 然后将他set到currentResources,这个currentResources是通过this.resourcesCurrentlyBeingLoaded.get()得到的,而this.resourcesCurrentlyBeingLoaded是ThreadLocal。
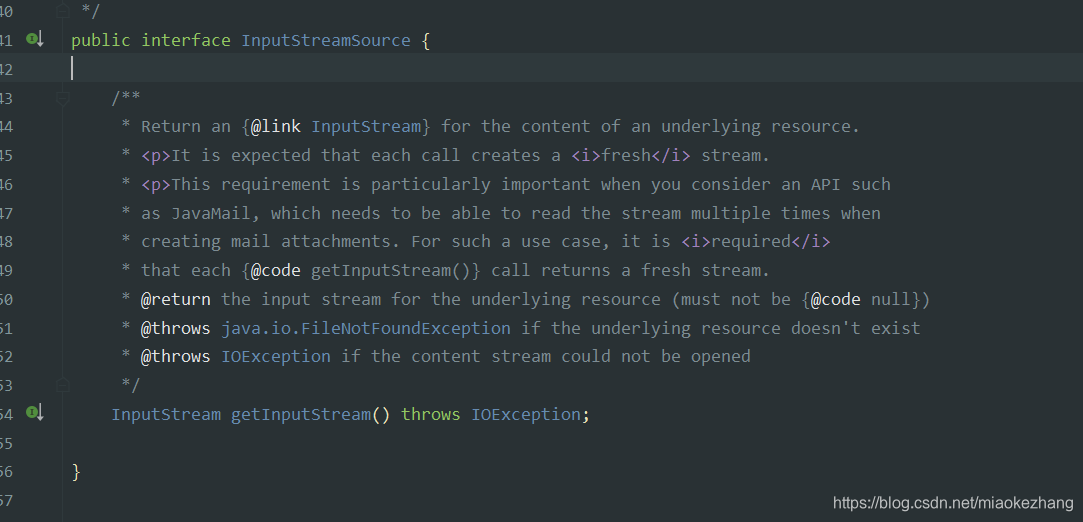
- 然后通过resource得到他的inputStream,因为resource是InputStreamSource的子实现类,这个接口只有getInputStream()这一个方法。
然后doLoadBeanDefinitions()方法传入了两个参数,InputSource是new InputSource(resource.getInputStream())出来的,第二个就是resource,
然后通过这两个参数构造成了一个Document doc。
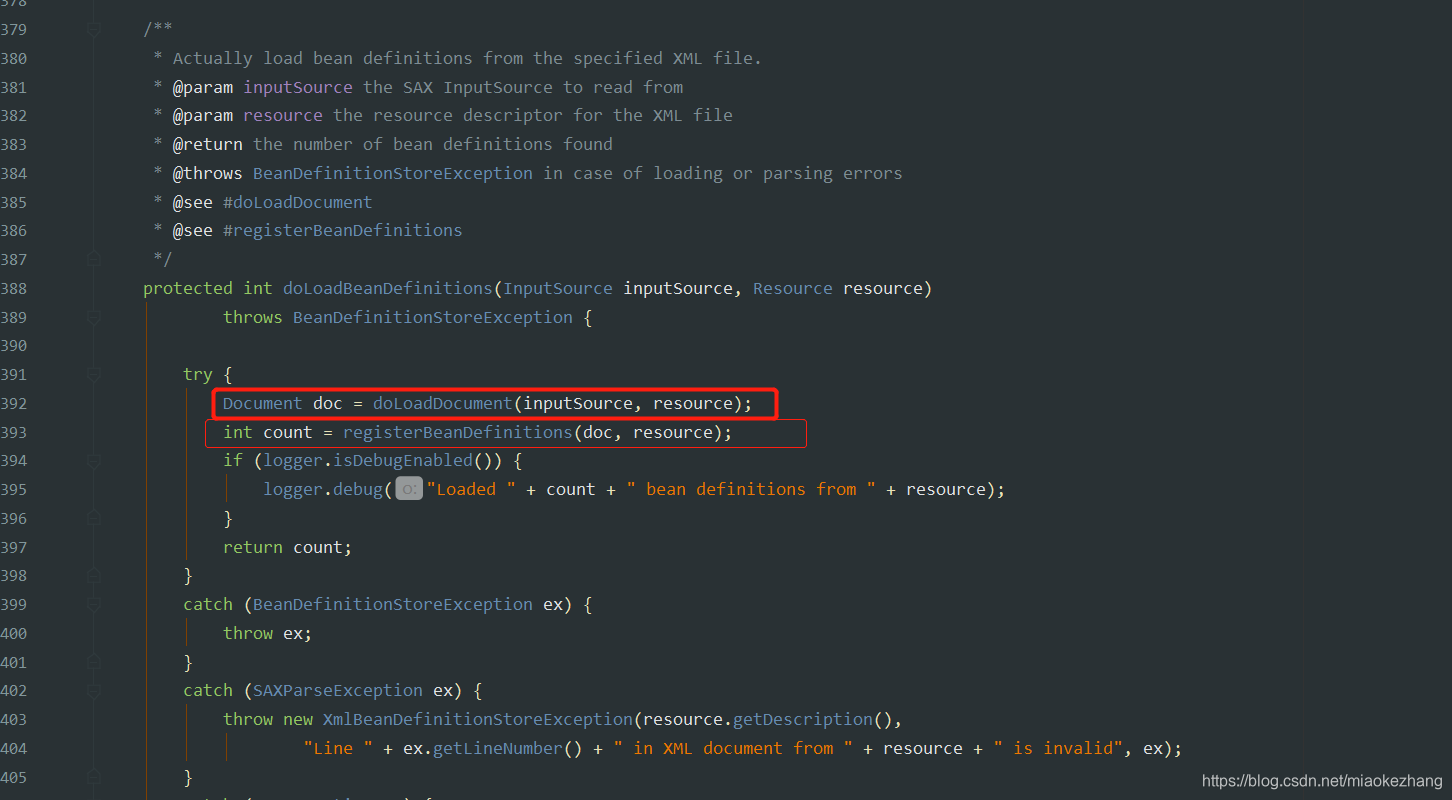
然后registerBeanDefinitions()传入了两个参数,resource+inputSource创造出来的doc和resouce,方法里创建了一个BeanDefinitionDocumentReader,这里没有用new()来构造BeanDefinitionDocumentReader实例,怕他的构造函数是private,使用的反射,打破了private修饰的构造方法不能被实例化,然后创建了BeanDefinitionDocumentReader接口的实现类DefaultBeanDefinitionDocumentReader的实例。
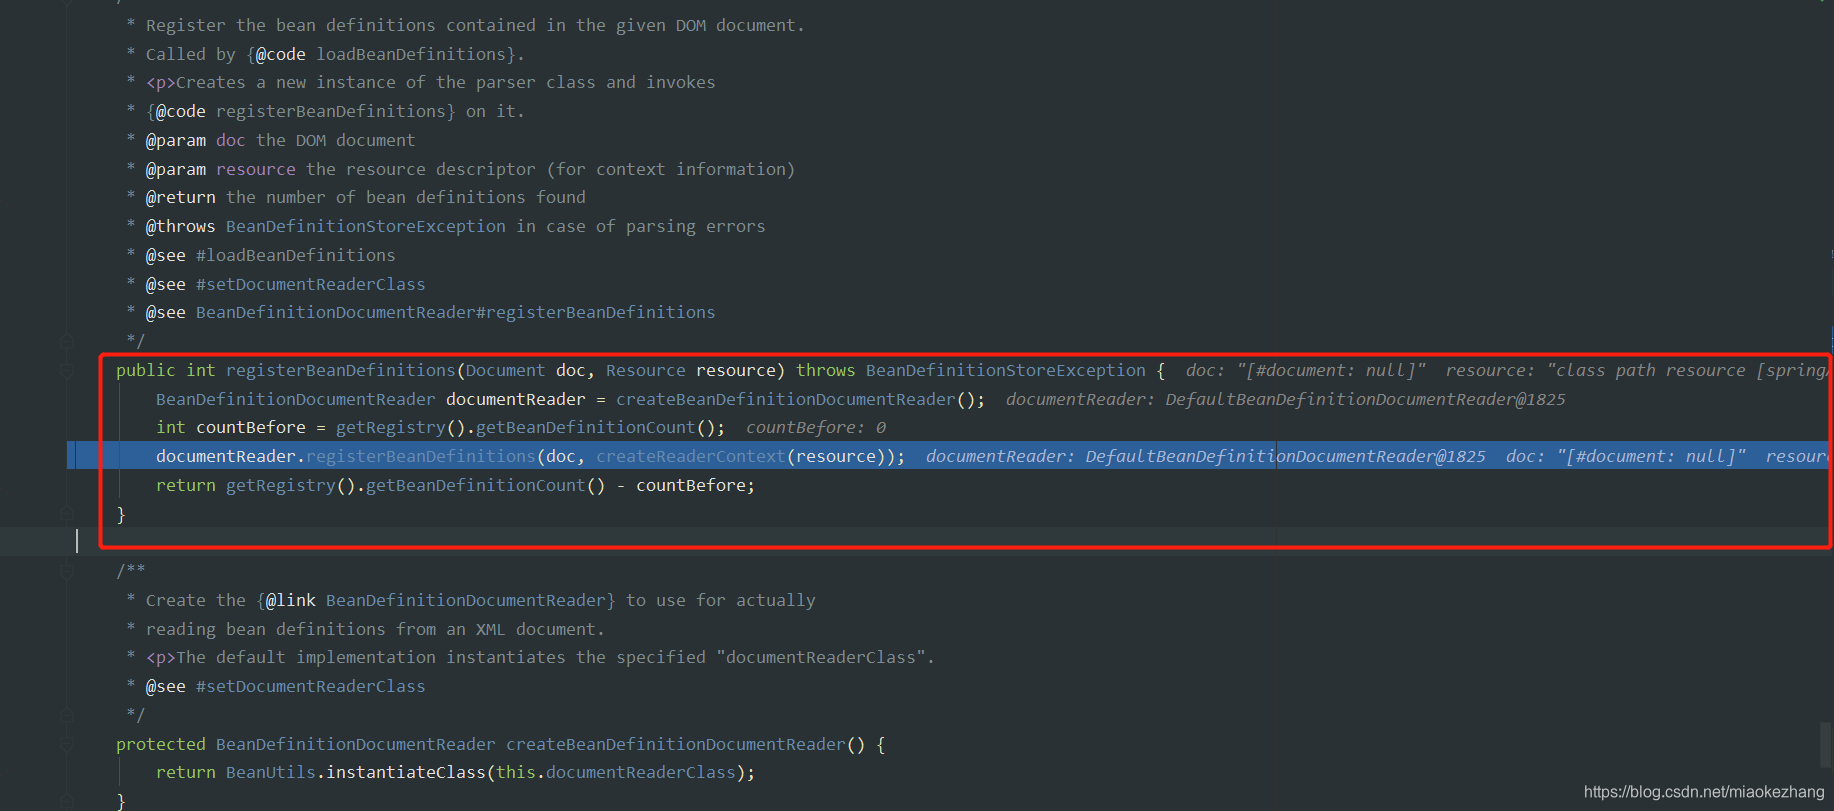
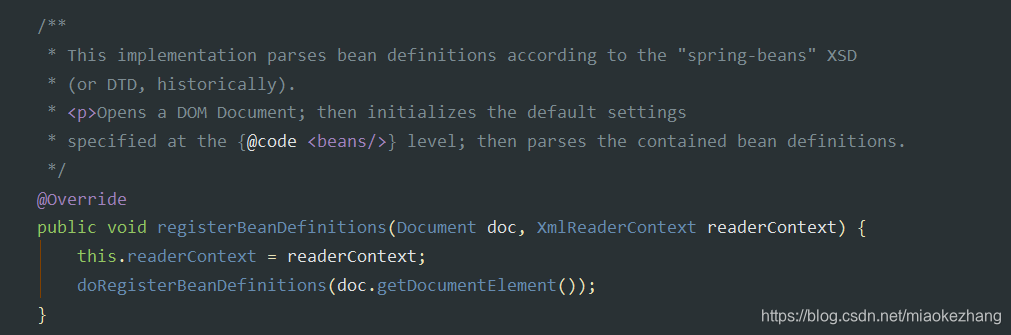
然后将createReaderContext(resource)出来的XmlReaderContext和doc作为参数执行documentReader的registerBeanDefinitions()方法。
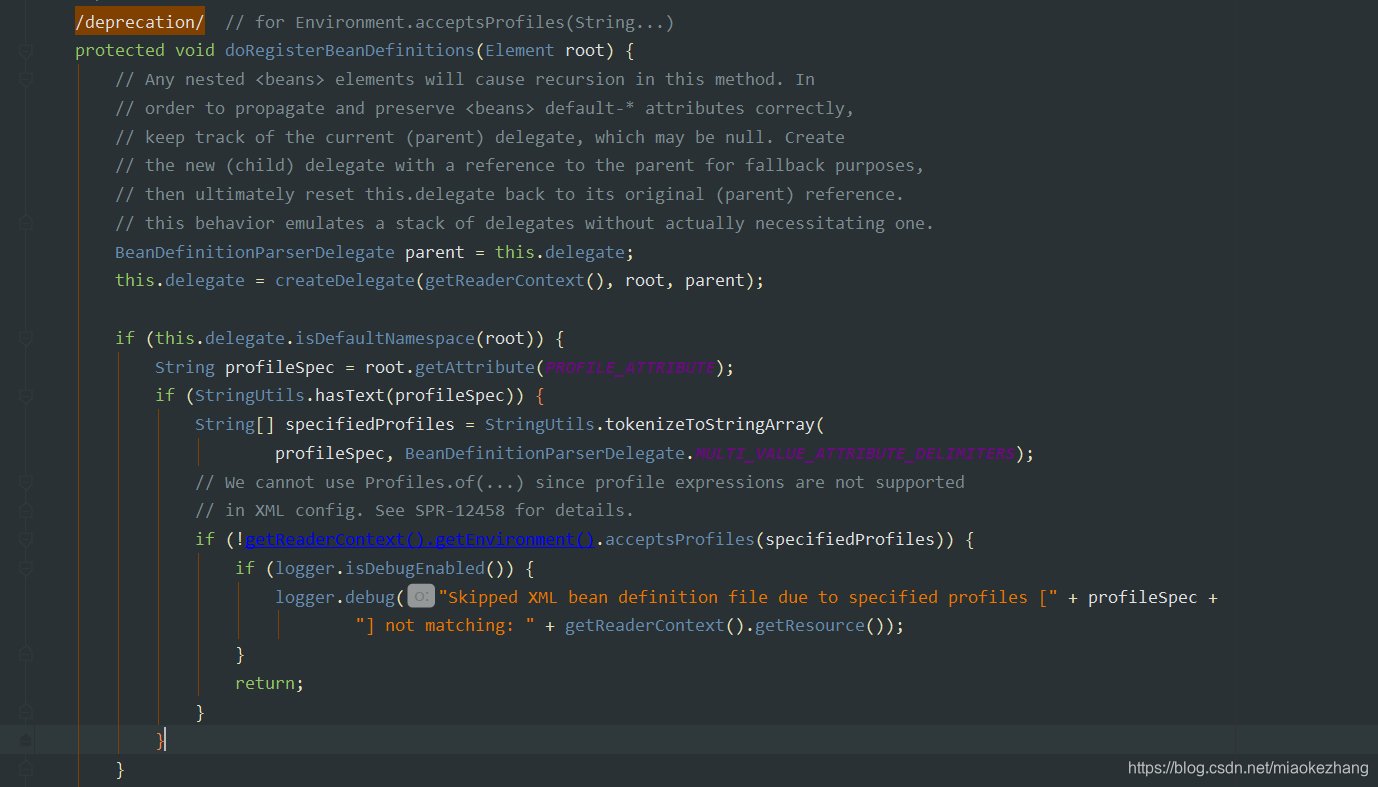
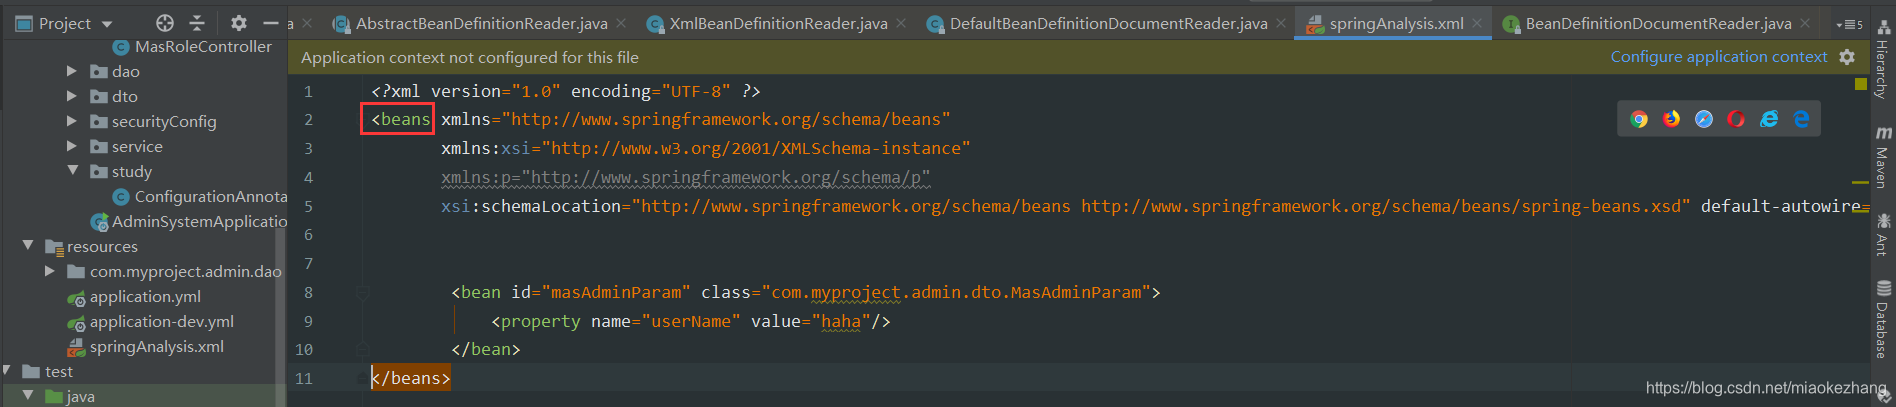
这个时候,root的内容从意思上看是根元素的意思,从配置文件上看,<beans标签是对应的root:
定位到相应内容也可以证明:
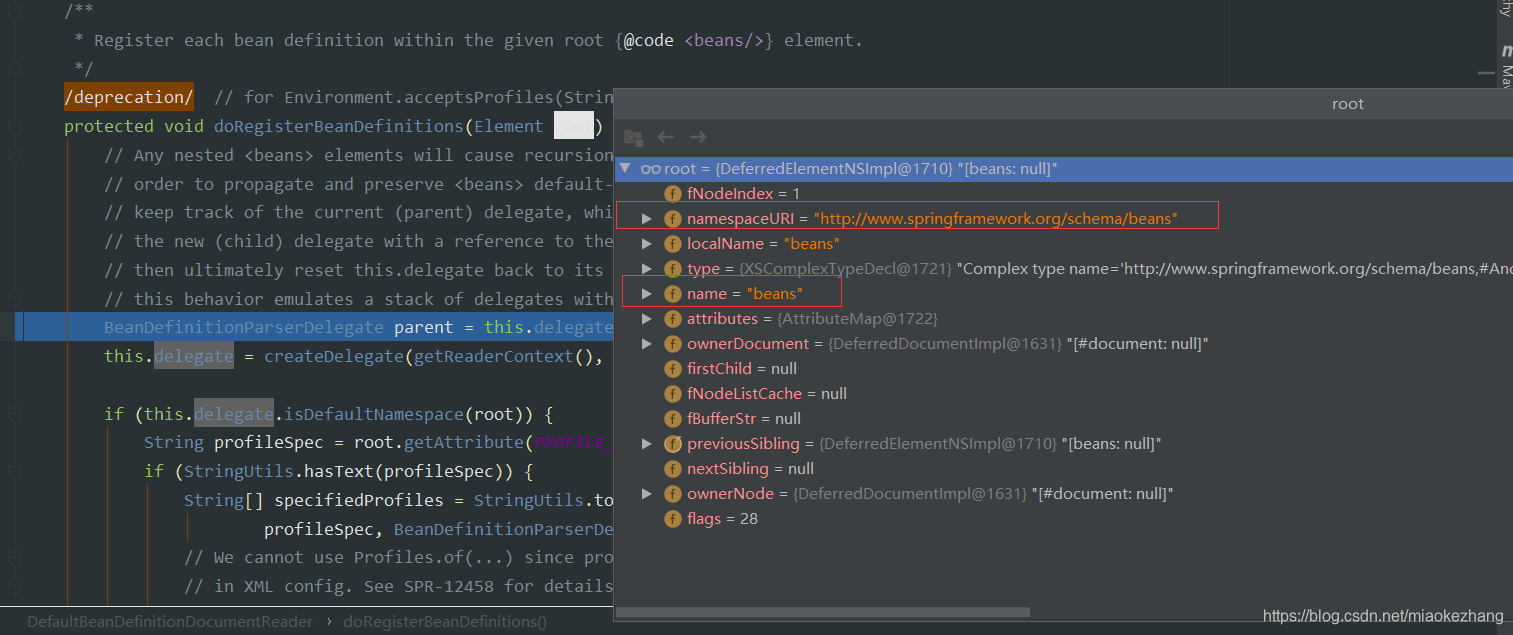
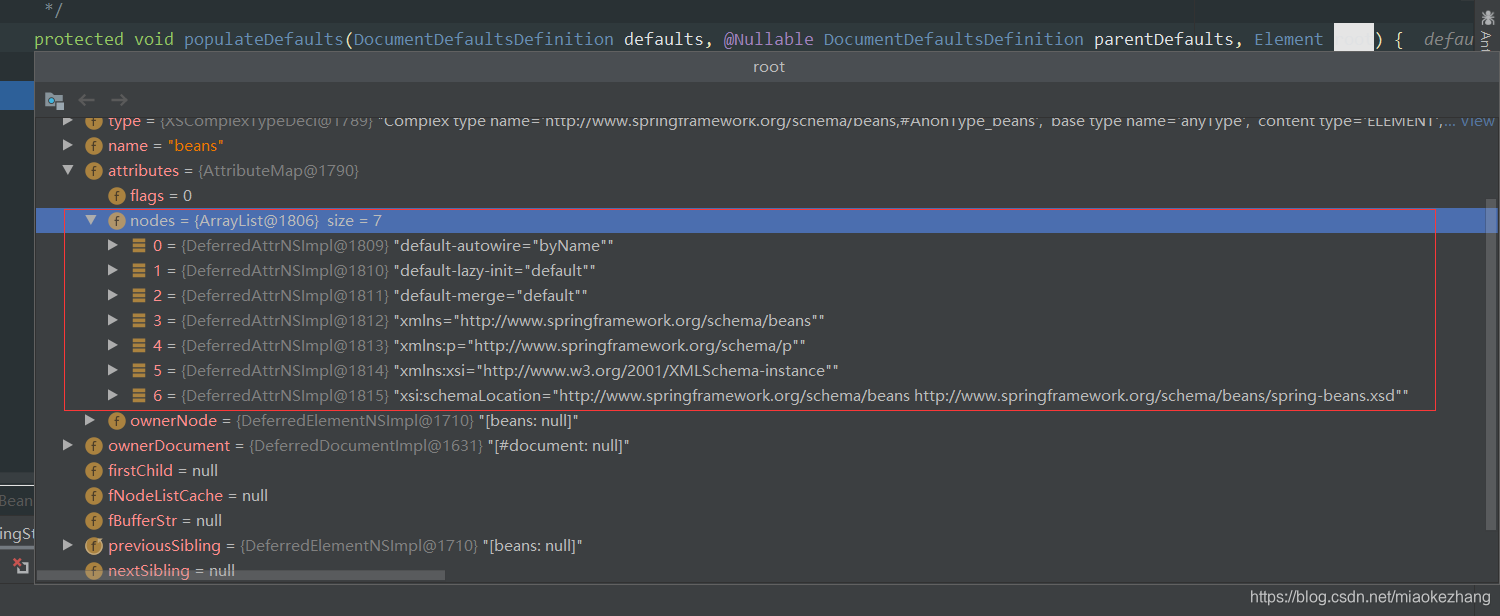
root目前是beans标签,有着一些默认defualts内容:
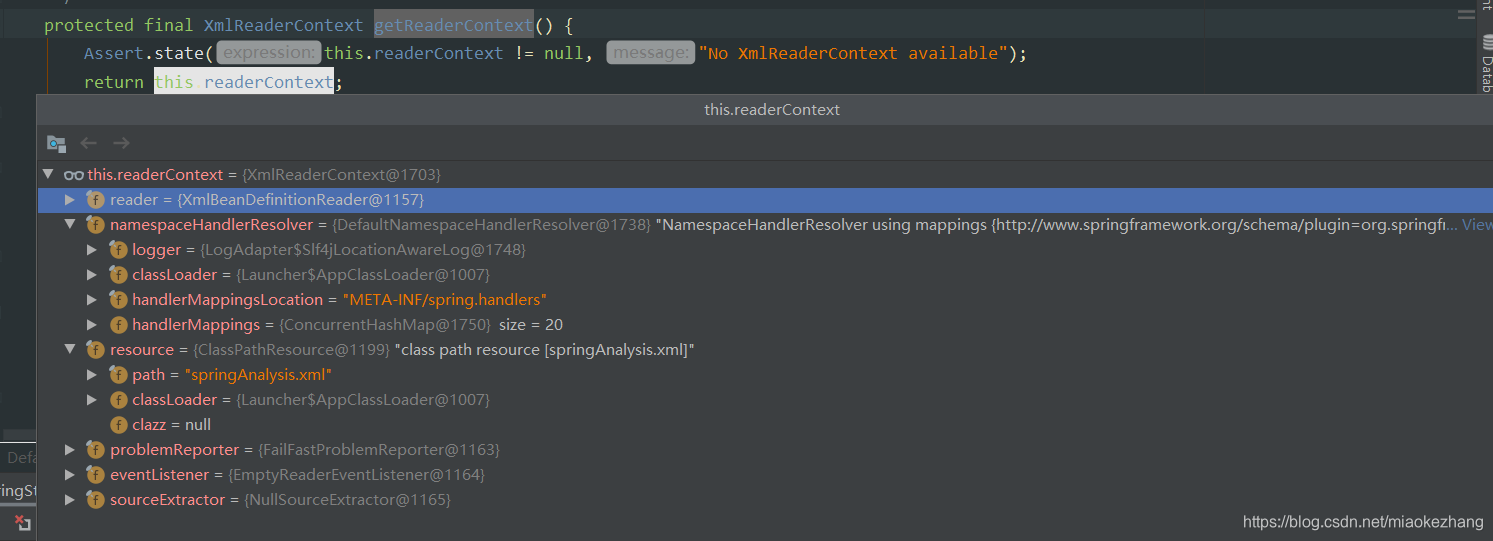
后面的this.delegate = createDelegate(getReaderContext(), root, parent);,上面已经将rederContext的内容已经设置好了,包含了Resource和reader的一些内容:
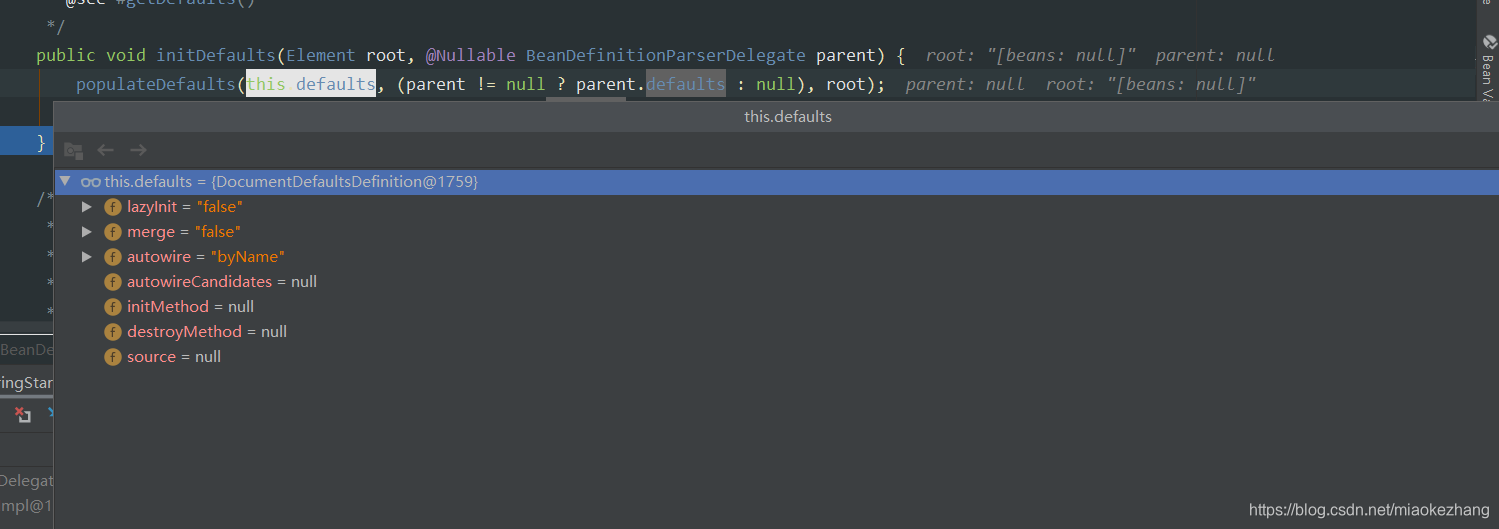
然后createDelegate()后面是通过readerContext创建了一个BeanDefinitionParserDelegate delegate,这里其实说是reader来解析xml配置文件,实际上是reader把事情委托给了BeanDefinitionParserDelegate 做了,既然委托给他,reader就需要把自己传给他,以及readr目前要解析的内容root,然后进行初始化initDefaults(),初始化方法里又有populateDefaults();将this.defaults的内容进行了设置,将root信息设置到this.defaults里去了:
创建了delegate委托类之后就来到了parseBeanDefinitions(root, this.delegate);方法,后面就到了parseBeanDefinitions():

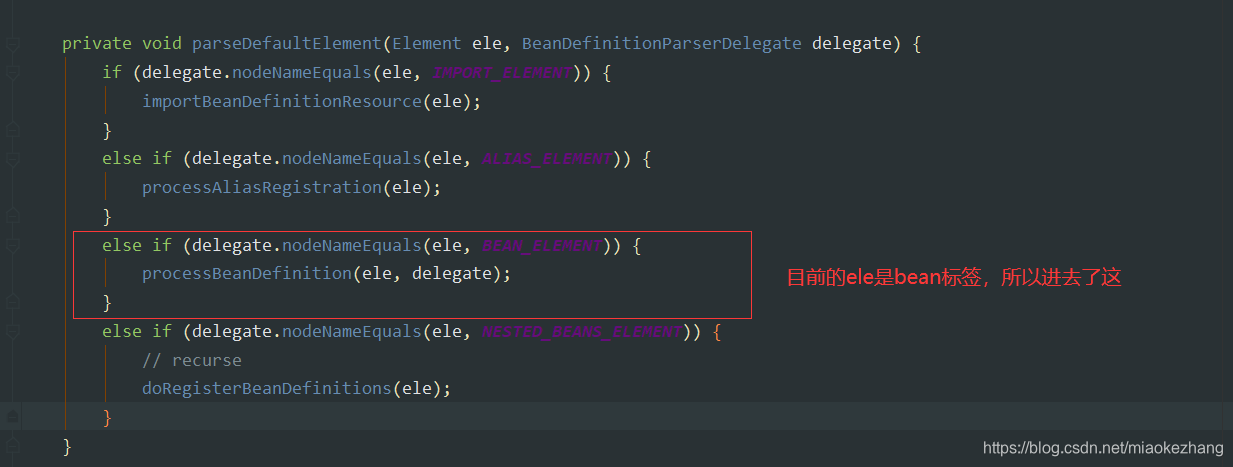
然后就到了处理BeanDefination的方法了,通过给定的element进行解析:


 614
614

 被折叠的 条评论
为什么被折叠?
被折叠的 条评论
为什么被折叠?
 到【灌水乐园】发言


