机器学习之k-近邻(kNN)算法与Python实现

k-近邻算法(kNN,k-NearestNeighbor),是最简单的机器学习分类算法之一,其核心思想在于用距离目标最近的k个样本数据的分类来代表目标的分类(这k个样本数据和目标数据最为相似)。

一 k-近邻(kNN)算法概述

1.概念

kNN算法的核心思想是用距离最近的k个样本数据的分类来代表目标数据的分类。

其原理具体地讲,存在一个训练样本集,这个数据训练样本的数据集合中的每个样本都包含数据的特征目标变量(即分类值),输入新的不含目标变量的数据,将该数据的特征与训练样本集中每一个样本进行比较,找到最相似的k个数据,这k个数据出席那次数最多的分类,即输入的具有特征值的数据的分类。

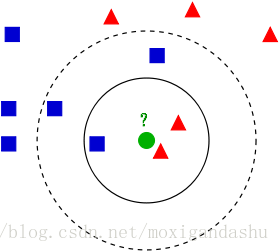
例如,训练样本集中包含一系列数据,这个数据包括样本空间位置(特征)和分类信息(即目标变量,属于红色三角形还是蓝色正方形),要对中心的绿色数据的分类。运用kNN算法思想,距离最近的k个样本的分类来代表测试数据的分类,那么:
当k=3时,距离最近的3个样本在实线内,具有2个红色三角和1个蓝色正方形**,因此将它归为红色三角。
当k=5时,距离最近的5个样本在虚线内,具有2个红色三角和3个蓝色正方形**,因此将它归为蓝色正方形。

KNN

2.特点

  • 优点
    (1)监督学习:可以看到,kNN算法首先需要一个训练样本集,这个集合中含有分类信息,因此它属于监督学习
    (2)通过计算距离来衡量样本之间相似度,算法简单,易于理解和实现。
    (3)对异常值不敏感

  • 缺点
    (4)需要设定k值,结果会受到k值的影响,通过上面的例子可以看到,不同的k值,最后得到的分类结果不尽相同。k一般不超过20。
    (5)计算量大,需要计算样本集中每个样本的距离,才能得到k个最近的数据样本。
    (6)训练样本集不平衡导致结果不准确问题。当样本集中主要是某个分类,该分类数量太大,导致近邻的k个样本总是该类,而不接近目标分类。

3.kNN算法流程

一般情况下,kNN有如下流程:
(1)收集数据:确定训练样本集合测试数据;
(2)计算测试数据和训练样本集中每个样本数据的距离;

  • 常用的距离计算公式:
    欧式距离公式: d(x,y)=ni=1(xiyi)2
    曼哈顿距离公式: d(x,y)=ni=1|xiyi|

(3)按照距离递增的顺序排序;
(4)选取距离最近的k个点;
(5)确定这k个点中分类信息的频率;
(6)返回前k个点中出现频率最高的分类,作为当前测试数据的分类。

二 、Python算法实现

1.KNN算法分类器

建立一个名为“KNN.py”的文件,构造一个kNN算法分类器的函数:

from numpy import *
import operator

#定义KNN算法分类器函数
#函数参数包括:(测试数据,训练数据,分类,k值)
def classify(inX,dataSet, labels, k):
    dataSetSize = dataSet.shape[0]
    diffMat = tile(inX,(dataSetSize,1))-dataSet
    sqDiffMat=diffMat**2
    sqDistances=sqDiffMat.sum(axis=1)
    distances=sqDistances**0.5 #计算欧式距离
    sortedDistIndicies=distances.argsort() #排序并返回index
    #选择距离最近的k个值
    classCount={}
    for i in range(k):
        voteIlabel=labels[sortedDistIndicies[i]]
        #D.get(k[,d]) -> D[k] if k in D, else d. d defaults to None.
        classCount[voteIlabel]=classCount.get(voteIlabel,0)+1
    #排序
    sortedClassCount=sorted(classCount.items(),key=operator.itemgetter(1),reverse=True)
    return sortedClassCount[0][0]

在KNN.py中定义一个生成“训练样本集”的函数:


#定义一个生成“训练样本集”的函数,包含特征和分类信息
def createDataSet():
    group=array([[1,1.1],[1,1],[0,0],[0,0.1]])
    labels=['A','A','B','B']
    return group,labels

在python控制台先将当前目录设置为“KNN.py”所在的文件目录,将测试数据[0,0]进行KNN算法分类测试,输入:

import KNN
#生成训练样本
group,labels=KNN.createDataSet()
#对测试数据[0,0]进行KNN算法分类测试
KNN.classify([0,0],group,labels,3)
Out[3]: 'B'

可以看到该分类器函数将[0,0]分类为B组,符合实际情况,分入了符合逻辑的正确的类别。但如何知道KNN分类的正确性呢?

2.kNN算法用于约会网站配对

2.1准备数据
该数据在文本文件datingTestSet2.txt中,该数据具有1000行,4列,分别是特征数据(每年获得的飞行常客里程数,玩视频游戏所耗时间百分比,每周消费的冰淇淋公升数),和目标变量/分类数据(是否喜欢(1表示不喜欢,2表示魅力一般,3表示极具魅力)),部分数据展示如下:

40920   8.326976    0.953952    3
14488   7.153469    1.673904    2
26052   1.441871    0.805124    1
75136   13.147394   0.428964    1
38344   1.669788    0.134296    1
72993   10.141740   1.032955    1
35948   6.830792    1.213192    3
42666   13.276369   0.543880    3
67497   8.631577    0.749278    1
35483   12.273169   1.508053    3
50242   3.723498    0.831917    1
63275   8.385879    1.669485    1
5569    4.875435    0.728658    2

完整地数据下载地址如下:
约会网站测试数据
(1)将文本记录转为成numpy

#定义一个将文本转化为numpy的函数
def file2matrix(filepath):
    fr=open(filepath)#读取文件
    arraylines=fr.readlines()
    numberOfLines=len(arraylines)#得到行数
    returnMat=zeros((numberOfLines,3))#构造全为0的零矩阵
    classLabelVector= []
    index=0
    #解析文件
    for line in arraylines:
        line=line.strip() #删除空白符(包括'\n', '\r',  '\t',  ' ')
        listFromLine=line.split('\t') #按照('\t')进行拆分
        returnMat[index,:]=listFromLine[0:3] #得到特征变量
        classLabelVector.append(listFromLine[-1]) #得到目标分类变量
        index+=1
    return returnMat,classLabelVector

在Python控制台输入:

in [5]:datingDataMat,datingLabels=KNN.file2matrix('G:\Workspaces\MachineLearning\machinelearninginaction\Ch02\datingTestSet2.txt')#括号是文件路径
in [6]:datingDataMat
out[6]:

array([[  4.09200000e+04,   8.32697600e+00,   9.53952000e-01],
       [  1.44880000e+04,   7.15346900e+00,   1.67390400e+00],
       [  2.60520000e+04,   1.44187100e+00,   8.05124000e-01],
       ..., 
       [  2.65750000e+04,   1.06501020e+01,   8.66627000e-01],
       [  4.81110000e+04,   9.13452800e+00,   7.28045000e-01],
       [  4.37570000e+04,   7.88260100e+00,   1.33244600e+00]])
in [7]:datingLabels[:10]
Out[7]: 
['3', '2', '1', '1', '1', '1', '3', '3', '1', '3']

(2)可视化分析数据
运用Matplotlib创建散点图来分析数据:

import matplotlib
import matplotlib.pyplot as plt
#对第二列和第三列数据进行分析:
fig=plt.figure()
ax=fig.add_subplot(111)
ax.scatter(datingDataMat[:,1],datingDataMat[:,2],c=datingLabels)
plt.xlabel('Percentage of Time Spent Playing Video Games')
plt.ylabel('Liters of Ice Cream Consumed Per Week')

散点图

#对第一列和第二列进行分析:
fig=plt.figure()
ax=fig.add_subplot(111)
ax.scatter(datingDataMat[:,0],datingDataMat[:,1],c=datingLabels)
plt.xlabel('Miles of plane Per year')
plt.ylabel('Percentage of Time Spent Playing Video Games')
ax.legend(loc='best')

散点图

可以看到不同的约会对象的喜欢程度按照特征有明显的类别区分。
因此可以使用KNN算法进行分类和预测。

(3)数据归一化
由于不同的数据在大小上差别较大,在计算欧式距离,整体较大的数据明细所占的比重更高,因此需要对数据进行归一化处理。

#归一化处理函数
def autoNorm(dataSet):
    minVals=dataSet.min(0) #最小值
    maxVals=dataSet.max(0) #最大值
    ranges=maxVals-minVals #最大最小值之差
    normDataSet=zeros(shape(dataSet)) #构造零矩阵
    m=dataSet.shape[0] #行数,shape返回[nrow,ncol]
    normDataSet=dataSet-tile(minVals,(m,1))#tile复制minval
    normDataSet=normDataSet/tile(ranges,(m,1))
    return normDataSet,ranges,minVals

在Python控制台输入:

reload(KNN)

Out[145]: <module 'KNN' from 'G:\\Workspaces\\MachineLearning\\KNN.py'>

normMat,ranges,minVals=KNN.autoNorm(datingDataMat)


normMat

Out[147]: 
array([[ 0.44832535,  0.39805139,  0.56233353],
       [ 0.15873259,  0.34195467,  0.98724416],
       [ 0.28542943,  0.06892523,  0.47449629],
       ..., 
       [ 0.29115949,  0.50910294,  0.51079493],
       [ 0.52711097,  0.43665451,  0.4290048 ],
       [ 0.47940793,  0.3768091 ,  0.78571804]])

ranges

Out[148]: array([  9.12730000e+04,   2.09193490e+01,   1.69436100e+00])

minVals

Out[149]: array([ 0.      ,  0.      ,  0.001156])

数据的准备工作完成,下一步对算法进行测试。

2.2 算法测试

kNN算法分类的结果的效果,可以使用正确率/错误率来衡量,错误率为0,则表示分类很完美,如果错误率为1,表示分类完全错误。我们使用1000条数据中的90%作为训练样本集,其中的10%来测试错误率。

#定义测试算法的函数
def datingClassTest(h=0.1):
    hoRatio=h #测试数据的比例
    datingDataMat,datingLabels=file2matrix('G:\Workspaces\MachineLearning\machinelearninginaction\Ch02\datingTestSet2.txt') #准备数据
    normMat,ranges,minVals=autoNorm(datingDataMat) #归一化处理
    m=normMat.shape[0] #得到行数
    numTestVecs=int(m*hoRatio) #测试数据行数
    errorCount=0 #定义变量来存储错误分类数
    for i in range(numTestVecs):
        classifierResult=classify(normMat[i,:],normMat[numTestVecs:m,:],datingLabels[numTestVecs:m],3)
        print('the classifier came back with: %d,the real answer is: %d'%(int(classifierResult),int(datingLabels[i])))
        if (classifierResult!=datingLabels[i]): errorCount+=1
    print('the total error rate is : %f'%(errorCount/float(numTestVecs)))

在控制台输入命令来测试错误率:

reload(KNN)

Out[150]: <module 'KNN' from 'G:\\Workspaces\\MachineLearning\\KNN.py'>

KNN.datingClassTest()

the classifier came back with: 3,the real answer is: 3
the classifier came back with: 2,the real answer is: 2
the classifier came back with: 1,the real answer is: 1
... ...
the classifier came back with: 2,the real answer is: 2
the classifier came back with: 1,the real answer is: 1
the classifier came back with: 3,the real answer is: 1
the total error rate is : 0.050000

可以看到KNN算法分类器处理约会数据的错误率是5%,具有较高额正确率。
可以在datingClassTest函数中传入参数h来改变测试数据比例,来看修改后Ration后错误率有什么样的变化。

KNN.datingClassTest(0.2)

the classifier came back with: 3,the real answer is: 3
the classifier came back with: 2,the real answer is: 2
the classifier came back with: 1,the real answer is: 1
... ...
the classifier came back with: 2,the real answer is: 2
the classifier came back with: 3,the real answer is: 3
the classifier came back with: 2,the real answer is: 2
the total error rate is : 0.080000

减小训练样本集数据,增加测试数据,错误率增加到8%。

2.3 使用KNN算法进行预测

def classifypersion():
    resultList=['not at all','in small doses','in large doses']
    percentTats=float(input('percentage of time spent playing video games?')) #raw_input->input,录入数据
    ffMiles=float(input('frequent flier miles earned per year?'))
    iceCream=float(input('liters of ice creamconsued per year?'))
    datingDataMat,datingLabels =file2matrix('G:\Workspaces\MachineLearning\machinelearninginaction\Ch02\datingTestSet2.txt')
    normMat,ranges,minVals=autoNorm(datingDataMat)
    inArr=array([ffMiles,percentTats,iceCream])
    classifierResult=classify((inArr-minVals/ranges),normMat,datingLabels,3)
    print('You will probably like this persion :%s'%resultList[int(classifierResult)-1])

测试一下:

reload(KNN)

Out[153]: <module 'KNN' from 'G:\\Workspaces\\MachineLearning\\KNN.py'>

KNN.classifypersion()


percentage of time spent playing video games?10

frequent flier miles earned per year?10000

liters of ice creamconsued per year?0.5
You will probably like this persion :not at all

3. KNN算法用于手写识别系统

已经将图片转化为32*32 的文本格式,文本格式如下:

00000000000111110000000000000000
00000000001111111000000000000000
00000000011111111100000000000000
00000000111111111110000000000000
00000001111111111111000000000000
00000011111110111111100000000000
00000011111100011111110000000000
00000011111100001111110000000000
00000111111100000111111000000000
00000111111100000011111000000000
00000011111100000001111110000000
00000111111100000000111111000000
00000111111000000000011111000000
00000111111000000000011111100000
00000111111000000000011111100000
00000111111000000000001111100000
00000111111000000000001111100000
00000111111000000000001111100000
00000111111000000000001111100000
00000111111000000000001111100000
00000011111000000000001111100000
00000011111100000000011111100000
00000011111100000000111111000000
00000001111110000000111111100000
00000000111110000001111111000000
00000000111110000011111110000000
00000000111111000111111100000000
00000000111111111111111000000000
00000000111111111111110000000000
00000000011111111111100000000000
00000000001111111111000000000000
00000000000111111110000000000000

3.1数据准备
(1)将32*32的文本格式转为成1*2014的向量

def img2vector(filename):
    returnvect=zeros((1,1024))
    fr=open(filename)
    for i in range(32):
        lineStr=fr.readline()
        for j in range(32):
            returnvect[0,32*i+j]=int(lineStr[j])
    return returnvect

在控制台中输入命令测试下函数:

reload(KNN)

Out[156]: <module 'KNN' from 'G:\\Workspaces\\MachineLearning\\KNN.py'>

testVector=KNN.img2vector('G:\\Workspaces\\MachineLearning\\machinelearninginaction\\Ch02\\trainingDigits\\0_13.txt')


testVector

Out[158]: array([[ 0.,  0.,  0., ...,  0.,  0.,  0.]])

testVector[0,0:31]

Out[159]: array([ 0.,  0.,  0., ...,  0.,  0.,  0.])

3.2 算法测试
使用kNN算法测试手写数字识别

#引入os模块的listdir函数,列出给定目录的文件名
from os impor listdir

def handwritingClassTest():
    hwLabels=[]
    trainingFileList=listdir('G:/Workspaces/MachineLearning/machinelearninginaction/Ch02/trainingDigits')#列出文件名
    m=len(trainingFileList) #文件数目
    trainMat=zeros((m,1024))
    #从文件名中解析分类信息,如0_13.txt
    for i in range(m):
        fileNameStr=trainingFileList[i]
        fileStr=fileNameStr.split('.')[0]
        classNumber=int(fileStr.split('_')[0])
        hwLabels.append(classNumber)
        trainMat[i]=img2vector('G:/Workspaces/MachineLearning/machinelearninginaction/Ch02/trainingDigits/%s'%fileNameStr)
    testFileList=listdir('G:/Workspaces/MachineLearning/machinelearninginaction/Ch02/testDigits')
    errorCount=0
    #同上,解析测试数据的分类信息
    mTest=len(testFileList)
    for i in range(mTest):
        fileNameStr=testFileList[i]
        fileStr=fileNameStr.split('.')[0]
        classNumber=int(fileStr.split('_')[0])
        vectorUnderTest=img2vector('G:/Workspaces/MachineLearning/machinelearninginaction/Ch02/testDigits/%s'%fileNameStr)
        classifierResult=classify(vectorUnderTest,trainMat,hwLabels,3)
        print('the classifier came back with :%d,the real answer is:%d'%(classifierResult,classNumber))
        if(classifierResult!=classNumber):errorCount+=1
    print('\n the total number of errors is: %d'%errorCount)
    print('\n total error rate is %f'%(errorCount/float(mTest)))

接下来在Python控制台输入命令来测试手写数字识别:

reload(KNN)
KNN.handwritingClassTest()

the classifier came back with :0,the real answer is:0
... ...
the classifier came back with :9,the real answer is:9

 the total number of errors is: 10

 total error rate is 0.010571

错误利率1.057%,具有较高的准确率。

阅读终点,创作起航,您可以撰写心得或摘录文章要点写篇博文。去创作
  • 11
    点赞
  • 89
    收藏
    觉得还不错? 一键收藏
  • 打赏
    打赏
  • 5
    评论
K近邻算法是一种简单易用的机器学习算法,它可以用于分类和回归问题。在分类问题中,K近邻算法通过计算待分类样本与训练集中每个样本的距离,找到距离待分类样本最近的K个样本,然后根据这K个样本的类别进行投票,将待分类样本归为票数最多的类别。在回归问题中,K近邻算法通过计算待预测样本与训练集中每个样本的距离,找到距离待预测样本最近的K个样本,然后根据这K个样本的值进行加权平均,得到待预测样本的预测值。 下面是一个使用K近邻算法进行乳腺癌检测分类的示例代码: ```python import pandas as pd from sklearn.model_selection import train_test_split from sklearn.neighbors import KNeighborsClassifier from sklearn.metrics import accuracy_score # 读取数据集 data = pd.read_csv("breast_cancer.csv") # 将类别变量转换为数值变量 data['diagnosis'] = data['diagnosis'].map({'M': 1, 'B': 0}) # 将特征变量和类别变量分开 X = data.drop(['diagnosis'], axis=1) y = data['diagnosis'] # 将数据集分为训练集和测试集 X_train, X_test, y_train, y_test = train_test_split(X, y, test_size=0.2, random_state=0) # 创建K近邻分类器 knn = KNeighborsClassifier(n_neighbors=5) # 训练K近邻分类器 knn.fit(X_train, y_train) # 在测试集上进行预测 y_pred = knn.predict(X_test) # 计算预测准确率 accuracy = accuracy_score(y_test, y_pred) print("预测准确率:", accuracy) ``` 上述代码使用了sklearn库中的KNeighborsClassifier类来创建K近邻分类器,并使用accuracy_score函数计算预测准确率。需要注意的是,K近邻算法对数据的缩放敏感,因此在使用K近邻算法之前,通常需要对数据进行缩放处理。

“相关推荐”对你有帮助么?

  • 非常没帮助
  • 没帮助
  • 一般
  • 有帮助
  • 非常有帮助
提交
评论 5
添加红包

请填写红包祝福语或标题

红包个数最小为10个

红包金额最低5元

当前余额3.43前往充值 >
需支付:10.00
成就一亿技术人!
领取后你会自动成为博主和红包主的粉丝 规则
hope_wisdom
发出的红包

打赏作者

moxigandashu

你的鼓励将是我创作的最大动力

¥1 ¥2 ¥4 ¥6 ¥10 ¥20
扫码支付:¥1
获取中
扫码支付

您的余额不足,请更换扫码支付或充值

打赏作者

实付
使用余额支付
点击重新获取
扫码支付
钱包余额 0

抵扣说明:

1.余额是钱包充值的虚拟货币,按照1:1的比例进行支付金额的抵扣。
2.余额无法直接购买下载,可以购买VIP、付费专栏及课程。

余额充值