


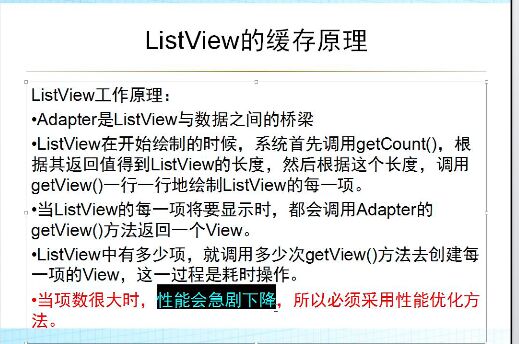
在android开发中ListView是比较常用的组件,它以列表的形式展示具体内容,并且能够根据数据的长度自适应显示。
列表的显示需要三个元素:
1.ListVeiw 用来展示列表的View。
2.适配器 用来把数据映射到ListView上的中介。
3.数据 具体的将被映射的字符串,图片,或者基本组件。
根据列表的适配器类型,列表分为三种,ArrayAdapter,SimpleAdapter和自定义Adapter
1、关于几种Adapter
   以ArrayAdapter最为简单,只能展示一行字。SimpleAdapter有最好的扩充性,可以自定义出各种效果。自定义Adapter可以认为是SimpleAdapter对数据库的简单结合,需要继承BaseAdapter可以方面的把数据库的内容以列表的形式展示出来。
   arrayAdapter和simpleAdapter了解就可以,重要的是自定义Adapter,在自定义Adapter中需要extends BaseAdapter,然后需要重写四个方法,分别是:getount(),getItem(),getItemId(),getView();
####一个studentAdapter的代码如下(注意方法的返回值):
public class StudentAdapter extends BaseAdapter {
   private List<Student> mData;
    @Override
    public int getCount() {
        return mData.size();//返回list类型数据的长度
    }

    @Override
    public Object getItem(int position) {
        return position;
    }

    @Override
    public long getItemId(int position) {
        return position;
    }

    @Override
    public View getView(int position, View convertView, ViewGroup parent) {
        teturn convertView;
    }
2、处理缓存的机制
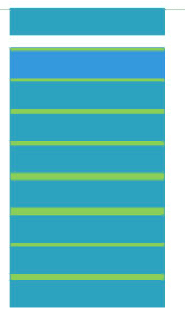
假如下面是一个手机屏幕显示的多条数据,当向上滑动时,上面的信息出屏,下面的向上走,把上面出屏的view拿到下面。向下滑是反过来
处理缓存这里用到了convertView,viewHolder
如昨天写的StudentAdapter中的getView方法代码如下:
 @Override
    public View getView(int position, View convertView, ViewGroup parent) {//这个方法是关键
        View view = mInflater.inflate(R.layout.activity_list, null);//对应activity—list中的属性
        Student student = mData.get(position);
        ImageView imageView = (ImageView) view.findViewById(R.id.image);//付属性
        TextView textView_name = (TextView) view.findViewById(R.id.list_name);
        TextView textView_age = (TextView) view.findViewById(R.id.list_age);
        TextView textView_sex = (TextView) view.findViewById(R.id.list_sex);
        TextView textView_hobby = (TextView) view.findViewById(R.id.list_hobby);
        textView_name.setText(student.getName());//添加属性
        textView_age.setText(student.getAge());
        textView_sex.setText(student.getSex());
        textView_hobby.setText(student.getHobby());
        imageView.setImageResource(student.getImg());
        return view;
    }
对每个属性分别赋值并setText都需要时间缓存,因此,当数据量过大时会出现问题。在这里用convertView,viewHolder,如下
@Override
public View getView(int position, View convertView, ViewGroup parent) {
//convertView是划出屏幕的数据
Student student = mData.get(position);
ViewHolder vh = null;
if (convertView == null) {//如果是空,则给一个新的flater
vh = new ViewHolder();
convertView = mInflater.inflate(R.layout.activity_list, null);
vh.imageView = (ImageView) convertView.findViewById(R.id.image);
vh.textView_name = (TextView) convertView.findViewById(R.id.list_name);
vh.textView_age = (TextView) convertView.findViewById(R.id.list_age);
vh.textView_sex = (TextView) convertView.findViewById(R.id.list_sex);
vh.textView_hobby = (TextView) convertView.findViewById(R.id.list_hobby);
convertView.setTag(vh);
} else {
vh = (ViewHolder) convertView.getTag();
}
vh.textView_name.setText(student.getName());
vh.textView_age.setText(student.getAge());
vh.textView_sex.setText(student.getSex());
vh.textView_hobby.setText(student.getHobby());
vh.imageView.setImageResource(student.getImg());
return convertView;
}
class ViewHolder {
ImageView imageView;
TextView textView_name;
TextView textView_age;
TextView textView_sex;
TextView textView_hobby;
}
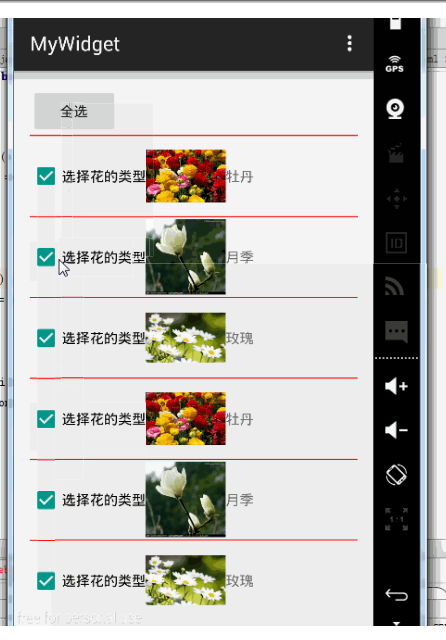
}3、案例展示
实现点击选择框和点击数据区域可以选择,再点击取消选择。在顶部添加全选按钮,底部添加反选按钮,并实现功能。
<1>新建MyFlowerActivity,这是会随之生成layout文件夹下的activity_my_list的xml文件。并且在MyFlowerActivity中有
    @Override
    protected void onCreate(Bundle savedInstanceState) {
        super.onCreate(savedInstanceState);
        setContentView(R.layout.activity_my_list_view);//xml文件位置
        mListView = (ListView) findViewById(R.id.listview);//listview的ip
注意;layout文件夹下的activity_my_list的xml文件,这个文件里不用写其他的东西,它是一个构架,
<RelativeLayout xmlns:android="http://schemas.android.com/apk/res/android"
    xmlns:tools="http://schemas.android.com/tools" android:layout_width="match_parent"
    android:layout_height="match_parent"
    android:paddingLeft="@dimen/activity_horizontal_margin"
    android:paddingRight="@dimen/activity_horizontal_margin"
    android:paddingTop="@dimen/activity_vertical_margin"
    android:paddingBottom="@dimen/activity_vertical_margin"
    tools:context="com.my.administrator.mywidget.MyListView">

<ListView
    android:id="@+id/listview"//这里是listview
    android:cacheColorHint="#00000000"//消去滑动图案
    android:divider="@color/red"//每条数据中间设置分割线
    android:dividerHeight="1dp"//分隔线的宽度
    android:layout_width="wrap_content"
    android:layout_height="wrap_content"
    >
</ListView>

</RelativeLayout>
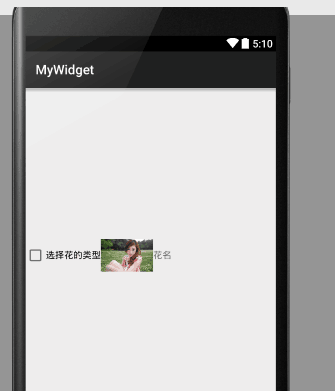
<2>在layout文件下新建item_flower.xml
在这里面搭建布局,整体为线性布局,依次有checkbox,imageview,textview
<LinearLayout xmlns:android="http://schemas.android.com/apk/res/android"
    android:layout_width="match_parent"
    android:layout_height="match_parent"
    android:gravity="center_vertical"
    android:orientation="horizontal">

    <CheckBox
        android:id="@+id/checkbox"
        android:layout_width="wrap_content"
        android:layout_height="wrap_content"
        android:focusable="false"
        android:text="选择花的类型" />

    <ImageView
        android:id="@+id/flower_imageview"
        android:layout_width="80dp"
        android:layout_height="80dp"
        android:src="@mipmap/meinv2" />

    <TextView
        android:id="@+id/textview_name"
        android:layout_width="wrap_content"
        android:layout_height="wrap_content"
        android:text="花名" />

</LinearLayout>
每条数据的布局如下
<3>在包modle下新建Flower 类
类中包含花的名称属性,图片属性
public class Flower {
    private String name;
    private int img;
    public String getName() {
        return name;
    }

    public void setName(String name) {
        this.name = name;
    }

    public int getImg() {
        return img;
    }

    public void setImg(int img) {
        this.img = img;
    }

    public Flower(String name, int img) {
        this.name = name;
        this.img = img;

    }
}
<4>在包Adapter下新建FlowerAdapter类,重写四个方法,分析如下:
public class FlowerAdapter extends BaseAdapter {//继承BaseAdapter
    private LayoutInflater mFlater;//用于与item_flower建立联系
    private List<Flower> mFlower;//与类Flower联系
    private boolean[] mManagerAllCheckBox;//用于判断是否选择,默认是False

    public FlowerAdapter(LayoutInflater mFlater, List<Flower> mFlower) {
        this.mFlater = mFlater;
        this.mFlower = mFlower;

        mManagerAllCheckBox = new boolean[mFlower.size()];
    }
    //这个是反选的方法
    public void checkFan(){
        //索引是从0开始的额
        for(int i =0;i<mFlower.size();i++){
            mManagerAllCheckBox[i] =!mManagerAllCheckBox[i];
        }
        notifyDataSetChanged();
    }
    //这个是全选的方法
  public void checkAll(){
       for(int i =0;i<mFlower.size();i++){
           mManagerAllCheckBox[i] = true;
       }
      notifyDataSetChanged();
  }
  //这个是点击选择一条数据的方法
    public void checkSelect(int position) {
        mManagerAllCheckBox[position] = !mManagerAllCheckBox[position];//没点之前是false,点击后取非变成true
        notifyDataSetChanged();
    }

    @Override
    public int getCount() {
        return mFlower.size();
    }

    @Override
    public Object getItem(int position) {
        return position;
    }

    @Override
    public long getItemId(int position) {
        return position;
    }

    @Override
    public View getView(final int position, View convertView, ViewGroup parent) {
        ViewHolder vh = null;
        if (convertView == null) {
            convertView = mFlater.inflate(R.layout.item_flower, null);//获得布局文件的内容
            vh = new ViewHolder();
            vh.checkBox = (CheckBox) convertView.findViewById(R.id.checkbox);
            vh.imageView = (ImageView) convertView.findViewById(R.id.flower_imageview);
            vh.textView = (TextView) convertView.findViewById(R.id.textview_name);
            convertView.setTag(vh);
        } else {
            vh = (ViewHolder) convertView.getTag();
        }
        Flower flower = mFlower.get(position);
        vh.imageView.setImageResource(flower.getImg());
        vh.textView.setText(flower.getName());
        vh.checkBox.setOnCheckedChangeListener(new CompoundButton.OnCheckedChangeListener() {
            @Override
            public void onCheckedChanged(CompoundButton buttonView, boolean isChecked) {
                Log.d("myFlower", "选择框发生变化" + isChecked);//点击时变为ture
                mManagerAllCheckBox[position] = isChecked;//这条数据被点击
                notifyDataSetChanged();//刷新listview
            }
        });
        vh.checkBox.setChecked(mManagerAllCheckBox[position]);
        return convertView;
    }
     class ViewHolder {
        CheckBox checkBox;
        ImageView imageView;
        TextView textView;
    }
}
<4>MyFlowerAdapter的写法
public class MyFlowerActivity extends AppCompatActivity {
    private List<Flower> mFlower;//数据
    private ListView mListView;
    private LayoutInflater mInflater;//联系item_flower
    private FlowerAdapter mFlowerAdapter;
    private View mHeaderView;//全选
    private Button mbtCheckAll;
    private  View mFootView;//反选
    private Button mbtCheckFan;

    @Override
    protected void onCreate(Bundle savedInstanceState) {
        super.onCreate(savedInstanceState);
        setContentView(R.layout.activity_my_list_view);//获得整体构架
        mListView = (ListView) findViewById(R.id.listview);//布局文件
        mInflater = getLayoutInflater();//得到布局里的数据
        initData();//添加数据的方法,在下面
       //这是全选,对全选按钮建立点击事件
        mHeaderView =mInflater.inflate(R.layout.flower_checkall, null);
        mbtCheckAll =(Button) mHeaderView.findViewById(R.id.button_checkall);
        mbtCheckAll.setOnClickListener(new View.OnClickListener() {
            @Override
            public void onClick(View v) {
                mFlowerAdapter.checkAll();
            }
        });
        //这是反选,对反选按钮建立点击事件
        mFootView = mInflater.inflate(R.layout.flower_foot,null);
        mbtCheckFan = (Button)mFootView.findViewById(R.id.button_fan);
        mbtCheckFan.setOnClickListener(new View.OnClickListener() {
            @Override
            public void onClick(View v) {
                mFlowerAdapter.checkFan();
            }
        });
     //这是自动把全选按钮添加到顶部和反选按钮添加到底部
        mListView.addHeaderView(mHeaderView);
        mListView.addFooterView(mFootView);

        mFlowerAdapter = new FlowerAdapter(mInflater, mFlower);
        mListView.setAdapter(mFlowerAdapter);
      //下面是点击时这条数据的变化,setOnItemClickListener
        mListView.setOnItemClickListener(new AdapterView.OnItemClickListener() {
            @Override
            public void onItemClick(AdapterView<?> parent, View view, int position, long id) {
                Log.d("myflower", "点击的花" + mFlower.get(position-1).getName());
                mFlowerAdapter.checkSelect(position-1);//这里pisition-1是因为,在顶部加上了全选按钮,它占了第一个索引的位置
            }
        });
    }
//下面是添加数据的方法
    private void initData() {
        mFlower = new ArrayList<>();
        Flower mudan = new Flower("牡丹", R.mipmap.flower1);
        Flower yueji = new Flower("月季", R.mipmap.flower2);
        Flower meigui = new Flower("玫瑰", R.mipmap.flower3);
        for (int i = 0; i < 6; i++) {
            mFlower.add(mudan);
            mFlower.add(yueji);
            mFlower.add(meigui);
        }
    }
<5>全选和反选按钮需要的代码:
<LinearLayout xmlns:android="http://schemas.android.com/apk/res/android"
    android:orientation="vertical"
    android:layout_width="match_parent"
    android:layout_height="match_parent">
<Button
    android:id="@+id/button_checkall"
    android:layout_width="wrap_content"
    android:layout_height="wrap_content"
    android:text="全选"/>
</LinearLayout>
______________________________
<LinearLayout xmlns:android="http://schemas.android.com/apk/res/android"
    android:orientation="vertical" android:layout_width="match_parent"
    android:layout_height="match_parent">
<Button
    android:id="@+id/button_fan"
    android:layout_width="wrap_content"
    android:layout_height="wrap_content"
    android:text="反选"/>
</LinearLayout>
到此全部完成


 1万+
1万+

 被折叠的 条评论
为什么被折叠?
被折叠的 条评论
为什么被折叠?
 到【灌水乐园】发言


