


http://danielnouri.org/notes/2014/12/17/using-convolutional-neural-nets-to-detect-facial-keypoints-tutorial/
December 17, 2014 | categories: Python, Deep Learning, Programming, Tutorial, Machine Learning | 192 Comments
This is a hands-on tutorial on deep learning. Step by step, we'll goabout building a solution for theFacial Keypoint Detection Kagglechallenge.The tutorial introduces Lasagne, a new library for buildingneural networks with Python and Theano. We'll use Lasagne toimplement a couple of network architectures, talk about dataaugmentation, dropout, the importance of momentum, and pre-training.Some of these methods will help us improve our results quite a bit.
I'll assume that you already know a fair bit about neural nets.That's because we won't talk about much of the background of howneural nets work; there's a few of good books and videos for that,like theNeural Networks and Deep Learning online book. Alec Radford's talkDeep Learning with Python's Theano library is a great quickintroduction. Make sure you also check out Andrej Karpathy'smind-blowing ConvNetJS Browser Demos.
Tutorial Contents
Prerequisites
You don't need to type the code and execute it yourself if you justwant to follow along. But here's the installation instructions forthose who have access to a CUDA-capable GPU and want to run theexperiments themselves.
I assume you have the CUDA toolkit, Python 2.7.x, numpy, pandas,matplotlib, and scikit-learn installed. Lasagne is still waiting forits first proper release, so for now we'll install it straight fromGithub. To install Lasagneand all the remaining dependencies, run this command:
pip install -r https://raw.githubusercontent.com/dnouri/kfkd-tutorial/master/requirements.txt
(Note that for sake of brevity, I'm not including commands to create avirtualenv and activate it.But you should.)
If everything worked well, you should be able to find thesrc/lasagne/examples/ directory in your virtualenv and run theMNIST example. Thisis sort of the "Hello, world" of neural nets. There's ten classes,one for each digit between 0 and 9, and the input is grayscale imagesof handwritten digits of size 28x28.
cd src/lasagne/examples/
python mnist.py
This command will start printing out stuff after thirty seconds or so.The reason it takes a while is that Lasagne uses Theano to do theheavy lifting; Theano in turn is a "optimizing GPU-meta-programmingcode generating array oriented optimizing math compiler in Python,"and it will generate C code that needs to be compiled before trainingcan happen. Luckily, we have to pay the price for this overhead onlyon the first run.
Once training starts, you'll see output like this:
Epoch 1 of 500
  training loss:            1.352731
  validation loss:          0.466565
  validation accuracy:              87.70 %
Epoch 2 of 500
  training loss:            0.591704
  validation loss:          0.326680
  validation accuracy:              90.64 %
Epoch 3 of 500
  training loss:            0.464022
  validation loss:          0.275699
  validation accuracy:              91.98 %
...
If you let training run long enough, you'll notice that after about 75epochs, it'll have reached a test accuracy of around 98%.
If you have a GPU, you'll want to configure Theano to use it. Forthis, create a ~/.theanorc file in your home directory and writeinto it the following:
[global]
floatX = float32
device = gpu0

[nvcc]
fastmath = True
(Should any of the instructions in this tutorial not work for you,submit a bug report here.)
The data
The training dataset for the Facial Keypoint Detection challengeconsists of 7,049 96x96 gray-scale images. For each image, we'resupposed learn to find the correct position (the x and y coordinates)of 15 keypoints, such asleft_eye_center,right_eye_outer_corner,mouth_center_bottom_lip, and so on.

An example of one of the faces with three keypoints marked.
An interesting twist with the dataset is that for some of thekeypoints we only have about 2,000 labels, while other keypoints havemore than 7,000 labels available for training.
Let's write some Python code that loads the data from the CSV filesprovided.We'll write a function that can load both the training and the testdata. These two datasets differ in that the test data doesn't containthe target values; it's the goal of the challenge to predict these.Here's ourload() function:
# file kfkd.py
import os

import numpy as np
from pandas.io.parsers import read_csv
from sklearn.utils import shuffle


FTRAIN = '~/data/kaggle-facial-keypoint-detection/training.csv'
FTEST = '~/data/kaggle-facial-keypoint-detection/test.csv'


def load(test=False, cols=None):
    """Loads data from FTEST if *test* is True, otherwise from FTRAIN.
    Pass a list of *cols* if you're only interested in a subset of the
    target columns.
    """
    fname = FTEST if test else FTRAIN
    df = read_csv(os.path.expanduser(fname))  # load pandas dataframe

    # The Image column has pixel values separated by space; convert
    # the values to numpy arrays:
    df['Image'] = df['Image'].apply(lambda im: np.fromstring(im, sep=' '))

    if cols:  # get a subset of columns
        df = df[list(cols) + ['Image']]

    print(df.count())  # prints the number of values for each column
    df = df.dropna()  # drop all rows that have missing values in them

    X = np.vstack(df['Image'].values) / 255.  # scale pixel values to [0, 1]
    X = X.astype(np.float32)

    if not test:  # only FTRAIN has any target columns
        y = df[df.columns[:-1]].values
        y = (y - 48) / 48  # scale target coordinates to [-1, 1]
        X, y = shuffle(X, y, random_state=42)  # shuffle train data
        y = y.astype(np.float32)
    else:
        y = None

    return X, y


X, y = load()
print("X.shape == {}; X.min == {:.3f}; X.max == {:.3f}".format(
    X.shape, X.min(), X.max()))
print("y.shape == {}; y.min == {:.3f}; y.max == {:.3f}".format(
    y.shape, y.min(), y.max()))
It's not necessary that you go through every single detail of thisfunction. But let's take a look at what the script above outputs:
$ python kfkd.py
left_eye_center_x            7034
left_eye_center_y            7034
right_eye_center_x           7032
right_eye_center_y           7032
left_eye_inner_corner_x      2266
left_eye_inner_corner_y      2266
left_eye_outer_corner_x      2263
left_eye_outer_corner_y      2263
right_eye_inner_corner_x     2264
right_eye_inner_corner_y     2264
...
mouth_right_corner_x         2267
mouth_right_corner_y         2267
mouth_center_top_lip_x       2272
mouth_center_top_lip_y       2272
mouth_center_bottom_lip_x    7014
mouth_center_bottom_lip_y    7014
Image                        7044
dtype: int64
X.shape == (2140, 9216); X.min == 0.000; X.max == 1.000
y.shape == (2140, 30); y.min == -0.920; y.max == 0.996
First it's printing a list of all columns in the CSV file along withthe number of available values for each. So while we have anImage for all rows in the training data, we only have 2,267 valuesformouth_right_corner_x and so on.
load() returns a tuple (X, y) wherey is the target matrix.y has shape n x m with n being the number of samples in thedataset that have allm keypoints. Dropping all rows with missingvalues is what this line does:
df = df.dropna() # drop all rows that have missing values in them
The script's output y.shape == (2140, 30) tells us that there'sonly 2,140 images in the dataset that have all 30 target valuespresent. Initially, we'll train with these 2,140 samples only. Whichleaves us with many more input dimensions (9,216) than samples; anindicator that overfitting might become a problem. Let's see. Ofcourse it's a bad idea to throw away 70% of the training data justlike that, and we'll talk about this later on.
Another feature of the load() function is that it scales theintensity values of the image pixels to be in the interval [0, 1],instead of 0 to 255. The target values (x and y coordinates) arescaled to[-1, 1]; before they were between 0 to 95.

Testing it out
The net1 object actually keeps a record of the data that it printsout in the table. We can access that record through thetrain_history_ attribute. Let's draw those two curves:
train_loss = np.array([i["train_loss"] for i in net1.train_history_])
valid_loss = np.array([i["valid_loss"] for i in net1.train_history_])
pyplot.plot(train_loss, linewidth=3, label="train")
pyplot.plot(valid_loss, linewidth=3, label="valid")
pyplot.grid()
pyplot.legend()
pyplot.xlabel("epoch")
pyplot.ylabel("loss")
pyplot.ylim(1e-3, 1e-2)
pyplot.yscale("log")
pyplot.show()

We can see that our net overfits, but it's not that bad. Inparticular, we don't see a point where the validation error gets worseagain, thus it doesn't appear thatearly stopping, a techniquethat's commonly used to avoid overfitting, would be very useful atthis point. Notice that we didn't use any regularization whatsoever,apart from choosing a small number of neurons in the hidden layer, asetting that will keep overfitting somewhat in control.
How do the net's predictions look like, then? Let's pick a fewexamples from the test set and check:
def plot_sample(x, y, axis):
    img = x.reshape(96, 96)
    axis.imshow(img, cmap='gray')
    axis.scatter(y[0::2] * 48 + 48, y[1::2] * 48 + 48, marker='x', s=10)

X, _ = load(test=True)
y_pred = net1.predict(X)

fig = pyplot.figure(figsize=(6, 6))
fig.subplots_adjust(
    left=0, right=1, bottom=0, top=1, hspace=0.05, wspace=0.05)

for i in range(16):
    ax = fig.add_subplot(4, 4, i + 1, xticks=[], yticks=[])
    plot_sample(X[i], y_pred[i], ax)

pyplot.show()

Our first model's predictions on 16 samples taken from the testset.
The predictions look reasonable, but sometimes they are quite a bitoff. Let's try and do a bit better.
Second model: convolutions
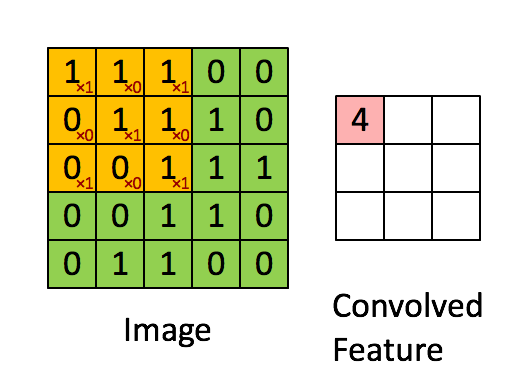
The convolution operation. (Animation taken from the Stanforddeep learning tutorial.)
LeNet5-style convolutionalneural nets are at the heart of deep learning's recent breakthrough incomputer vision. Convolutional layers are different to fullyconnected layers; they use a few tricks to reduce the number ofparameters that need to be learned, while retaining highexpressiveness. These are:
- local connectivity: neurons are connected only to a subset ofneurons in the previous layer,
- weight sharing: weights are shared between a subset of neurons inthe convolutional layer (these neurons form what's called afeaturemap),
- pooling: static subsampling of inputs.

Illustration of local connectivity and weight sharing. (Taken fromthedeeplearning.net tutorial.)
Units in a convolutional layer actually connect to a 2-d patch ofneurons in the previous layer, a prior that lets them exploit the 2-dstructure in the input.
When using convolutional layers in Lasagne, we have to prepare theinput data such that each sample is no longer a flat vector of 9,216pixel intensities, but a three-dimensional matrix with shape(c, 0,1), where c is the number of channels (colors), and 0 and 1correspond to the x and y dimensions of the input image. In our case,the concrete shape will be(1, 96, 96), because we're dealing with asingle (gray) color channel only.
A function load2d that wraps the previously writtenload anddoes the necessary transformations is easily coded:
def load2d(test=False, cols=None):
    X, y = load(test=test)
    X = X.reshape(-1, 1, 96, 96)
    return X, y
We'll build a convolutional neural net with three convolutional layersand two fully connected layers. Each conv layer is followed by a 2x2max-pooling layer. Starting with 32 filters, we double the number offilters with every conv layer. The densely connected hidden layersboth have 500 units.
There's again no regularization in the form of weight decay ordropout. It turns out that using very small convolutional filters,such as our 3x3 and 2x2 filters, is again a pretty good regularizer byitself.
Let's write down the code:
net2 = NeuralNet(
    layers=[
        ('input', layers.InputLayer),
        ('conv1', layers.Conv2DLayer),
        ('pool1', layers.MaxPool2DLayer),
        ('conv2', layers.Conv2DLayer),
        ('pool2', layers.MaxPool2DLayer),
        ('conv3', layers.Conv2DLayer),
        ('pool3', layers.MaxPool2DLayer),
        ('hidden4', layers.DenseLayer),
        ('hidden5', layers.DenseLayer),
        ('output', layers.DenseLayer),
        ],
    input_shape=(None, 1, 96, 96),
    conv1_num_filters=32, conv1_filter_size=(3, 3), pool1_pool_size=(2, 2),
    conv2_num_filters=64, conv2_filter_size=(2, 2), pool2_pool_size=(2, 2),
    conv3_num_filters=128, conv3_filter_size=(2, 2), pool3_pool_size=(2, 2),
    hidden4_num_units=500, hidden5_num_units=500,
    output_num_units=30, output_nonlinearity=None,

    update_learning_rate=0.01,
    update_momentum=0.9,

    regression=True,
    max_epochs=1000,
    verbose=1,
    )

X, y = load2d()  # load 2-d data
net2.fit(X, y)

# Training for 1000 epochs will take a while.  We'll pickle the
# trained model so that we can load it back later:
import cPickle as pickle
with open('net2.pickle', 'wb') as f:
    pickle.dump(net2, f, -1)
Training this neural net is much more computationally costly than thefirst one we trained. It takes around 15x as long to train; those1000 epochs take more than 20 minutes on even a powerful GPU.
However, our patience is rewarded with what's already a much bettermodel than the one we had before. Let's take a look at the outputwhen running the script. First comes the list of layers with theiroutput shapes. Note that the first conv layer produces 32 outputimages of size (94, 94), that's one 94x94 output image per filter:
InputLayer            (None, 1, 96, 96)       produces    9216 outputs
Conv2DCCLayer         (None, 32, 94, 94)      produces  282752 outputs
MaxPool2DCCLayer      (None, 32, 47, 47)      produces   70688 outputs
Conv2DCCLayer         (None, 64, 46, 46)      produces  135424 outputs
MaxPool2DCCLayer      (None, 64, 23, 23)      produces   33856 outputs
Conv2DCCLayer         (None, 128, 22, 22)     produces   61952 outputs
MaxPool2DCCLayer      (None, 128, 11, 11)     produces   15488 outputs
DenseLayer            (None, 500)             produces     500 outputs
DenseLayer            (None, 500)             produces     500 outputs
DenseLayer            (None, 30)              produces      30 outputs
What follows is the same table that we saw with the first example,with train and validation error over time:
 Epoch  |  Train loss  |  Valid loss  |  Train / Val
--------|--------------|--------------|----------------
     1  |    0.111763  |    0.042740  |     2.614934
     2  |    0.018500  |    0.009413  |     1.965295
     3  |    0.008598  |    0.007918  |     1.085823
     4  |    0.007292  |    0.007284  |     1.001139
     5  |    0.006783  |    0.006841  |     0.991525
...
   500  |    0.001791  |    0.002013  |     0.889810
   501  |    0.001789  |    0.002011  |     0.889433
   502  |    0.001786  |    0.002009  |     0.889044
   503  |    0.001783  |    0.002007  |     0.888534
   504  |    0.001780  |    0.002004  |     0.888095
   505  |    0.001777  |    0.002002  |     0.887699
...
   995  |    0.001083  |    0.001568  |     0.690497
   996  |    0.001082  |    0.001567  |     0.690216
   997  |    0.001081  |    0.001567  |     0.689867
   998  |    0.001080  |    0.001567  |     0.689595
   999  |    0.001080  |    0.001567  |     0.689089
  1000  |    0.001079  |    0.001566  |     0.688874
Quite a nice improvement over the first network. Our RMSE is lookingpretty good, too:
>>> np.sqrt(0.001566) * 48
1.8994904579913006
We can compare the predictions of the two networks using one of themore problematic samples in the test set:
sample1 = load(test=True)[0][6:7]
sample2 = load2d(test=True)[0][6:7]
y_pred1 = net1.predict(sample1)[0]
y_pred2 = net2.predict(sample2)[0]

fig = pyplot.figure(figsize=(6, 3))
ax = fig.add_subplot(1, 2, 1, xticks=[], yticks=[])
plot_sample(sample1[0], y_pred1, ax)
ax = fig.add_subplot(1, 2, 2, xticks=[], yticks=[])
plot_sample(sample1[0], y_pred2, ax)
pyplot.show()

The predictions of net1 on the left compared to the predictions ofnet2.
And then let's compare the learning curves of the first and the secondnetwork:

This looks pretty good, I like the smoothness of the new error curves.But we do notice that towards the end, the validation error of net2flattens out much more quickly than the training error. I bet wecould improve that by using more training examples. What if weflipped the input images horizontically; would we be able to improvetraining by doubling the amount of training data this way?
Data augmentation
An overfitting net can generally be made to perform better by usingmore training data. (And if your unregularized net does not overfit,you should probably make it larger.)
Data augmentation lets us artificially increase the number of trainingexamples by applying transformations, adding noise etc. That'sobviously more economic than having to go out and collect moreexamples by hand. Augmentation is a very useful tool to have in yourdeep learning toolbox.
We mentioned batch iterators already briefly. It is the batchiterator's job to take a matrix of samples, and split it up inbatches, in our case of size 128. While it does the splitting, thebatch iterator can also apply transformations to the data on the fly.So to produce those horizontal flips, we don't actually have to doublethe amount of training data in the input matrix. Rather, we will justperform the horizontal flips with 50% chancewhile we're iteratingover the data. This is convenient, and for some problems it allows usto produce an infinite number of examples, without blowing up thememory usage. Also, transformations to the input images can be donewhile the GPU is busy processing a previous batch, so they come atvirtually no cost.
Flipping the images horizontically is just a matter of using slicing:
X, y = load2d()
X_flipped = X[:, :, :, ::-1]  # simple slice to flip all images

# plot two images:
fig = pyplot.figure(figsize=(6, 3))
ax = fig.add_subplot(1, 2, 1, xticks=[], yticks=[])
plot_sample(X[1], y[1], ax)
ax = fig.add_subplot(1, 2, 2, xticks=[], yticks=[])
plot_sample(X_flipped[1], y[1], ax)
pyplot.show()

Left shows the original image, right is the flipped image.
In the picture on the right, notice that the target value keypointsaren't aligned with the image anymore. Since we're flipping theimages, we'll have to make sure we also flip the target values. To dothis, not only do we have to flip the coordinates, we'll also have toswap target value positions; that's because the flippedleft_eye_center_x no longer points to the left eye in our flippedimage; now it corresponds toright_eye_center_x. Some points likenose_tip_y are not affected. We'll define a tupleflip_indices that holds the information about which columns in thetarget vector need to swap places when we flip the imagehorizontically. Remember the list of columns was:
left_eye_center_x            7034
left_eye_center_y            7034
right_eye_center_x           7032
right_eye_center_y           7032
left_eye_inner_corner_x      2266
left_eye_inner_corner_y      2266
...
Since left_eye_center_x will need to swap places withright_eye_center_x, we write down the tuple(0, 2). Alsoleft_eye_center_y needs to swap places: withright_eye_center_y. Thus we write down(1, 3), and so on. Inthe end, we have:
flip_indices = [
    (0, 2), (1, 3),
    (4, 8), (5, 9), (6, 10), (7, 11),
    (12, 16), (13, 17), (14, 18), (15, 19),
    (22, 24), (23, 25),
    ]

# Let's see if we got it right:
df = read_csv(os.path.expanduser(FTRAIN))
for i, j in flip_indices:
    print("# {} -> {}".format(df.columns[i], df.columns[j]))

# this prints out:
# left_eye_center_x -> right_eye_center_x
# left_eye_center_y -> right_eye_center_y
# left_eye_inner_corner_x -> right_eye_inner_corner_x
# left_eye_inner_corner_y -> right_eye_inner_corner_y
# left_eye_outer_corner_x -> right_eye_outer_corner_x
# left_eye_outer_corner_y -> right_eye_outer_corner_y
# left_eyebrow_inner_end_x -> right_eyebrow_inner_end_x
# left_eyebrow_inner_end_y -> right_eyebrow_inner_end_y
# left_eyebrow_outer_end_x -> right_eyebrow_outer_end_x
# left_eyebrow_outer_end_y -> right_eyebrow_outer_end_y
# mouth_left_corner_x -> mouth_right_corner_x
# mouth_left_corner_y -> mouth_right_corner_y
Our batch iterator implementation will derive from the defaultBatchIterator class and override thetransform() method only.Let's see how it looks like when we put it all together:
from nolearn.lasagne import BatchIterator

class FlipBatchIterator(BatchIterator):
    flip_indices = [
        (0, 2), (1, 3),
        (4, 8), (5, 9), (6, 10), (7, 11),
        (12, 16), (13, 17), (14, 18), (15, 19),
        (22, 24), (23, 25),
        ]

    def transform(self, Xb, yb):
        Xb, yb = super(FlipBatchIterator, self).transform(Xb, yb)

        # Flip half of the images in this batch at random:
        bs = Xb.shape[0]
        indices = np.random.choice(bs, bs / 2, replace=False)
        Xb[indices] = Xb[indices, :, :, ::-1]

        if yb is not None:
            # Horizontal flip of all x coordinates:
            yb[indices, ::2] = yb[indices, ::2] * -1

            # Swap places, e.g. left_eye_center_x -> right_eye_center_x
            for a, b in self.flip_indices:
                yb[indices, a], yb[indices, b] = (
                    yb[indices, b], yb[indices, a])

        return Xb, yb
To use this batch iterator for training, we'll pass it as thebatch_iterator_train argument toNeuralNet. Let's definenet3, a network that looks exactly the same asnet2 except forthese lines at the very end:
net3 = NeuralNet(
    # ...
    regression=True,
    batch_iterator_train=FlipBatchIterator(batch_size=128),
    max_epochs=3000,
    verbose=1,
    )
Now we're passing our FlipBatchIterator, but we've also tripledthe number of epochs to train. While each one of our training epochswill still look at the same number of examples as before (after all,we haven't changed the size of X), it turns out that trainingnevertheless takes quite a bit longer when we use our transformingFlipBatchIterator. This is because what the network learnsgeneralizes better this time, and it's arguably harder to learn thingsthat generalize than to overfit.
So this will take maybe take an hour to train. Let's make sure wepickle the model at the end of training, and then we're ready to gofetch some tea and biscuits. Or maybe do the laundry:
net3.fit(X, y)

import cPickle as pickle
with open('net3.pickle', 'wb') as f:
    pickle.dump(net3, f, -1)
$ python kfkd.py
...
 Epoch  |  Train loss  |  Valid loss  |  Train / Val
--------|--------------|--------------|----------------
...
   500  |    0.002238  |    0.002303  |     0.971519
...
  1000  |    0.001365  |    0.001623  |     0.841110
  1500  |    0.001067  |    0.001457  |     0.732018
  2000  |    0.000895  |    0.001369  |     0.653721
  2500  |    0.000761  |    0.001320  |     0.576831
  3000  |    0.000678  |    0.001288  |     0.526410
Comparing the learning with that of net2, we notice that the error onthe validation set after 3000 epochs is indeed about 5% smaller forthe data augmented net. We can see how net2 stops learning anythinguseful after 2000 or so epochs, and gets pretty noisy, while net3continues to improve its validation error throughout, though slowly.

Still seems like a lot of work for only a small gain? We'll find outif it was worth it in the next secion.
Changing learning rate and momentum over time
What's annoying about our last model is that it took already an hourto train it, and it's not exactly inspiring to have to wait for yourexperiment's results for so long. In this section, we'll talk about acombination of two tricks to fix that and make the net train muchfaster again.
An intuition behind starting with a higher learning rate anddecreasing it during the course of training is this: As we starttraining, we're far away from the optimum, and we want to take bigsteps towards it and learn quickly. But the closer we get to theoptimum, the lighter we want to step. It's like taking the trainhome, but when you enter your door you do it by foot, not by train.
On the importance of initialization and momentum in deep learningis the title of a talk and a paper by Ilya Sutskever et al. It'sthere that we learn about another useful trick to boost deep learning:namely increasing the optimization method's momentum parameter duringtraining.
Remember that in our previous model, we initialized learning rate andmomentum with a static 0.01 and 0.9 respectively. Let's change thatsuch that the learning rate decreases linearly with the number ofepochs, while we let the momentum increase.
NeuralNet allows us to update parameters during training using theon_epoch_finished hook. We can pass a function toon_epoch_finished and it'll be called whenever an epoch isfinished. However, before we can assign new values toupdate_learning_rate andupdate_momentum on the fly, we'llhave to change these two parameters to become Theanosharedvariables. Thankfully, that's pretty easy:
import theano

def float32(k):
    return np.cast['float32'](k)

net4 = NeuralNet(
    # ...
    update_learning_rate=theano.shared(float32(0.03)),
    update_momentum=theano.shared(float32(0.9)),
    # ...
    )
The callback or list of callbacks that we pass will be called with twoarguments:nn, which is the NeuralNet instance itself, andtrain_history, which is the same asnn.train_history_.
Instead of working with callback functions that use hard-coded values,we'll use a parametrizable class with a__call__ method as ourcallback. Let's call this classAdjustVariable. Theimplementation is reasonably straight-forward:
class AdjustVariable(object):
    def __init__(self, name, start=0.03, stop=0.001):
        self.name = name
        self.start, self.stop = start, stop
        self.ls = None

    def __call__(self, nn, train_history):
        if self.ls is None:
            self.ls = np.linspace(self.start, self.stop, nn.max_epochs)

        epoch = train_history[-1]['epoch']
        new_value = float32(self.ls[epoch - 1])
        getattr(nn, self.name).set_value(new_value)
Let's plug it all together now and then we're ready to starttraining:
net4 = NeuralNet(
    # ...
    update_learning_rate=theano.shared(float32(0.03)),
    update_momentum=theano.shared(float32(0.9)),
    # ...
    regression=True,
    # batch_iterator_train=FlipBatchIterator(batch_size=128),
    on_epoch_finished=[
        AdjustVariable('update_learning_rate', start=0.03, stop=0.0001),
        AdjustVariable('update_momentum', start=0.9, stop=0.999),
        ],
    max_epochs=3000,
    verbose=1,
    )

X, y = load2d()
net4.fit(X, y)

with open('net4.pickle', 'wb') as f:
    pickle.dump(net4, f, -1)
We'll train two nets: net4 doesn't use our FlipBatchIterator,net5 does. Other than that, they're identical.
This is the learning of net4:
 Epoch  |  Train loss  |  Valid loss  |  Train / Val
--------|--------------|--------------|----------------
    50  |    0.004216  |    0.003996  |     1.055011
   100  |    0.003533  |    0.003382  |     1.044791
   250  |    0.001557  |    0.001781  |     0.874249
   500  |    0.000915  |    0.001433  |     0.638702
   750  |    0.000653  |    0.001355  |     0.481806
  1000  |    0.000496  |    0.001387  |     0.357917
Cool, training is happening much faster now! The train error atepochs 500 and 1000 is half of what it used to be innet2, beforeour adjustments to learning rate and momentum. This time,generalization seems to stop improving after 750 or so epochs already;looks like there's no point in training much longer.
What about net5 with the data augmentation switched on?
 Epoch  |  Train loss  |  Valid loss  |  Train / Val
--------|--------------|--------------|----------------
    50  |    0.004317  |    0.004081  |     1.057609
   100  |    0.003756  |    0.003535  |     1.062619
   250  |    0.001765  |    0.001845  |     0.956560
   500  |    0.001135  |    0.001437  |     0.790225
   750  |    0.000878  |    0.001313  |     0.668903
  1000  |    0.000705  |    0.001260  |     0.559591
  1500  |    0.000492  |    0.001199  |     0.410526
  2000  |    0.000373  |    0.001184  |     0.315353
And again we have much faster training than with net3, andbetter results. After 1000 epochs, we're better off than net3 wasafter 3000 epochs. What's more, the model trained with dataaugmentation is now about 10% better with regard to validation errorthan the one without.

Dropout
Introduced in 2012 in the Improving neural networks by preventingco-adaptation of feature detectorspaper, dropout is a popular regularization technique that worksamazingly well. I won't go into the details of why it works so well,you canread about that elsewhere.
Like with any other regularization technique, dropout only makes senseif we have a network that's overfitting, which is clearly the case forthenet5 network that we trained in the previous section. It'simportant to remember to get your net to train nicely and overfitfirst, then regularize.
To use dropout with Lasagne, we'll add DropoutLayer layers betweenthe existing layers and assign dropout probabilities to each one ofthem. Here's the complete definition of our new net. I've added a# ! comment at the end of those lines that were added between thisand net5.
net6 = NeuralNet(
    layers=[
        ('input', layers.InputLayer),
        ('conv1', layers.Conv2DLayer),
        ('pool1', layers.MaxPool2DLayer),
        ('dropout1', layers.DropoutLayer),  # !
        ('conv2', layers.Conv2DLayer),
        ('pool2', layers.MaxPool2DLayer),
        ('dropout2', layers.DropoutLayer),  # !
        ('conv3', layers.Conv2DLayer),
        ('pool3', layers.MaxPool2DLayer),
        ('dropout3', layers.DropoutLayer),  # !
        ('hidden4', layers.DenseLayer),
        ('dropout4', layers.DropoutLayer),  # !
        ('hidden5', layers.DenseLayer),
        ('output', layers.DenseLayer),
        ],
    input_shape=(None, 1, 96, 96),
    conv1_num_filters=32, conv1_filter_size=(3, 3), pool1_pool_size=(2, 2),
    dropout1_p=0.1,  # !
    conv2_num_filters=64, conv2_filter_size=(2, 2), pool2_pool_size=(2, 2),
    dropout2_p=0.2,  # !
    conv3_num_filters=128, conv3_filter_size=(2, 2), pool3_pool_size=(2, 2),
    dropout3_p=0.3,  # !
    hidden4_num_units=500,
    dropout4_p=0.5,  # !
    hidden5_num_units=500,
    output_num_units=30, output_nonlinearity=None,

    update_learning_rate=theano.shared(float32(0.03)),
    update_momentum=theano.shared(float32(0.9)),

    regression=True,
    batch_iterator_train=FlipBatchIterator(batch_size=128),
    on_epoch_finished=[
        AdjustVariable('update_learning_rate', start=0.03, stop=0.0001),
        AdjustVariable('update_momentum', start=0.9, stop=0.999),
        ],
    max_epochs=3000,
    verbose=1,
    )
Our network is sufficiently large now to crash Python's pickle with amaximum recursion error. Therefore we have to increase Python'srecursion limit before we save it:
import sys
sys.setrecursionlimit(10000)

X, y = load2d()
net6.fit(X, y)

import cPickle as pickle
with open('net6.pickle', 'wb') as f:
    pickle.dump(net6, f, -1)
Taking a look at the learning, we notice that it's become sloweragain, and that's expected with dropout, but eventually it willoutperformnet5:
 Epoch  |  Train loss  |  Valid loss  |  Train / Val
--------|--------------|--------------|---------------
    50  |    0.004619  |    0.005198  |     0.888566
   100  |    0.004369  |    0.004182  |     1.044874
   250  |    0.003821  |    0.003577  |     1.068229
   500  |    0.002598  |    0.002236  |     1.161854
  1000  |    0.001902  |    0.001607  |     1.183391
  1500  |    0.001660  |    0.001383  |     1.200238
  2000  |    0.001496  |    0.001262  |     1.185684
  2500  |    0.001383  |    0.001181  |     1.171006
  3000  |    0.001306  |    0.001121  |     1.164100
Also overfitting doesn't seem to be nearly as bad. Though we'll haveto be careful with those numbers: the ratio between training andvalidation has a slightly different meaning now since the train erroris evaluated with dropout, whereas the validation error is evaluatedwithout dropout. A more comparable value for the train error isthis:
from sklearn.metrics import mean_squared_error
print mean_squared_error(net6.predict(X), y)
# prints something like 0.0010073791
In our previous model without dropout, the error on the train set was0.000373. So not only does our dropout net perform slightly better,it overfitsmuch less than what we had before. That's great news,because it means that we can expect even better performance when wemake the net larger (and more expressive). And that's what we'll trynext: we increase the number of units in the last two hidden layersfrom 500 to 1000. Update these lines:
net7 = NeuralNet(
    # ...
    hidden4_num_units=1000,  # !
    dropout4_p=0.5,
    hidden5_num_units=1000,  # !
    # ...
    )
The improvement over the non-dropout layer is now becoming moresubstantial:
 Epoch  |  Train loss  |  Valid loss  |  Train / Val
--------|--------------|--------------|---------------
    50  |    0.004756  |    0.007043  |     0.675330
   100  |    0.004440  |    0.005321  |     0.834432
   250  |    0.003974  |    0.003928  |     1.011598
   500  |    0.002574  |    0.002347  |     1.096366
  1000  |    0.001861  |    0.001613  |     1.153796
  1500  |    0.001558  |    0.001372  |     1.135849
  2000  |    0.001409  |    0.001230  |     1.144821
  2500  |    0.001295  |    0.001146  |     1.130188
  3000  |    0.001195  |    0.001087  |     1.099271
And we're still looking really good with the overfitting! My feelingis that if we increase the number of epochs to train, this model mightbecome even better. Let's try it:
net12 = NeuralNet(
    # ...
    max_epochs=10000,
    # ...
    )
 Epoch  |  Train loss  |  Valid loss  |  Train / Val
--------|--------------|--------------|---------------
    50  |    0.004756  |    0.007027  |     0.676810
   100  |    0.004439  |    0.005321  |     0.834323
   500  |    0.002576  |    0.002346  |     1.097795
  1000  |    0.001863  |    0.001614  |     1.154038
  2000  |    0.001406  |    0.001233  |     1.140188
  3000  |    0.001184  |    0.001074  |     1.102168
  4000  |    0.001068  |    0.000983  |     1.086193
  5000  |    0.000981  |    0.000920  |     1.066288
  6000  |    0.000904  |    0.000884  |     1.021837
  7000  |    0.000851  |    0.000849  |     1.002314
  8000  |    0.000810  |    0.000821  |     0.985769
  9000  |    0.000769  |    0.000803  |     0.957842
 10000  |    0.000760  |    0.000787  |     0.966583
So there you're witnessing the magic that is dropout. :-)
Let's compare the nets we trained so for and their respective trainand validation errors:
 Name  |   Description    |  Epochs  |  Train loss  |  Valid loss
-------|------------------|----------|--------------|--------------
 net1  |  single hidden   |     400  |    0.002244  |    0.003255
 net2  |  convolutions    |    1000  |    0.001079  |    0.001566
 net3  |  augmentation    |    3000  |    0.000678  |    0.001288
 net4  |  mom + lr adj    |    1000  |    0.000496  |    0.001387
 net5  |  net4 + augment  |    2000  |    0.000373  |    0.001184
 net6  |  net5 + dropout  |    3000  |    0.001306  |    0.001121
 net7  |  net6 + epochs   |   10000  |    0.000760  |    0.000787
Training specialists
Remember those 70% of training data that we threw away in thebeginning? Turns out that's a very bad idea if we want to get acompetitive score in the Kaggle leaderboard. There's quite a bit ofvariance in those 70% of data and in the challenge's test set that ourmodel hasn't seen yet.
So instead of training a single model, let's train a few specialists,with each one predicting a different set of target values. We'lltrain one model that only predictsleft_eye_center andright_eye_center, one only fornose_tip and so on; overall,we'll have six models. This will allow us to use the full trainingdataset, and hopefully get a more competitive score overall.
The six specialists are all going to use exactly the same networkarchitecture (a simple approach, not necessarily the best). Becausetraining is bound to take much longer now than before, let's thinkabout a strategy so that we don't have to wait formax_epochs tofinish, even if the validation error stopped improving much earlier.This is calledearly stopping, and we'll write anotheron_epoch_finished callback to take care of that. Here's theimplementation:
class EarlyStopping(object):
    def __init__(self, patience=100):
        self.patience = patience
        self.best_valid = np.inf
        self.best_valid_epoch = 0
        self.best_weights = None

    def __call__(self, nn, train_history):
        current_valid = train_history[-1]['valid_loss']
        current_epoch = train_history[-1]['epoch']
        if current_valid < self.best_valid:
            self.best_valid = current_valid
            self.best_valid_epoch = current_epoch
            self.best_weights = nn.get_all_params_values()
        elif self.best_valid_epoch + self.patience < current_epoch:
            print("Early stopping.")
            print("Best valid loss was {:.6f} at epoch {}.".format(
                self.best_valid, self.best_valid_epoch))
            nn.load_params_from(self.best_weights)
            raise StopIteration()
You can see that there's two branches inside the __call__: thefirst where the current validation score is better than what we'vepreviously seen, and the second where the best validation epoch wasmore thanself.patience epochs in the past. In the first case westore away the weights:
self.best_weights = nn.get_all_params_values()
In the second case, we set the weights of the network back to thosebest_weights before raisingStopIteration, signalling toNeuralNet that we want to stop training.
          nn.load_params_from(self.best_weights)
          raise StopIteration()
Let's update the list of on_epoch_finished handlers in our net'sdefinition and useEarlyStopping:
net8 = NeuralNet(
    # ...
    on_epoch_finished=[
        AdjustVariable('update_learning_rate', start=0.03, stop=0.0001),
        AdjustVariable('update_momentum', start=0.9, stop=0.999),
        EarlyStopping(patience=200),
        ],
    # ...
    )
So far so good, but how would we go about defining those specialistsand what they should each predict? Let's make a list for that:
SPECIALIST_SETTINGS = [
    dict(
        columns=(
            'left_eye_center_x', 'left_eye_center_y',
            'right_eye_center_x', 'right_eye_center_y',
            ),
        flip_indices=((0, 2), (1, 3)),
        ),

    dict(
        columns=(
            'nose_tip_x', 'nose_tip_y',
            ),
        flip_indices=(),
        ),

    dict(
        columns=(
            'mouth_left_corner_x', 'mouth_left_corner_y',
            'mouth_right_corner_x', 'mouth_right_corner_y',
            'mouth_center_top_lip_x', 'mouth_center_top_lip_y',
            ),
        flip_indices=((0, 2), (1, 3)),
        ),

    dict(
        columns=(
            'mouth_center_bottom_lip_x',
            'mouth_center_bottom_lip_y',
            ),
        flip_indices=(),
        ),

    dict(
        columns=(
            'left_eye_inner_corner_x', 'left_eye_inner_corner_y',
            'right_eye_inner_corner_x', 'right_eye_inner_corner_y',
            'left_eye_outer_corner_x', 'left_eye_outer_corner_y',
            'right_eye_outer_corner_x', 'right_eye_outer_corner_y',
            ),
        flip_indices=((0, 2), (1, 3), (4, 6), (5, 7)),
        ),

    dict(
        columns=(
            'left_eyebrow_inner_end_x', 'left_eyebrow_inner_end_y',
            'right_eyebrow_inner_end_x', 'right_eyebrow_inner_end_y',
            'left_eyebrow_outer_end_x', 'left_eyebrow_outer_end_y',
            'right_eyebrow_outer_end_x', 'right_eyebrow_outer_end_y',
            ),
        flip_indices=((0, 2), (1, 3), (4, 6), (5, 7)),
        ),
    ]
We already discussed the need for flip_indices in theDataaugmentation section. Remember from section The data that ourload_data() function takes an optional list of columns to extract.We'll make use of this feature when we fit the specialist models in anew functionfit_specialists():
from collections import OrderedDict
from sklearn.base import clone

def fit_specialists():
    specialists = OrderedDict()

    for setting in SPECIALIST_SETTINGS:
        cols = setting['columns']
        X, y = load2d(cols=cols)

        model = clone(net)
        model.output_num_units = y.shape[1]
        model.batch_iterator_train.flip_indices = setting['flip_indices']
        # set number of epochs relative to number of training examples:
        model.max_epochs = int(1e7 / y.shape[0])
        if 'kwargs' in setting:
            # an option 'kwargs' in the settings list may be used to
            # set any other parameter of the net:
            vars(model).update(setting['kwargs'])

        print("Training model for columns {} for {} epochs".format(
            cols, model.max_epochs))
        model.fit(X, y)
        specialists[cols] = model

    with open('net-specialists.pickle', 'wb') as f:
        # we persist a dictionary with all models:
        pickle.dump(specialists, f, -1)
There's nothing too spectacular happening here. Instead of trainingand persisting a single model, we do it with a list of models that aresaved in a dictionary that maps columns to the trainedNeuralNetinstances. Now despite our early stopping, this will still takeforever to train (though by forever I don't meanGoogle-forever, I meanmaybe half a day on a single GPU); I don't recommend that you actuallyrun this.
We could of course easily parallelize training these specialist netsacross GPUs, but maybe you don't have the luxury of access to a boxwith multiple CUDA GPUs. In the next section we'll talk about anotherway to cut down on training time. But let's take a look at theresults of fitting these expensive to train specialists first:

Learning curves for six specialist models. The solid linesrepresent RMSE on the validation set, the dashed lines errors onthe train set.mean is the mean validation error of all netsweighted by number of target values. All curves have been scaledto have the same length on the x axis.
Lastly, this solution gives us a Kaggle leaderboardscore of 2.17 RMSE, which corresponds to the second place at thetime of writing (right behind yours truly).
Supervised pre-training
In the last section of this tutorial, we'll discuss a way to maketraining our specialists faster. The idea is this: instead ofinitializing the weights of each specialist network at random, we'llinitialize them with the weights that were learned innet6 ornet7. Remember from ourEarlyStopping implementation thatcopying weights from one network to another is as simple as using theload_params_from() method. Let's modify thefit_specialistsmethod to do just that. I'm again marking the lines that changedcompared to the previous implementation with a# ! comment:
def fit_specialists(fname_pretrain=None):
    if fname_pretrain:  # !
        with open(fname_pretrain, 'rb') as f:  # !
            net_pretrain = pickle.load(f)  # !
    else:  # !
        net_pretrain = None  # !

    specialists = OrderedDict()

    for setting in SPECIALIST_SETTINGS:
        cols = setting['columns']
        X, y = load2d(cols=cols)

        model = clone(net)
        model.output_num_units = y.shape[1]
        model.batch_iterator_train.flip_indices = setting['flip_indices']
        model.max_epochs = int(4e6 / y.shape[0])
        if 'kwargs' in setting:
            # an option 'kwargs' in the settings list may be used to
            # set any other parameter of the net:
            vars(model).update(setting['kwargs'])

        if net_pretrain is not None:  # !
            # if a pretrain model was given, use it to initialize the
            # weights of our new specialist model:
            model.load_params_from(net_pretrain)  # !

        print("Training model for columns {} for {} epochs".format(
            cols, model.max_epochs))
        model.fit(X, y)
        specialists[cols] = model

    with open('net-specialists.pickle', 'wb') as f:
        # this time we're persisting a dictionary with all models:
        pickle.dump(specialists, f, -1)
It turns out that initializing those nets not at random, but byre-using weights from one of the networks we learned earlier has infact two big advantages: One is that training converges much faster;maybe four times faster in this case. The second advantage is that italso helps get better generalization; pre-training acts as aregularizer. Here's the same learning curves as before, but now forthe pre-trained nets:

Learning curves for six specialist models that were pre-trained.
Finally, the score for this solution on the challenge's leaderboard is2.13 RMSE. Again the second place, but getting closer!
Conclusion
There's probably a dozen ideas that you have that you want to try out.You can find thesource code for the final solution hereto download and play around with. It also includes the bit thatgenerates a submission file for the Kaggle challenge. Runpythonkfkd.py to find out how to use the script on the command-line.
Here's a couple of the more obvious things that you could try out atthis point: Try optimizing the parameters for the individualspecialist networks; this is something that we haven't done so far.Observe that the six nets that we trained all have different levels ofoverfitting. If they're not or hardly overfitting, like for the greenand the yellow net above, you could try to decrease the amount ofdropout. Likewise, if it's overfitting badly, like the black andpurple nets, you could try increasing the amount of dropout. In thedefinition of SPECIALIST_SETTINGS we can already add somenet-specific settings; so say we wanted to add more regularization tothe second net, then we could change the second entry of the list tolook like so:
    dict(
        columns=(
            'nose_tip_x', 'nose_tip_y',
            ),
        flip_indices=(),
        kwargs=dict(dropout2_p=0.3, dropout3_p=0.4),  # !
        ),
And there's a ton of other things that you could try to tweak. Maybeyou'll try adding another convolutional or fully connected layer? I'mcurious to hear about improvements that you're able to come up with inthe comments.
Edit: Kaggle features this tutorial on their sitewhere they've included instructions on how to use Amazon GPU instancesto run the tutorial, which is useful if you don't own a CUDA-capableGPU.


 449
449

 被折叠的 条评论
为什么被折叠?
被折叠的 条评论
为什么被折叠?
 到【灌水乐园】发言


