


说明
本文运行环境
- macOS 10.13.6
- python 3.7
- pandas 0.24.1
CSV文件
CSV的文件内容如下:
id,name,salary,start_date,dept
1,Rick,623.3,2012-01-01,IT
2,Dan,515.2,2013-09-23,Operations
3,Michelle,611,2014-11-15,IT
4,Ryan,729,2014-05-11,HR
5,Gary,843.25,2015-03-27,Finance
6,Nina,578,2013-05-21,IT
7,Simon,632.8,2013-07-30,Operations
8,Guru,722.5,2014-06-17,Finance
第一行是用逗号分隔的列名,之后每行是对应的数据记录,数据来自于CSV Files from tutorialspoint
将如上CSV文件存储到本地 ~/Desktop/person.csv,并命名为person.csv
pandas
安装与引用
安装pandas
conda install -c anaconda pandas
引入pandas
import pandas as pd
DataFrame
读取CSV文件
df = pd.read_csv('/Users/No_notion/Desktop/person.csv')
df
output:

读取文件前两行
df.head(n=2)
output:

DataFrame读取
df的类型
type(df)

#output:
pandas.core.frame.DataFrame
df的列名
df.columns

#output:
Index(['id', 'name', 'salary', 'start_date', 'dept'], dtype='object')
df的索引
df.index

#output:
RangeIndex(start=0, stop=8, step=1)
获取索引1的数据
loc索引为可以为数字或字符
df.loc[0]
#output:
id                     1
name                Rick
salary             623.3
start_date    2012-01-01
dept                  IT
Name: 0, dtype: object
获取索引1,2,3的数据
df.loc[[0,1,2]]
output:

获取索引1,2,3的数据
df.loc[:2]
output:
获取薪水大于600$的数据
df[df.salary>600]
output:

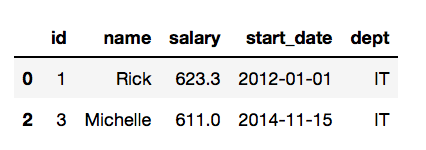
获取薪水大于600的IT部门的员工数据
df[(df.dept =='IT') & (df.salary>600)]
output:
获取所有薪水值并返回数组
df.salary.values

#output:
array([623.3 , 515.2 , 611.  , 729.  , 843.25, 578.  , 632.8 , 722.5 ])
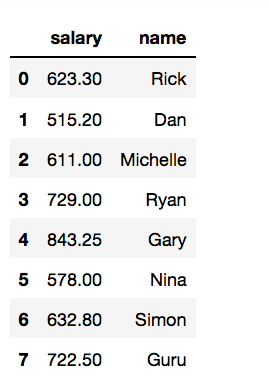
获取name,salary两列数据
df[['salary','name']]
output:
DataFrame操作
定义薪资的map函数
def judge_salary(salary):
    if salary >= 800:
        return ' very high'
    elif salary >=600:
        return 'high'
    elif salary >=500:
        return 'midium'
    else:
        return 'low'

df.salary.map(judge_salary)

#output:
0          high
1        midium
2          high
3          high
4     very high
5        midium
6          high
7          high
Name: salary, dtype: object
根据薪资的map函数返回值生成新的一列
df['salary_level'] = df.salary.map(judge_salary)
df
output:

利用applymap函数为每个员工薪水加100$
#定义增加薪水的函数
def raise_salary(original_salary):

    return original_salary + 100

#为列salary添加map函数
df['salary'] = df[['salary']].applymap(raise_salary)
df
output

利用匿名函数为每个员工薪水再加100$
df['salary'] = df[['salary']].applymap(lambda x: x+100)
df
output:

利用apply函数为部门添加分类
apply函数可以传些参数,比applymap函数更精细控制
 axis = 0: 为每一列提供函数
 axis = 1: 为每一行提供函数
df['dept'] = df.apply(lambda x: x.dept+'-1',axis=1)
df
output:


 2万+
2万+


 被折叠的 条评论
为什么被折叠?
被折叠的 条评论
为什么被折叠?
 到【灌水乐园】发言


