


本文是Linux c++ onvif客户端开发系列文章之一:
- Linux c++ onvif客户端开发(1): 根据wsdl生成cpp源文件
- Linux c++ onvif客户端开发(2): 获取摄像头H264/H265 RTSP地址
- Linux c++ onvif客户端开发(3): 扫描设备
- Linux c++ onvif客户端开发(4): 扫描某个设备是否支持onvif
- Linux c++ onvif客户端开发(5):gsoap内存管理
对于onvif操作有两个基本步骤:
1. 通过probe消息获取服务地址。 这里可以通过扫描局域网方式,也可以对某个设备IP发送probe探针。如果是跨网段了,那么得必须对单个地址发送probe消息了,详见第4篇文章。
2. 然后在服务地址上进行请求操作。
首先掏出ONVIF Device Test Tool测试一番
1.打开测试工具,选中网卡
2. Device IP填写好设备地址,probe获取服务地址
3. password填写密码,check 获取设备信息
获取信息是需要密码的。

查看文档接口
wsdl定义
https://www.onvif.org/ver10/device/wsdl/devicemgmt.wsdl

ONVIF-Core-Specification
https://www.onvif.org/specs/core/ONVIF-Core-Specification.pdf
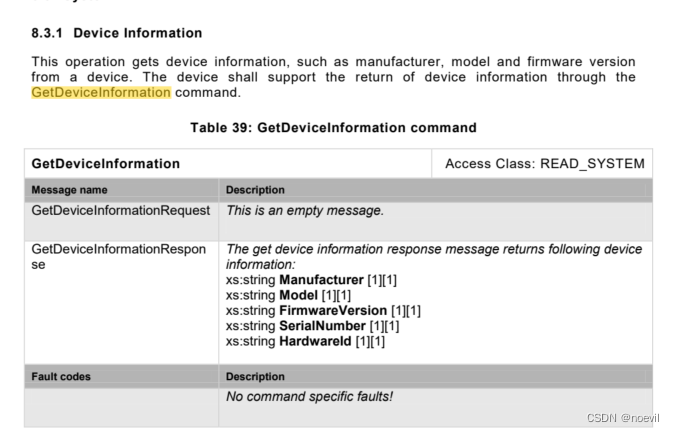
READ_SYSTEM说明是至少需要user权限的。
代码实现
管理soap对象
定义一个类来管理soap对象,构造函数初始化,析构函数释放资源。
soap对象上下文中管理了很多堆上的资源,它可以被重复利用,但是资源要及时释放。
定义
class OnvifSoap {
public:
    OnvifSoap(int timeout);
    ~OnvifSoap();

    void InitHeader();

    void InitProbeType(struct wsdd__ProbeType *probe);

    int Error() { return soap_->error; }

    // 返回的xml中soap:Fault
    std::string FaultString();
    std::string FaultCode();
    std::string FaultSubcode();
    std::string FaultDetail();

    struct soap *Soap() const;

    void Destroy();

private:
    struct soap *soap_;
};
实现
#define SOAP_TO "urn:schemas-xmlsoap-org:ws:2005:04:discovery"
#define SOAP_ACTION "http://schemas.xmlsoap.org/ws/2005/04/discovery/Probe"

#define SOAP_MCAST_ADDR "soap.udp://239.255.255.250:3702" // onvif规定的组播地址

#define SOAP_ITEM ""                            // 寻找的设备范围
#define SOAP_TYPES "dn:NetworkVideoTransmitter" // 寻找的设备类型

#define SOAP_SOCK_TIMEOUT (2) // socket超时时间(单秒秒)


OnvifSoap::OnvifSoap(int timeout) {
    // There is no need to call soap_init to initialize the context
    // allocated with soap_new, since soap_new initializes the allocated
    // context.
    // https://www.genivia.com/doc/guide/html/group__group__context.html#ga87c20488b2dc680aaa7689b1d024989c
    soap_ = soap_new();
    if (!soap_)
        throw std::runtime_error("soap_new() fail");

    soap_set_namespaces(soap_, namespaces); // 设置soap的namespaces

    // 不正常数据设置成5s
    if (timeout <= 0)
        timeout = SOAP_SOCK_TIMEOUT;

    soap_->recv_timeout = timeout; // 设置超时(超过指定时间没有数据就退出)
    soap_->send_timeout = timeout;
    soap_->connect_timeout = timeout;

#if defined(__linux__) ||                                                      \
    defined(__linux) // 参考https://www.genivia.com/dev.html#client-c的修改:
    soap_->socket_flags = MSG_NOSIGNAL; // To prevent connection reset errors
#endif

    soap_set_mode(soap_,
                  SOAP_C_UTFSTRING); // 设置为UTF-8编码,否则叠加中文OSD会乱码
}

OnvifSoap::~OnvifSoap() {
    soap_destroy(soap_); // delete managed C++ objects
    soap_end(soap_);     // delete managed memory。soap_malloc
    soap_done(soap_);    // stacked
    soap_free(soap_);    /* we're done with the context */
}

void OnvifSoap::InitHeader() {
    // T * soap_new_T(struct soap*) allocates and initializes data of type T
    // in context-managed heap memory, managed data is deleted with
    // soap_destroy (deletes C++ objects) and soap_end (deletes all other
    // data), and you can also use soap_malloc to allocate uninitialized
    // context-managed memory.
    struct SOAP_ENV__Header *header = soap_new_SOAP_ENV__Header(soap_);
    // soap_default_SOAP_ENV__Header(soap_, header);

    header->wsa__MessageID = (char *)soap_wsa_rand_uuid(soap_);
    header->wsa__To = soap_strdup(soap_, SOAP_TO);
    header->wsa__Action = soap_strdup(soap_, SOAP_ACTION);
    soap_->header = header;
}

void OnvifSoap::InitProbeType(struct wsdd__ProbeType *probe) {
    // 用于描述查找哪类的Web服务
    struct wsdd__ScopesType *scope = soap_new_wsdd__ScopesType(soap_);
    // soap_default_wsdd__ScopesType(soap_, scope); // 设置寻找设备的范围
    scope->__item = soap_strdup(soap_, "");

    probe->Scopes = scope;
    probe->Types = soap_strdup(soap_, SOAP_TYPES); // 设置寻找设备的类型
}

std::string OnvifSoap::FaultString() {
    const char *fault_string = soap_fault_string(soap_);
    if (!fault_string)
        return std::string();
    else
        return std::string(fault_string);
}

std::string OnvifSoap::FaultCode() {
    const char *code = *soap_faultcode(soap_);
    if (!code)
        return std::string();
    else
        return std::string(code);
}

std::string OnvifSoap::FaultSubcode() {
    const char *subcode = soap_fault_subcode(soap_);
    if (!subcode)
        return std::string();
    else
        return std::string(subcode);
}

std::string OnvifSoap::FaultDetail() {
    const char *detail = soap_fault_detail(soap_);
    if (!detail)
        return std::string();
    else
        return std::string(detail);
}

struct soap *OnvifSoap::Soap() const {
    return soap_;
}

void OnvifSoap::Destroy() { soap_->destroy(); }
soap_set_namespaces(soap, namespaces); 这里的namespaces是你生成的nsmap文档中的那个东西。一般来说,你要include “wsdd.nsmap"这种方式导入。
然后就是设置超时时间等
释放资源,当前知道需要soap_destroy、soap_end、soap_done、soap_free四个函数连续调用即可。详见内存管理一文。
定义表示设备信息的结构体
struct OnvifDeviceInformation {
    std::string manufacturer;
    std::string model;
    std::string firmware_version;
    std::string serial_number;
    std::string hardware_id;
};
定义一个设备类
class OnvifDevice {
public:
    OnvifDevice(const std::string &ip, const std::string &user,
                const std::string &passwd, int default_timeout = 2);
    ~OnvifDevice();

    std::string FaultString();
    std::string FaultCode();
    std::string FaultSubcode();
    std::string FaultDetail();

    int Probe(int timeout = 1);

    std::string xaddr() const { return xaddr_; }

    int GetDeviceInformation(OnvifDeviceInformation &device_info);


private:
    std::string ip_;
    std::string username_;
    std::string password_;
    int default_timeout_;

    std::string xaddr_;

    std::unique_ptr<OnvifSoap> soap_;
};
xaddr_表示设备的服务地址,通过probe之后填充
实现probe
前面两篇文章已经有这个功能实现,这里还是继续写一下,做一下完整的记录。
int OnvifDevice::Probe(int timeout) {
    int result = 0;

    soap_.reset(new OnvifSoap(timeout));

    struct wsdd__ProbeType req;      // 用于发送Probe消息
    struct __wsdd__ProbeMatches rep; // 用于接收Probe应答
    struct wsdd__ProbeMatchType *probeMatch;

    soap_->InitHeader();        // 设置消息头描述
    soap_->InitProbeType(&req); // 设置寻找的设备的范围和类型

    std::string addr(std::string("soap.udp://") + ip_ + ":3702");

    // 向单播地址发送Probe消息
    result = soap_send___wsdd__Probe(soap_->Soap(), addr.data(), NULL, &req);
    // 开始循环接收设备发送过来的消息
    if (SOAP_OK == result) {
        memset(&rep, 0x00, sizeof(rep));
        result = soap_recv___wsdd__ProbeMatches(soap_->Soap(), &rep);
        if (SOAP_OK == result) {
            if (rep.wsdd__ProbeMatches) {
                for (int i = 0; i < rep.wsdd__ProbeMatches->__sizeProbeMatch;
                     i++) {
                    probeMatch = rep.wsdd__ProbeMatches->ProbeMatch + i;
                    xaddr_ = probeMatch->XAddrs;
                }
            }
        }
    }

    return result;
}
使用OnvifSoap来管理soap对象,reset一个干净的对象。然后发送一个probe消息到所在地址。
如果成功了就返回SOAP_OK,并且将xaddr_填充服务地址。
GetDeviceInformation获取设备信息
int OnvifDevice::GetDeviceInformation(OnvifDeviceInformation &device_info) {
    soap_.reset(new OnvifSoap(default_timeout_));

    soap_wsse_add_UsernameTokenDigest(soap_->Soap(), nullptr, username_.data(),
                                      password_.data());

    _tds__GetDeviceInformation req;
    _tds__GetDeviceInformationResponse resp;

    int result = soap_call___tds__GetDeviceInformation(
        soap_->Soap(), xaddr_.data(), NULL, &req, resp);

    if (SOAP_OK == result) {
        device_info.manufacturer = resp.Manufacturer;
        device_info.firmware_version = resp.FirmwareVersion;
        device_info.hardware_id = resp.HardwareId;
        device_info.model = resp.Model;
        device_info.serial_number = resp.SerialNumber;
    }

    return result;
}
从文档接口看出不需要填充请求参数,所以定义请求和返回对象,然后直接调用API就完事。
调用实现方法
int main(int argc, char **argv) {
    OnvifDevice device("YOURIP", USERNAME, PASSWORD);
    int er = device.Probe();
    std::cout << "error code " << er << std::endl;
    if (SOAP_OK == er) {

        OnvifDeviceInformation dev_info;
        int err = device.GetDeviceInformation(dev_info);
        if (SOAP_OK == err) {
            std::cout << "manufatory: " << dev_info.manufacturer << std::endl;
            std::cout << "firmware_version: " << dev_info.firmware_version
                      << std::endl;
            std::cout << "hardware_id: " << dev_info.hardware_id << std::endl;
            std::cout << "model: " << dev_info.model << std::endl;
            std::cout << "serial_number: " << dev_info.serial_number
                      << std::endl;
        } else {
            std::cout << "GetDeviceInformation fail, " << device.FaultString()
                      << ", fault code " << device.FaultCode() << ", subcode "
                      << device.FaultSubcode() << ", detail "
                      << device.FaultDetail() << std::endl;
            return -1;
        }
   }
   return 0;
}


 1万+
1万+


 被折叠的 条评论
为什么被折叠?
被折叠的 条评论
为什么被折叠?
 到【灌水乐园】发言


