


一.了解时钟RTC
RTC (Real Time Clock):实时时钟
RTC是个独立的定时器。RTC模块拥有一个连续计数的计数器,在相应的软件配置下,可以提供时钟日历的功能。修改计数器的值可以重新设置当前时间和日期 RTC还包含用于管理低功耗模式的自动唤醒单元。
二、任务内容
1)读取RTC初始时间,验证是否为 1970年1月1日零分零秒;
2)将RTC时间调整为当前时间,并以 2021年x月x日x分x秒的格式从串口输出(或输出到OLED屏),每1s改变一次;
3)如果输出内容中需加入“星期x”,请修改代码。
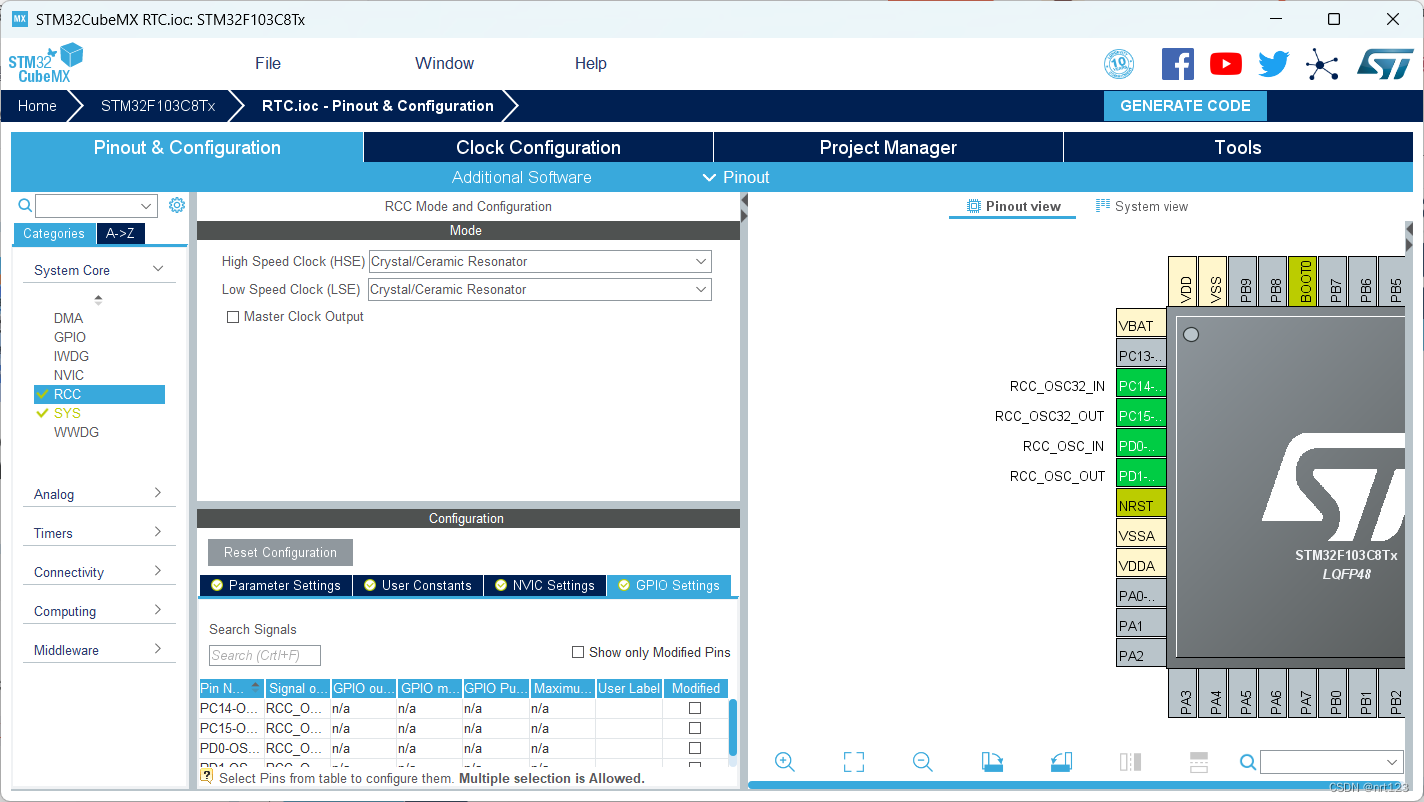
配置RCC(设置高速外部时钟,使能外部晶振LSE)
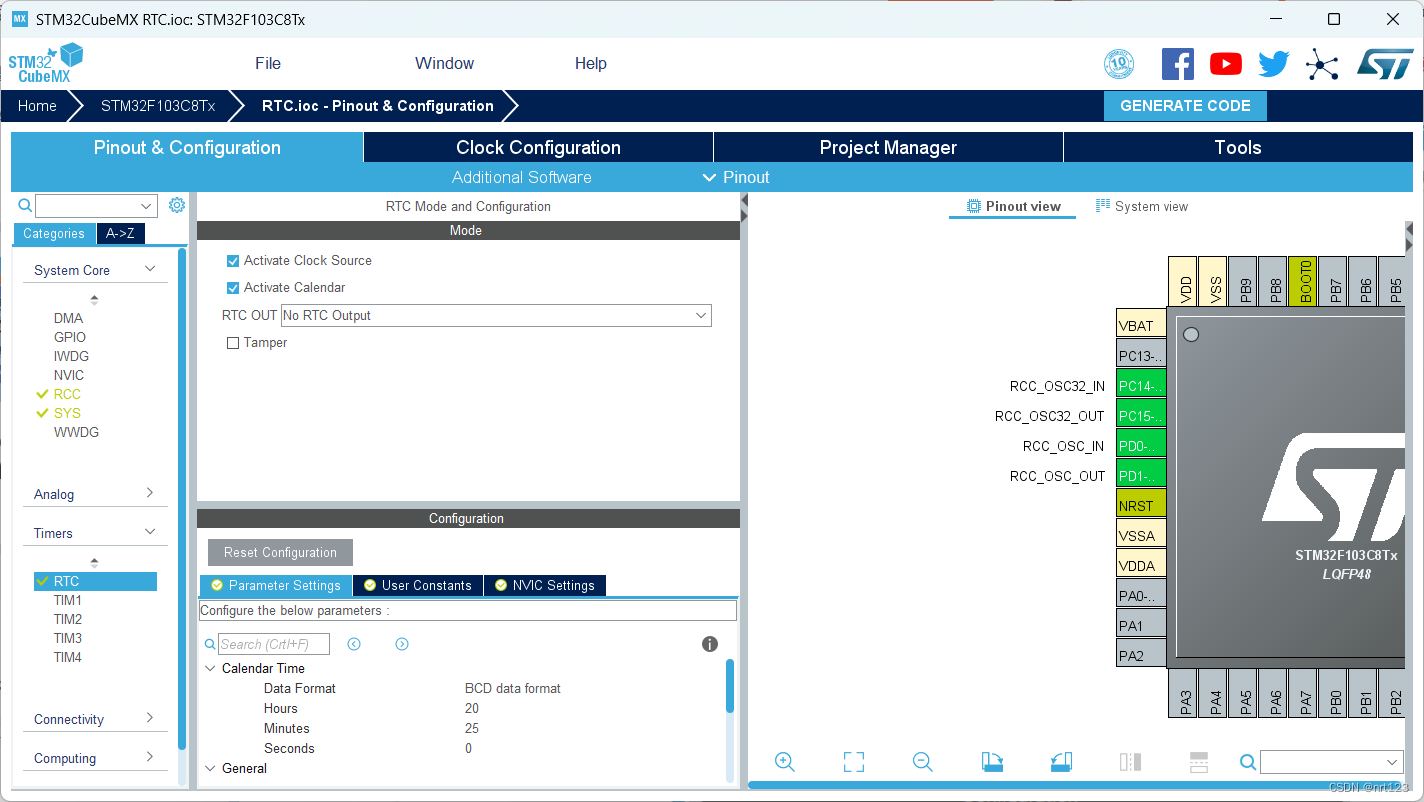
配置RTC(激活时钟源(Activate Clock Source)和日历(Activate Calendar))这里时钟配置可以更改为23年,但是本人考虑先照做一遍,以防出错,所以还是为21年 O.o嘻嘻
![]()
RTC_OUT: Not RTC_OUT
Tamper: ×
第一个是是否使能 tamper(PC13)引脚上输出校正的秒脉冲时钟,
第二个: RTC入侵检测校验功能
RTC校验功能,使能侵入检测功能。RTC时钟经64分频输出到侵入检测引脚TAMPER上
当 TAMPER引脚上的信号从 0变成1或者从 1变成 0(取决于备份控制寄存器BKP_CR的 TPAL位),会产生一个侵入检测事件。侵入检测事件将所有数据备份寄存器内容清除。
也就是第一个是使能tamper(PC13)引脚作为时钟脉冲输出
第二个是使能tamper(PC13)引脚作为入侵检测功能
下面是两个RTC的中断:
RTC全局中断RTC_IRQHandler()
闹钟中断函数RTCAlarm_IRQHandler()
使能串口

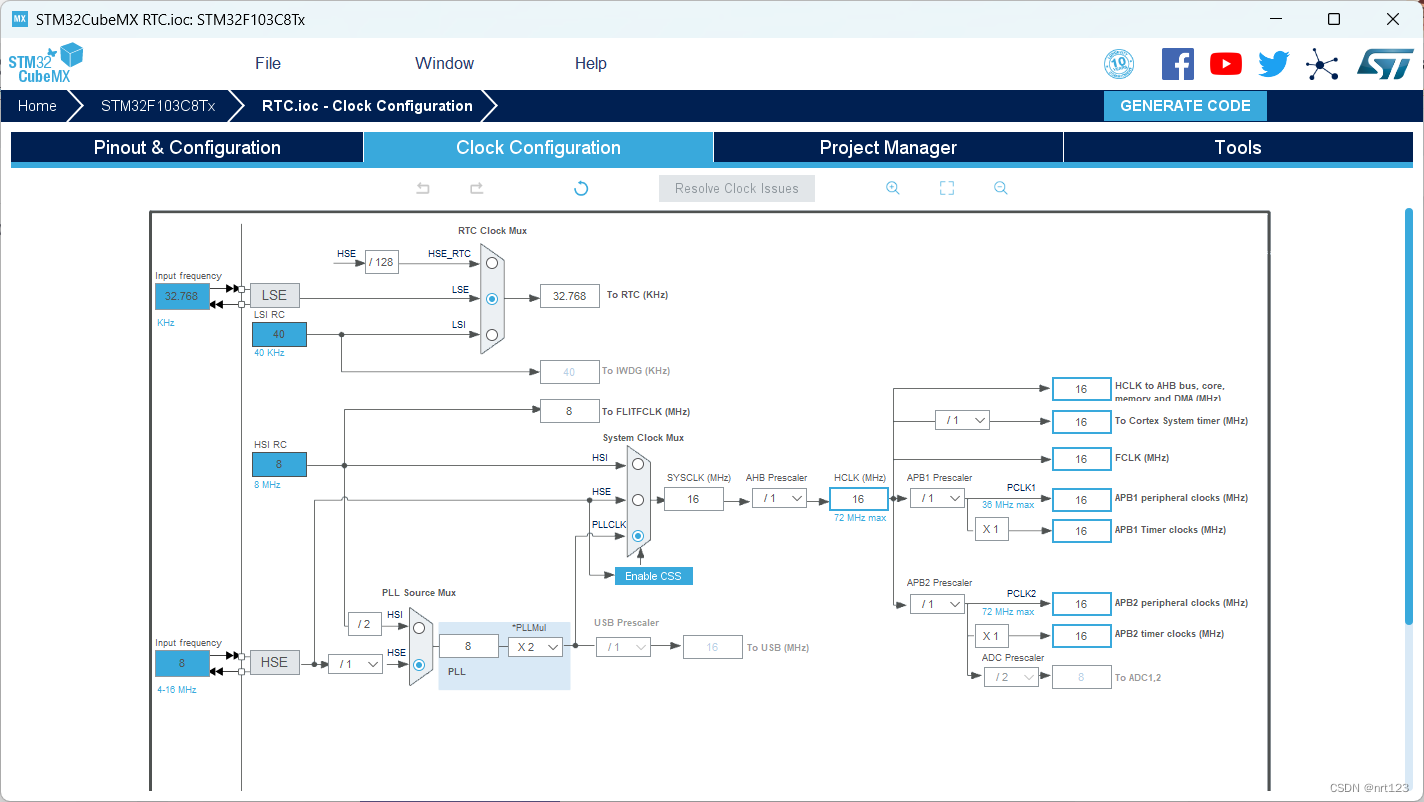
时钟树配置
设置项目


三.添加代码
/* USER CODE BEGIN Header */
/**
******************************************************************************
* @file : main.c
* @brief : Main program body
******************************************************************************
* @attention
*
* <h2><center>© Copyright (c) 2021 STMicroelectronics.
* All rights reserved.</center></h2>
*
* This software component is licensed by ST under BSD 3-Clause license,
* the "License"; You may not use this file except in compliance with the
* License. You may obtain a copy of the License at:
* opensource.org/licenses/BSD-3-Clause
*
******************************************************************************
*/
/* USER CODE END Header */
/* Includes ------------------------------------------------------------------*/
#include "main.h"
#include "rtc.h"
#include "usart.h"
#include "gpio.h"
/* Private includes ----------------------------------------------------------*/
/* USER CODE BEGIN Includes */
/* USER CODE END Includes */
/* Private typedef -----------------------------------------------------------*/
/* USER CODE BEGIN PTD */
RTC_DateTypeDef GetData; //获取日期结构体
RTC_TimeTypeDef GetTime; //获取时间结构体
/* USER CODE END PTD */
/* Private define ------------------------------------------------------------*/
/* USER CODE BEGIN PD */
/* USER CODE END PD */
/* Private macro -------------------------------------------------------------*/
/* USER CODE BEGIN PM */
/* USER CODE END PM */
/* Private variables ---------------------------------------------------------*/
/* USER CODE BEGIN PV */
/* USER CODE END PV */
/* Private function prototypes -----------------------------------------------*/
void SystemClock_Config(void);
/* USER CODE BEGIN PFP */
/* USER CODE END PFP */
/* Private user code ---------------------------------------------------------*/
/* USER CODE BEGIN 0 */
/* USER CODE END 0 */
/**
* @brief The application entry point.
* @retval int
*/
int main(void)
{
/* USER CODE BEGIN 1 */
/* USER CODE END 1 */
/* MCU Configuration--------------------------------------------------------*/
/* Reset of all peripherals, Initializes the Flash interface and the Systick. */
HAL_Init();
/* USER CODE BEGIN Init */
/* USER CODE END Init */
/* Configure the system clock */
SystemClock_Config();
/* USER CODE BEGIN SysInit */
/* USER CODE END SysInit */
/* Initialize all configured peripherals */
MX_GPIO_Init();
MX_RTC_Init();
MX_USART1_UART_Init();
/* USER CODE BEGIN 2 */
/* USER CODE END 2 */
/* Infinite loop */
/* USER CODE BEGIN WHILE */
while (1)
{
/* Get the RTC current Time */
HAL_RTC_GetTime(&hrtc, &GetTime, RTC_FORMAT_BIN);
/* Get the RTC current Date */
HAL_RTC_GetDate(&hrtc, &GetData, RTC_FORMAT_BIN);
/* Display date Format : yy/mm/dd */
printf("%02d/%02d/%02d\r\n",2000 + GetData.Year, GetData.Month, GetData.Date);
/* Display time Format : hh:mm:ss */
printf("%02d:%02d:%02d\r\n",GetTime.Hours, GetTime.Minutes, GetTime.Seconds);
printf("\r\n");
HAL_Delay(1000);
}
/* USER CODE END 3 */
}
/**
* @brief System Clock Configuration
* @retval None
*/
void SystemClock_Config(void)
{
RCC_OscInitTypeDef RCC_OscInitStruct = {0};
RCC_ClkInitTypeDef RCC_ClkInitStruct = {0};
RCC_PeriphCLKInitTypeDef PeriphClkInit = {0};
/** Initializes the RCC Oscillators according to the specified parameters
* in the RCC_OscInitTypeDef structure.
*/
RCC_OscInitStruct.OscillatorType = RCC_OSCILLATORTYPE_HSE|RCC_OSCILLATORTYPE_LSE;
RCC_OscInitStruct.HSEState = RCC_HSE_ON;
RCC_OscInitStruct.HSEPredivValue = RCC_HSE_PREDIV_DIV1;
RCC_OscInitStruct.LSEState = RCC_LSE_ON;
RCC_OscInitStruct.HSIState = RCC_HSI_ON;
RCC_OscInitStruct.PLL.PLLState = RCC_PLL_ON;
RCC_OscInitStruct.PLL.PLLSource = RCC_PLLSOURCE_HSE;
RCC_OscInitStruct.PLL.PLLMUL = RCC_PLL_MUL9;
if (HAL_RCC_OscConfig(&RCC_OscInitStruct) != HAL_OK)
{
Error_Handler();
}
/** Initializes the CPU, AHB and APB buses clocks
*/
RCC_ClkInitStruct.ClockType = RCC_CLOCKTYPE_HCLK|RCC_CLOCKTYPE_SYSCLK
|RCC_CLOCKTYPE_PCLK1|RCC_CLOCKTYPE_PCLK2;
RCC_ClkInitStruct.SYSCLKSource = RCC_SYSCLKSOURCE_PLLCLK;
RCC_ClkInitStruct.AHBCLKDivider = RCC_SYSCLK_DIV1;
RCC_ClkInitStruct.APB1CLKDivider = RCC_HCLK_DIV2;
RCC_ClkInitStruct.APB2CLKDivider = RCC_HCLK_DIV1;
if (HAL_RCC_ClockConfig(&RCC_ClkInitStruct, FLASH_LATENCY_2) != HAL_OK)
{
Error_Handler();
}
PeriphClkInit.PeriphClockSelection = RCC_PERIPHCLK_RTC;
PeriphClkInit.RTCClockSelection = RCC_RTCCLKSOURCE_LSE;
if (HAL_RCCEx_PeriphCLKConfig(&PeriphClkInit) != HAL_OK)
{
Error_Handler();
}
}
/* USER CODE BEGIN 4 */
/* USER CODE END 4 */
/**
* @brief This function is executed in case of error occurrence.
* @retval None
*/
void Error_Handler(void)
{
/* USER CODE BEGIN Error_Handler_Debug */
/* User can add his own implementation to report the HAL error return state */
__disable_irq();
while (1)
{
}
/* USER CODE END Error_Handler_Debug */
}
#ifdef USE_FULL_ASSERT
/**
* @brief Reports the name of the source file and the source line number
* where the assert_param error has occurred.
* @param file: pointer to the source file name
* @param line: assert_param error line source number
* @retval None
*/
void assert_failed(uint8_t *file, uint32_t line)
{
/* USER CODE BEGIN 6 */
/* User can add his own implementation to report the file name and line number,
ex: printf("Wrong parameters value: file %s on line %d\r\n", file, line) */
/* USER CODE END 6 */
}
#endif /* USE_FULL_ASSERT */
/************************ (C) COPYRIGHT STMicroelectronics *****END OF FILE****/
编译运行

![]()
没有报错O.o嘻嘻
烧录结果

总结:跟着学长一部一部的走,基本不会出现问题,首先要理解RTC是什么和它的工作原理,我们就可以轻松的展示出这些数据,并且这个可以利用AHT20将温湿度也展示出来


 1372
1372


 被折叠的 条评论
为什么被折叠?
被折叠的 条评论
为什么被折叠?
 到【灌水乐园】发言


