


Android性能优化(一) —— 布局优化
前言
最近一直在不停的阅读一些优质的书籍,《Android开发艺术探索》我已经看了三遍了,但是并不是每一次都非常细致的一字不落的看完,第一次看到话应该是比较走马观花一样的对本书有一个整体的认识,后面每一次看都是有侧重点的看,从中学到了很多的东西,所谓温故而知新,可以为师矣,说的一点不错。也看了《深入理解Java虚拟机》一书,这个就比较深入了,看起来可能会有点吃力的,但是真的挺有意思的。扯的有点远,我写博客的目的很简单,就是巩固或者总结自己所学的知识,幸运的话能帮到周围的童靴就更好
性能优化主要包括以下几种:布局优化、绘制优化、内存泄漏优化、响应速度优化、ListView和BitMap优化以及线程优化等几个方面。后期的话有时间我会将每一个模块都写出来一篇博客出来,算是深入理解一下吧。布局优化又分为三个部分,即我们常用的include标签、还有merge标签和ViewStub。
include标签估计是用的最多了的,这个就很简单了,比如我们要在Activity中写两个按钮,正常情况下我们会直接写代码如下,但是如果这里的布局会重复的多次使用,每次都写一遍岂不是很麻烦,就可以封装到include标签中,这样的话就大大减少了我们的工作量,这个经常用在比如Activity的顶部的TitleBar中。
<?xml version="1.0" encoding="utf-8"?>
<android.support.constraint.ConstraintLayout
    xmlns:android="http://schemas.android.com/apk/res/android"
    xmlns:app="http://schemas.android.com/apk/res-auto"
    xmlns:tools="http://schemas.android.com/tools"
    android:layout_width="match_parent"
    android:layout_height="match_parent"
    tools:context="com.oman.touchevent.test.MergeActivity">

    <Button
        android:id="@+id/button1"
        android:layout_width="match_parent"
        android:layout_height="wrap_content"
        android:text="button1" />

    <Button
        android:id="@+id/button2"
        android:layout_width="match_parent"
        android:layout_height="wrap_content"
        android:text="button2"
        app:layout_constraintTop_toBottomOf="@id/button1" />

</android.support.constraint.ConstraintLayout>
<?xml version="1.0" encoding="utf-8"?>
<android.support.constraint.ConstraintLayout
xmlns:android="http://schemas.android.com/apk/res/android"
xmlns:tools="http://schemas.android.com/tools"
android:layout_width="match_parent"
android:layout_height="match_parent"
tools:context="com.oman.touchevent.test.model.TestActivity">
<include layout="@layout/include_item" />
</android.support.constraint.ConstraintLayout>- 接下来说下merge标签,因为我们在写页面布局的时候往往不仅讲究美观还要运行高效,我们都知道大多数的Android显示屏幕每秒钟会更新60帧,那么就意味着平均1/60s,也就是大约16ms的时间就得对UI就行渲染,如果渲染时间过长超过这个时间就会出现界面卡顿的现象,那个时候用户的体验式极差的,会有意想不到的惊喜等待着你哦。那么我们就需要加快渲染的速度,使用户感受不到卡顿,怎么做呢,减少布局的层级就是解决方法之一,使用merge标签,还是上面的例子,我们将最外层的布局最外层的ConstraintLayout布局去掉了,使用merge标签,如下,使用的时候还是使用include标签直接引用即可,这样就会减少一个布局层级,加快渲染速度
<?xml version="1.0" encoding="utf-8"?>
<merge
xmlns:android="http://schemas.android.com/apk/res/android"
xmlns:app="http://schemas.android.com/apk/res-auto">
<Button
android:id="@+id/button1"
android:layout_width="match_parent"
android:layout_height="wrap_content"
android:text="button1" />
<Button
android:id="@+id/button2"
android:layout_width="match_parent"
android:layout_height="wrap_content"
app:layout_constraintTop_toBottomOf="@id/button1"
android:text="button2" />
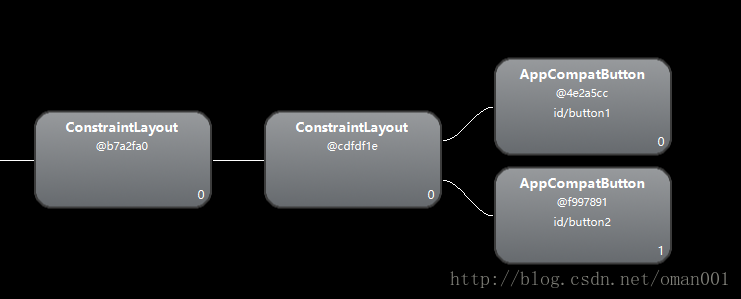
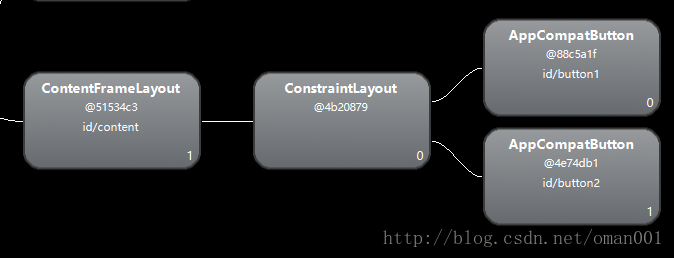
</merge>- 下面附上两张图对比一下刚才不使用merge标签的布局层级VS使用merge标签的布局层级(这里我使用的是安卓自带的Hierarchy View工具,不会的小伙伴自行百度学习),我们发现这里不使用merge的布局层级有两个ConstraintLayout,使用merge的布局层级只有一个ConstraintLayout,这在布局层级嵌套过多的时候,对于优化是大有用处的,还有平时我们在开发的时候如果使用LinearLayout和使用RelativeLayout都可以的话就使用LinearLayout布局,如果层级嵌套过多的话就使用RelativeLayout和上面的merge标签。
接下来说说ViewStub控件,这个控件的作用是有时候出现一个界面刚开始不需要显示某些控件,等需要显示的时候再显示,这样的话就会减少系统的性能消耗。下面来说说具体使用吧:
先写一个两个按钮的布局view_stub.xml
<?xml version="1.0" encoding="utf-8"?>
    <LinearLayout xmlns:android="http://schemas.android.com/apk/res/android"
        android:layout_width="match_parent"
        android:layout_height="match_parent"
        android:orientation="vertical">

        <Button
            android:id="@+id/edit_extra1"
            android:layout_width="match_parent"
            android:layout_height="wrap_content"
            android:layout_marginLeft="20dp"
            android:layout_marginRight="20dp"
            android:text="我是ViewStub布局按钮1" />

        <Button
            android:id="@+id/edit_extra2"
            android:layout_width="match_parent"
            android:layout_height="wrap_content"
            android:layout_marginLeft="20dp"
            android:layout_marginRight="20dp"
            android:text="我是ViewStub布局按钮2" />

</LinearLayout>- 我们使用ViewStub控件将其写入布局中
<ViewStub
        android:id="@+id/view_stub"
        android:layout_width="match_parent"
        android:layout_height="wrap_content"
android:layout="@layout/view_stub" />- 代码中使用方法如下,首先findViewById找到ViewStub,找到后需要使用方法inflate()填充使其显示,如果多次调用此方法会报错,这时候如果已经调取过inflate()方法了,但是已经隐藏了此控件的话,我们想要再次显示的话就需要使用setVisibility(View.VISIBLE),另外一点需要注意的是inflate()方法的返回值是ViewStub的父类控件,代码如下
                if (!isShow) {
                    try {
                        //返回的是父布局  如果调用过inflate方法再次调用就会报错,得使用setVisibility方法
                        LinearLayout linearLayout = (LinearLayout) mViewStub.inflate();
                        linearLayout.findViewById(R.id.edit_extra1).setOnClickListener(new View.OnClickListener() {
                            @Override
                            public void onClick(View v) {
                                Toast.makeText(PreActivity.this, ((Button) v).getText() + "", Toast.LENGTH_SHORT).show();
                            }
                        });
                    } catch (Exception e) {
                        mViewStub.setVisibility(View.VISIBLE);
                    }
                    isShow = true;
                } else {
                    mViewStub.setVisibility(View.GONE);
                    isShow = false;
                }


 532
532

 被折叠的 条评论
为什么被折叠?
被折叠的 条评论
为什么被折叠?
 到【灌水乐园】发言


