本篇博客主要记录一下如何利用Google Play Service进行安全检测。
1 Google Play Service的使用原理
Google Play Service提供了大量的API供用户使用,
以便让应用低成本地集成Google最新的产品及功能。
应用使用Google Play Service时,基本的原理如下图所示,其中:
1、应用在使用Google Play Service时,
必须集成Google提供的Client Library,
通过Client Library,应用才能与Google Play Service进行IPC通信。
2、Google Play Service是独立运行在系统后台的服务,
与Google Play Store共同发布。
3、Google Play Store负责更新Google Play Service。

可以看出,Google通过引入Client Library后,
将应用与Google Play Service解耦。
这样即使不修改应用,只要更新了Google Play Services,
应用就能够使用到Google提供功能的最新版本。
同时,Client Library还可以进行准入控制等相关操作。
2 集成Client Library

为了使用Client Library,首先我们需要利用Android Studio的SDK Manager加载Google Repository。
如上图所示,主要是勾选其中的红线部分,然后点击下载即可。
下载完Google Repository后,只需要修改应用Module对应的build.gradle文件,
加载对应的库文件即可。
例如:
dependencies {
compile fileTree(dir: 'libs', include: ['*.jar'])
.....................
compile 'com.google.android.gms:play-services:11.0.1'
}
这里需要注意的是,com.google.android.gms:play-services引入的是Google Play Service全体API的集合。
当我们仅需要特定API接口时,可以仅引入独立的库,
这样可以减小应用的体积,避免应用中方法数过多。
例如,仅需要SafetyNet时,可以仅compile:
com.google.android.gms:play-services-safetynet:11.0.1
目前,Play Service定义的所有独立API库可以参考如下链接:
https://developers.google.com/android/guides/setup
3 确保设备上的Google Play Service可用
当应用导入了Client Library后,我们就可以在应用中使用Client Library提供的接口了。
不过,我们知道一个应用将被安装到不同厂商的机器上,
部分厂商的ROM中并没有集成Google Play Store,更别提Google Play Service了。
因此,当应用需要使用Google Play Service的功能时,
首先需要做的就是判断当前设备是否具有对应的能力。
目前从文档来看,判断Google Play Service是否可用,
最好的办法就是使用Client Library中GoogleApiAvailability提供的接口。
具体的做法类似于:
@Override
protected void onResume() {
super.onResume();
GoogleApiAvailability googleApiAvailability = GoogleApiAvailability.getInstance();
int ret = googleApiAvailability.isGooglePlayServicesAvailable(this);
if (ret == ConnectionResult.SUCCESS) {
Log.d(TAG, "This phone has available google service inside");
.............
} else {
Log.e(TAG, "This phone don't have available google service inside");
googleApiAvailability.getErrorDialog(this, ret, 0).show();
}
}
- 1
- 2
- 3
- 4
- 5
- 6
- 7
- 8
- 9
- 10
- 11
- 12
- 13
- 14
- 15
- 16
- 17
- 18
- 19
- 20
- 21
- 22
- 23
- 24
- 25
- 26
- 27
4 利用Google API Client访问服务
当device支持Google Play Service时,应用就可以使用对应的功能了。
如下图所示,应用实际上必须使用Client Library中的Google API Client来访问具体的服务。

从图中可以看出,Google API Client作为应用与服务的桥梁,负责具体的通信细节。
在应用中获取Google API Client的方法如下所示:
private GoogleApiClient mGoogleApiClient;
private void connectGooglePlayService() {
Log.d(TAG, "connect to google play service");
mGoogleApiClient = new GoogleApiClient.Builder(this)
.enableAutoManage(this, new FailedListener())
.addApi(SafetyNet.API)
.addConnectionCallbacks(new ConnectionCallback())
.build();
}
private class FailedListener implements GoogleApiClient.OnConnectionFailedListener {
@Override
public void onConnectionFailed(@NonNull ConnectionResult connectionResult) {
Log.e(TAG, "connect failed: " + connectionResult);
..............
}
}
private class ConnectionCallback implements GoogleApiClient.ConnectionCallbacks {
@Override
public void onConnected(@Nullable Bundle bundle) {
Log.d(TAG, "connect to google play service success");
...........
}
@Override
public void onConnectionSuspended(int i) {
Log.e(TAG, "connect to google play service fail");
...........
}
}
- 1
- 2
- 3
- 4
- 5
- 6
- 7
- 8
- 9
- 10
- 11
- 12
- 13
- 14
- 15
- 16
- 17
- 18
- 19
- 20
- 21
- 22
- 23
- 24
- 25
- 26
- 27
- 28
- 29
- 30
- 31
- 32
- 33
- 34
- 35
- 36
- 37
- 38
- 39
- 40
- 41
- 42
- 43
一旦应用创建出GoogleApiClient,同时成功连接Google Play Service后,
就可以通过对应的API,使用相应的功能了。
5 SafetyNet的安全检测功能
接下来我们以SafetyNet为例,看看如何使用Google Play Service提供的安全检测功能。
5.1 Attestation API
从文档和测试返回的结果来看,Attestation API主要用于检测:
应用所在设备Android运行环境的安全性和兼容性,有点类似CTS测试的味道。
需要注意的是:
在使用这个API前,需要进入 Google Developers Console,
开通 Android Device Verification API 并申请对应的Apk key。
具体的网址可以自行搜索,有Google邮箱即可申请。
申请到key值后,需要在应用的AndroidManifest.xml中添加如下内容:
<meta-data android:name="com.google.android.safetynet.ATTEST_API_KEY"
<!
android:value="AIzaSyCPVFlNC********-*********2NcvGi2sj0" />
当添加完key值后,应用就可以使用SafetyNet的attest接口了。
这里我们以一种老式的调用方式为例,介绍一下API的使用方式:
private void attest() {
byte[] nonce = getRequestNonce();
SafetyNet.SafetyNetApi.attest(mGoogleApiClient, nonce)
.setResultCallback(new ResultCallback<SafetyNetApi.AttestationResult>() {
@Override
public void onResult(SafetyNetApi.AttestationResult result) {
Status status = result.getStatus();
if (status.isSuccess()) {
String ret = result.getJwsResult();
Log.d(TAG, "attest success with ret: " + ret);
..............
} else {
Log.d(TAG, "attest fail");
}
}
});
}
private byte[] getRequestNonce() {
String token = "ATTest " + System.currentTimeMillis() + TAG;
return token.getBytes();
}
- 1
- 2
- 3
- 4
- 5
- 6
- 7
- 8
- 9
- 10
- 11
- 12
- 13
- 14
- 15
- 16
- 17
- 18
- 19
- 20
- 21
- 22
- 23
- 24
- 25
- 26
- 27
- 28
- 29
- 30
- 31
- 32
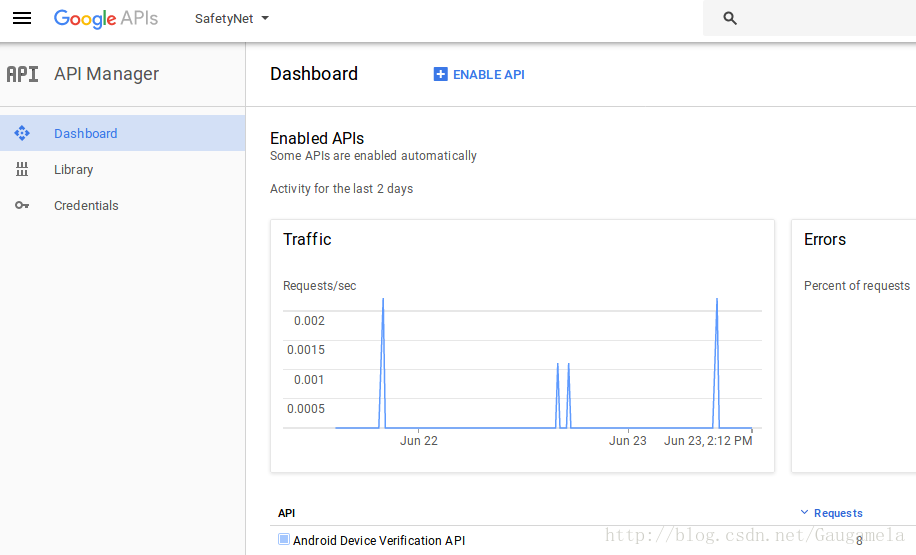
需要说明的是:
该API每日访问Google服务的次数是受限制的(估计因为用的是免费的,所以才受限吧)。
实际上,Google API控制台会统计每个API的请求次数,如下图所示:
5.2 Safe Browsing API
Safe Browsing API主要用于检测:
某个url对应的网址是否具有潜在威胁。
与Attestation API一样,使用该API前同样需要进入Google Developers Console,
开通Safe Browsing API并申请对应的App key值。
在使用时,需要在AndroidManifest.xml中添加类似如下内容:
<meta-data android:name="com.google.android.safetynet.API_KEY"
<!--对于同一个应用而言,使用不同的API时可以共享同一个key -->
android:value="AIzaSyCPVFlNC********-*********2NcvGi2sj0" />
应用使用该API的方式类似于:
private void browseTest(String url) {
SafetyNet.SafetyNetApi.lookupUri(mGoogleApiClient, url,
SafeBrowsingThreat.TYPE_POTENTIALLY_HARMFUL_APPLICATION,
SafeBrowsingThreat.TYPE_SOCIAL_ENGINEERING)
.setResultCallback(new ResultCallback<SafetyNetApi.SafeBrowsingResult>() {
@Override
public void onResult(SafetyNetApi.SafeBrowsingResult result) {
Status status = result.getStatus();
if ((status != null) && status.isSuccess()) {
Log.d(TAG, "browse test success");
mHandler.sendMessage(
mHandler.obtainMessage(BROWSE, result.getDetectedThreats()));
} else {
Log.e(TAG, "browse test fail: " + result.getStatus());
...........
}
}
});
}
- 1
- 2
- 3
- 4
- 5
- 6
- 7
- 8
- 9
- 10
- 11
- 12
- 13
- 14
- 15
- 16
- 17
- 18
- 19
- 20
- 21
- 22
- 23
- 24
- 25
- 26
- 27
- 28
- 29
5.3 Verify Apps API
最后,我们看看Google Play Service的Verify Apps API。
这个API主要用于检测:
手机上已安装的应用是否有害。
与前面两个API不同的是,在使用这个API前,必须开启终端对应的Feature。
对应的代码类似于:
private void enableVerifyFeature() {
if (!mEnableVerifyFeature) {
mSafetyNetClient = SafetyNet.getClient(this);
mSafetyNetClient.enableVerifyApps()
.addOnCompleteListener(new OnCompleteListener<SafetyNetApi.VerifyAppsUserResponse>() {
@Override
public void onComplete(Task<SafetyNetApi.VerifyAppsUserResponse> task) {
if (task.isSuccessful()) {
SafetyNetApi.VerifyAppsUserResponse result = task.getResult();
if (result.isVerifyAppsEnabled()) {
Log.d(TAG, "The user gave consent " +
"to enable the Verify Apps feature.");
..................
} else {
Log.e(TAG, "The user didn't give consent " +
"to enable the Verify Apps feature.");
...............
}
} else {
Log.e(TAG, "A general error occurred.");
...............
}
}
});
}
}
- 1
- 2
- 3
- 4
- 5
- 6
- 7
- 8
- 9
- 10
- 11
- 12
- 13
- 14
- 15
- 16
- 17
- 18
- 19
- 20
- 21
- 22
- 23
- 24
- 25
- 26
- 27
- 28
- 29
- 30
- 31
- 32
- 33
- 34
一旦Verify App对应的Feature开启后,我们就可以利用Verify App的API了,其中老式的用法类似于:
private void listHarmfulApps() {
SafetyNet.SafetyNetApi.listHarmfulApps(mGoogleApiClient)
.setResultCallback(new ResultCallbacks<SafetyNetApi.HarmfulAppsResult>() {
@Override
public void onSuccess(@NonNull SafetyNetApi.HarmfulAppsResult harmfulAppsResult) {
Log.d(TAG, "list harm full success");
..............
}
@Override
public void onFailure(@NonNull Status status) {
Log.d(TAG, "list harm full fail: " + status);
}
});
}
- 1
- 2
- 3
- 4
- 5
- 6
- 7
- 8
- 9
- 10
- 11
- 12
- 13
- 14
- 15
- 16
- 17
最后,我们来看看官方文档推荐的新的调用方式:
private void listHarmfulApps() {
mSafetyNetClient.listHarmfulApps()
.addOnCompleteListener(new OnCompleteListener<SafetyNetApi.HarmfulAppsResponse>() {
@Override
public void onComplete(Task<SafetyNetApi.HarmfulAppsResponse> task) {
Log.d(TAG, "listHarmfulApps onComplete");
if (task.isSuccessful()) {
SafetyNetApi.HarmfulAppsResponse result = task.getResult();
long scanTimeMs = result.getLastScanTimeMs();
Log.d(TAG, "list harmful apps used time: " + scanTimeMs);
List<HarmfulAppsData> appList = result.getHarmfulAppsList();
if (appList.isEmpty()) {
Log.d(TAG, "There are no known " +
"potentially harmful apps installed.");
} else {
Log.e(TAG,
"Potentially harmful apps are installed!");
for (HarmfulAppsData harmfulApp : appList) {
Log.e(TAG, "Information about a harmful app:");
Log.e(TAG,
" APK: " + harmfulApp.apkPackageName);
Log.e(TAG,
" SHA-256: " + harmfulApp.apkSha256);
Log.e(TAG,
" Category: " + harmfulApp.apkCategory);
}
}
} else {
Log.e(TAG, "An error occurred. ");
}
}
}).addOnFailureListener(new OnFailureListener() {
@Override
public void onFailure(@NonNull Exception e) {
e.printStackTrace();
}
});
}
- 1
- 2
- 3
- 4
- 5
- 6
- 7
- 8
- 9
- 10
- 11
- 12
- 13
- 14
- 15
- 16
- 17
- 18
- 19
- 20
- 21
- 22
- 23
- 24
- 25
- 26
- 27
- 28
- 29
- 30
- 31
- 32
- 33
- 34
- 35
- 36
- 37
- 38
- 39
- 40
- 41
- 42
- 43
- 44
- 45
- 46
- 47
- 48
需要说明的是:
自己测试时发现,listHarmfulApps接口并不稳定,在Android 6.0上偶尔会遇到编码为12004的错误。
参考Google的API文档,发现这是Verify App API的internal error。
此外,该接口在Android 7.0平台上,似乎也没法有效使用(不知是否与具体厂商有关)。
最后,我不得不吐槽一下,这个接口的能力简直是渣渣,居然几乎难以有效检测出威胁样本。
6 总结
本篇文档主要介绍了Google Play Service的原理和集成方法,
并以SafetyNet API为例,介绍了应用如何使用Google Play Service提供的功能。
参考文献
https://developers.google.com/android/guides/overview
https://developer.android.com/training/safetynet
原文地址: http://blog.csdn.net/gaugamela/article/details/73658554


 本文介绍如何利用Google Play Service进行安全检测,包括集成方法、客户端库使用、设备兼容性检查、GoogleAPIClient访问服务及SafetyNet API的详细使用过程。


 1276
1276

 被折叠的 条评论
为什么被折叠?
被折叠的 条评论
为什么被折叠?
 到【灌水乐园】发言


