


8.1 shell介绍
8.2 命令历史
8.3 命令补全和别名
8.4 通配符
8.5 输入输出重定向
8.6 管道符和作业控制
8.7/8.8 shell变量
8.9 环境变量配置文件
扩展:bashrc和bash_profile的区别 http://ask.apelearn.com/question/7719
一、 shell介绍
- shell是一个命令解释器,提供用户和机器之间的交互
- 支持特定语法,比如逻辑判断、循环(if for whell)
- 每个用户都可以有自己特定的shell
- CentOS7默认shell为bash(Bourne Agin Shell)
- 还有zsh、ksh等
二、 命令历史
- history命令
- bash_history
- 最大1000条
- 变量HISTSIZE
- /etc/profile中修改
- HISTTIMEFORMAT="%Y/%m/%d %H:%M:%S "
- 永久保存 chattr +a ~/.bash_history
- !!
- !n
- !word
1 .history 命令
显示历史命令
[root@linux-151 ~]# history
    1  mkdir /tmp/222
    2  rmdir /tmp/111/ /tmp/222/
	.
	.
	.
   995  echo $?
   996  ls /usr/local/apache2/
   997  init 0
   998  ls ./.bash_history
   999  vim ./.bash_history
   1000  history
3. .bash_history 文件
历史命令保存在用户家目录的.bash_history文件中
4. history –c
清空内存中的历史记录;不会清除.bash_history文件中的记录。
[root@linux-151 ~]# history -c
[root@linux-151 ~]# history
    2  history
[root@linux-151 ~]# head -10 .bash_history
mkdir /tmp/222
rmdir /tmp/111/ /tmp/222/
ls
lsls tmp
ls /tmp
mkdir /tmp/111
mkdir /tmp/222
ls
ls /tmp
rmdir /tmp/111/ /tmp/222/
- 只有当用户正常退出当前shell时,在当前shell中运行的命令才会保存至.bash_history文件中。
5. 定义HISTSIZE值,在配置文件/etc/profile中修改
[root@linux-151 ~]# vim /etc/profile
搜索HISTSIZE 默认值是1000,可以修改成5000条,然后按esc,:wq 保存退出。
然后运行命令:source /etc/profile
[root@linux-151 ~]# source /etc/profile
[root@linux-151 ~]# echo $HISTSIZE
5000
6. 定义格式:HISTTIMEFORMAT="%Y/%m/%d %H:%M:%S "
在配置文件/etc/profile中修改,在HISTSIZE=5000下面,添加一行HISTTIMEFORMAT="%Y/%m/%d %H:%M:%S "
[root@linux-151 ~]# vim /etc/profile
[root@linux-151 ~]# source /etc/profile
[root@linux-151 ~]# history
    2  2018/04/20 22:49:44 history
    3  2018/04/20 22:50:20 head -10 .bash_history
    4  2018/04/20 22:55:05 vim /etc/profile
    5  2018/04/20 22:57:52 source /etc/prfile
    6  2018/04/20 22:58:04 source /etc/profile
    7* 2018/04/20 22:58:16 echo $HIST
    8  2018/04/20 23:01:02 vim /etc/profile
    9  2018/04/20 23:03:49 history
   10  2018/04/20 23:03:57 source /etc/profile
   11  2018/04/20 23:03:59 history
   12  2018/04/20 23:04:20 vim /etc/profile
   13  2018/04/20 23:05:14 source /etc/profile
   14  2018/04/20 23:05:17 history
6. 永久保存 chattr +a ~/.bash_history
- 给.bash_history加一个a权限,不能删除,可以追加
[root@linux-151 ~]# chattr +a .bash_history
7. !!:连续两个!表示执行上一条命令。
[root@linux-151 ~]# pwd
/root
[root@linux-151 ~]# !!
pwd
/root
8. !n:这里的n是数字,表示执行命令历史中的第n条命令。
[root@linux-128 ~]# history
    2  2018/04/20 22:49:44 history
    3  2018/04/20 22:50:20 head -10 .bash_history
    4  2018/04/20 22:55:05 vim /etc/profile
    5  2018/04/20 22:57:52 source /etc/prfile
    6  2018/04/20 22:58:04 source /etc/profile
    7* 2018/04/20 22:58:16 echo $HIST
    8  2018/04/20 23:01:02 vim /etc/profile
    9  2018/04/20 23:03:49 history
   10  2018/04/20 23:03:57 source /etc/profile
   11  2018/04/20 23:03:59 history
   12  2018/04/20 23:04:20 vim /etc/profile
   13  2018/04/20 23:05:14 source /etc/profile
   14  2018/04/20 23:05:17 history
   15  2018/04/20 23:07:56 chattr +a .bash_history
   16  2018/04/20 23:08:10 vim .bash_history
   17  2018/04/20 23:09:25 pwd
   18  2018/04/20 23:10:31 history
[root@linux-128 ~]# !17
pwd
/root
9. !字符串: !pw表示执行命令历史中最近一次以pw开头的命令。
[root@linux-151 ~]# !pw
pwd
/root
8.3 命令补全和别名
补全
- tab键,敲一下,敲两下
- 参数补全,安装bash-completion
- alias别名给命令重新起个名字
- 各用户都有自己配置别名的文件 ~/.bashrc
- ls /etc/profile.d/
- 自定义的alias放到~/.bashrc
- 按tab键可以帮我们补全一个指令,一个路径或者一个文件名
- Centos6中tab键只能补全本身;Centos7中tab键支持命令参数补全,需要安装一个包bash-completion
[root@linux-151 ~]# yum install -y bash-completion
重启服务器 reboot
别名
- Alias也是bash所特有的功能之一;直接执行alias命令会看到目前系统预设的所有别名。
[root@linux-151 ~]# alias
alias cp='cp -i'
alias egrep='egrep --color=auto'
alias fgrep='fgrep --color=auto'
alias grep='grep --color=auto'
alias l.='ls -d .* --color=auto'
alias ll='ls -l --color=auto'
alias ls='ls --color=auto'
alias mv='mv -i'
alias rm='rm -i'
alias which='alias | /usr/bin/which --tty-only --read-alias --show-dot --show-tilde'
- 用户家目录下.bashrc文件中只配置了几个alias
# .bashrc

# User specific aliases and functions

alias rm='rm -i'
alias cp='cp -i'
alias mv='mv -i'

# Source global definitions
if [ -f /etc/bashrc ]; then
        . /etc/bashrc
fi
- 其他的很多别名在/etc/profile.d/目录下,有很多.sh文件中定义;
[root@linux-151 ~]# ls /etc/profile.d/
256term.csh colorgrep.csh colorls.sh less.csh vim.sh
256term.sh colorgrep.sh lang.csh less.sh which2.csh
bash_completion.sh colorls.csh lang.sh vim.csh which2.sh
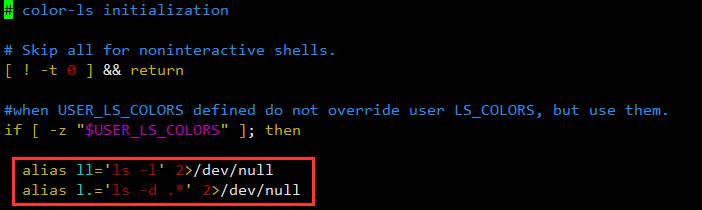
root@linux-151 ~]# vim /etc/profile.d/colorls.sh
三、 通配符
- ls *.txt
- ls ?.txt
- ls [0-9].txt
- ls {1,2}.txt
*用来匹配零个或多个任意字符
[root@linux-151 ~]# ls *txt
11.txt  1a.txt  23.txt  321.txt  ab.txt  a.txt  b.txt  工号.txt
[root@linux-151 ~]# ls 1*
11.txt  11.txt.bak  12  1a.txt  1.log
123:
[root@linux-151 ~]# ls *1*
11.txt  11.txt.bak  12  1a.txt  1.log  321.txt  321.txt.bak
123:
[root@linux-151 ~]# ls *a*
11.txt.bak  1a.txt  321.txt.bak  ab.txt  anaconda-ks.cfg  a.txt
?用来匹配一个字符
[root@linux-151 ~]# ls ?.txt
a.txt  b.txt
ls [0-3].txt [ ]里面表示范围,只要是在这个范围内都列出来
[root@linux-151 ~]# ls [0-3].txt
1.txt  2.txt
[root@linux-151 ~]# ls [a-z].txt
a.txt  b.txt
[root@linux-151 ~]# ls [0-9a-zA-Z].txt
1.txt  2.txt  a.txt  b.txt
ls {1,2}.txt { }花括号里面要用“,”隔开,1.txt或者2.txt;
[root@linux-151 ~]# ls {1,2}.txt
1.txt  2.txt

[root@linux-151 ~]# ls {1,2,3}.txt
ls: 无法访问3.txt: 没有那个文件或目录
1.txt  2.txt
四、 输入输出重定向
- cat 1.txt >2.txt
- cat 1.txt >> 2.txt
- ls aaa.txt 2>err
- ls aaa.txt 2>>err
- wc -l < 1.txt
- command >1.txt 2>&1
举个例子:
ls test.sh test1.sh >success.txt 2>&1将前面执行结果的标准输出流写入success.txt文件,省略了1,全句为:
ls test.sh test1.sh 1>success.txt 2>&1错误输出用2,如2>error.txt。用&1表示类似1,和1绑定到一起,输出到一个文件,用&表示绑定在一起。而“&-”表示关闭。
但注意,
command > file 2>file 与command > file 2>&1 是不同的:
command > file 2>file :是将命令所产生的标准输出信息stdout和错误的输出信息stderr送到file中,但这样会导致file会被打开两次,所以stdout和stderr会互相覆盖。实际上FD1和FD2同时使用file,引起资源竞争。
而command >file 2>&1:将stdout直接送向file,而stderr是继承FD1管道后被送往file,所以file 只被打开一次,stdout和stderr共用FD1一个管道。实际相当于stderr合并到stdout后一起输出到file中。
从IO效率上,前一条命令的效率要比后面一条的命令效率要低,所以在编写shell脚本的时候,较多的时候我们会用command > file 2>&1 这样的写法.
>输出重定向
[root@linux-151 ~]# echo "112233">1.txt
[root@linux-151 ~]# cat 1.txt
112233
>>追加重定向
[root@linux-151 ~]# echo "aabbcc">>1.txt
[root@linux-151 ~]# cat 1.txt
112233
Aabbcc
2> 错误重定向
[root@linux-151 ~]# ls aaa.txt 2>2.txt
[root@linux-151 ~]# cat 2.txt
ls: 无法访问aaa.txt: 没有那个文件或目录
2>>错误追加重定向
[root@linux-151 ~]# ls aaa.txt 2>>2.txt
[root@linux-151 ~]# cat 2.txt
ls: 无法访问aaa.txt: 没有那个文件或目录
ls: 无法访问aaa.txt: 没有那个文件或目录
&> == >+2>正确和错误重定向
[root@linux-151 ~]# ls 1.txt aaa.txt &> 1.txt
[root@linux-151 ~]# cat 1.txt
ls: 无法访问aaa.txt: 没有那个文件或目录
1.txt
&>>
[root@linux-151 ~]# ls 1.txt aaa.txt &>> 1.txt
[root@linux-151 ~]# cat 1.txt
ls: 无法访问aaa.txt: 没有那个文件或目录
1.txt
ls: 无法访问aaa.txt: 没有那个文件或目录
1.txt
可以将正确输出到一个文件中,错误输入到另一个文件中,也可以同时输出到一个文件中(用&>)。
[root@linux-151 ~]# ls 1.txt aaa.txt > 1.txt 2>2.txt
[root@linux-151 ~]# cat 1.txt
1.txt
[root@linux-151 ~]# cat 2.txt
ls: 无法访问aaa.txt: 没有那个文件或目录
< 输入重定向
[root@linux-151 ~]# wc -l < /etc/passwd
27
左边只能是命令,不能是文件。
管道符 |
- 管道符的作用是将前面一个命令的输出作为后面一个命令的输入
[root@linux-151 ~]# cat /etc/passwd |wc -l
27
[root@linux-151 ~]# cat /etc/passwd |grep "root"
root:x:0:0:root:/root:/bin/bash
operator:x:11:0:operator:/root:/sbin/nologin
作业控制
当一个进程运行时,ctrl+z 可以暂停这个任务
[root@linux-151 ~]# sleep 100
^Z
[1]+  已停止               sleep 100
当暂停后,可以输入fg(foreground简写)命令来恢复这个进程,让它在前端继续运行。
[root@linux-151 ~]# fg
sleep 100
我们也可以使用命令bg(background简写)将暂停的进程直接丢到后台运行。
[root@linux-151 ~]# bg
[1]+ sleep 100 &
我们可以使用命令jobs来查看有那些进程是被暂停了。
[root@linux-151 ~]# jobs
[1]-  已停止               sleep 100
[2]+  已停止               sleep 200
我们可以直接将一条命令丢在后台运行。
[root@linux-151 ~]# sleep 300 &
[3] 2180
[root@linux-151 ~]# jobs
[1]-  已停止               sleep 100
[2]+  已停止               sleep 200
[3]   运行中               sleep 300 &
shell变量
- 变量就是使用一个比较简单的字符串来代替某些具有特殊意义的设定以及数据。
- 环境变量PATH,它是shell预设的一个变量,通常shell预设的变量都是大写的。
[root@linux-151 ~]# echo $PATH
/usr/local/sbin:/usr/local/bin:/usr/sbin:/usr/bin:/root/bin
[root@linux-151 ~]# echo $HOME
/root
[root@linux-151 ~]# echo $HISTSIZE
5000
命令env
- 使用env命令可以列出系统预设的全部系统变量
[root@linux-151 ~]# env
XDG_SESSION_ID=1
HOSTNAME=linux-151
SELINUX_ROLE_REQUESTED=
TERM=xterm
SHELL=/bin/bash
HISTSIZE=1000
SSH_CLIENT=192.168.0.103 53060 22
SELINUX_USE_CURRENT_RANGE=
SSH_TTY=/dev/pts/0
USER=root
MAIL=/var/spool/mail/root
PATH=/usr/local/sbin:/usr/local/bin:/usr/sbin:/usr/bin:/root/bin
PWD=/root
LANG=zh_CN.UTF-8
SELINUX_LEVEL_REQUESTED=
HISTCONTROL=ignoredups
SHLVL=1
HOME=/root
LOGNAME=root
SSH_CONNECTION=192.168.0.103 53060 192.168.0.151 22
LESSOPEN=||/usr/bin/lesspipe.sh %s
XDG_RUNTIME_DIR=/run/user/0
_=/usr/bin/env
- HOSTNAME:表示主机的名称;
- SHELL:表示当前用户的shell类型;
- HISTSIZE:表示历史记录数;
- MAIL:表示当前用户的邮件存放目录;
- PATH:改变量决定了shell将到那些目录中寻找命令或者程序;
- PWD:表示当前目录;
- LANG:这是与语言相关的环境变量,多语言环境可以修改此环境变量;
- HOME:表示当前用户的家目录;
- LOGNAME:表示当前用户的登录名;
命令set
- 命令set不仅可以显示系统预设的环境变量,还可以显示用户自定义的变量。
自定义变量规则:
- 设定变量的格式为a=b,其中a为变量名,b为变量的内容,等号两边不能有空格;
- 变量名只能由字母,数字以及下划线组成,而且不能以数字开头。
- 当变量值带有特殊字符(如空格)时,需要加上单引号。
[root@linux-151 ~]# name=l em
-bash: em: 未找到命令

[root@linux-151 ~]# name='l em'
[root@linux-151 ~]# echo $name
l em
变量内容本身就带有单引号,这个时候需要加上双引号
[root@linux-151 ~]# name="l'em"
[root@linux-151 ~]# echo $name
l'em
如果变量内容中需要用到其他命令,运行结果则可以使用反引号;
[root@linux-151 ~]# name=`pwd`
[root@linux-151 ~]# echo $name
/root
变量内容可以累加其他变量的内容,但需要加上双引号
[root@linux-151 ~]# a=1
[root@linux-151 ~]# b=2
[root@linux-151 ~]# c=3
[root@linux-151 ~]# d="$a$b$c"
[root@linux-151 ~]# echo $d
123
查看当前在哪个终端下:
[root@linux-151 ~]# echo $SSH_TTY
/dev/pts/0
如果再当前shell中运行bash命令,则会进入一个新的shell中,这个shell是原来shell的子shell,我们可以用pstree来查看: 需要先安装一个包:
[root@linux-151 ~]# yum install -y psmisc

systemd─┬─NetworkManager───2*[{NetworkManager}]
        ├─agetty
        ├─auditd───{auditd}
        ├─chronyd
        ├─crond
        ├─dbus-daemon
        ├─firewalld───{firewalld}
        ├─irqbalance
        ├─lvmetad
        ├─master─┬─pickup
        │        └─qmgr
        ├─polkitd───5*[{polkitd}]
        ├─rsyslogd───2*[{rsyslogd}]
        ├─sshd───sshd───bash─┬─bash───pstree
        │                    └─2*[sleep]
        ├─systemd-journal
        ├─systemd-logind
        ├─systemd-udevd
        ├─tuned───4*[{tuned}]
        └─vmtoolsd───{vmtoolsd}
设置全局变量
export a=11
- 注意:export声明变量a后,只会让该shell的子shell或者孙shell生效,但是不会让它的父shell和其他终端的shell生效。
撤销变量
unset 变量名系统环境变量和个人环境变量
- /etc/profile 用户环境变量,交互,登录才执行
- /etc/bashrc 用户不用登录,执行shell就生效
- ~/.bashrc
- ~/.bash_profile
- ~/.bash_history
- ~/.bash_logout
- PS1='[\033[01;32m]\u@\h[\033[00m]:[\033[01;36m]\w[\033[00m]$ '
环境变量分为系统层次变和用户层次
- /etc/profile 设置系统环境变量,不管针对哪个用户这些环境变量都会生效,但是设置这个配置文件不太好,编辑的时候会有一段提示: 这不是一个好主意来改变这个文件,除非你知道你 正在做的事情。如果你想更改某些环境变量,最好在/etc/profile.d /下去自定义,创建格式为XXX.sh, 在未来的更新将防止合并的必要性。
[root@lem ~]# ls /etc/profile.d
colorls.csh glib2.csh lang.csh less.csh path.sh vim.sh
colorls.sh glib2.sh lang.sh less.sh vim.csh which2.sh

[root@lem ~]# vim /etc/profile.d/path.sh
#!/bin/path
export PATH=$PATH:/tmp/:/data/bin/
-
编辑完后要source /etc/profile,加载的时候会调用profile.d下面的所有文件。
-
/etc/bashrc 设置PS1和umask; 它和/etc/profile一样,在/etc/bashrc设置不好,要在/etc/profile.d下去定义,创建格式为.sh的文件
-
进去编辑配置,完成后source /etc/profile 加载一下。
[root@lem ~]# vim /etc/profile.d/umask.sh
#bsah/bin
PS1="[\u@\h-\t \W]\$ "
[root@lem ~]# source /etc/profile
[root@lem-23:35:13 ~]$ ls
-
\u 用户名 \h主机名 \t 时间 \W 当前目录 \w 目录的完整路径 $ 就是#,如果普通用户就是$
-
.bash_profile 定义用户自己的环境变量,每个用户都可以使用该文件输入专用于自己使用的shell信息,当用户登陆时,该文件仅仅执行一次
-
.bashrc :文件包含专属用户自己的shell的bash信息,登陆时以及每次打开新的shell时,该文件都被读取。可以将用户之定义的alias或者自定义变量写到这个文件中
-
.bash_history 记录命令历史用的
-
.bash_logout 退出shell时,会执行该文件,可以把一些清理的工作放到这个文件中。


 2万+
2万+


 被折叠的 条评论
为什么被折叠?
被折叠的 条评论
为什么被折叠?
 到【灌水乐园】发言


