


paper:CrossViT: Cross-Attention Multi-Scale Vision Transformer for Image Classification
official implementation:https://github.com/IBM/CrossViT
third-party implementation:https://github.com/huggingface/pytorch-image-models/blob/main/timm/models/crossvit.py
性能有所提升,但速度变慢了!
出发点
视觉Transformer(ViT)在图像分类方面相比卷积神经网络(CNN)取得了令人瞩目的成果,激发了作者对多尺度特征表示的兴趣,本文研究了如何在Transformer模型中学习多尺度特征表示以提高图像分类的性能。作者提出了一个双分支Transformer,以结合不同大小的图像patch(即Transformer中的token)来生成更强的图像特征。这个方法旨在解决如何在视觉Transformer中有效地融合多尺度特征的问题。
创新点
- 双分支Transformer:通过两个不同计算复杂度的分支处理小patch和大patch,然后多次通过注意力机制进行融合,使得特征互补。
- 交叉注意力特征融合:设计了一个基于交叉注意力的融合模块,该模块使用每个分支的class token作为查询,与其它分支交换信息,实现线性时间复杂度的特征融合。
方法介绍
patch size的细粒度影响了ViT的精度和复杂度。使用更小的patch,ViT可以表现得更好,但会导致更高的FLOPs和内存消耗。受此启发,作者提出的方法是利用小patch的性能优势同时又可以平衡复杂度。具体来说,本文首先引入了一个双分支ViT,每个分支的patch大小不同,然后提出了一个简单有效的模块来融合两个分支的信息。
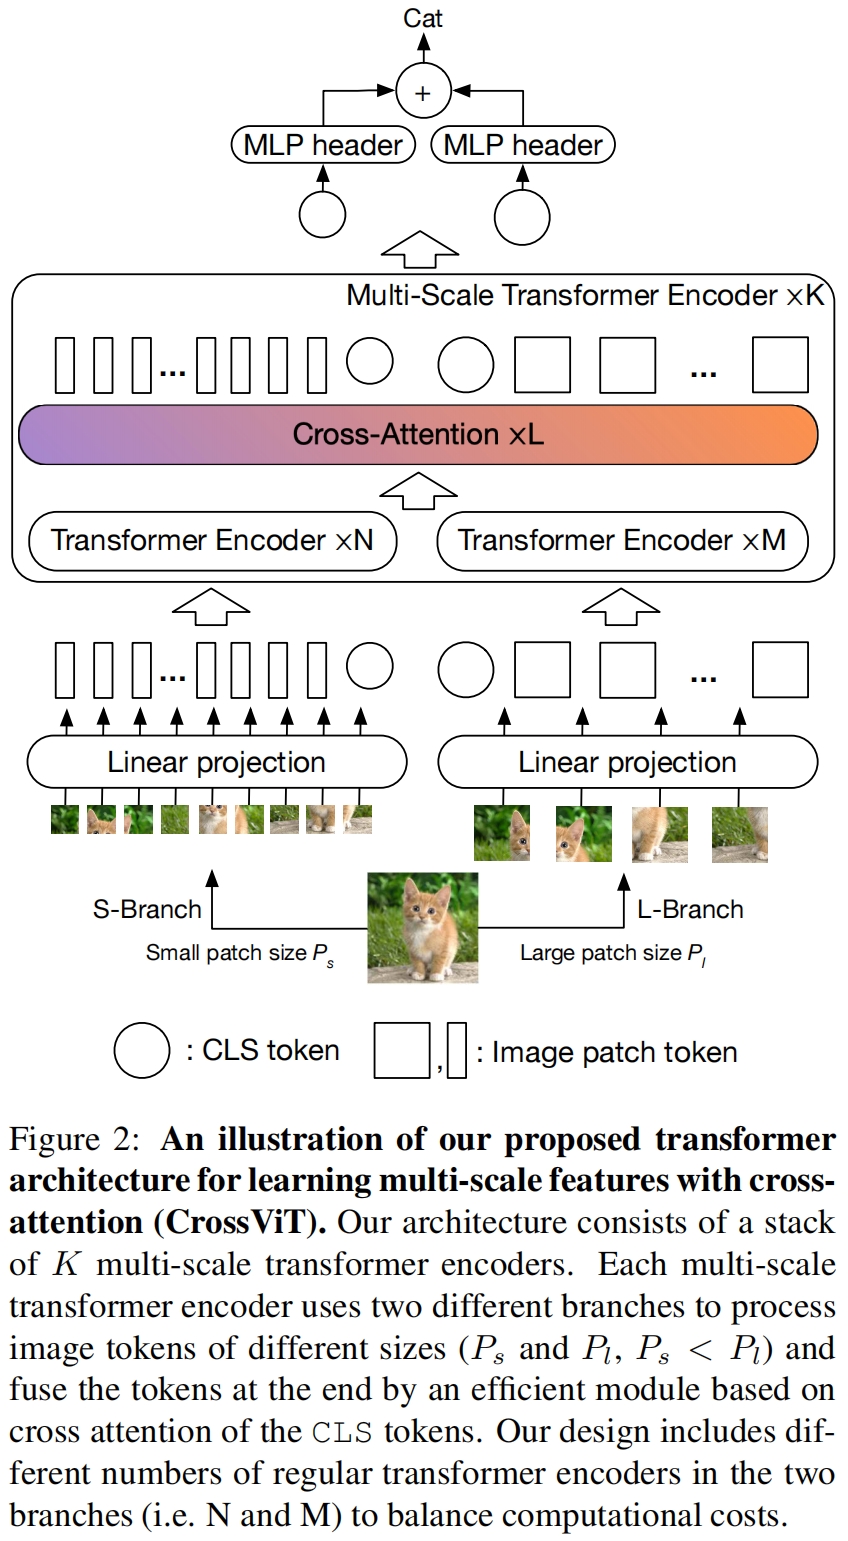
图2展示了本文提出的交叉注意力多尺度视觉Transformer的网络架构(Cross-Attention Multi-Scale Vision Transformer,CrossViT)。模型由 \(K\) 个多尺度transformer encoder构成,每个encoder包含两个分支:(1)L-Branch:一个大的(主)分支,使用粗粒度的patch size(\(P_l\))以及更多的encoder和更大的embedding维度。(2)S-Branch:一个小的(辅助)分支,使用细粒度的patch size(\(P_s\))以及更少的encoder和更小的embedding维度。将两个分支融合 \(L\) 次最后用两个分支的class token进行预测。
有效的特征融合是学习多尺度特征表示的关键。作者探索了四种不同的融合策略,三种简单的启发式方法和本文提成的cross-attention module,如图3所示。
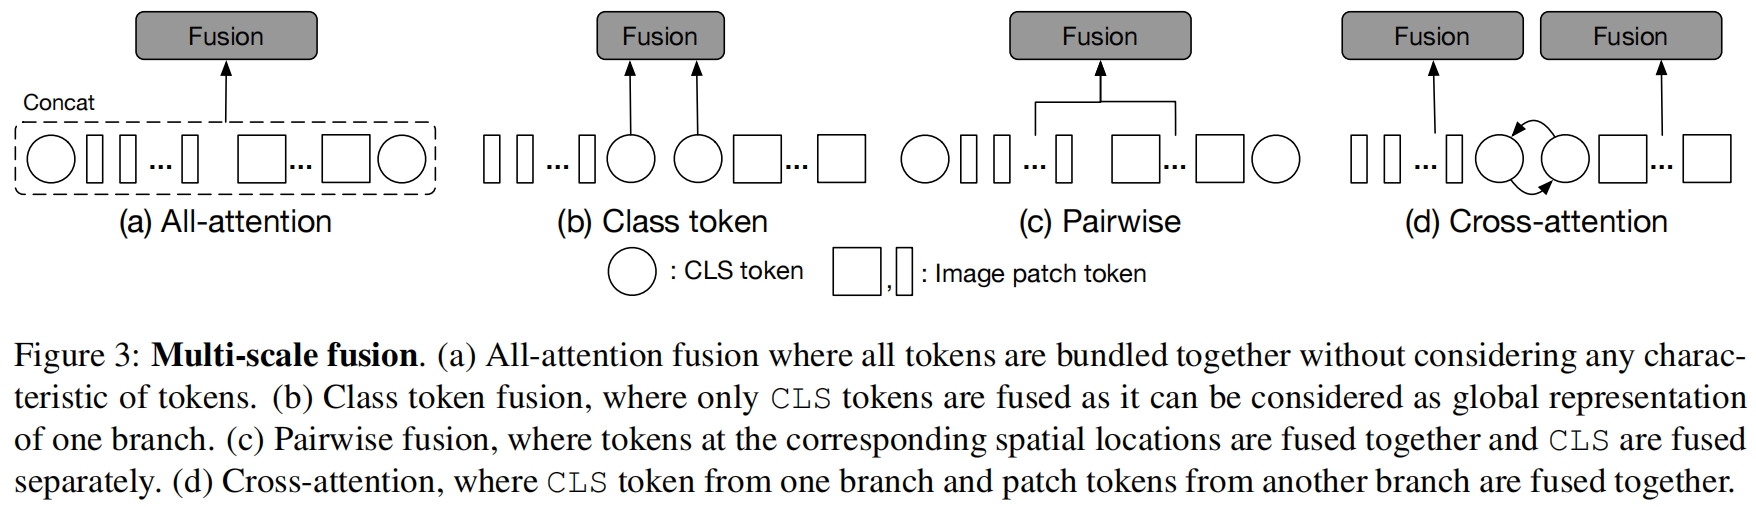
其中(a)是直接将两个分支的所有token进行concat然后通过self-attention进行融合,这种方法的计算时间是token总长度的二次方。(b)是将两个分支的class token进行融合,class token可以被认为是一个分支的抽象全局特性表示因为它作为最终embedding用于预测。(c)是根据两个分支token的对应位置进行两两融合,因为两个分支处理的patch大小不同,token的数量也不同,因为需要进行插值来对齐spatial size,然后再以pair-wise的方式进行融合。
(d)是本文提出的cross-attention fusion,其中一个分支的class token与另一个分支的所有patch token进行融合。具体来说,为了更有效地融合多尺度特征,我们首先利用每个分支的class token作为一个agent代理,与另一个分支的patch tokens交换信息,然后将其映射回自己的分支。由于class token已经从自己分支的所有patch token中学习到了抽象信息,因此与另一个分支的patch token进行交互有助于融入不同尺度的信息。在与其它分支的token融合后,class token在下一个transformer encoder上再次与自己分支的patch token进行交互,将从其它分支学习到的信息传递给自己分支的patch token从而丰富每个patch token的特征表示。
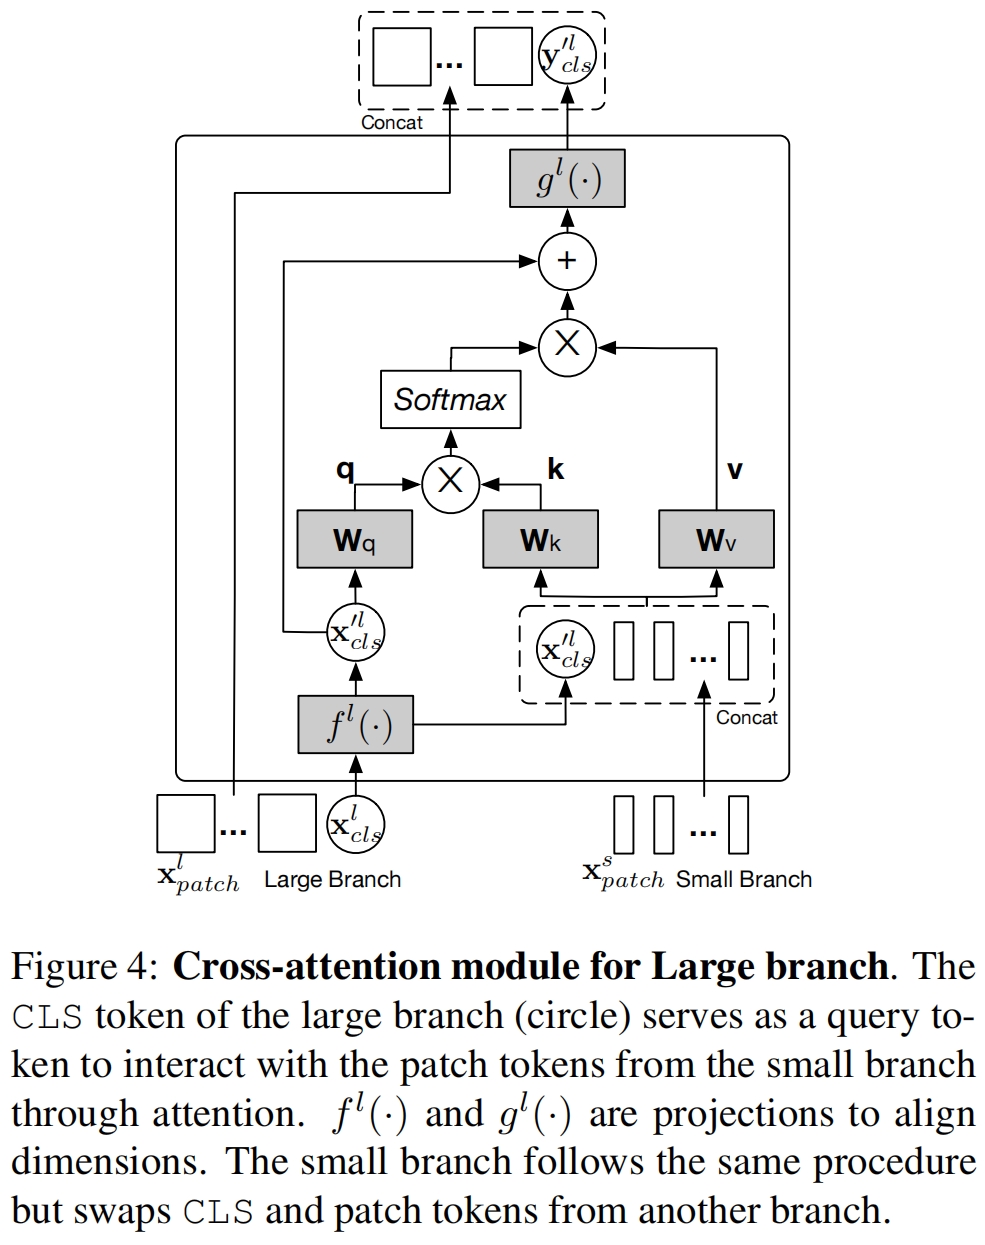
Large branch的交叉注意力模块如图4所示。具体来说,对于branch \(l\),首先将其class token与S-Branch的patch token进行拼接,如式(5)。
![]()
其中 \(f^l(\cdot)\) 是映射函数用来对齐维度。然后模块在 \(\mathbf{x}^l_{cls}\) 和 \(\mathbf{x}'^{l}\) 之间计算交叉注意力cross-attention (CA),其中class token是唯一的query,因为patch token的信息已经融入到了class token之中。CA可以表示如下

其中 \(\mathbf{W}_q,\mathbf{W}_k,\mathbf{W}_v\in \mathbb{R}^{C\times (C/h)}\) 是可学习的参数,\(C,h\) 分别是embedding维度和heads数量。注意由于我们在query中只使用class token,在cross-attention中生成attention map\((\mathbf{A})\)的计算和内存复杂度是线性的而不是all-attention中的二次方。此外和self-attention一样,我们在CA中也用多个heads并称之为MCA。但我们不在cross-attention后使用FFN。具体来说,给定输入 \(\mathbf{x}^l\),经过一个有layer normalization和residual shortcut的cross-attention模块的输出 \(\mathbf{z}^l\) 表示如下

其中 \(f^l(\cdot)\) 和 \(g^l(\cdot)\) 分别是用于维度对齐的projection和back-projection函数。
实验结果
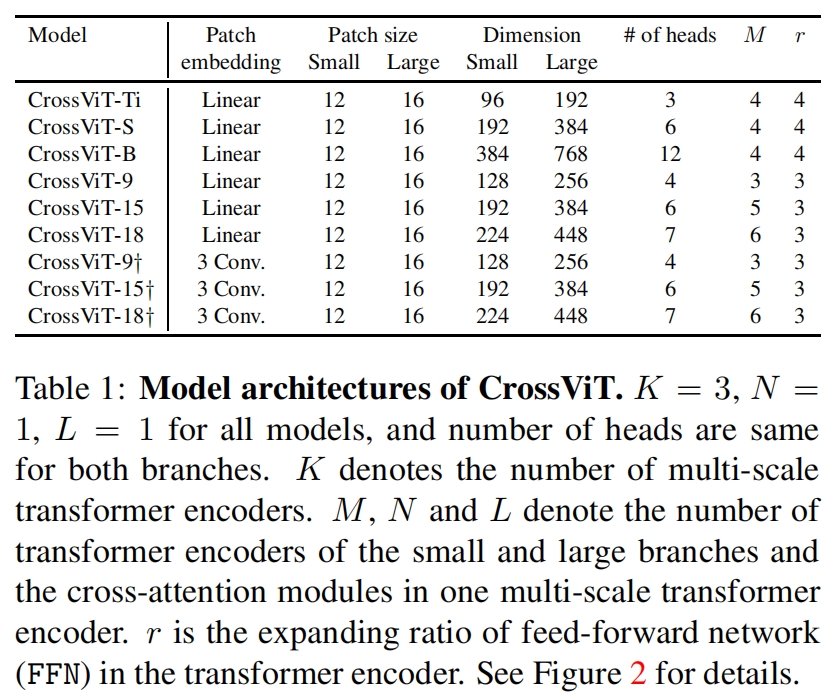
不同尺度模型的配置如表1所示。
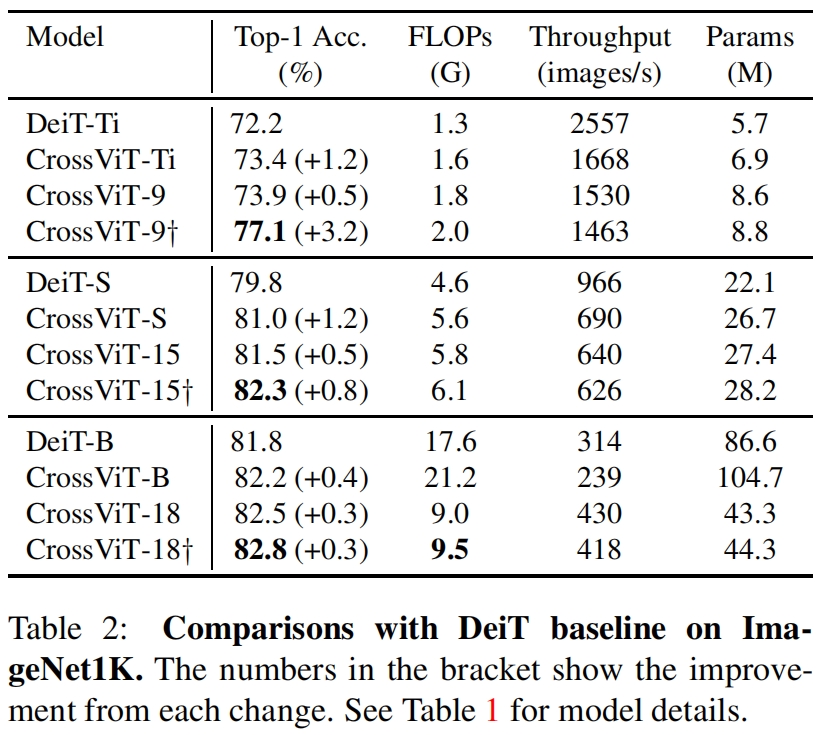
和DeiT的对比如表2所示。可以看到虽然CrossViT相比类似大小的DeiT精度有所提升,但吞吐也降低了不少。比如CrossViT-Ti相比DeiT-Ti精度提升了1.2%,但吞吐降低了接近35%。另外可以看到将patch embedding由一个线性层换成3个卷积可以进一步提升性能,尤其是对于小模型如CrossViT-9,精度进一步提升了3.2%,但作者并没有给出将DeiT的patch embedding换成3个卷积的结果,因此这里无法确定修改patch embedding层对性能的提升是否和crossvit整体的结构有关。
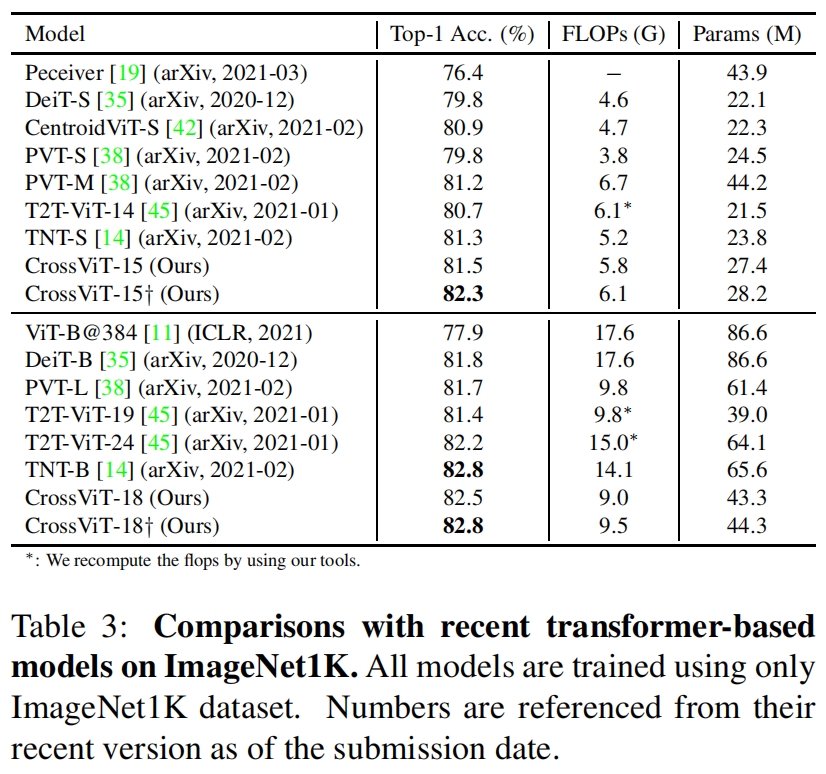
和其它transformer模型在ImageNet上的性能对比如表3所示,虽然CrossViT取得了最优的性能,但这里只给出了FLOPs和参数量,并没有给出延迟或吞吐,所以无法对比模型实际的推理速度。
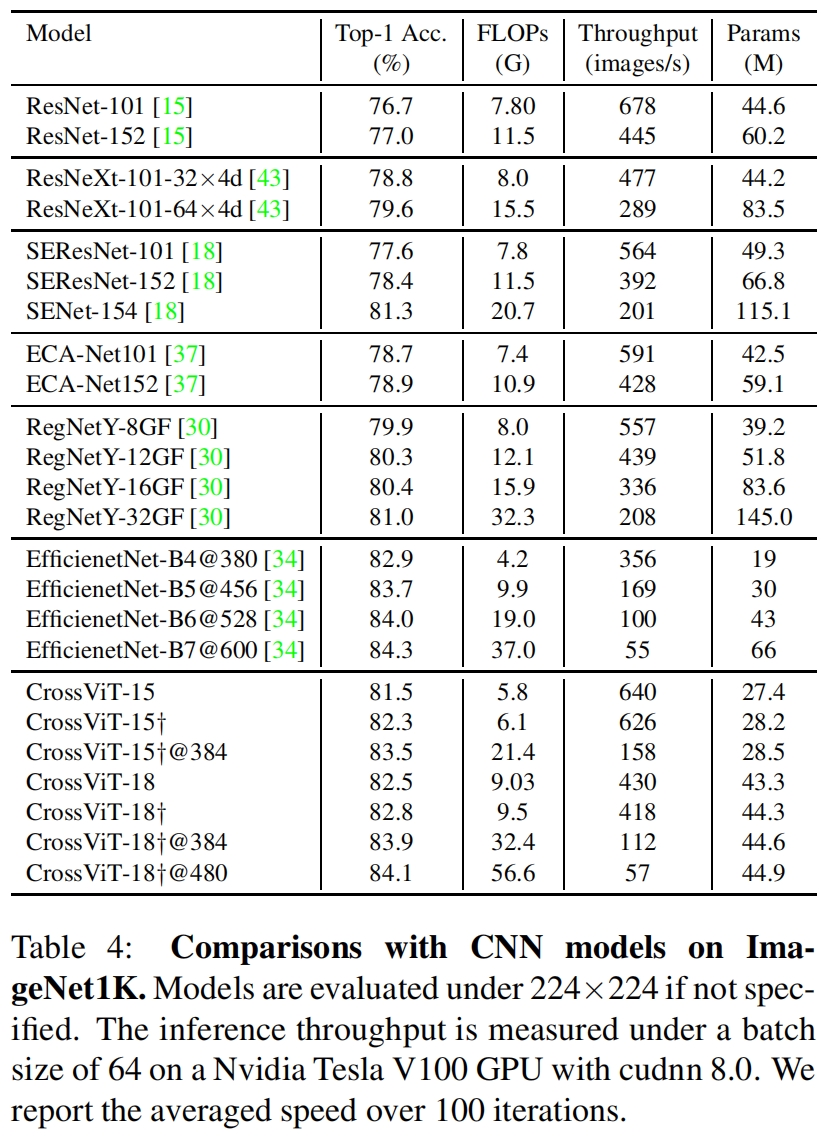
和一些卷积模型在ImageNet上的性能对比如表4所示,这里给出的吞吐,但和sota模型相比并没有优势,比如和EfficientNet相比,精度差不多,吞吐还小一点。
代码解析
这里以timm中的实现为例,输入大小为(1, 3, 224, 224),模型选择"crossvit_small_240",具体配置如下
model_args = dict(
        img_scale=(1.0, 224/240), patch_size=[12, 16], embed_dim=[192, 384], depth=[[1, 4, 0], [1, 4, 0], [1, 4, 0]],
        num_heads=[6, 6], mlp_ratio=[4, 4, 1])
其中两个分支的输入分别为240x240和224x224,patch_size分别为12和16,则patch数量即token_num分别为(240/12)^2=400 和 (224/16)^2=196。depth列表中三个子列表代表一共有3个stage,每个stage中large-branch和small-branch的block数量分别为1和4,至于最后的0表示两个分支后面fusion block的数量,代码给出的所有模型variants最后一个数都是0表明只有一个fusion block。
类CrossViT的forward_features的代码如下,其中对两个分支分别进行patch_embed并加上class token,得到的输出shape分别为 (1, 401, 192) 和 (1, 197, 384)。
def forward_features(self, x) -> List[torch.Tensor]:  # (1,3,240,240)
    B = x.shape[0]
    xs = []
    for i, patch_embed in enumerate(self.patch_embed):
        x_ = x
        ss = self.img_size_scaled[i]
        x_ = scale_image(x_, ss, self.crop_scale)
        x_ = patch_embed(x_)
        cls_tokens = self.cls_token_0 if i == 0 else self.cls_token_1  # hard-coded for torch jit script
        cls_tokens = cls_tokens.expand(B, -1, -1)
        x_ = torch.cat((cls_tokens, x_), dim=1)
        pos_embed = self.pos_embed_0 if i == 0 else self.pos_embed_1  # hard-coded for torch jit script
        x_ = x_ + pos_embed
        x_ = self.pos_drop(x_)
        xs.append(x_)  # (1,401,192), (1,197,384)

    for i, blk in enumerate(self.blocks):
        xs = blk(xs)

    # NOTE: was before branch token section, move to here to assure all branch token are before layer norm
    xs = [norm(xs[i]) for i, norm in enumerate(self.norm)]
    return xs
然后一个blk就是一个MultiScaleBlock的实例,一个MultiScaleBlock代表一个stage的所有实现这里包括large-branch的1个attention block、small-branch的4个attention block以及最后的cross attention block,代码如下
class MultiScaleBlock(nn.Module):

    def __init__(
            self,
            dim,
            patches,
            depth,  # [1,4,0]
            num_heads,
            mlp_ratio,
            qkv_bias=False,
            proj_drop=0.,
            attn_drop=0.,
            drop_path=0.,
            act_layer=nn.GELU,
            norm_layer=nn.LayerNorm,
    ):
        super().__init__()

        num_branches = len(dim)
        self.num_branches = num_branches
        # different branch could have different embedding size, the first one is the base
        self.blocks = nn.ModuleList()
        for d in range(num_branches):  # 2
            tmp = []
            for i in range(depth[d]):
                tmp.append(Block(
                    dim=dim[d],
                    num_heads=num_heads[d],
                    mlp_ratio=mlp_ratio[d],
                    qkv_bias=qkv_bias,
                    proj_drop=proj_drop,
                    attn_drop=attn_drop,
                    drop_path=drop_path[i],
                    norm_layer=norm_layer,
                ))
            if len(tmp) != 0:
                self.blocks.append(nn.Sequential(*tmp))

        if len(self.blocks) == 0:
            self.blocks = None

        self.projs = nn.ModuleList()
        for d in range(num_branches):
            if dim[d] == dim[(d + 1) % num_branches] and False:
                tmp = [nn.Identity()]
            else:
                tmp = [norm_layer(dim[d]), act_layer(), nn.Linear(dim[d], dim[(d + 1) % num_branches])]
            self.projs.append(nn.Sequential(*tmp))
        # ModuleList(
        #   (0): Sequential(
        #     (0): LayerNorm((192,), eps=1e-06, elementwise_affine=True)
        #     (1): GELU()
        #     (2): Linear(in_features=192, out_features=384, bias=True)
        #   )
        #   (1): Sequential(
        #     (0): LayerNorm((384,), eps=1e-06, elementwise_affine=True)
        #     (1): GELU()
        #     (2): Linear(in_features=384, out_features=192, bias=True)
        #   )
        # )

        self.fusion = nn.ModuleList()
        for d in range(num_branches):
            d_ = (d + 1) % num_branches
            nh = num_heads[d_]  # [6,6]
            if depth[-1] == 0:  # backward capability:
                self.fusion.append(
                    CrossAttentionBlock(
                        dim=dim[d_],
                        num_heads=nh,
                        mlp_ratio=mlp_ratio[d],
                        qkv_bias=qkv_bias,
                        proj_drop=proj_drop,
                        attn_drop=attn_drop,
                        drop_path=drop_path[-1],
                        norm_layer=norm_layer,
                    ))
            else:
                tmp = []
                for _ in range(depth[-1]):
                    tmp.append(CrossAttentionBlock(
                        dim=dim[d_],
                        num_heads=nh,
                        mlp_ratio=mlp_ratio[d],
                        qkv_bias=qkv_bias,
                        proj_drop=proj_drop,
                        attn_drop=attn_drop,
                        drop_path=drop_path[-1],
                        norm_layer=norm_layer,
                    ))
                self.fusion.append(nn.Sequential(*tmp))

        self.revert_projs = nn.ModuleList()
        for d in range(num_branches):
            if dim[(d + 1) % num_branches] == dim[d] and False:
                tmp = [nn.Identity()]
            else:
                tmp = [norm_layer(dim[(d + 1) % num_branches]), act_layer(),
                       nn.Linear(dim[(d + 1) % num_branches], dim[d])]
            self.revert_projs.append(nn.Sequential(*tmp))
        # ModuleList(
        #   (0): Sequential(
        #     (0): LayerNorm((384,), eps=1e-06, elementwise_affine=True)
        #     (1): GELU()
        #     (2): Linear(in_features=384, out_features=192, bias=True)
        #   )
        #   (1): Sequential(
        #     (0): LayerNorm((192,), eps=1e-06, elementwise_affine=True)
        #     (1): GELU()
        #     (2): Linear(in_features=192, out_features=384, bias=True)
        #   )
        # )

    def forward(self, x: List[torch.Tensor]) -> List[torch.Tensor]:  # [(1,401,192),(1,197,384)]

        outs_b = []
        for i, block in enumerate(self.blocks):
            outs_b.append(block(x[i]))  # [(1,401,192),(1,197,384)]

        # only take the cls token out
        proj_cls_token = torch.jit.annotate(List[torch.Tensor], [])
        for i, proj in enumerate(self.projs):
            proj_cls_token.append(proj(outs_b[i][:, 0:1, ...]))  # [(1,1,384),(1,1,192]

        # cross attention
        outs = []
        for i, (fusion, revert_proj) in enumerate(zip(self.fusion, self.revert_projs)):
            tmp = torch.cat((proj_cls_token[i], outs_b[(i + 1) % self.num_branches][:, 1:, ...]), dim=1)  # (1,197,384) | (1,401,192)
            tmp = fusion(tmp)  # (1,1,384) | (1,1,192)
            reverted_proj_cls_token = revert_proj(tmp[:, 0:1, ...])  # (1,1,192) | (1,1,384)
            tmp = torch.cat((reverted_proj_cls_token, outs_b[i][:, 1:, ...]), dim=1)  # (1,401,192) | (1,197,384)
            outs.append(tmp)  # [(1,401,192),(1,197,384)]
        return outs
forward函数中输入x包含两个分支的输入首先经过self.blocks的处理,这里的block就是普通的self-attention block,输出shape保持不变。
然后分别从两个分支中取出class token并经过proj处理后另一个分支的维度对齐,得到输出proj_cls_token。
然后一个分支经过proj后的class token与另一个分支的所有patch tokens拼接起来得到tmp,然后经过fusion即cross-attention block的处理再经过revert_proj映射回原本所在分支的维度,然后与原本分支的patch tokens拼接起来得到该分支最终的输出tmp。
其中fusion即cross-attention block的代码如下
class CrossAttention(nn.Module):
    def __init__(
            self,
            dim,
            num_heads=8,
            qkv_bias=False,
            attn_drop=0.,
            proj_drop=0.,
    ):
        super().__init__()
        self.num_heads = num_heads
        head_dim = dim // num_heads
        # NOTE scale factor was wrong in my original version, can set manually to be compat with prev weights
        self.scale = head_dim ** -0.5

        self.wq = nn.Linear(dim, dim, bias=qkv_bias)
        self.wk = nn.Linear(dim, dim, bias=qkv_bias)
        self.wv = nn.Linear(dim, dim, bias=qkv_bias)
        self.attn_drop = nn.Dropout(attn_drop)
        self.proj = nn.Linear(dim, dim)
        self.proj_drop = nn.Dropout(proj_drop)

    def forward(self, x):  # (1,197,384)
        B, N, C = x.shape
        # B1C -> B1H(C/H) -> BH1(C/H)
        q = self.wq(x[:, 0:1, ...]).reshape(B, 1, self.num_heads, C // self.num_heads).permute(0, 2, 1, 3)  # (1,1,384)->(1,1,6,64)->(1,6,1,64)
        # BNC -> BNH(C/H) -> BHN(C/H)
        k = self.wk(x).reshape(B, N, self.num_heads, C // self.num_heads).permute(0, 2, 1, 3)  # (1,197,384)->(1,197,6,64)->(1,6,197,64)
        # BNC -> BNH(C/H) -> BHN(C/H)
        v = self.wv(x).reshape(B, N, self.num_heads, C // self.num_heads).permute(0, 2, 1, 3)  # (1,6,197,64)

        attn = (q @ k.transpose(-2, -1)) * self.scale  # BH1(C/H) @ BH(C/H)N -> BH1N   (1,6,1,197)
        attn = attn.softmax(dim=-1)
        attn = self.attn_drop(attn)

        x = (attn @ v).transpose(1, 2).reshape(B, 1, C)  # (BH1N @ BHN(C/H)) -> BH1(C/H) -> B1H(C/H) -> B1C
        # (1,6,1,64)->(1,1,6,64)->(1,1,384)
        x = self.proj(x)  # (1,1,384)
        x = self.proj_drop(x)
        return x


class CrossAttentionBlock(nn.Module):

    def __init__(
            self,
            dim,
            num_heads,
            mlp_ratio=4.,
            qkv_bias=False,
            proj_drop=0.,
            attn_drop=0.,
            drop_path=0.,
            act_layer=nn.GELU,
            norm_layer=nn.LayerNorm,
    ):
        super().__init__()
        self.norm1 = norm_layer(dim)
        self.attn = CrossAttention(
            dim,
            num_heads=num_heads,
            qkv_bias=qkv_bias,
            attn_drop=attn_drop,
            proj_drop=proj_drop,
        )
        # NOTE: drop path for stochastic depth, we shall see if this is better than dropout here
        self.drop_path = DropPath(drop_path) if drop_path > 0. else nn.Identity()

    def forward(self, x):
        x = x[:, 0:1, ...] + self.drop_path(self.attn(self.norm1(x)))  # (1,197,384)->(1,1,384)
        return x
可以看到CrossAttention中的实现和self-attention是一样的,只不过在求query时只用了class token即26行。并在在CrossAttentionBlock的forward函数中我们看到只有attention没有FFN。
经过forward_features处理后,还需要经过forward_head得到模型的预测,代码如下。可以看到预测是通过对两个分支的class token取平均得到的。
def forward_head(self, xs: List[torch.Tensor], pre_logits: bool = False) -> torch.Tensor:
    xs = [x[:, 1:].mean(dim=1) for x in xs] if self.global_pool == 'avg' else [x[:, 0] for x in xs]  # token, [(1,192),(1,384)]
    xs = [self.head_drop(x) for x in xs]
    if pre_logits or isinstance(self.head[0], nn.Identity):
        return torch.cat([x for x in xs], dim=1)
    # ModuleList(
    #   (0): Linear(in_features=192, out_features=1000, bias=True)
    #   (1): Linear(in_features=384, out_features=1000, bias=True)
    # )
    return torch.mean(torch.stack([head(xs[i]) for i, head in enumerate(self.head)], dim=0), dim=0)  # (2,1,1000)->(1,1000)


 888
888

 被折叠的 条评论
为什么被折叠?
被折叠的 条评论
为什么被折叠?
 到【灌水乐园】发言


