


亚博k210官方教程:https://www.yahboom.com/study/K210-AI-Camera
k210开发者套件教程:https://www.yahboom.com/study/K210-Developer-Kit
1.初识k210
K210是由中国的Kendryte公司推出的一款低功耗人工智能处理器,主要用于边缘计算和智能设备中。它基于RISC-V架构,具有双核的处理能力,专为机器学习和深度学习应用而设计。同时k210上手难度较低,方便初学者快速上手。国内k210文档资料众多,开源项目不在少数,有利于学习。
2.搭建开发环境
k210的开发环境搭建十分简便,下载CanMV IDE 即可搭建完成k210集成开发环境,接着只需用一条USB数据线即可连接k210,在软件中进行对项目的开发。
IDE下载链接![]() https://pan.baidu.com/e/1-G-bxFy3r-3KqDWuoc7c5g注:如果k210连接不上电脑,可尝试自行安装驱动后再尝试连接。
https://pan.baidu.com/e/1-G-bxFy3r-3KqDWuoc7c5g注:如果k210连接不上电脑,可尝试自行安装驱动后再尝试连接。
CH340驱动下载链接:https://www.yahboom.com/download_version/id/16023040571068
3.连接电脑与固件烧录
打开CanMV IDE,用USB数据线连接电脑与k210后,点击左下角,可尝试主机与k210连接,连接成功后,右下角箭头变为绿色。这时,可尝试对k210进行系统固件的烧录,点击上方栏目中的“工具”选项,再点击“k210烧录工具”,选择要烧录的出厂固件,选定完成后即可进行出厂固件烧录,等待烧录完成即可。
4.代码与API手册
k210采用micro python进行编码,代码大体写法与Windows上的python相同,只有一部分模块与库函数不同,语法与python基本相同。通过k210 CanMV API手册,可以查询到每个函数的作用已经函数中所包含的参数还要各个参数的用法与类型,在遇到不懂的地方可以通过查询API手册的方式,来学习函数的用法。API还包含多种例程可供学习,是学习k210操作的实用工具。
API手册网站链接:https://developer.canaan-creative.com/canmv/main/canmv/library/canmv
5.实战例程
下面以2021电赛F题为例,进行k210实战的讲解。
以下是电赛原题:
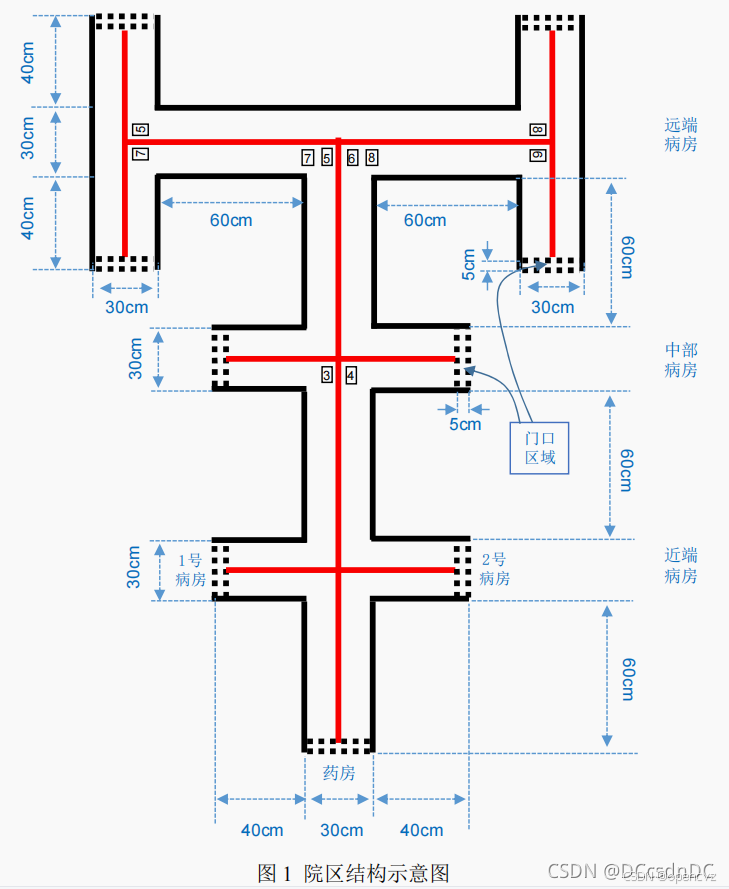
设计并制作智能送药小车,模拟完成在医院药房与病房间药品的送取作业。院区结构示意如图 1 所示。院区走廊两侧的墙体由黑实线表示。走廊地面上画有居中的红实线,并放置标识病房号的黑色数字可移动纸张。药房和近端病房号(1、 2 号)如图 1 所示位置固定不变,中部病房和远端病房号(3-8 号)测试时随机设定。工作过程:参赛者手动将小车摆放在药房处(车头投影在门口区域内,面向病房),手持数字标号纸张由小车识别病房号,将约 200g 药品一次性装载到送药小车上;小车检测到药品装载完成后自动开始运送;小车根据走廊上的标识信息自动识别、寻径将药品送到指定病房(车头投影在门口区域内),点亮红色指示灯,等待卸载药品;病房处人工卸载药品后,小车自动熄灭红色指示灯,开始返回;小车自动返回到药房(车头投影在门口区域内,面向药房)后,点亮绿色指示灯。
k210的代码如下:
import sensor, image, time, lcd, gc, cmath, ustruct
from maix import KPU
from fpioa_manager import fm
from machine import UART
from maix import utils

lcd.init()
lcd.clear()
gc.enable()
utils.gc_heap_size(6291456)
sensor.reset()
sensor.set_pixformat(sensor.RGB565)
sensor.set_framesize(sensor.QVGA)
sensor.set_vflip(1)
sensor.set_vflip(False)
sensor.set_hmirror(False)
sensor.skip_frames(time = 2000)
clock = time.clock()

fm.register(6, fm.fpioa.UART2_RX)
fm.register(8, fm.fpioa.UART2_TX)
yb_uart = UART(UART.UART2, 115200, 8, 0, 0, timeout=1000, read_buf_len=4096)

thresholds_1 = [(20, 80, 22, 127, 22, 127)]
thresholds_2 = [(0, 10, -8, 7, -18, 13)]

labels = ["1", "2", "3", "4", "5", "6", "7", "8"]
anchor = (2.69, 3.39, 3.56, 4.25, 4.16, 5.39, 4.91, 6.22, 6.19, 7.16)

kpu = KPU()
kpu.load_kmodel('/sd/det_num.kmodel')
kpu.init_yolo2(anchor, anchor_num=(int)(len(anchor)/2), img_w=320, img_h=240, net_w=320 , net_h=240 ,layer_w=10 ,layer_h=8, threshold=0.6, nms_value=0.3, classes=len(labels))

while(True):
    gc.collect()
    clock.tick()
    img = sensor.snapshot()
    yb_uart = UART(UART.UART2, 115200, 8, 0, 0, timeout=1000, read_buf_len=4096)
    kpu.run_with_output(img)
    dect = kpu.regionlayer_yolo2()
    fps = clock.fps()
    num = 0
    x = 0
    y = 0
    flag = 0
    bk = 0
    if len(dect) > 0:
        for l in dect :
            a = img.draw_rectangle(l[0],l[1],l[2],l[3],color=(0,255,0))
            info = "%s %.3f" % (labels[l[4]], l[5])
            a = img.draw_string(l[0],l[1],info,color=(255,0,0),scale=2.0)
            print(info)
            num = int(labels[l[4]])
            del info
        a = img.draw_string(0, 0, "%2.1ffps" %(fps),color=(0,60,255),scale=2.0)


    blobs_1 = img.find_blobs(thresholds_1, pixels_threshold=100, area_threshold=100)
    if blobs_1:
        max_blob = max(blobs_1, key=lambda b: b.pixels())
        img.draw_rectangle(max_blob.rect(),color=(139, 0, 0))
        img.draw_cross(max_blob.cx(), max_blob.cy())
        x = max_blob.cx()
        y = max_blob.cy()
        if y>50:
            flag = 1

    blobs_2 = img.find_blobs(thresholds_2, pixes_threshold=250, area_threshold=250)
    if blobs_2:
        bk = 1
        max_blob = max(blobs_2, key=lambda b: b.pixels())
        img.draw_rectangle(max_blob.rect(), color=(255, 255, 0))


    lcd.display(img)
    date = ustruct.pack("<bbbbbbb",
        num,
        x,
        y,
        flag,
        bk,
        0x0D,
        0x0A
        )
    yb_uart.write(date)

    yb_uart.deinit()
    del num,x,y,flag,bk
引脚映射
fm.register(6, fm.fpioa.UART2_RX)
fm.register(8, fm.fpioa.UART2_TX)
注册串口引脚函数,将串口映射。
实现巡线
 blobs_1 = img.find_blobs(thresholds_1, pixels_threshold=100, area_threshold=100)
    if blobs_1:
        max_blob = max(blobs_1, key=lambda b: b.pixels())
        img.draw_rectangle(max_blob.rect(),color=(139, 0, 0))
        img.draw_cross(max_blob.cx(), max_blob.cy())
        x = max_blob.cx()
        y = max_blob.cy()
        if y>50:
            flag = 1

    blobs_2 = img.find_blobs(thresholds_2, pixes_threshold=250, area_threshold=250)
    if blobs_2:
        bk = 1
        max_blob = max(blobs_2, key=lambda b: b.pixels())
        img.draw_rectangle(max_blob.rect(), color=(255, 255, 0))
此段代码巡线代码,通过识别色块来达到循迹的效果。thresholds_1、thresholds_2为提前设定好的LAB颜色阈值,可通过工具一栏的机器视觉来寻找阈值。
串口数据的打包与发送
   date = ustruct.pack("<bbbbbbb",
        num,
        x,
        y,
        flag,
        bk,
        0x0D,
        0x0A
        )
    yb_uart.write(date)
其中untruct.pack()为数据打包函数;yb_uart.write()为串口数据的发送。
其他(数字识别)
通过micro python自带的KPU模块,可以通过标注数据集的方式让k210进行机器学习,达到识别数字的效果。下面推荐一个线上标注的网站:嘉楠开发者社区-模型训练。
注:需要一张sd卡存储写入的代码,代码文件命名为“main.py”,模型文件与代码文件在同一个目录。导入模型的路径在函数kpu.load_kmodel()中写入。


 5647
5647

 被折叠的 条评论
为什么被折叠?
被折叠的 条评论
为什么被折叠?
 到【灌水乐园】发言


