


 该代码示例展示了如何在ArduinoIDE环境下配置ESP32-CAM进行JPEG图像的捕获和串口传输。关键步骤包括禁用棕色输出检测,设置摄像头参数,特别是当有PSRAM时选择CAMERA_FB_IN_PSRAM模式,以及通过Serial.write()函数发送JPEG数据。
参考博客:https://www.cnblogs.com/yangfengwu/p/15671206.html
2023-09-10 更新
camera_config_t配置更新,原来的代码编译上传后不工作了,重新配置了config.fb_location = CAMERA_FB_IN_DRAM;模式- 要在Arduino IED手动开启 PSRAM:

上面博客中使用ESP-IDF框架进行搭建,这里用Arduino IDE环境重新修改了一下,代码如下:
/*********
  Rui Santos
  Complete project details at https://RandomNerdTutorials.com/esp32-cam-video-streaming-web-server-camera-home-assistant/

  IMPORTANT!!!
   - Select Board "AI Thinker ESP32-CAM"
   - GPIO 0 must be connected to GND to upload a sketch
   - After connecting GPIO 0 to GND, press the ESP32-CAM on-board RESET button to put your board in flashing mode

  Permission is hereby granted, free of charge, to any person obtaining a copy
  of this software and associated documentation files.

  The above copyright notice and this permission notice shall be included in all
  copies or substantial portions of the Software.
*********/
#include "freertos/FreeRTOS.h"
#include "freertos/task.h"
#include "esp_err.h"
#include "esp_log.h"
#include "esp_camera.h"
#include <WiFi.h>
#include "esp_timer.h"
#include "img_converters.h"
#include "Arduino.h"
#include "fb_gfx.h"
#include "soc/soc.h" //disable brownout problems
#include "soc/rtc_cntl_reg.h"  //disable brownout problems
#include "esp_http_server.h"

// 定义摄像头模型
#define CAMERA_MODEL_AI_THINKER

#if defined(CAMERA_MODEL_AI_THINKER)
  #define PWDN_GPIO_NUM     32
  #define RESET_GPIO_NUM    -1
  #define XCLK_GPIO_NUM      0
  #define SIOD_GPIO_NUM     26
  #define SIOC_GPIO_NUM     27

  #define Y9_GPIO_NUM       35
  #define Y8_GPIO_NUM       34
  #define Y7_GPIO_NUM       39
  #define Y6_GPIO_NUM       36
  #define Y5_GPIO_NUM       21
  #define Y4_GPIO_NUM       19
  #define Y3_GPIO_NUM       18
  #define Y2_GPIO_NUM        5
  #define VSYNC_GPIO_NUM    25
  #define HREF_GPIO_NUM     23
  #define PCLK_GPIO_NUM     22
#else
  #error "Camera model not selected"
#endif

// 摄像头采集的JPEG图像通过串口发送
void jpeg2serial(void){
  camera_fb_t * fb = NULL;
  esp_err_t res = ESP_OK;
  size_t _jpg_buf_len = 0;
  uint8_t * _jpg_buf = NULL;

  while(true){
    // 获取frame buffer
    fb = esp_camera_fb_get();
    if (!fb)
    {
      Serial.println("Camera capture failed");
      res = ESP_FAIL;
    }
    else
    {
        if(fb->format != PIXFORMAT_JPEG)
        {
          bool jpeg_converted = frame2jpg(fb, 80, &_jpg_buf, &_jpg_buf_len);
          esp_camera_fb_return(fb);
          fb = NULL;
          if(!jpeg_converted)
          {
            Serial.println("JPEG compression failed");
            res = ESP_FAIL;
          }
        }
        else
        {
          _jpg_buf_len = fb->len;
          _jpg_buf = fb->buf;
          res = ESP_OK;
        }
    }
    // 通过串口发送数据
    if(res == ESP_OK)
    {
      Serial.write(_jpg_buf,_jpg_buf_len);
      Serial.flush();
//      Serial.printf("MJPG: %uB\n",(uint32_t)(_jpg_buf_len));
    }

    if(fb){
      esp_camera_fb_return(fb);
      fb = NULL;
      _jpg_buf = NULL;
    }
    else if(_jpg_buf){
      free(_jpg_buf);
      _jpg_buf = NULL;
    }
    if(res != ESP_OK){
      break;
    }
    vTaskDelay(5000 / portTICK_PERIOD_MS);//延时2s
  }
}

void setup() {
  WRITE_PERI_REG(RTC_CNTL_BROWN_OUT_REG, 0); //disable brownout detector
  // 串口初始化
  Serial.begin(115200);
  Serial.setDebugOutput(false);
  // 打印存储信息
  Serial.printf("Total heap: %d\n", ESP.getHeapSize());
  Serial.printf("Free heap: %d\n", ESP.getFreeHeap());
  Serial.printf("Total PSRAM: %d\n", ESP.getPsramSize());
  Serial.printf("Free PSRAM: %d\n", ESP.getFreePsram());

  // 摄像头参数配置
  camera_config_t config;
  config.ledc_channel = LEDC_CHANNEL_0;
  config.ledc_timer = LEDC_TIMER_0;
  config.pin_d0 = Y2_GPIO_NUM;
  config.pin_d1 = Y3_GPIO_NUM;
  config.pin_d2 = Y4_GPIO_NUM;
  config.pin_d3 = Y5_GPIO_NUM;
  config.pin_d4 = Y6_GPIO_NUM;
  config.pin_d5 = Y7_GPIO_NUM;
  config.pin_d6 = Y8_GPIO_NUM;
  config.pin_d7 = Y9_GPIO_NUM;
  config.pin_xclk = XCLK_GPIO_NUM;
  config.pin_pclk = PCLK_GPIO_NUM;
  config.pin_vsync = VSYNC_GPIO_NUM;
  config.pin_href = HREF_GPIO_NUM;
  config.pin_sscb_sda = SIOD_GPIO_NUM;
  config.pin_sscb_scl = SIOC_GPIO_NUM;
  config.pin_pwdn = PWDN_GPIO_NUM;
  config.pin_reset = RESET_GPIO_NUM;
  config.xclk_freq_hz = 20000000; //XCLK 20MHz or 10MHz for OV2640 double FPS (Experimental)
  config.pixel_format = PIXFORMAT_JPEG;  //YUV422,GRAYSCALE,RGB565,JPEG
  config.grab_mode = CAMERA_GRAB_WHEN_EMPTY;

  if(psramFound()){
    Serial.printf("Camera init with PSRAM!\n");
    config.frame_size = FRAMESIZE_VGA; // 640*480
    config.jpeg_quality = 12; //0-63 lower number means higher quality
    config.fb_count = 2; //if more than one, i2s runs in continuous mode. Use only with JPEG
    config.grab_mode = CAMERA_GRAB_LATEST;
    config.fb_location = CAMERA_FB_IN_PSRAM;
  } else {
    Serial.printf("Camera init without PSRAM, use DRAM\n");
    config.frame_size = FRAMESIZE_QVGA; // 320*240
    config.jpeg_quality = 15;
    config.fb_count = 1;
    config.fb_location = CAMERA_FB_IN_DRAM; // use DRAM
  }

  // 摄像头初始化
  esp_err_t err = esp_camera_init(&config);
  if (err != ESP_OK) {
    Serial.printf("Camera init failed with error 0x%x", err);
    return;
  }

}

void loop() {

  jpeg2serial();
}
使用原作者提供的工具可以查看效果:
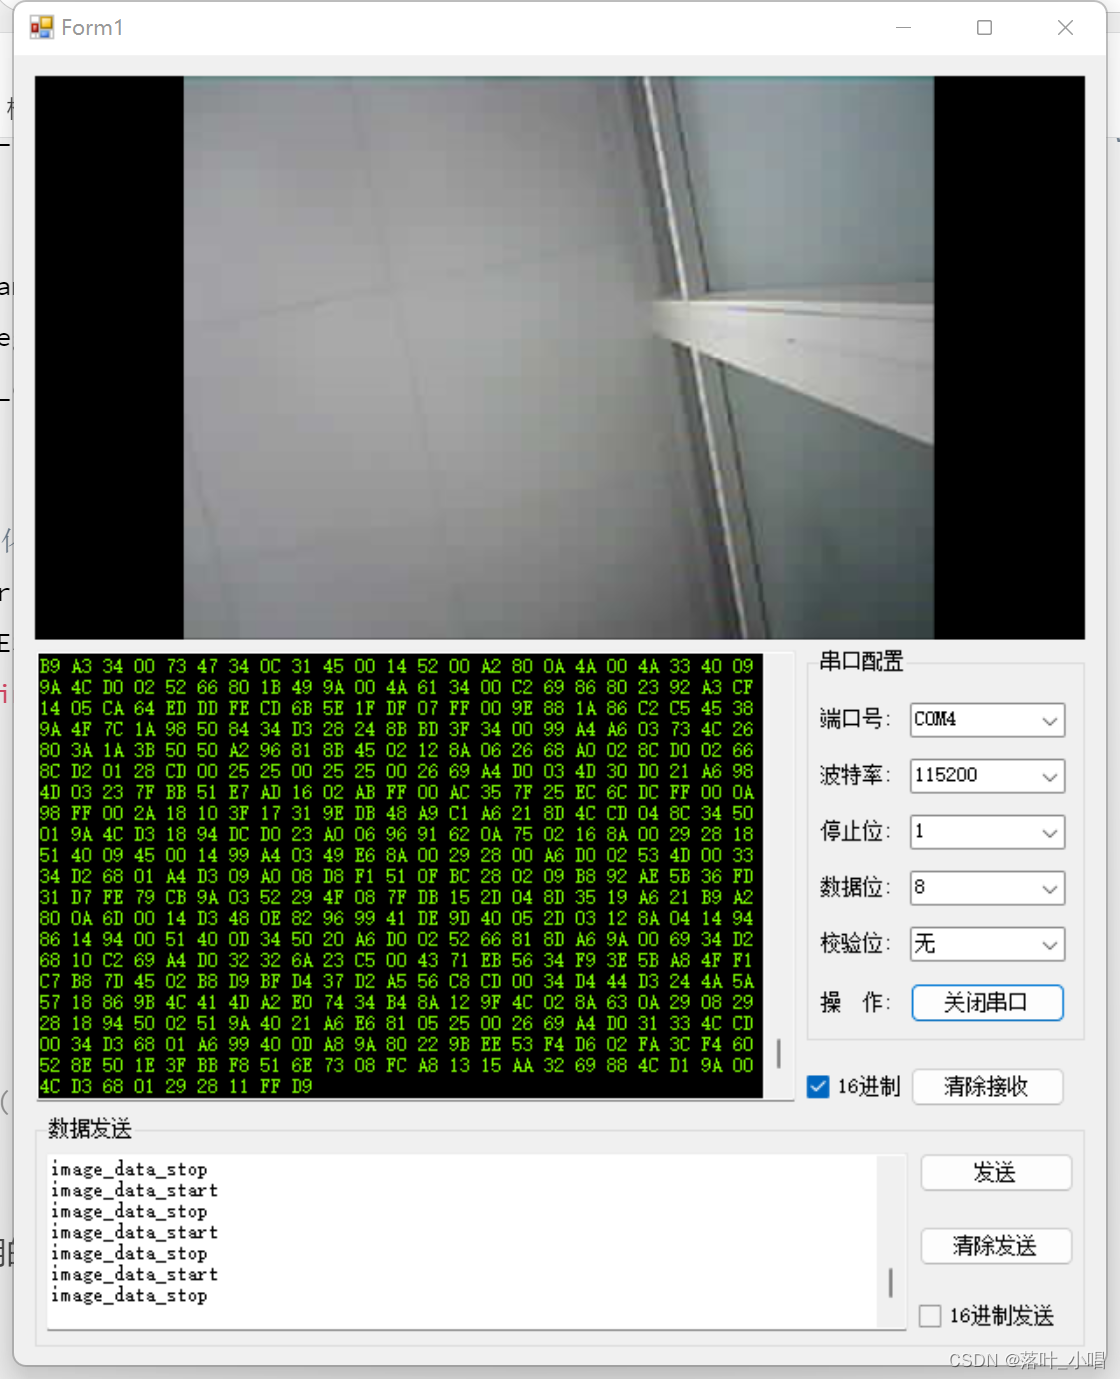
【要点】:
- 串口发送图像数据的命令为:
      Serial.write(_jpg_buf,_jpg_buf_len);
      Serial.flush();
      //下面这一句不能再添加,否则客户端解析不了图片
      //      Serial.printf("MJPG: %uB\n",(uint32_t)(_jpg_buf_len));
- 可以自行修改图像尺寸
config.frame_size和图像质量config.jpeg_quality - 可以自己编写客户端进行解码


 310
310

 被折叠的 条评论
为什么被折叠?
被折叠的 条评论
为什么被折叠?
 到【灌水乐园】发言


