


https://docs.spring.io/spring-framework/reference/testing/testcontext-framework.html
Spring TestContext框架(位于org.springframework.test.context包中)提供了通用的、注解驱动的单元和集成测试支持,这种支持与使用的测试框架无关。TestContext框架还非常重视约定优于配置,提供了合理的默认设置,你可以通过基于注解的配置来覆盖这些默认设置。
除了通用的测试基础设施,TestContext框架还为JUnit 4、JUnit Jupiter(又名JUnit 5)和TestNG提供了明确的支持。对于JUnit 4和TestNG,Spring提供了抽象的支持类。此外,Spring为JUnit 4提供了一个自定义的JUnit Runner和自定义的JUnit Rules,以及一个用于JUnit Jupiter的自定义Extension,这些工具让你可以编写所谓的POJO测试类。POJO测试类不需要扩展特定的类层次结构,比如抽象的支持类。
关键抽象
框架的核心由TestContextManager类以及TestContext、TestExecutionListener和SmartContextLoader接口组成。对于每个测试类(例如,在JUnit Jupiter中单个测试类内的所有测试方法的执行),都会创建一个TestContextManager。TestContextManager反过来管理一个保存当前测试上下文的TestContext。随着测试的进行,TestContextManager还会更新TestContext的状态,并委托给TestExecutionListener实现,这些实现通过提供依赖注入、管理事务等来对实际的测试执行进行操作。SmartContextLoader负责为给定的测试类加载ApplicationContext。
TestContext
TestContext封装了运行测试的上下文(与实际使用的测试框架无关),并为其所负责的测试实例提供上下文管理和缓存支持。如果请求,TestContext还会委托给SmartContextLoader来加载ApplicationContext。
TestContextManager
TestContextManager是进入Spring TestContext框架的主要入口,负责管理单个TestContext,并在定义良好的测试执行点向每个注册的TestExecutionListener发出事件:
- 在任何特定测试框架的“before class”或“before all”方法之前。
- 测试实例后处理。
- 在任何特定测试框架的“before”或“before each”方法之前。
- 在执行测试方法之后,但在测试设置之后立即进行。
- 在执行测试方法之后,但在测试清理之前立即进行。
- 在任何特定测试框架的“after”或“after each”方法之后。
- 在任何特定测试框架的“after class”或“after all”方法之后。
TestExecutionListener
TestExecutionListener定义了响应由TestContextManager发布的测试执行事件的API,TestExecutionListener 监听器已与 TestContextManager 注册关联。
上下文加载器
ContextLoader是一个策略接口,用于为由Spring TestContext框架管理的集成测试加载ApplicationContext。你应该实现SmartContextLoader而不是这个接口,以提供对组件类、活动的bean定义profile、测试属性源、上下文层次结构和WebApplicationContext支持的支持。
SmartContextLoader是ContextLoader接口的扩展,它取代了原始的最小化ContextLoader SPI。具体来说,SmartContextLoader可以选择处理资源位置、组件类或上下文初始化器。此外,SmartContextLoader可以在它加载的上下文中设置活动的bean定义profile和测试属性源。
Spring提供了以下实现:
DelegatingSmartContextLoader:两个默认加载器之一,它根据测试类声明的配置或默认位置或默认配置类的存在,内部委托给AnnotationConfigContextLoader、GenericXmlContextLoader或GenericGroovyXmlContextLoader。只有在类路径上存在Groovy时,才启用Groovy支持。WebDelegatingSmartContextLoader:两个默认加载器之一,它根据测试类声明的配置或默认位置或默认配置类的存在,内部委托给AnnotationConfigWebContextLoader、GenericXmlWebContextLoader或GenericGroovyXmlWebContextLoader。只有在测试类上存在@WebAppConfiguration注解时,才会使用webContextLoader。只有在类路径上存在Groovy时,才启用Groovy支持。AnnotationConfigContextLoader:从组件类加载标准的ApplicationContext。AnnotationConfigWebContextLoader:从组件类加载WebApplicationContext。GenericGroovyXmlContextLoader:从资源位置加载标准的ApplicationContext,这些资源位置可以是Groovy脚本或XML配置文件。GenericGroovyXmlWebContextLoader:从资源位置加载WebApplicationContext,这些资源位置可以是Groovy脚本或XML配置文件。GenericXmlContextLoader:从XML资源位置加载标准的ApplicationContext。GenericXmlWebContextLoader:从XML资源位置加载WebApplicationContext。
引导TestContext框架
Spring TestContext框架内部的默认配置足以满足所有常见用例。然而,有时开发团队或第三方框架可能希望更改默认的ContextLoader,实现自定义的TestContext或ContextCache,扩展默认的ContextCustomizerFactory和TestExecutionListener实现集合等。对于这种对TestContext框架操作方式的低级别控制,Spring提供了一种引导策略。
TestContextBootstrapper定义了引导TestContext框架的SPI。TestContextManager使用TestContextBootstrapper来加载当前测试的TestExecutionListener实现,并构建它管理的TestContext。你可以通过使用@BootstrapWith(直接使用或作为元注解)为测试类(或测试类层次结构)配置自定义的引导策略。如果没有通过使用@BootstrapWith显式配置引导程序,则根据@WebAppConfiguration的存在与否,使用DefaultTestContextBootstrapper或WebTestContextBootstrapper。
由于TestContextBootstrapper SPI在未来可能会发生变化(以适应新的需求),建议实现者不要直接实现这个接口,而是扩展AbstractTestContextBootstrapper或其具体的子类之一。
TestExecutionListener 配置
Spring提供了以下默认注册的TestExecutionListener实现,按照确切的顺序排列:
ServletTestExecutionListener:为WebApplicationContext配置Servlet API模拟对象。DirtiesContextBeforeModesTestExecutionListener:处理“before”模式的@DirtiesContext注解。ApplicationEventsTestExecutionListener:提供对ApplicationEvents的支持。DependencyInjectionTestExecutionListener:为测试实例提供依赖注入。MicrometerObservationRegistryTestExecutionListener:提供对Micrometer的ObservationRegistry的支持。DirtiesContextTestExecutionListener:处理“after”模式的@DirtiesContext注解。TransactionalTestExecutionListener:提供默认回滚语义的事务性测试执行。SqlScriptsTestExecutionListener:运行通过使用@Sql注解配置的SQL脚本。EventPublishingTestExecutionListener:将测试执行事件发布到测试的ApplicationContext。
注册TestExecutionListener 实现
可以通过使用@TestExecutionListeners注解,为测试类、其子类和嵌套类显式注册TestExecutionListener实现。
如果你扩展了一个使用@TestExecutionListeners注解的类,并且需要切换回使用默认的监听器集合,可以使用以下注解来注释你的类。
// Switch to default listeners
@TestExecutionListeners(
	listeners = {},
	inheritListeners = false,
	mergeMode = MERGE_WITH_DEFAULTS)
class MyTest extends BaseTest {
	// class body...
}
自动发现默认的TestExecutionListener 实现
使用@TestExecutionListeners注册TestExecutionListener实现适用于有限测试场景中的自定义监听器。然而,如果需要在整个测试套件中使用自定义监听器,这可能会变得繁琐。通过SpringFactoriesLoader机制自动发现默认TestExecutionListener实现的支持解决了这个问题。
例如,spring-test模块在其META-INF/spring.factories属性文件中的org.springframework.test.context.TestExecutionListener键下声明了所有核心默认的TestExecutionListener实现。第三方框架和开发人员可以通过自己的spring.factories文件,以相同的方式将自己的TestExecutionListener实现贡献到默认监听器列表中。
TestExecutionListener 实现排序
当TestContext框架通过前面提到的SpringFactoriesLoader机制发现默认的TestExecutionListener实现时,实例化的监听器会使用Spring的AnnotationAwareOrderComparator进行排序,该排序器遵循Spring的Ordered接口和@Order注解的顺序。AbstractTestExecutionListener和Spring提供的所有默认TestExecutionListener实现都实现了Ordered接口并具有适当的值。因此,第三方框架和开发人员应确保他们的默认TestExecutionListener实现通过实现Ordered接口或声明@Order注解以正确的顺序注册。
合并TestExecutionListener 实现
如果通过@TestExecutionListeners注册了自定义TestExecutionListener,那么默认的监听器将不会被注册。在大多数常见的测试场景中,这实际上迫使开发人员除了声明任何自定义监听器外,还要手动声明所有默认的监听器。下面的列表演示了这种配置风格:
@ContextConfiguration
@TestExecutionListeners({
	MyCustomTestExecutionListener.class,
	ServletTestExecutionListener.class,
	DirtiesContextBeforeModesTestExecutionListener.class,
	DependencyInjectionTestExecutionListener.class,
	DirtiesContextTestExecutionListener.class,
	TransactionalTestExecutionListener.class,
	SqlScriptsTestExecutionListener.class
})
class MyTest {
	// class body...
}
这种方法的挑战在于,它要求开发人员确切地知道哪些监听器是默认注册的。此外,默认监听器的集合可能会随着版本的发布而变化——例如,SqlScriptsTestExecutionListener在Spring Framework 4.1中引入,DirtiesContextBeforeModesTestExecutionListener在Spring Framework 4.2中引入。此外,像Spring Boot和Spring Security这样的第三方框架通过使用前面提到的自动发现机制来注册它们自己的默认TestExecutionListener实现。
为了避免必须了解并重新声明所有默认监听器,你可以将@TestExecutionListeners的mergeMode属性设置为MergeMode.MERGE_WITH_DEFAULTS。MERGE_WITH_DEFAULTS表示本地声明的监听器应与默认监听器合并。合并算法确保从列表中删除重复项,并且合并后的监听器集合根据AnnotationAwareOrderComparator的语义进行排序。如果监听器实现了Ordered接口或用@Order注解标注,它可以影响其与默认监听器合并的位置。否则,在合并时,本地声明的监听器将被追加到默认监听器的列表中。
例如,如果前面示例中的MyCustomTestExecutionListener类将其order值(例如,500)配置为小于ServletTestExecutionListener的顺序(恰好是1000),那么MyCustomTestExecutionListener可以自动与默认列表合并,排在ServletTestExecutionListener之前,前面的示例可以用以下代码替换:
@ContextConfiguration
@TestExecutionListeners(
	listeners = MyCustomTestExecutionListener.class,
	mergeMode = MERGE_WITH_DEFAULTS
)
class MyTest {
	// class body...
}
应用程序事件
自Spring Framework 5.3.3起,TestContext框架提供了对在ApplicationContext中发布的应用程序事件的记录支持,以便在测试中对这些事件进行断言。单个测试执行期间发布的所有事件都可以通过ApplicationEvents API获得,该API允许将事件作为java.util.Stream处理。
要在测试中使用ApplicationEvents,请执行以下操作:
- 确保你的测试类用
@RecordApplicationEvents注解或元注解。 - 确保注册了
ApplicationEventsTestExecutionListener。但是,ApplicationEventsTestExecutionListener默认是注册的,只有在通过@TestExecutionListeners使用自定义配置且不包括默认监听器时,才需要手动注册。 - 用
@Autowired注解一个ApplicationEvents类型的字段,并在你的测试和生命周期方法(例如JUnit Jupiter中的@BeforeEach和@AfterEach方法)中使用该ApplicationEvents实例。当在JUnit Jupiter中使用SpringExtension时,你可以在测试或生命周期方法中声明一个ApplicationEvents类型的参数,作为测试类中@Autowired字段的替代方案。
下面的测试类使用JUnit Jupiter的SpringExtension和AssertJ来断言在调用Spring管理组件中的方法时发布的应用程序事件的类型:
@SpringJUnitConfig(/* ... */)
@RecordApplicationEvents
class OrderServiceTests {

	@Autowired
	OrderService orderService;

	@Autowired
	ApplicationEvents events;

	@Test
	void submitOrder() {
		// Invoke method in OrderService that publishes an event
		orderService.submitOrder(new Order(/* ... */));
		// Verify that an OrderSubmitted event was published
		long numEvents = events.stream(OrderSubmitted.class).count();
		assertThat(numEvents).isEqualTo(1);
	}
}
测试执行事件(Test Execution Events)
Spring Framework 5.2中引入的EventPublishingTestExecutionListener提供了实现自定义TestExecutionListener的另一种方法。测试的ApplicationContext中的组件可以监听由EventPublishingTestExecutionListener发布的以下事件,每个事件都对应于TestExecutionListener API中的一个方法。
BeforeTestClassEventPrepareTestInstanceEventBeforeTestMethodEventBeforeTestExecutionEventAfterTestExecutionEventAfterTestMethodEventAfterTestClassEvent
这些事件可能因为各种原因被消费,例如重置mock bean或跟踪测试执行。消费测试执行事件而不是实现自定义TestExecutionListener的一个优势是,任何在测试ApplicationContext中注册的Spring bean都可以消费测试执行事件,并且这些bean可以直接从ApplicationContext的依赖注入和其它特性中受益。相比之下,TestExecutionListener不是ApplicationContext中的一个bean。
EventPublishingTestExecutionListener默认是注册的;然而,它只有在ApplicationContext已经加载的情况下才发布事件。这防止了ApplicationContext不必要或过早地加载。
因此,在另一个TestExecutionListener加载ApplicationContext之后,才会发布BeforeTestClassEvent。例如,在使用默认注册的TestExecutionListener实现的情况下,对于使用特定测试ApplicationContext的第一个测试类,不会发布BeforeTestClassEvent,但对于同一测试套件中使用相同测试ApplicationContext的任何后续测试类,都会发布BeforeTestClassEvent,因为在后续测试类运行时,上下文已经加载(只要上下文没有通过@DirtiesContext或max-size驱逐策略从ContextCache中移除)。
如果你希望确保每个测试类都能发布BeforeTestClassEvent,需要注册一个TestExecutionListener,在beforeTestClass回调中加载ApplicationContext,并且该TestExecutionListener必须注册在EventPublishingTestExecutionListener之前。
同样,如果使用@DirtiesContext在给定测试类的最后一个测试方法后从上下文缓存中移除ApplicationContext,那么对于该测试类不会发布AfterTestClassEvent。
为了监听测试执行事件,Spring bean可以选择实现org.springframework.context.ApplicationListener接口。或者,可以使用@EventListener注解标记监听方法,并配置为监听上述列出的特定事件类型之一。由于这种方法的普及,Spring提供了以下专用的@EventListener注解,以简化测试执行事件监听器的注册。这些注解位于org.springframework.test.context.event.annotation包中。
@BeforeTestClass@PrepareTestInstance@BeforeTestMethod@BeforeTestExecution@AfterTestExecution@AfterTestMethod@AfterTestClass
异常处理
默认情况下,如果测试执行事件监听器在消费事件时抛出异常,该异常将传播到正在使用的底层测试框架(如JUnit或TestNG)。例如,如果消费BeforeTestMethodEvent导致异常,相应的测试方法将因该异常而失败。相比之下,如果异步测试执行事件监听器抛出异常,该异常不会传播到底层测试框架。
异步监听器
如果你希望特定的测试执行事件监听器异步处理事件,可以使用Spring的常规@Async支持。
上下文管理
每个TestContext为其负责的测试实例提供上下文管理和缓存支持。测试实例不会自动获得配置的ApplicationContext的访问权限。但是,如果测试类实现了ApplicationContextAware接口,那么将向测试实例提供对ApplicationContext的引用。请注意,AbstractJUnit4SpringContextTests和AbstractTestNGSpringContextTests实现了ApplicationContextAware,因此会自动提供对ApplicationContext的访问。
作为实现ApplicationContextAware接口的替代方案,可以通过在字段或setter方法上使用@Autowired注解来为你的测试类注入应用程序上下文,如下例所示:
@SpringJUnitConfig
class MyTest {

	@Autowired
	ApplicationContext applicationContext;

	// class body...
}
同样,如果你的测试配置为加载WebApplicationContext,可以将web应用程序上下文注入到你的测试中,如下所示:
@SpringJUnitWebConfig
class MyWebAppTest {

	@Autowired
	WebApplicationContext wac;

	// class body...
}
使用@Autowired的依赖注入由DependencyInjectionTestExecutionListener提供,该监听器默认是配置好的。
使用TestContext框架的测试类不需要扩展任何特定类或实现特定接口来配置其应用程序上下文。相反,通过在类级别声明@ContextConfiguration注解来实现配置。如果你的测试类没有显式声明应用程序上下文资源位置或组件类,则配置的ContextLoader会确定如何从默认位置或默认配置类加载上下文。除了上下文资源位置和组件类之外,还可以通过应用程序上下文初始化器来配置应用程序上下文。
以下部分解释了如何使用Spring的@ContextConfiguration注解来配置测试ApplicationContext,使用XML配置文件、Groovy脚本、组件类(通常是@Configuration类)或上下文初始化器。或者,可以实现并配置自己的自定义SmartContextLoader以用于高级用例。
使用 XML 资源进行上下文配置
要使用XML配置文件为你的测试加载ApplicationContext,请使用@ContextConfiguration注解你的测试类,并配置locations属性,该属性包含XML配置元数据的资源位置数组。普通路径或相对路径(例如,context.xml)被视为相对于测试类定义的包的类路径资源。以斜杠开头的路径被视为绝对类路径位置(例如,/org/example/config.xml)。表示资源URL的路径(即,以classpath:、file:、http:等为前缀的路径)按原样使用。
@ExtendWith(SpringExtension.class)
// ApplicationContext will be loaded from "/app-config.xml" and
// "/test-config.xml" in the root of the classpath
@ContextConfiguration(locations = {"/app-config.xml", "/test-config.xml"})
class MyTest {
	// class body...
}
@ContextConfiguration支持通过标准的Java value属性为locations属性提供别名。因此,如果你不需要在@ContextConfiguration中声明其他属性,可以省略locations属性名的声明,并使用以下示例所示的简写格式声明资源位置:
@ExtendWith(SpringExtension.class)
@ContextConfiguration({"/app-config.xml", "/test-config.xml"})
class MyTest {
	// class body...
}
如果你从@ContextConfiguration注解中省略了locations和value属性,TestContext框架会尝试检测默认的XML资源位置。具体来说,GenericXmlContextLoader和GenericXmlWebContextLoader会根据测试类的名称检测默认位置。如果你的类名为com.example.MyTest,GenericXmlContextLoader将从"classpath:com/example/MyTest-context.xml"加载你的应用程序上下文。以下示例展示了如何这样做:
@ExtendWith(SpringExtension.class)
// ApplicationContext will be loaded from
// "classpath:com/example/MyTest-context.xml"
@ContextConfiguration
class MyTest {
	// class body...
}
使用 Groovy 脚本进行上下文配置
要使用Groovy Bean Definition DSL的Groovy脚本为你的测试加载ApplicationContext,可以使用@ContextConfiguration注解你的测试类,并配置locations或value属性,该属性包含Groovy脚本的资源位置数组。Groovy脚本的资源查找语义与XML配置文件的描述相同。
如果在类路径上存在Groovy,Spring TestContext框架自动启用使用Groovy脚本加载ApplicationContext的支持。
以下示例展示了如何指定Groovy配置文件:
@ExtendWith(SpringExtension.class)
// ApplicationContext will be loaded from "/AppConfig.groovy" and
// "/TestConfig.groovy" in the root of the classpath
@ContextConfiguration({"/AppConfig.groovy", "/TestConfig.Groovy"})
class MyTest {
	// class body...
}
如果你从@ContextConfiguration注解中省略了locations和value属性,TestContext框架会尝试检测默认的Groovy脚本。具体来说,GenericGroovyXmlContextLoader和GenericGroovyXmlWebContextLoader会根据测试类的名称检测默认位置。如果你的类名为com.example.MyTest,Groovy上下文加载器将从"classpath:com/example/MyTestContext.groovy"加载你的应用程序上下文。以下示例展示了如何使用默认设置:
@ExtendWith(SpringExtension.class)
// ApplicationContext will be loaded from
// "classpath:com/example/MyTestContext.groovy"
@ContextConfiguration
class MyTest {
	// class body...
}
可以同时声明XML配置文件和Groovy脚本,方法是使用@ContextConfiguration的locations或value属性。如果配置的资源位置的路径以.xml结尾,则使用XmlBeanDefinitionReader加载。否则,使用GroovyBeanDefinitionReader加载。
以下列表展示了如何在集成测试中结合使用两者:
@ExtendWith(SpringExtension.class)
// ApplicationContext will be loaded from
// "/app-config.xml" and "/TestConfig.groovy"
@ContextConfiguration({ "/app-config.xml", "/TestConfig.groovy" })
class MyTest {
	// class body...
}
使用组件类进行上下文配置
要使用组件类为你的测试加载ApplicationContext,可以使用@ContextConfiguration注解你的测试类,并配置classes属性,该属性包含对组件类的引用数组。以下示例展示了如何这样做:
@ExtendWith(SpringExtension.class)
// ApplicationContext will be loaded from AppConfig and TestConfig
@ContextConfiguration(classes = {AppConfig.class, TestConfig.class})
class MyTest {
	// class body...
}
“组件类”这个术语可以指以下任何一种:
- 一个用
@Configuration注解的类。 - 一个组件(即,用
@Component、@Service、@Repository或其它定型(stereotype)注解注解的类)。 - 一个符合 JSR-330 规范的类,该类用
jakarta.inject注解进行注解。 - 包含
@Bean方法的任何类。 - 任何其他旨在作为 Spring 组件注册的类(即在
ApplicationContext中的 Spring
bean),可能会利用单个构造函数的自动装配功能,而无需使用 Spring 注解。
如果你从 @ContextConfiguration 注解中省略了 classes 属性,TestContext 框架会尝试检测默认配置类的存在。具体来说,AnnotationConfigContextLoader 和 AnnotationConfigWebContextLoader 会检测测试类中所有满足配置类实现要求的静态嵌套类。配置类的名称是任意的。此外,如果需要的话,一个测试类可以包含多个静态嵌套的配置类。在以下示例中,OrderServiceTest 类声明了一个名为 Config 的静态嵌套配置类,这个配置类会自动用于加载测试类的 ApplicationContext:
@SpringJUnitConfig
// ApplicationContext will be loaded from the static nested Config class
class OrderServiceTest {

	@Configuration
	static class Config {

		// this bean will be injected into the OrderServiceTest class
		@Bean
		OrderService orderService() {
			OrderService orderService = new OrderServiceImpl();
			// set properties, etc.
			return orderService;
		}
	}

	@Autowired
	OrderService orderService;

	@Test
	void testOrderService() {
		// test the orderService
	}

}
混合使用 XML、Groovy 脚本和组件类
有时,将 XML 配置文件、Groovy 脚本和组件类(通常是 @Configuration 类)混合使用来配置测试的 ApplicationContext 可能是可取的。例如,如果你在生产环境中使用 XML 配置,你可能决定使用 @Configuration 类来配置测试中特定的由 Spring 管理的组件,反之亦然。
此外,一些第三方框架(如 Spring Boot)提供了一流的支持,可以同时从不同类型的资源中加载 ApplicationContext(例如,XML 配置文件、Groovy 脚本和 @Configuration 类)。从历史上看,Spring 框架对于标准部署并未支持这种功能。因此,Spring 框架在 spring-test 模块中提供的大多数 SmartContextLoader 实现都只为每个测试上下文支持一种资源类型。但这并不意味着你不能同时使用两种资源。一般规则的一个例外是,GenericGroovyXmlContextLoader 和 GenericGroovyXmlWebContextLoader 同时支持 XML 配置文件和 Groovy 脚本。此外,第三方框架可能会选择通过 @ContextConfiguration 支持locations 和classes 的声明,并且在 TestContext 框架的标准测试支持下,你有以下选项。
如果你想使用资源位置(例如 XML 或 Groovy)和 @Configuration 类来配置你的测试,你必须选择一个作为入口点,而这个入口点必须包含或导入另一个。例如,在 XML 或 Groovy 脚本中,你可以通过组件扫描或将其定义为普通的 Spring bean 来包含 @Configuration 类,而在 @Configuration 类中,你可以使用 @ImportResource 来导入 XML 配置文件或 Groovy 脚本。请注意,这种行为在语义上相当于你在生产环境中配置应用程序的方式:在生产配置中,你定义了一组 XML 或 Groovy 资源位置或一组 @Configuration 类,从中加载你的生产 ApplicationContext,但你仍然有自由包含或导入另一种类型的配置。
使用上下文定制器的配置
ContextCustomizer 负责在 bean 定义被加载到上下文中但上下文被刷新之前,对提供的 ConfigurableApplicationContext 进行自定义。
ContextCustomizerFactory 负责根据一些自定义逻辑创建 ContextCustomizer,该逻辑确定是否需要对给定的测试类使用 ContextCustomizer,例如基于某个特定注解的存在。工厂在 ContextLoaders 为测试类处理上下文配置属性之后、但在创建 MergedContextConfiguration 之前被调用。
例如,Spring 框架提供了以下默认注册的 ContextCustomizerFactory 实现:
MockServerContainerContextCustomizerFactory:如果类路径中存在 WebSocket 支持,并且测试类或其任一封闭类被注解或元注解为 @WebAppConfiguration,则创建一个 MockServerContainerContextCustomizer。MockServerContainerContextCustomizer 会实例化一个新的 MockServerContainer,并将其存储在 ServletContext 中,属性名为 jakarta.websocket.server.ServerContainer。
注册ContextCustomizerFactory 实现
你可以通过使用 @ContextCustomizerFactories 注解,为测试类、其子类和嵌套类显式地注册 ContextCustomizerFactory 实现。
自动发现ContextCustomizerFactory 实现
使用 @ContextCustomizerFactories 注册 ContextCustomizerFactory 实现适合在有限的测试场景中使用自定义工厂。但是,如果整个测试套件都需要使用自定义工厂,这可能会变得繁琐。这个问题通过 SpringFactoriesLoader 机制对默认 ContextCustomizerFactory 实现的自动发现支持来解决。
例如,构成 Spring Framework 和 Spring Boot 中测试支持的模块会在它们的 META-INF/spring.factories 属性文件中,以 org.springframework.test.context.ContextCustomizerFactory 键声明所有核心的默认 ContextCustomizerFactory 实现。第三方框架和开发者可以通过他们自己的 spring.factories 文件,以同样的方式将自己的 ContextCustomizerFactory 实现添加到默认工厂的列表中。
合并ContextCustomizerFactory 实现
如果通过 @ContextCustomizerFactories 注册了自定义的 ContextCustomizerFactory,它将会与通过前面提到的自动发现机制注册的默认工厂合并。
合并算法确保从列表中移除了重复项,并且在合并时,将局部声明的工厂添加到默认工厂的列表后面。
要替换测试类、其子类和嵌套类的默认工厂,你可以将 @ContextCustomizerFactories 的 mergeMode 属性设置为 MergeMode.REPLACE_DEFAULTS。
使用上下文初始化器的上下文配置
要使用上下文初始化器为测试配置ApplicationContext,请使用@ContextConfiguration注解你的测试类,并使用包含实现ApplicationContextInitializer的类的引用数组配置initializers属性。然后,声明的上下文初始化器将用于初始化为测试加载的ConfigurableApplicationContext。请注意,每个声明的初始化器支持的具体ConfigurableApplicationContext类型必须与SmartContextLoader创建的ApplicationContext类型(通常是GenericApplicationContext)兼容。此外,初始化器的调用顺序取决于它们是否实现了Spring的Ordered接口或使用了Spring的@Order注解或标准的@Priority注解。以下示例展示了如何使用初始化器:
@ExtendWith(SpringExtension.class)
// ApplicationContext will be loaded from TestConfig
// and initialized by TestAppCtxInitializer
@ContextConfiguration(
	classes = TestConfig.class,
	initializers = TestAppCtxInitializer.class)
class MyTest {
	// class body...
}
还可以完全省略在@ContextConfiguration中声明XML配置文件、Groovy脚本或组件类,而只声明ApplicationContextInitializer类,这些类随后负责在上下文中注册bean——例如,通过从XML文件或配置类中以编程方式加载bean定义。以下示例展示了如何这样做:
@ExtendWith(SpringExtension.class)
// ApplicationContext will be initialized by EntireAppInitializer
// which presumably registers beans in the context
@ContextConfiguration(initializers = EntireAppInitializer.class)
class MyTest {
	// class body...
}
上下文配置继承
@ContextConfiguration 支持布尔类型的 inheritLocations 和 inheritInitializers 属性,这些属性表示是否应继承由超类声明的资源位置或组件类和上下文初始化器。这两个标志的默认值都是 true。这意味着测试类会继承任何超类声明的资源位置或组件类以及上下文初始化器。具体来说,测试类的资源位置或组件类会被添加到超类声明的资源位置或注解类列表中。类似地,给定测试类的初始化器会被添加到由测试超类定义的初始化器集合中。因此,子类可以选择扩展资源位置、组件类或上下文初始化器。
如果在 @ContextConfiguration 中将 inheritLocations 或 inheritInitializers 属性设置为 false,则测试类的资源位置或组件类以及上下文初始化器分别会遮蔽并实际上替换超类定义的配置。
从 Spring Framework 5.3 开始,测试配置也可以从外部类继承。
在下一个使用XML资源位置的示例中,ExtendedTest 的 ApplicationContext 将按顺序从 base-config.xml 和 extended-config.xml 加载。因此,extended-config.xml 中定义的bean可以覆盖(即替换)base-config.xml 中定义的bean。以下示例展示了一个类如何扩展另一个类并使用自己的配置文件以及超类的配置文件:
@ExtendWith(SpringExtension.class)
// ApplicationContext will be loaded from "/base-config.xml"
// in the root of the classpath
@ContextConfiguration("/base-config.xml")
class BaseTest {
	// class body...
}

// ApplicationContext will be loaded from "/base-config.xml" and
// "/extended-config.xml" in the root of the classpath
@ContextConfiguration("/extended-config.xml")
class ExtendedTest extends BaseTest {
	// class body...
}
同样,在下一个使用组件类的示例中,ExtendedTest 的 ApplicationContext 将按顺序从 BaseConfig 和 ExtendedConfig 类加载。因此,ExtendedConfig 中定义的bean可以覆盖(即替换)BaseConfig 中定义的bean。以下示例展示了一个类如何扩展另一个类并使用自己的配置类以及超类的配置类:
// ApplicationContext will be loaded from BaseConfig
@SpringJUnitConfig(BaseConfig.class)
class BaseTest {
	// class body...
}

// ApplicationContext will be loaded from BaseConfig and ExtendedConfig
@SpringJUnitConfig(ExtendedConfig.class)
class ExtendedTest extends BaseTest {
	// class body...
}
在下一个使用上下文初始化器的示例中,ExtendedTest 的 ApplicationContext 通过使用 BaseInitializer 和 ExtendedInitializer 进行初始化。然而,需要注意的是,初始化器的调用顺序取决于它们是否实现了 Spring 的 Ordered 接口或者使用了 Spring 的 @Order 注解或标准的 @Priority 注解。以下示例展示了一个类如何扩展另一个类并使用自己的初始化器以及超类的初始化器:
// ApplicationContext will be initialized by BaseInitializer
@SpringJUnitConfig(initializers = BaseInitializer.class)
class BaseTest {
	// class body...
}

// ApplicationContext will be initialized by BaseInitializer
// and ExtendedInitializer
@SpringJUnitConfig(initializers = ExtendedInitializer.class)
class ExtendedTest extends BaseTest {
	// class body...
}
基于环境profile的上下文配置
Spring 框架对环境和profile(又名“bean定义配置文件”)的概念提供了一流的支持,集成测试可以被配置为激活特定于各种测试场景的bean定义profile。这可以通过使用 @ActiveProfiles 注解来注释测试类,并在加载测试的 ApplicationContext 时提供应该激活的profile列表来实现。
可以将 @ActiveProfiles 与 SmartContextLoader SPI 的任何实现一起使用,但是 @ActiveProfiles 不支持与旧的 ContextLoader SPI 的实现一起使用。
考虑两个使用XML配置和@Configuration类的例子:
<!-- app-config.xml -->
<beans xmlns="http://www.springframework.org/schema/beans"
	xmlns:xsi="http://www.w3.org/2001/XMLSchema-instance"
	xmlns:jdbc="http://www.springframework.org/schema/jdbc"
	xmlns:jee="http://www.springframework.org/schema/jee"
	xsi:schemaLocation="...">

	<bean id="transferService"
			class="com.bank.service.internal.DefaultTransferService">
		<constructor-arg ref="accountRepository"/>
		<constructor-arg ref="feePolicy"/>
	</bean>

	<bean id="accountRepository"
			class="com.bank.repository.internal.JdbcAccountRepository">
		<constructor-arg ref="dataSource"/>
	</bean>

	<bean id="feePolicy"
		class="com.bank.service.internal.ZeroFeePolicy"/>

	<beans profile="dev">
		<jdbc:embedded-database id="dataSource">
			<jdbc:script
				location="classpath:com/bank/config/sql/schema.sql"/>
			<jdbc:script
				location="classpath:com/bank/config/sql/test-data.sql"/>
		</jdbc:embedded-database>
	</beans>

	<beans profile="production">
		<jee:jndi-lookup id="dataSource" jndi-name="java:comp/env/jdbc/datasource"/>
	</beans>

	<beans profile="default">
		<jdbc:embedded-database id="dataSource">
			<jdbc:script
				location="classpath:com/bank/config/sql/schema.sql"/>
		</jdbc:embedded-database>
	</beans>

</beans>
@ExtendWith(SpringExtension.class)
// ApplicationContext will be loaded from "classpath:/app-config.xml"
@ContextConfiguration("/app-config.xml")
@ActiveProfiles("dev")
class TransferServiceTest {

	@Autowired
	TransferService transferService;

	@Test
	void testTransferService() {
		// test the transferService
	}
}
当运行 TransferServiceTest 时,它的 ApplicationContext 是从类路径根目录下的 app-config.xml 配置文件加载的。如果你检查 app-config.xml,可以看到 accountRepository bean 依赖于一个 dataSource bean。然而,dataSource 并没有被定义为顶级 bean。相反,dataSource 被定义了三次:在production profile、dev profile和default profile中。
过使用 @ActiveProfiles("dev") 注解 TransferServiceTest,我们指示 Spring TestContext Framework 加载 ApplicationContext,并将激活的profile设置为 {"dev"}。结果,创建了一个嵌入式数据库并用测试数据填充,accountRepository bean 被绑定到了开发环境的 DataSource 引用。这很可能是我们在集成测试中想要的。
有时候将bean分配给default profile是有用的。只有当没有其它profile被特别激活时,默认profile中的bean才会被包含。可以使用此功能定义在应用程序的默认状态下使用的“后备”bean。例如,你可能为dev 和production 显式提供一个数据源,但在这两个都没有被激活时定义一个内存数据源作为默认值。
以下代码清单演示了如何使用 @Configuration 类而不是 XML 来实现相同的配置和集成测试:
@Configuration
@Profile("dev")
public class StandaloneDataConfig {

	@Bean
	public DataSource dataSource() {
		return new EmbeddedDatabaseBuilder()
			.setType(EmbeddedDatabaseType.HSQL)
			.addScript("classpath:com/bank/config/sql/schema.sql")
			.addScript("classpath:com/bank/config/sql/test-data.sql")
			.build();
	}
}
@Configuration
@Profile("production")
public class JndiDataConfig {

	@Bean(destroyMethod="")
	public DataSource dataSource() throws Exception {
		Context ctx = new InitialContext();
		return (DataSource) ctx.lookup("java:comp/env/jdbc/datasource");
	}
}
@Configuration
@Profile("default")
public class DefaultDataConfig {

	@Bean
	public DataSource dataSource() {
		return new EmbeddedDatabaseBuilder()
			.setType(EmbeddedDatabaseType.HSQL)
			.addScript("classpath:com/bank/config/sql/schema.sql")
			.build();
	}
}
@Configuration
public class TransferServiceConfig {

	@Autowired DataSource dataSource;

	@Bean
	public TransferService transferService() {
		return new DefaultTransferService(accountRepository(), feePolicy());
	}

	@Bean
	public AccountRepository accountRepository() {
		return new JdbcAccountRepository(dataSource);
	}

	@Bean
	public FeePolicy feePolicy() {
		return new ZeroFeePolicy();
	}
}
@SpringJUnitConfig({
		TransferServiceConfig.class,
		StandaloneDataConfig.class,
		JndiDataConfig.class,
		DefaultDataConfig.class})
@ActiveProfiles("dev")
class TransferServiceTest {

	@Autowired
	TransferService transferService;

	@Test
	void testTransferService() {
		// test the transferService
	}
}
在这个变体中,我们将 XML 配置拆分为四个独立的 @Configuration 类:
TransferServiceConfig:通过使用@Autowired依赖注入获取dataSource。StandaloneDataConfig:为嵌入式数据库定义一个dataSource,适用于开发者测试。JndiDataConfig:定义一个在生产环境中从 JNDI 检索的dataSource。DefaultDataConfig:在没有激活的profile 的情况下,为默认的嵌入式数据库定义一个dataSource。
与基于 XML 的配置示例一样,我们仍然使用 @ActiveProfiles("dev") 注解 TransferServiceTest,但这次我们通过使用 @ContextConfiguration 注解指定了所有四个配置类。测试类的主体本身保持不变。
在给定项目中,通常会在多个测试类中使用一组profile。因此,为了避免重复声明 @ActiveProfiles 注解,可以在基类上声明一次 @ActiveProfiles,子类自动继承基类中的 @ActiveProfiles 配置。在以下示例中,@ActiveProfiles(以及其它注解)的声明已移至抽象超类 AbstractIntegrationTest:
自Spring Framework 5.3起,测试配置也可以从包含它的类中继承。
@SpringJUnitConfig({
		TransferServiceConfig.class,
		StandaloneDataConfig.class,
		JndiDataConfig.class,
		DefaultDataConfig.class})
@ActiveProfiles("dev")
abstract class AbstractIntegrationTest {
}
// "dev" profile inherited from superclass
class TransferServiceTest extends AbstractIntegrationTest {

	@Autowired
	TransferService transferService;

	@Test
	void testTransferService() {
		// test the transferService
	}
}
@ActiveProfiles 还支持一个 inheritProfiles 属性,可以用来禁用活动profile的继承,如下例所示:
// "dev" profile overridden with "production"
@ActiveProfiles(profiles = "production", inheritProfiles = false)
class ProductionTransferServiceTest extends AbstractIntegrationTest {
	// test body
}
此外,有时需要通过编程方式而不是声明性地解析测试的活动profile——例如,基于:
- 当前操作系统。
- 测试是否在持续集成构建服务器上运行。
- 某些环境变量的存在。
- 自定义类级别注解的存在。
- 其他考虑因素。
要通过编程方式解析活动的 bean 定义profile,可以实现一个自定义的 ActiveProfilesResolver 并通过使用 @ActiveProfiles 的 resolver 属性来注册它。以下示例演示了如何实现和注册一个自定义的 OperatingSystemActiveProfilesResolver:
// "dev" profile overridden programmatically via a custom resolver
@ActiveProfiles(
		resolver = OperatingSystemActiveProfilesResolver.class,
		inheritProfiles = false)
class TransferServiceTest extends AbstractIntegrationTest {
	// test body
}
public class OperatingSystemActiveProfilesResolver implements ActiveProfilesResolver {

	@Override
	public String[] resolve(Class<?> testClass) {
		String profile = ...;
		// determine the value of profile based on the operating system
		return new String[] {profile};
	}
}
使用测试属性源的上下文配置
Spring 框架对具有属性源层次结构的环境概念提供了一流的支持,你可以使用特定于测试的属性源来配置集成测试。与在 @Configuration 类上使用的 @PropertySource 注解相比,你可以在测试类上声明 @TestPropertySource 注解来为测试属性文件或内联属性声明资源位置。这些测试属性源被添加到为注解的集成测试加载的 ApplicationContext 的Environment 中的 PropertySources 集合中。
可以将 @TestPropertySource 与 SmartContextLoader SPI 的任何实现一起使用,但是 @TestPropertySource 不支持与旧的 ContextLoader SPI 的实现一起使用。
SmartContextLoader 的实现可以通过 MergedContextConfiguration 中的 getPropertySourceDescriptors() 和 getPropertySourceProperties() 方法访问合并后的测试属性源值。
声明测试属性源
可以使用 @TestPropertySource 的 locations 或 value 属性来配置测试属性文件。
默认情况下,支持传统的和基于 XML 的 java.util.Properties 文件格式——例如,“classpath:/com/example/test.properties” 或 “file:///path/to/file.xml”。从 Spring Framework 6.1 开始,可以通过 @TestPropertySource 中的 factory 属性配置自定义的 PropertySourceFactory,以支持不同的文件格式,如 JSON、YAML 等。
每个路径都被解释为一个 Spring 资源。普通路径(例如,“test.properties”)被视为相对于测试类定义包的类路径资源。以斜杠开头的路径被视为绝对类路径资源(例如:“/org/example/test.xml”)。引用 URL 的路径(例如,以 classpath:、file: 或 http: 为前缀的路径)将使用指定的资源协议进行加载。
路径中的属性占位符(如 ${…})将根据 Environment 进行解析。
从 Spring Framework 6.1 开始,还支持资源位置模式——例如,“classpath*:/config/*.properties”。
以下示例使用了一个测试属性文件:
@ContextConfiguration
@TestPropertySource("/test.properties")
class MyIntegrationTests {
	// class body...
}
可以使用 @TestPropertySource 的 properties 属性配置以内联属性的形式存在的键值对,如下面的示例所示。所有键值对都作为具有最高优先级的单个测试 PropertySource 添加到封装的 Environment 中。
键值对的支持语法与 Java 属性文件中定义的条目语法相同:
key=valuekey:valuekey value
尽管可以使用上述任何语法变体定义属性,并在键和值之间使用任意数量的空格,但建议在测试套件中使用一种语法变体和一致的间距——例如,考虑始终使用 key = value 而不是 key= value、key=value 等。同样,如果使用文本块定义内联属性,则应在测试套件中始终使用文本块定义内联属性。
原因是提供的确切字符串将用于确定上下文缓存的键。因此,要从上下文缓存中受益,必须确保一致地定义内联属性。
以下示例设置了两个内联属性:
@ContextConfiguration
@TestPropertySource(properties = {"timezone = GMT", "port = 4242"})
class MyIntegrationTests {
	// class body...
}
从 Spring Framework 6.1 开始,可以使用文本块在单个字符串中定义多个内联属性。以下示例使用文本块设置了两个内联属性:
@ContextConfiguration
@TestPropertySource(properties = """
	timezone = GMT
	port = 4242
	""")
class MyIntegrationTests {
	// class body...
}
从 Spring Framework 5.2 开始,@TestPropertySource 可以作为可重复的注解使用。这意味着可以在单个测试类上多次声明 @TestPropertySource,后面的 @TestPropertySource 注解中的位置和属性将覆盖之前 @TestPropertySource 注解中的相应内容。
此外,还可以在测试类上声明多个组合注解,每个注解都使用 @TestPropertySource 进行元注解,所有这些 @TestPropertySource 声明都将贡献给你的测试属性源。
直接出现的 @TestPropertySource 注解总是优先于元出现的 @TestPropertySource 注解。换句话说,直接出现的 @TestPropertySource 注解中的locations 和properties 将覆盖作为元注解使用的 @TestPropertySource 注解中的位置和属性。
默认属性文件检测
如果 @TestPropertySource 被声明为一个空注解(即,没有为 locations 或 properties 属性明确指定值),则会尝试检测相对于声明该注解的类的默认属性文件。例如,如果带有注解的测试类是 com.example.MyTest,相应的默认属性文件是 classpath:com/example/MyTest.properties。如果无法检测到默认值,将抛出 IllegalStateException。
优先级
测试属性的优先级高于在操作系统环境、Java 系统属性或应用程序通过使用 @PropertySource 声明性地或编程性地添加的属性源中定义的属性。因此,测试属性可用于选择性地覆盖从系统和应用程序属性源加载的属性。此外,内联属性的优先级高于从资源位置加载的属性。然而,请注意,通过 @DynamicPropertySource 注册的属性的优先级高于通过 @TestPropertySource 加载的属性。
在下一个示例中,timezone 和port 属性以及在 “/test.properties” 中定义的任何属性都将覆盖在系统和应用程序属性源中定义的同名属性。此外,如果 “/test.properties” 文件定义了timezone 和port 属性的条目,这些将被使用 properties 属性声明的内联属性覆盖。下面的示例展示了如何在文件中以及内联中指定属性:
@ContextConfiguration
@TestPropertySource(
	locations = "/test.properties",
	properties = {"timezone = GMT", "port = 4242"}
)
class MyIntegrationTests {
	// class body...
}
继承和覆盖测试属性源
@TestPropertySource 支持布尔类型的 inheritLocations 和 inheritProperties 属性,这两个属性表示是否应继承超类声明的属性文件的资源位置和内联属性。这两个标志的默认值都是 true。这意味着测试类会继承任何超类声明的locations 和内联属性。具体来说,测试类的资源locations 和内联属性会被追加到超类声明的locations 和内联属性之后。因此,子类可以选择扩展资源locations 和内联属性。请注意,后出现的属性会覆盖(即,重写)之前出现的同名属性。此外,上述优先级规则也适用于继承的测试属性源。
如果在 @TestPropertySource 中将 inheritLocations 或 inheritProperties 属性设置为 false,那么测试类的locations 或内联属性将分别覆盖并实际上替换超类定义的配置。
从 Spring Framework 5.3 开始,测试配置也可以从封装类继承。
在下一个示例中,BaseTest的ApplicationContext是通过仅使用base.properties文件作为测试属性源来加载的。相比之下,ExtendedTest的ApplicationContext是通过使用base.properties和extended.properties文件作为测试属性源位置来加载的。以下示例展示了如何使用属性文件在子类及其超类中定义属性:
@TestPropertySource("base.properties")
@ContextConfiguration
class BaseTest {
	// ...
}

@TestPropertySource("extended.properties")
@ContextConfiguration
class ExtendedTest extends BaseTest {
	// ...
}
在下一个示例中,BaseTest的ApplicationContext是通过仅使用内联的key1属性来加载的。相比之下,ExtendedTest的ApplicationContext是通过使用内联的key1和key2属性来加载的。以下示例展示了如何使用内联属性在子类及其超类中定义属性:
@TestPropertySource(properties = "key1 = value1")
@ContextConfiguration
class BaseTest {
	// ...
}

@TestPropertySource(properties = "key2 = value2")
@ContextConfiguration
class ExtendedTest extends BaseTest {
	// ...
}
使用动态属性源的上下文配置
从Spring框架5.2.5版本,TestContext框架通过@DynamicPropertySource注解提供了对动态属性的支持。这个注解可以在集成测试中使用,用来向为集成测试加载的ApplicationContext的环境(Environment)中的属性源集合(PropertySources)添加具有动态值的属性。
@DynamicPropertySource 注解及其支持基础设施最初设计是为了允许来自基于Testcontainers的测试的属性能够轻松地暴露给Spring集成测试。然而,这个特性也可以与任何形式的外部资源一起使用,这些资源的生命周期是在测试的ApplicationContext之外维护的。
与在类级别上应用的@TestPropertySource注解相比,@DynamicPropertySource必须应用于一个静态方法,该方法接受一个DynamicPropertyRegistry参数,用于向环境(Environment)添加名称-值对。这些值是动态的,并通过Supplier提供,该Supplier仅在属性被解析时调用。通常情况下,使用方法引用来提供值,如下例所示,该例子使用了Testcontainers项目在Spring ApplicationContext之外管理一个Redis容器。管理的Redis容器的IP地址和端口通过redis.host和redis.port属性提供给测试的ApplicationContext内的组件。这些属性可以通过Spring的环境(Environment)抽象访问,或者直接注入到Spring管理的组件中 —— 例如,分别通过@Value("${redis.host}")和@Value("${redis.port}")。
如果你在基类中使用@DynamicPropertySource并发现子类的测试失败了,因为动态属性在子类之间发生了变化,你可能需要在基类上加上@DirtiesContext注解以确保每个子类都能得到一个带有正确动态属性的自己的ApplicationContext。
@SpringJUnitConfig(/* ... */)
@Testcontainers
class ExampleIntegrationTests {

	@Container
	static GenericContainer redis =
		new GenericContainer("redis:5.0.3-alpine").withExposedPorts(6379);

	@DynamicPropertySource
	static void redisProperties(DynamicPropertyRegistry registry) {
		registry.add("redis.host", redis::getHost);
		registry.add("redis.port", redis::getFirstMappedPort);
	}

	// tests ...

}
优先级
动态属性具有比从@TestPropertySource、操作系统环境、Java系统属性或应用程序通过使用@PropertySource声明性地或通过编程方式添加的属性源加载的属性更高的优先级。因此,动态属性可以用于选择性地覆盖通过@TestPropertySource、系统属性源和应用程序属性源加载的属性。
加载一个 WebApplicationContext
要指示TestContext框架加载WebApplicationContext而不是标准的ApplicationContext,可以用@WebAppConfiguration注解相应的测试类。
在测试类上添加@WebAppConfiguration注解会指示TestContext框架(TCF)为集成测试加载一个WebApplicationContext (WAC)。在后台,TCF确保创建一个MockServletContext,并将其提供给你的测试的WAC。默认情况下,MockServletContext的基本资源路径被设置为src/main/webapp。这被解释为相对于JVM根目录(通常指向你的项目路径)的路径。如果你熟悉Maven项目中web应用程序的目录结构,就会知道src/main/webapp是WAR根目录的默认位置。如果需要覆盖此默认设置,可以向@WebAppConfiguration注解提供另一个路径(例如@WebAppConfiguration("src/test/webapp"))。如果希望从类路径而不是文件系统引用基本资源路径,可以使用Spring的classpath:前缀。
Spring对WebApplicationContext实现的测试支持与其对标准ApplicationContext实现的支持不相上下。当使用WebApplicationContext进行测试时,可以自由声明XML配置文件、Groovy脚本或使用@ContextConfiguration的@Configuration类。也可以自由使用任何其他测试注解,如@ActiveProfiles、@TestExecutionListeners、@Sql、@Rollback等。
以下示例展示了TestContext框架对约定优于配置的支持:
@ExtendWith(SpringExtension.class)

// defaults to "file:src/main/webapp"
@WebAppConfiguration

// detects "WacTests-context.xml" in the same package
// or static nested @Configuration classes
@ContextConfiguration
class WacTests {
	//...
}
如果使用@WebAppConfiguration注解测试类但没有指定资源基本路径,资源路径实际上默认为file:src/main/webapp。同样,如果声明了@ContextConfiguration但没有指定资源locations、组件classes或上下文initializers,Spring会尝试通过约定来检测你的配置(即,WacTests-context.xml位于与WacTests类相同的包中,或者静态嵌套的@Configuration类)。
以下示例展示了如何使用@WebAppConfiguration显式声明资源基本路径,以及使用@ContextConfiguration声明XML资源位置:
@ExtendWith(SpringExtension.class)

// file system resource
@WebAppConfiguration("webapp")

// classpath resource
@ContextConfiguration("/spring/test-servlet-config.xml")
class WacTests {
	//...
}
这里需要注意的重要一点是这两个注解路径的不同语义。默认情况下,@WebAppConfiguration资源路径是基于文件系统的,而@ContextConfiguration资源位置是基于类路径的。
以下示例展示了我们可以通过指定Spring资源前缀来覆盖这两个注解的默认资源语义:
@ExtendWith(SpringExtension.class)

// classpath resource
@WebAppConfiguration("classpath:test-web-resources")

// file system resource
@ContextConfiguration("file:src/main/webapp/WEB-INF/servlet-config.xml")
class WacTests {
	//...
}
使用Web模拟对象(或Web模拟工具)
为了提供全面的Web测试支持,TestContext框架默认启用了一个ServletTestExecutionListener。在针对WebApplicationContext进行测试时,这个TestExecutionListener会在每个测试方法之前使用Spring Web的RequestContextHolder设置默认的线程局部状态,并根据@WebAppConfiguration配置的基本资源路径创建一个MockHttpServletRequest、一个MockHttpServletResponse和一个ServletWebRequest。ServletTestExecutionListener还确保MockHttpServletResponse和ServletWebRequest可以被注入到测试实例中,并且一旦测试完成,它会清理线程局部状态。
一旦为测试加载了一个WebApplicationContext,你可能会发现需要与Web Mocks进行交互——例如,设置测试夹具(test fixture)或在调用Web组件后执行断言。以下示例展示了哪些mocks可以被注入到你的测试实例中。请注意,WebApplicationContext和MockServletContext在整个测试套件中都被缓存,而其他mocks则由ServletTestExecutionListener按每个测试方法管理。
@SpringJUnitWebConfig
class WacTests {

	@Autowired
	WebApplicationContext wac; // cached

	@Autowired
	MockServletContext servletContext; // cached

	@Autowired
	MockHttpSession session;

	@Autowired
	MockHttpServletRequest request;

	@Autowired
	MockHttpServletResponse response;

	@Autowired
	ServletWebRequest webRequest;

	//...
}
上下文缓存
一旦TestContext框架为测试加载了一个ApplicationContext(或WebApplicationContext),该上下文就会被缓存并在相同测试套件中声明相同唯一上下文配置的所有后续测试中重用。要理解缓存是如何工作的,重要的是要明白“唯一”和“测试套件”的含义。
ApplicationContext可以通过用于加载它的配置参数组合唯一标识。因此,配置参数的唯一组合被用来生成上下文缓存的键。TestContext框架使用以下配置参数构建上下文缓存键:
locations(来自@ContextConfiguration)classes(来自@ContextConfiguration)contextInitializerClasses(来自@ContextConfiguration)contextCustomizers(来自ContextCustomizerFactory)——这包括@DynamicPropertySource方法以及Spring Boot测试支持的各种特性,如@MockBean和@SpyBean。contextLoader(来自@ContextConfiguration)parent(来自@ContextHierarchy)activeProfiles(来自@ActiveProfiles)propertySourceDescriptors(来自@TestPropertySource)propertySourceProperties(来自@TestPropertySource)resourceBasePath(来自@WebAppConfiguration)
例如,如果TestClassA为@ContextConfiguration的locations (或value)属性指定了{"app-config.xml", "test-config.xml"},TestContext框架将加载相应的ApplicationContext,并将其存储在一个基于这些位置的静态上下文缓存键下。因此,如果TestClassB也为它的位置定义了{"app-config.xml", "test-config.xml"}(无论是显式地还是通过继承隐式地),但没有定义@WebAppConfiguration、不同的ContextLoader、不同的活动profile、不同的上下文初始化器、不同的测试属性源或不同的父上下文,那么相同的ApplicationContext将被两个测试类共享。这意味着加载应用程序上下文的设置成本仅在每个测试套件中发生一次,后续的测试执行速度会更快。
Spring TestContext框架将应用程序上下文存储在一个静态缓存中。这意味着上下文实际上是存储在一个静态变量中的。换句话说,如果测试在不同的进程中运行,那么在每次测试执行之间都会清除静态缓存,这实际上禁用了缓存机制。
为了从缓存机制中受益,所有测试必须在同一个进程或测试套件中运行。这可以通过在IDE中将所测试作为一组执行来实现。同样,当使用构建框架(如Ant、Maven或Gradle)执行测试时,确保构建框架在测试之间不创建新的进程是很重要的。例如,如果Maven Surefire插件的forkMode设置为always或pertest,TestContext框架就无法在测试类之间缓存应用程序上下文,构建过程因此会显著变慢。
上下文缓存的大小是有界限的,默认的最大大小为32。每当达到最大大小时,就会使用最近最少使用(LRU)的回收策略来清除和关闭过时的上下文。可以通过设置名为spring.test.context.cache.maxSize的JVM系统属性,在命令行或构建脚本中配置最大大小。或者,也可以通过SpringProperties机制设置相同的属性。
由于在给定的测试套件中加载大量的应用程序上下文可能会导致套件运行时间过长,因此了解已加载和缓存了多少上下文往往是有益的。要查看底层上下文缓存的统计信息,可以将org.springframework.test.context.cache日志类别的日志级别设置为DEBUG。
在不太可能的情况下,如果测试破坏了应用程序上下文并需要重新加载(例如,通过修改bean定义或应用程序对象的状态),可以使用@DirtiesContext注解你的测试类或测试方法。这会指示Spring从缓存中移除上下文,并在运行下一个需要相同应用程序上下文的测试之前重建应用程序上下文。请注意,对@DirtiesContext注解的支持由DirtiesContextBeforeModesTestExecutionListener和DirtiesContextTestExecutionListener提供,这些监听器默认是启用的。
当需要调试使用Spring TestContext框架执行的测试时,分析控制台输出(即输出到SYSOUT和SYSERR流)可能会很有用。一些构建工具和IDE能够将控制台输出与给定的测试关联起来;然而,有些控制台输出不容易与给定的测试关联。
关于由Spring框架本身或在ApplicationContext中注册的组件触发的控制台日志记录,重要的是要理解由Spring TestContext框架在测试套件中加载的ApplicationContext的生命周期。
测试的ApplicationContext通常在准备测试类实例时加载——例如,为了执行对测试实例的@Autowired字段的依赖注入。这意味着,在ApplicationContext初始化期间触发的任何控制台日志通常无法与单个测试方法关联。然而,如果根据@DirtiesContext语义,在执行测试方法之前立即关闭上下文,那么在执行测试方法之前将加载上下文的新实例。在后一种情况下,IDE或构建工具可能会将控制台日志与单个测试方法关联起来。
测试的ApplicationContext可以通过以下几种情况之一关闭。
- 根据
@DirtiesContext语义关闭上下文。 - 由于根据LRU(最近最少使用)的回收策略自动从缓存中清除了上下文,因此关闭了上下文。
- 当测试套件的JVM终止时,通过JVM关闭钩子关闭上下文。
如果根据@DirtiesContext语义在特定的测试方法之后关闭了上下文,IDE或构建工具可能会将控制台日志与单个测试方法关联起来。如果根据@DirtiesContext语义在测试类之后关闭了上下文,那么在ApplicationContext关闭期间触发的任何控制台日志都无法与单个测试方法关联。同样,通过JVM关闭钩子在关闭阶段触发的任何控制台日志也无法与单个测试方法关联。
当Spring ApplicationContext通过JVM关闭钩子关闭时,在关闭阶段执行的回调将在名为SpringContextShutdownHook的线程上执行。因此,如果希望禁用在通过JVM关闭钩子关闭ApplicationContext时触发的控制台日志记录,可能可以向你的日志框架注册一个自定义过滤器,允许忽略由该线程发起的任何日志记录。
上下文失败阈值
自Spring框架6.1起,实施了一项上下文失败阈值策略,有助于避免重复尝试加载失败的ApplicationContext。默认情况下,失败阈值设置为1,这意味着对于给定的上下文缓存键,只会尝试加载一次ApplicationContext。任何后续尝试加载相同上下文缓存键的ApplicationContext都会导致立即抛出IllegalStateException,并附带一条错误消息,解释尝试被预先跳过的原因。这种行为允许单个测试类和测试套件通过避免重复尝试加载永远无法成功加载的ApplicationContext(例如,由于配置错误或缺少外部资源而无法在当前环境中加载上下文)来更快地失败。
可以通过在命令行或构建脚本中设置名为spring.test.context.failure.threshold的JVM系统属性,并赋予一个正整数值来配置上下文失败阈值。或者,也可以通过SpringProperties机制设置相同的属性。
如果希望有效地禁用上下文失败阈值,可以将属性设置为一个非常大的值。例如,从命令行可以通过-Dspring.test.context.failure.threshold=1000000来设置系统属性。
上下文层次结构
在编写依赖于已加载的Spring ApplicationContext的集成测试时,通常针对单个上下文进行测试就足够了。然而,有时针对ApplicationContext实例的层次结构进行测试是有益的,甚至是必要的。例如,如果正在开发一个Spring MVC web应用程序,通常会有一个由Spring的ContextLoaderListener加载的根WebApplicationContext,以及一个由Spring的DispatcherServlet加载的子WebApplicationContext。这导致了一个父子上下文层次结构,其中共享的组件和基础设施配置在根上下文中声明,并在子上下文中由web特定的组件使用。另一个用例可以在Spring Batch应用程序中找到,通常会有一个提供共享批处理基础设施配置的父上下文,以及一个用于特定批处理作业配置的子上下文。
可以通过在单个测试类或测试类层次结构中使用@ContextHierarchy注解声明上下文配置来编写使用上下文层次结构的集成测试。如果在测试类层次结构中的多个类上声明了上下文层次结构,还可以合并或覆盖上下文层次结构中特定命名级别的上下文配置。当合并层次结构中给定级别的配置时,配置资源类型(即XML配置文件或组件类)必须保持一致。否则,完全可以接受使用不同资源类型配置上下文层次结构中的不同级别。
本节中剩余的基于JUnit Jupiter的示例展示了集成测试常见配置场景,这些测试需要使用上下文层次结构。
具有上下文层次结构的单一测试类
ControllerIntegrationTests代表了一个典型的Spring MVC web应用程序的集成测试场景,通过声明一个由两个级别组成的上下文层次结构:一个用于根WebApplicationContext(通过使用TestAppConfig @Configuration类加载)和一个用于分发器servlet WebApplicationContext(通过使用WebConfig @Configuration类加载)。注入到测试实例中的WebApplicationContext是子上下文(即层次结构中最低的上下文)。下面的列表显示了这个配置场景:
@ExtendWith(SpringExtension.class)
@WebAppConfiguration
@ContextHierarchy({
	@ContextConfiguration(classes = TestAppConfig.class),
	@ContextConfiguration(classes = WebConfig.class)
})
class ControllerIntegrationTests {

	@Autowired
	WebApplicationContext wac;

	// ...
}
具有隐式父上下文的类层次结构
此示例中的测试类定义了一个测试类层次结构内的上下文层次结构。AbstractWebTests声明了Spring驱动的web应用程序中根WebApplicationContext的配置。然而,请注意,AbstractWebTests并未声明@ContextHierarchy。因此,AbstractWebTests的子类可以有选择地参与上下文层次结构或遵循@ContextConfiguration的标准语义。SoapWebServiceTests和RestWebServiceTests都扩展了AbstractWebTests,并通过使用@ContextHierarchy定义了一个上下文层次结构。结果是加载了三个应用程序上下文(每个@ContextConfiguration声明一个),并且基于AbstractWebTests中的配置加载的应用程序上下文被设置为每个为具体子类加载的上下文的父上下文。下面的列表显示了这个配置场景:
@ExtendWith(SpringExtension.class)
@WebAppConfiguration
@ContextConfiguration("file:src/main/webapp/WEB-INF/applicationContext.xml")
public abstract class AbstractWebTests {}

@ContextHierarchy(@ContextConfiguration("/spring/soap-ws-config.xml"))
public class SoapWebServiceTests extends AbstractWebTests {}

@ContextHierarchy(@ContextConfiguration("/spring/rest-ws-config.xml"))
public class RestWebServiceTests extends AbstractWebTests {}
具有合并上下文层次结构配置的类层次结构
此示例中的类展示了使用命名层次结构级别以合并上下文层次结构中特定级别的配置。BaseTests在层次结构中定义了两个级别:parent 和child。ExtendedTests扩展了BaseTests,并指示Spring TestContext框架合并child 层次结构级别的上下文配置,确保@ContextConfiguration中声明的名称属性都是child。结果是加载了三个应用程序上下文:一个用于/app-config.xml,一个用于/user-config.xml,还有一个用于{"/user-config.xml", "/order-config.xml"}。与前一个例子一样,从/app-config.xml加载的应用程序上下文被设置为从/user-config.xml和{"/user-config.xml", "/order-config.xml"}加载的上下文的父上下文。下面的列表显示了这个配置场景:
@ExtendWith(SpringExtension.class)
@ContextHierarchy({
	@ContextConfiguration(name = "parent", locations = "/app-config.xml"),
	@ContextConfiguration(name = "child", locations = "/user-config.xml")
})
class BaseTests {}

@ContextHierarchy(
	@ContextConfiguration(name = "child", locations = "/order-config.xml")
)
class ExtendedTests extends BaseTests {}
具有覆盖上下文层次结构配置的类层次结构
与前一个例子相比,此示例演示了如何通过将@ContextConfiguration中的inheritLocations标志设置为false来覆盖上下文层次结构中给定命名级别的配置。因此,ExtendedTests的应用程序上下文仅从/test-user-config.xml加载,并将其父上下文设置为从/app-config.xml加载的上下文。下面的列表显示了这个配置场景:
@ExtendWith(SpringExtension.class)
@ContextHierarchy({
	@ContextConfiguration(name = "parent", locations = "/app-config.xml"),
	@ContextConfiguration(name = "child", locations = "/user-config.xml")
})
class BaseTests {}

@ContextHierarchy(
	@ContextConfiguration(
		name = "child",
		locations = "/test-user-config.xml",
		inheritLocations = false
))
class ExtendedTests extends BaseTests {}
如果在作为上下文层次结构的一部分配置其上下文的测试中使用@DirtiesContext,可以使用hierarchyMode标志来控制如何清除上下文缓存。
测试夹具的依赖注入(Dependency Injection of Test Fixtures)
当你使用DependencyInjectionTestExecutionListener(默认配置)时,测试实例的依赖项将从使用@ContextConfiguration或相关注解配置的应用程序上下文中的bean中注入。可以根据选择的注解以及是否将它们放在setter方法或字段上来使用setter注入、字段注入或两者兼用。如果使用的是JUnit Jupiter,还可以选择性地使用构造器注入。为了与Spring基于注解的注入支持保持一致,还可以使用Spring的@Autowired注解或JSR-330的@Inject注解进行字段和setter注入。
对于JUnit Jupiter以外的测试框架,TestContext框架不参与测试类的实例化。因此,对于测试类来说,使用@Autowired或@Inject对构造函数没有影响。
尽管在生产代码中不鼓励使用字段注入,但在测试代码中字段注入实际上相当自然。这种差异的理由是你永远不会直接实例化你的测试类。因此,没有必要能够调用测试类的公共构造函数或setter方法。
因为@Autowired用于按类型执行自动装配,如果你有多个相同类型的bean定义,不能依赖这种方法来处理这些特定的bean。在这种情况下,可以将@Autowired与@Qualifier结合使用。也可以选择将@Inject与@Named结合使用。或者,如果你的测试类可以访问其ApplicationContext,可以通过使用(例如)调用applicationContext.getBean("titleRepository", TitleRepository.class)来进行显式查找。
如果你不希望将依赖注入应用到测试实例,请不要用@Autowired或@Inject注释字段或setter方法。或者,可以通过使用@TestExecutionListeners显式配置你的类并从监听器列表中省略DependencyInjectionTestExecutionListener.class来完全禁用依赖注入。
考虑测试HibernateTitleRepository类的场景。接下来的两个代码清单演示了在字段和setter方法上使用@Autowired。在所有样本代码清单之后,介绍了应用程序上下文配置。
以下代码清单中的依赖注入行为并非特定于JUnit Jupiter。相同的DI技术可以与任何支持的测试框架一起使用。
以下示例调用了静态断言方法,例如assertNotNull(),但没有在调用前加上Assertions。在这种情况下,假设通过import static声明正确导入了该方法,但在示例中未显示。
第一个代码清单显示了基于JUnit Jupiter的测试类的实现,该实现使用@Autowired进行字段注入:
@ExtendWith(SpringExtension.class)
// specifies the Spring configuration to load for this test fixture
@ContextConfiguration("repository-config.xml")
class HibernateTitleRepositoryTests {

	// this instance will be dependency injected by type
	@Autowired
	HibernateTitleRepository titleRepository;

	@Test
	void findById() {
		Title title = titleRepository.findById(new Long(10));
		assertNotNull(title);
	}
}
或者,可以配置类以使用@Autowired进行setter注入,如下所示:
@ExtendWith(SpringExtension.class)
// specifies the Spring configuration to load for this test fixture
@ContextConfiguration("repository-config.xml")
class HibernateTitleRepositoryTests {

	// this instance will be dependency injected by type
	HibernateTitleRepository titleRepository;

	@Autowired
	void setTitleRepository(HibernateTitleRepository titleRepository) {
		this.titleRepository = titleRepository;
	}

	@Test
	void findById() {
		Title title = titleRepository.findById(new Long(10));
		assertNotNull(title);
	}
}
前面的代码清单使用了@ContextConfiguration注解引用的相同的XML上下文文件(即repository-config.xml)。以下显示了此配置:
<?xml version="1.0" encoding="UTF-8"?>
<beans xmlns="http://www.springframework.org/schema/beans"
	xmlns:xsi="http://www.w3.org/2001/XMLSchema-instance"
	xsi:schemaLocation="http://www.springframework.org/schema/beans
		https://www.springframework.org/schema/beans/spring-beans.xsd">

	<!-- this bean will be injected into the HibernateTitleRepositoryTests class -->
	<bean id="titleRepository" class="com.foo.repository.hibernate.HibernateTitleRepository">
		<property name="sessionFactory" ref="sessionFactory"/>
	</bean>

	<bean id="sessionFactory" class="org.springframework.orm.hibernate5.LocalSessionFactoryBean">
		<!-- configuration elided for brevity -->
	</bean>

</beans>
如果你从Spring提供的测试基类扩展,而该基类恰好在其setter方法上使用@Autowired,那么在应用程序上下文中可能会定义受影响类型的多个bean(例如,多个DataSource bean)。在这种情况下,可以覆盖setter方法并使用@Qualifier注解来指示特定的目标bean,如下所示(但确保也委托给超类中的覆盖方法):
// ...

	@Autowired
	@Override
	public void setDataSource(@Qualifier("myDataSource") DataSource dataSource) {
		super.setDataSource(dataSource);
	}

// ...
指定的限定符值指示要注入的特定DataSource bean,将类型匹配的范围缩小到特定的bean。它的值与相应定义内的声明进行匹配。bean名称被用作后备限定符值,因此你也可以有效地通过名称指向特定的bean(如前所示,假设myDataSource是bean id)。
测试请求和会话作用域的Bean
Spring自早期以来就支持请求和会话作用域的bean,可以通过以下步骤来测试请求作用域和会话作用域的bean:
- 确保通过使用
@WebAppConfiguration注解来为你的测试加载一个WebApplicationContext。 - 将模拟请求或会话注入到你的测试实例中,并适当准备测试夹具。
- 调用你从配置的
WebApplicationContext(通过依赖注入)检索的Web组件。 - 对mock对象执行断言。
下一个代码片段显示了登录用例的XML配置。请注意,userService bean依赖于request-scoped的loginAction bean。此外,LoginAction是通过使用SpEL表达式实例化的,这些表达式从当前HTTP请求中检索用户名和密码。在我们的测试中,我们希望通过TestContext框架管理的模拟来配置这些请求参数。以下列表显示了这个用例的配置:
Request-scoped bean configuration
<beans>

	<bean id="userService" class="com.example.SimpleUserService"
			c:loginAction-ref="loginAction"/>

	<bean id="loginAction" class="com.example.LoginAction"
			c:username="#{request.getParameter('user')}"
			c:password="#{request.getParameter('pswd')}"
			scope="request">
		<aop:scoped-proxy/>
	</bean>

</beans>
在RequestScopedBeanTests中,我们将UserService(即被测试的主体)和MockHttpServletRequest注入到我们的测试实例中。在我们的requestScope()测试方法中,我们通过设置提供的MockHttpServletRequest中的请求参数来设置测试夹具。当在userService上调用loginUser()方法时,我们可以确保用户服务可以访问当前MockHttpServletRequest的request-scoped loginAction(即我们刚刚设置参数的那个)。然后,我们可以基于已知的用户名和密码输入对结果进行断言。以下列表显示了如何执行此操作:
@SpringJUnitWebConfig
class RequestScopedBeanTests {

	@Autowired UserService userService;
	@Autowired MockHttpServletRequest request;

	@Test
	void requestScope() {
		request.setParameter("user", "enigma");
		request.setParameter("pswd", "$pr!ng");

		LoginResults results = userService.loginUser();
		// assert results
	}
}
以下代码片段与我们之前看到的request-scoped bean的示例类似。然而,这次userService bean依赖于一个session-scoped userPreferences bean。请注意,UserPreferences bean是通过使用SpEL表达式实例化的,该表达式从当前HTTP会话中检索主题。在我们的测试中,我们需要在TestContext框架管理的模拟会话中配置一个主题。以下示例显示了如何执行此操作:
<beans>

	<bean id="userService" class="com.example.SimpleUserService"
			c:userPreferences-ref="userPreferences" />

	<bean id="userPreferences" class="com.example.UserPreferences"
			c:theme="#{session.getAttribute('theme')}"
			scope="session">
		<aop:scoped-proxy/>
	</bean>

</beans>
在SessionScopedBeanTests中,我们将UserService和MockHttpSession注入到我们的测试实例中。在我们的sessionScope()测试方法中,我们通过设置提供的MockHttpSession中的预期theme 属性来设置测试夹具。当在userService上调用processUserPreferences()方法时,我们可以确保用户服务可以访问当前MockHttpSession的session-scoped userPreferences,并且我们可以基于配置的主题对结果进行断言。以下示例显示了如何执行此操作:
@SpringJUnitWebConfig
class SessionScopedBeanTests {

	@Autowired UserService userService;
	@Autowired MockHttpSession session;

	@Test
	void sessionScope() throws Exception {
		session.setAttribute("theme", "blue");

		Results results = userService.processUserPreferences();
		// assert results
	}
}
事务管理
在TestContext框架中,事务由TransactionalTestExecutionListener管理,即使你没有在测试类上显式声明@TestExecutionListeners,也会默认进行配置。然而,要启用对事务的支持,必须在使用@ContextConfiguration语义加载的ApplicationContext中配置一个PlatformTransactionManager bean。此外,还必须在测试的类或方法级别声明Spring的@Transactional注解。
测试管理的事务
测试管理的事务是指通过 TransactionalTestExecutionListener 声明式管理的事务,或通过 TestTransaction以编程方式管理的事务。你不应该将这些事务与 Spring 管理的事务(即那些在为测试加载的 ApplicationContext 中由 Spring 直接管理的事务)或应用程序管理的事务(即那些在由测试调用的应用程序代码中通过编程方式管理的事务)混淆。Spring 管理的事务和应用程序管理的事务通常会参与测试管理的事务。但是,如果 Spring 管理的事务或应用程序管理的事务配置了除 REQUIRED 或 SUPPORTS 以外的任何传播类型,你应该谨慎行事。
当使用测试框架中的任何形式的抢占式超时与 Spring 的测试管理事务结合使用时,必须谨慎行事。
具体来说,Spring 的测试支持会在当前测试方法被调用之前,将事务状态绑定到当前线程(通过 java.lang.ThreadLocal 变量)。如果测试框架为了支持抢占式超时而在新线程中调用当前测试方法,那么在当前测试方法内执行的任何操作都不会在测试管理的事务中执行。因此,这些操作的结果不会被测试管理的事务回滚。相反,这些操作会被提交到持久化存储(例如关系型数据库),即使 Spring 正确回滚了测试管理的事务。
这种情况可能发生的情况包括但不限于以下几种:
- JUnit 4 的
@Test(timeout = …)支持和TimeOut规则 - JUnit Jupiter 的
org.junit.jupiter.api.Assertions类中的assertTimeoutPreemptively(…)方法 - TestNG 的
@Test(timeOut = …)支持
启用和禁用事务
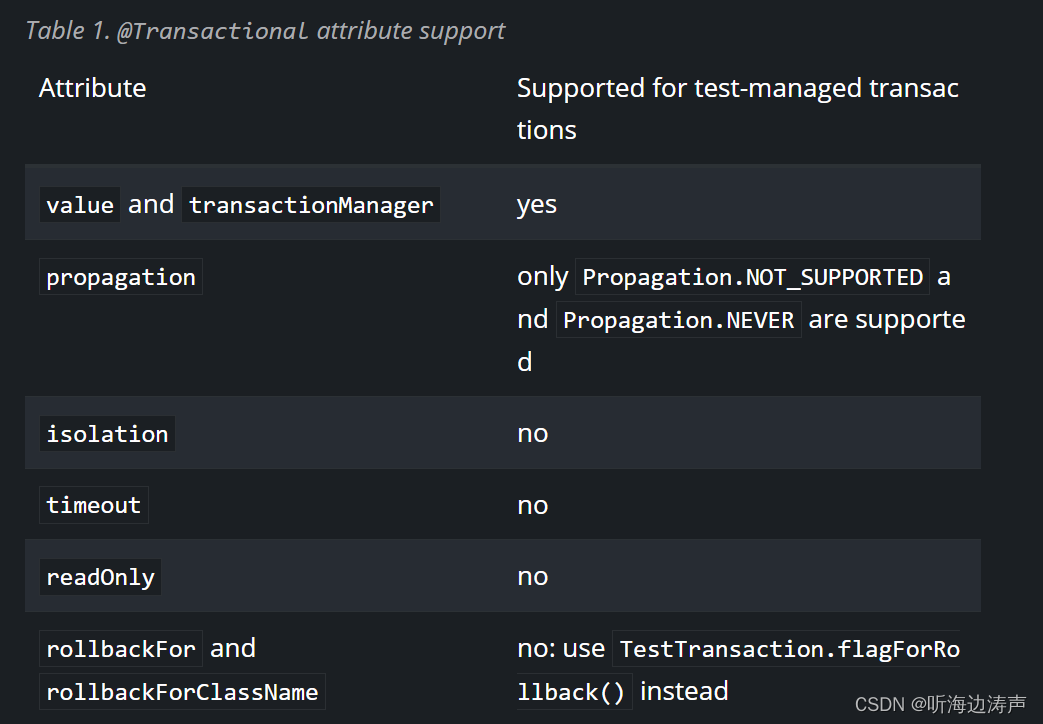
使用 @Transactional 注解一个测试方法会导致该测试在事务中运行,该事务在测试完成后默认会自动回滚。如果一个测试类被 @Transactional 注解,那么该类层次结构中的每个测试方法都会在事务中运行。没有被 @Transactional 注解(无论是在类级别还是方法级别)的测试方法不会在事务中运行。请注意,@Transactional 不支持测试生命周期方法——例如,被 JUnit Jupiter 的 @BeforeAll、@BeforeEach 等注解的方法。此外,被 @Transactional 注解但propagation 属性设置为 NOT_SUPPORTED 或 NEVER 的测试不会在事务中运行。

方法级别的生命周期方法——例如,被 JUnit Jupiter 的 @BeforeEach 或 @AfterEach 注解的方法——会在测试管理的事务中运行。另一方面,套件级别和类级别的生命周期方法——例如,被 JUnit Jupiter 的 @BeforeAll 或 @AfterAll 注解的方法,以及被 TestNG 的 @BeforeSuite、@AfterSuite、@BeforeClass 或 @AfterClass 注解的方法——不会在测试管理的事务中运行。
如果你需要在套件级别或类级别的生命周期方法中运行事务内的代码,你可能需要将相应的 PlatformTransactionManager 注入到你的测试类中,然后使用它与 TransactionTemplate 进行编程式事务管理。
请注意,AbstractTransactionalJUnit4SpringContextTests 和 AbstractTransactionalTestNGSpringContextTests 已经预先配置了类级别的事务支持。
以下示例演示了为基于Hibernate的UserRepository编写集成测试的常见场景:
@SpringJUnitConfig(TestConfig.class)
@Transactional
class HibernateUserRepositoryTests {

	@Autowired
	HibernateUserRepository repository;

	@Autowired
	SessionFactory sessionFactory;

	JdbcTemplate jdbcTemplate;

	@Autowired
	void setDataSource(DataSource dataSource) {
		this.jdbcTemplate = new JdbcTemplate(dataSource);
	}

	@Test
	void createUser() {
		// track initial state in test database:
		final int count = countRowsInTable("user");

		User user = new User(...);
		repository.save(user);

		// Manual flush is required to avoid false positive in test
		sessionFactory.getCurrentSession().flush();
		assertNumUsers(count + 1);
	}

	private int countRowsInTable(String tableName) {
		return JdbcTestUtils.countRowsInTable(this.jdbcTemplate, tableName);
	}

	private void assertNumUsers(int expected) {
		assertEquals("Number of rows in the [user] table.", expected, countRowsInTable("user"));
	}
}
createUser() 方法运行后无需清理数据库,因为 TransactionalTestExecutionListener 会自动回滚对数据库所做的任何更改。
事务回滚和提交行为
默认情况下,测试事务将在测试完成后自动回滚;但是,事务的提交和回滚行为可以通过 @Commit 和 @Rollback 注解进行声明式配置。
编程式事务管理
通过使用TestTransaction中的静态方法,可以以编程方式与测试管理的事务进行交互。例如,可以在测试方法、前置方法和后置方法中使用TestTransaction来启动或结束当前的测试管理事务,或者配置当前的测试管理事务以进行回滚或提交。只要启用了TransactionalTestExecutionListener,就会自动支持TestTransaction。
以下示例展示了 TestTransaction 的一些功能。
@ContextConfiguration(classes = TestConfig.class)
public class ProgrammaticTransactionManagementTests extends
		AbstractTransactionalJUnit4SpringContextTests {

	@Test
	public void transactionalTest() {
		// assert initial state in test database:
		assertNumUsers(2);

		deleteFromTables("user");

		// changes to the database will be committed!
		TestTransaction.flagForCommit();
		TestTransaction.end();
		assertFalse(TestTransaction.isActive());
		assertNumUsers(0);

		TestTransaction.start();
		// perform other actions against the database that will
		// be automatically rolled back after the test completes...
	}

	protected void assertNumUsers(int expected) {
		assertEquals("Number of rows in the [user] table.", expected, countRowsInTable("user"));
	}
}
在事务外部运行代码
偶尔,你可能需要在事务性测试方法之前或之后但在事务性上下文之外运行某些代码——例如,在运行测试之前验证数据库的初始状态,或在测试运行后验证期望的事务提交行为(如果测试配置为提交事务)。TransactionalTestExecutionListener 支持 @BeforeTransaction 和 @AfterTransaction 注解,正是为了应对这样的场景。你可以在测试类中的任何 void 方法或测试接口中的任何 void 默认方法上使用这些注解之一,而 TransactionalTestExecutionListener 会确保你的在事务之前的方法或在事务之后的方法在适当的时间运行。
一般来说,@BeforeTransaction 和 @AfterTransaction 方法不能接受任何参数。
然而,从 Spring Framework 6.1 开始,对于使用 SpringExtension 与 JUnit Jupiter 的测试,@BeforeTransaction 和 @AfterTransaction 方法可以选择性地接受参数,这些参数将由任何已注册的 JUnit ParameterResolver 扩展(如 SpringExtension)解析。这意味着像 TestInfo 这样的 JUnit 特定参数或来自测试 ApplicationContext 的 bean 可以被提供给 @BeforeTransaction 和 @AfterTransaction 方法,如下面的示例所示。
@BeforeTransaction
void verifyInitialDatabaseState(@Autowired DataSource dataSource) {
	// Use the DataSource to verify the initial state before a transaction is started
}
对于事务性测试方法,任何前置方法(如使用 JUnit Jupiter 的 @BeforeEach 注解的方法)和任何后置方法(如使用 JUnit Jupiter 的 @AfterEach 注解的方法)都会在测试管理的事务中运行。
类似地,只有使用 @BeforeTransaction 或 @AfterTransaction 注解的方法才会为事务性测试方法运行。
配置事务管理器
TransactionalTestExecutionListener 期望在 Spring ApplicationContext 中为测试定义一个 PlatformTransactionManager bean。如果在测试的 ApplicationContext 中有多个 PlatformTransactionManager 实例,你可以使用 @Transactional("myTxMgr") 或 @Transactional(transactionManager = "myTxMgr") 声明限定符,或者由一个 @Configuration 类实现 TransactionManagementConfigurer。
所有与事务相关的注解的演示
以下基于 JUnit Jupiter 的示例展示了一个虚构的集成测试场景,该场景强调了所有与事务相关的注解。该示例并不是为了展示最佳实践,而是演示这些注解如何被使用。@Sql 的事务管理包含一个额外示例,该示例使用 @Sql 进行声明式 SQL 脚本执行,具有默认的事务回滚语义。以下示例展示了相关的注解:
@SpringJUnitConfig
@Transactional(transactionManager = "txMgr")
@Commit
class FictitiousTransactionalTest {

	@BeforeTransaction
	void verifyInitialDatabaseState() {
		// logic to verify the initial state before a transaction is started
	}

	@BeforeEach
	void setUpTestDataWithinTransaction() {
		// set up test data within the transaction
	}

	@Test
	// overrides the class-level @Commit setting
	@Rollback
	void modifyDatabaseWithinTransaction() {
		// logic which uses the test data and modifies database state
	}

	@AfterEach
	void tearDownWithinTransaction() {
		// run "tear down" logic within the transaction
	}

	@AfterTransaction
	void verifyFinalDatabaseState() {
		// logic to verify the final state after transaction has rolled back
	}

}
当测试应用程序代码时,这些代码会操作 Hibernate 会话或 JPA 持久化上下文的状态,请确保在运行这些代码的测试方法中刷新底层的工作单元。未能刷新底层工作单元可能会导致假阳性结果:测试通过了,但相同的代码在实时生产环境中会抛出异常。请注意,这适用于任何维护内存工作单元的 ORM 框架。在以下基于 Hibernate 的示例测试用例中,一个方法展示了假阳性结果,而另一个方法则正确地展示了刷新会话的结果:
// ...

@Autowired
SessionFactory sessionFactory;

@Transactional
@Test // no expected exception!
public void falsePositive() {
	updateEntityInHibernateSession();
	// False positive: an exception will be thrown once the Hibernate
	// Session is finally flushed (i.e., in production code)
}

@Transactional
@Test(expected = ...)
public void updateWithSessionFlush() {
	updateEntityInHibernateSession();
	// Manual flush is required to avoid false positive in test
	sessionFactory.getCurrentSession().flush();
}

// ...
以下示例展示了与 JPA 匹配的方法:
// ...

@PersistenceContext
EntityManager entityManager;

@Transactional
@Test // no expected exception!
public void falsePositive() {
	updateEntityInJpaPersistenceContext();
	// False positive: an exception will be thrown once the JPA
	// EntityManager is finally flushed (i.e., in production code)
}

@Transactional
@Test(expected = ...)
public void updateWithEntityManagerFlush() {
	updateEntityInJpaPersistenceContext();
	// Manual flush is required to avoid false positive in test
	entityManager.flush();
}

// ...
与关于在测试 ORM 代码时避免假阳性的说明类似,如果应用程序使用了实体生命周期回调(也称为实体监听器),请确保在运行该代码的测试方法中刷新底层工作单元。未能刷新或清除底层工作单元可能会导致某些生命周期回调未被调用。
例如,在使用 JPA 时,@PostPersist、@PreUpdate 和 @PostUpdate 回调在实体被保存或更新后,除非调用了 entityManager.flush(),否则这些回调不会被调用。类似地,如果一个实体已经附加到当前的工作单元(与当前持久化上下文关联),那么除非在尝试重新加载实体之前调用 entityManager.clear(),否则尝试重新加载该实体不会导致 @PostLoad 回调被调用。
以下示例展示了如何刷新 EntityManager,以确保在实体被持久化时调用 @PostPersist 回调。示例中使用的 Person 实体已经注册了一个带有 @PostPersist 回调方法的实体监听器。
// ...

@Autowired
JpaPersonRepository repo;

@PersistenceContext
EntityManager entityManager;

@Transactional
@Test
void savePerson() {
	// EntityManager#persist(...) results in @PrePersist but not @PostPersist
	repo.save(new Person("Jane"));

	// Manual flush is required for @PostPersist callback to be invoked
	entityManager.flush();

	// Test code that relies on the @PostPersist callback
	// having been invoked...
}

// ...
执行SQL脚本
在编写针对关系型数据库的集成测试时,通常运行SQL脚本来修改数据库schema 或将测试数据插入表中是有益的。spring-jdbc模块提供了在加载Spring ApplicationContext时通过执行SQL脚本来初始化嵌入式或现有数据库的支持。
虽然在 ApplicationContext 加载时一次性初始化数据库进行测试非常有用,但有时在集成测试期间能够修改数据库也是至关重要的。
以编程方式执行SQL脚本
Spring 提供了以下选项,以便在集成测试方法中编程方式执行 SQL 脚本。
org.springframework.jdbc.datasource.init.ScriptUtilsorg.springframework.jdbc.datasource.init.ResourceDatabasePopulatororg.springframework.test.context.junit4.AbstractTransactionalJUnit4SpringContextTestsorg.springframework.test.context.testng.AbstractTransactionalTestNGSpringContextTests
ScriptUtils 提供了一组用于处理 SQL 脚本的静态实用方法,主要供框架内部使用。然而,如果你需要完全控制 SQL 脚本的解析和运行方式,那么 ScriptUtils 可能比其他后面描述的一些替代方案更适合你的需求。
ResourceDatabasePopulator 提供了一个基于对象的 API,用于通过外部资源中定义的 SQL 脚本以编程方式填充、初始化或清理数据库。ResourceDatabasePopulator 提供了配置字符编码、语句分隔符、注释分隔符和解析和运行脚本时使用的错误处理标志的选项。每个配置选项都有一个合理的默认值。要运行配置在 ResourceDatabasePopulator 中的脚本,可以调用 populate(Connection) 方法来针对 java.sql.Connection 运行填充器,或者调用 execute(DataSource) 方法来针对 javax.sql.DataSource 运行填充器。以下示例指定了用于测试schema 和测试数据的 SQL 脚本,将语句分隔符设置为 @@,并针对 DataSource 运行脚本:
@Test
void databaseTest() {
	ResourceDatabasePopulator populator = new ResourceDatabasePopulator();
	populator.addScripts(
			new ClassPathResource("test-schema.sql"),
			new ClassPathResource("test-data.sql"));
	populator.setSeparator("@@");
	populator.execute(this.dataSource);
	// run code that uses the test schema and data
}
ResourceDatabasePopulator 内部会委托给 ScriptUtils 来解析和运行 SQL 脚本。类似地,AbstractTransactionalJUnit4SpringContextTests 和 AbstractTransactionalTestNGSpringContextTests 中的 executeSqlScript(..) 方法内部也会使用 ResourceDatabasePopulator 来运行 SQL 脚本。
使用 @Sql 声明式地执行 SQL 脚本
除了前面提到的以编程方式运行 SQL 脚本的机制外,还可以在 Spring TestContext Framework 中声明式地配置 SQL 脚本。具体来说,可以在测试类或测试方法上声明 @Sql 注解,以配置在集成测试类或测试方法之前或之后针对特定数据库运行的单个 SQL 语句或 SQL 脚本的资源路径。@Sql 的支持由 SqlScriptsTestExecutionListener 提供,该监听器默认是启用的。
默认情况下,方法级别的 @Sql 声明会覆盖类级别的声明,但可以通过 @SqlMergeMode 针对每个测试类或每个测试方法进行配置来改变这种行为。
然而,这并不适用于配置为 BEFORE_TEST_CLASS 或 AFTER_TEST_CLASS 执行阶段的类级别声明。这些声明不能被覆盖,并且除了任何方法级别的脚本和语句之外,相应的脚本和语句将针对每个类执行一次。
路径资源语义
每个路径都被解释为一个 Spring Resource。普通路径(例如,“schema.sql")被视为类路径资源,相对于定义测试类的包。以斜杠开头的路径被视为绝对类路径资源(例如,”/org/example/schema.sql")。引用 URL 的路径(例如,以 classpath:、file:、http: 开头的路径)将使用指定的资源协议进行加载。
以下示例展示了如何在基于 JUnit Jupiter 的集成测试类中在类级别和方法级别使用 @Sql:
@SpringJUnitConfig
@Sql("/test-schema.sql")
class DatabaseTests {

	@Test
	void emptySchemaTest() {
		// run code that uses the test schema without any test data
	}

	@Test
	@Sql({"/test-schema.sql", "/test-user-data.sql"})
	void userTest() {
		// run code that uses the test schema and test data
	}
}
默认脚本检测
如果没有指定 SQL 脚本或语句,则会尝试根据 @Sql 的声明位置来检测默认脚本。如果无法检测到默认脚本,则会抛出 IllegalStateException 异常。
- 类级别声明:如果带注解的测试类是
com.example.MyTest,则对应的默认脚本是
classpath:com/example/MyTest.sql。 - 方法级别声明:如果带注解的测试方法名为
testMethod(),并且定义在com.example.MyTest类中,则对应的默认脚本是classpath:com/example/MyTest.testMethod.sql。
记录 SQL 脚本和语句
如果你想查看正在执行哪些 SQL 脚本,请将 org.springframework.test.context.jdbc 日志类别设置为 DEBUG。
如果你想查看正在执行哪些 SQL 语句,请将 org.springframework.jdbc.datasource.init 日志类别设置为 DEBUG。
声明多个 @Sql 集合
如果你需要为给定的测试类或测试方法配置多组 SQL 脚本,但每组具有不同的语法配置、不同的错误处理规则或不同的执行阶段,你可以声明多个 @Sql 实例。你可以将 @Sql 用作可重复注解,或者使用 @SqlGroup 注解作为显式容器来声明多个 @Sql 实例。
以下示例展示了如何使用 @Sql 作为可重复注解:
@Test
@Sql(scripts = "/test-schema.sql", config = @SqlConfig(commentPrefix = "`"))
@Sql("/test-user-data.sql")
void userTest() {
	// run code that uses the test schema and test data
}
在前面的示例中展示的场景中,test-schema.sql 脚本使用了不同的单行注释语法。
以下示例与前面的示例相同,只是 @Sql 声明在 @SqlGroup 内被组合在一起。使用 @SqlGroup 是可选的,但你可能需要为了与其他 JVM 语言兼容而使用 @SqlGroup。
@Test
@SqlGroup({
	@Sql(scripts = "/test-schema.sql", config = @SqlConfig(commentPrefix = "`")),
	@Sql("/test-user-data.sql")
)}
void userTest() {
	// run code that uses the test schema and test data
}
脚本执行阶段
默认情况下,SQL 脚本会在对应的测试方法之前运行。但是,如果你需要在测试方法之后运行特定的脚本集(例如,为了清理数据库状态),你可以将 @Sql 中的 executionPhase 属性设置为 AFTER_TEST_METHOD,如下例所示:
@Test
@Sql(
	scripts = "create-test-data.sql",
	config = @SqlConfig(transactionMode = ISOLATED)
)
@Sql(
	scripts = "delete-test-data.sql",
	config = @SqlConfig(transactionMode = ISOLATED),
	executionPhase = AFTER_TEST_METHOD
)
void userTest() {
	// run code that needs the test data to be committed
	// to the database outside of the test's transaction
}
ISOLATED 和 AFTER_TEST_METHOD 分别从 Sql.TransactionMode 和 Sql.ExecutionPhase 静态导入。
从 Spring Framework 6.1 开始,可以通过在类级别的 @Sql 声明中将 executionPhase 属性设置为 BEFORE_TEST_CLASS 或 AFTER_TEST_CLASS 来在测试类之前或之后运行特定的脚本集,如下所示:
@SpringJUnitConfig
@Sql(scripts = "/test-schema.sql", executionPhase = BEFORE_TEST_CLASS)
class DatabaseTests {

	@Test
	void emptySchemaTest() {
		// run code that uses the test schema without any test data
	}

	@Test
	@Sql("/test-user-data.sql")
	void userTest() {
		// run code that uses the test schema and test data
	}
}
EFORE_TEST_CLASS 是从 Sql.ExecutionPhase 静态导入的。
使用 @SqlConfig 配置脚本
你可以使用 @SqlConfig 注解来配置脚本解析和错误处理。当在集成测试类上作为类级别的注解声明时,@SqlConfig 服务于测试类层次结构中所有 SQL 脚本的全局配置。当直接使用 @Sql 注解的 config 属性声明时,@SqlConfig 服务于封闭 @Sql 注解中声明的 SQL 脚本的本地配置。@SqlConfig 中的每个属性都有一个默认的隐式值,这些值在相应属性的 javadoc 中有文档说明。根据 Java 语言规范中定义的注解属性规则,不幸的是,不可能将 null 值分配给注解属性。因此,为了支持覆盖继承的全局配置,@SqlConfig 属性的显式默认值可以是 ""(对于字符串)、{}(对于数组)或 DEFAULT(对于枚举)。这种方法允许 @SqlConfig 的本地声明通过提供除 ""、{} 或 DEFAULT 以外的值来选择性覆盖 @SqlConfig 全局声明中的单个属性。当本地 @SqlConfig 属性未提供除 ""、{} 或 DEFAULT 以外的显式值时,会继承全局 @SqlConfig 属性。因此,显式的本地配置会覆盖全局配置。
@Sql 和 @SqlConfig 提供的配置选项与 ScriptUtils 和 ResourceDatabasePopulator 支持的选项相当,但它们是 <jdbc:initialize-database/> 命名空间元素提供的配置选项的超集。
@Sql 的事务管理
默认情况下,SqlScriptsTestExecutionListener 会推断出使用 @Sql 配置的脚本所需的事务语义。具体来说,SQL 脚本将在没有事务的情况下运行,或者在现有的 Spring 管理的事务中运行(例如,通过 TransactionalTestExecutionListener 管理的事务,用于标注有 @Transactional 的测试),或者在隔离的事务中运行,这取决于 @SqlConfig 中配置的 transactionMode 属性的值和测试中 ApplicationContext 中是否存在 PlatformTransactionManager。然而,最低要求是 javax.sql.DataSource 必须存在于测试的 ApplicationContext 中。
如果 SqlScriptsTestExecutionListener 用于检测 DataSource 和 PlatformTransactionManager 以及推断事务语义的算法不符合你的需求,你可以通过设置 @SqlConfig 的 dataSource 和 transactionManager 属性来指定明确的名称。此外,你还可以通过设置 @SqlConfig 的 transactionMode 属性来控制事务传播行为(例如,脚本是否应在隔离事务中运行)。以下示例展示了使用 JUnit Jupiter 和带有 @Sql 的事务性测试的典型测试场景:
@SpringJUnitConfig(TestDatabaseConfig.class)
@Transactional
class TransactionalSqlScriptsTests {

	final JdbcTemplate jdbcTemplate;

	@Autowired
	TransactionalSqlScriptsTests(DataSource dataSource) {
		this.jdbcTemplate = new JdbcTemplate(dataSource);
	}

	@Test
	@Sql("/test-data.sql")
	void usersTest() {
		// verify state in test database:
		assertNumUsers(2);
		// run code that uses the test data...
	}

	int countRowsInTable(String tableName) {
		return JdbcTestUtils.countRowsInTable(this.jdbcTemplate, tableName);
	}

	void assertNumUsers(int expected) {
		assertEquals(expected, countRowsInTable("user"),
			"Number of rows in the [user] table.");
	}
}
在 usersTest() 方法运行后,无需清理数据库,因为任何对数据库所做的更改(无论是在测试方法内部还是在 /test-data.sql 脚本中)都将由 TransactionalTestExecutionListener 自动回滚。
使用 @SqlMergeMode 合并和覆盖配置
从 Spring Framework 5.2 开始,可以将方法级别的 @Sql 声明与类级别的声明合并。例如,这允许为数据库schema 或一些常见的测试数据在每个测试类中提供一次配置,然后为每个测试方法提供额外的、特定用例的测试数据。要启用 @Sql 的合并,请将 @SqlMergeMode(MERGE) 注解添加到你的测试类或测试方法中。要禁用特定测试方法(或特定的测试子类)的合并,可以通过 @SqlMergeMode(OVERRIDE) 切换回默认模式。
并行测试执行
Spring Framework 5.0 在使用 Spring TestContext Framework 时,引入了在一个 JVM 内部并行执行测试的基本支持。通常,这意味着大多数测试类或测试方法都可以并行运行,而无需对测试代码或配置进行任何更改。
请注意,将并发性引入测试套件可能会导致意外的副作用、奇怪的运行时行为,以及间歇性失败或看似随机失败的测试。因此,Spring 团队提供了以下关于何时不要并行运行测试的通用指南。
如果测试满足以下条件,则不要并行运行测试:
- 使用 Spring Framework 的
@DirtiesContext支持。 - 使用 Spring Boot 的
@MockBean或@SpyBean支持。 - 使用 JUnit 4 的
@FixMethodOrder支持或任何旨在确保测试方法按特定顺序运行的测试框架特性。但是,请注意,如果整个测试类都是并行运行的,则这一点不适用。 - 更改共享服务或系统(如数据库、消息代理、文件系统等)的状态。这既适用于嵌入式系统,也适用于外部系统。
如果并行测试执行因异常而失败,并指出当前测试的 ApplicationContext 不再处于活动状态,这通常意味着 ApplicationContext 已在另一个线程中从 ContextCache 中移除。
这可能是由于使用了 @DirtiesContext 或由于自动从 ContextCache 中驱逐导致的。如果 @DirtiesContext 是罪魁祸首,你需要找到避免使用 @DirtiesContext 的方法,或者将此类测试排除在并行执行之外。如果 ContextCache 的最大大小已超出,你可以增加缓存的最大大小。
在 Spring TestContext Framework 中,只有当底层的 TestContext 实现提供了拷贝构造函数时,才能进行并行测试执行。Spring 中使用的 DefaultTestContext 提供了这样的构造函数。然而,如果你使用第三方库提供了自定义的 TestContext 实现,你需要验证它是否适合并行测试执行。
TestContext 框架支持类
本节描述了支持 Spring TestContext Framework 的各种类。
Spring JUnit 4 Runner
Spring TestContext Framework 通过自定义运行器(支持 JUnit 4.12 或更高版本)与 JUnit 4 完全集成。通过使用 @RunWith(SpringJUnit4ClassRunner.class) 或更简短的 @RunWith(SpringRunner.class) 变体来注解测试类,开发人员可以实现基于标准 JUnit 4 的单元测试和集成测试,同时享受 TestContext 框架的好处,例如支持加载应用程序上下文、测试实例的依赖注入、事务性测试方法执行等。如果你想要使用替代运行器(例如 JUnit 4 的 Parameterized 运行器)或第三方运行器(例如 MockitoJUnitRunner)与 Spring TestContext Framework 一起使用,你可以选择使用 Spring 对 JUnit 规则的支持。
以下代码列表显示了使用自定义 Spring 运行器配置测试类的最低要求:
@RunWith(SpringRunner.class)
@TestExecutionListeners({})
public class SimpleTest {

	@Test
	public void testMethod() {
		// test logic...
	}
}
在前面的示例中,@TestExecutionListeners 被配置为一个空列表,以禁用默认的监听器。否则,这些默认的监听器将要求通过 @ContextConfiguration 配置一个 ApplicationContext。
Spring JUnit 4 规则
org.springframework.test.context.junit4.rules 包提供了以下 JUnit 4 规则(支持 JUnit 4.12 或更高版本):
SpringClassRuleSpringMethodRule
SpringClassRule 是一个 JUnit 测试规则,它支持 Spring TestContext Framework 的类级别特性,而 SpringMethodRule 则是一个 JUnit 方法规则,它支持 Spring TestContext Framework 的实例级别和方法级别特性。
与 SpringRunner 相比,Spring 基于规则的 JUnit 支持具有独立于任何 org.junit.runner.Runner 实现的优势,因此可以与现有的替代运行器(如 JUnit 4 的 Parameterized)或第三方运行器(如 MockitoJUnitRunner)结合使用。
为了支持 TestContext 框架的全部功能,你必须将 SpringClassRule 与 SpringMethodRule 结合使用。以下示例展示了在集成测试中正确声明这些规则的方式:
// Optionally specify a non-Spring Runner via @RunWith(...)
@ContextConfiguration
public class IntegrationTest {

	@ClassRule
	public static final SpringClassRule springClassRule = new SpringClassRule();

	@Rule
	public final SpringMethodRule springMethodRule = new SpringMethodRule();

	@Test
	public void testMethod() {
		// test logic...
	}
}
JUnit 4 支持类
org.springframework.test.context.junit4 包为基于 JUnit 4 的测试用例提供了以下支持类(支持 JUnit 4.12 或更高版本):
AbstractJUnit4SpringContextTestsAbstractTransactionalJUnit4SpringContextTests
AbstractJUnit4SpringContextTests 是一个抽象基类,它在一个 JUnit 4 环境中集成了 Spring TestContext Framework 并提供了显式的 ApplicationContext 测试支持。当你继承 AbstractJUnit4SpringContextTests 时,你可以访问一个受保护的 applicationContext 实例变量,可以使用它来执行显式的 bean 查找或测试整个上下文的状态。
AbstractTransactionalJUnit4SpringContextTests 是 AbstractJUnit4SpringContextTests 的一个抽象事务性扩展,它增加了一些用于 JDBC 访问的便捷功能。这个类期望在 ApplicationContext 中定义了一个 javax.sql.DataSource bean 和一个 PlatformTransactionManager bean。当你继承 AbstractTransactionalJUnit4SpringContextTests 时,你可以访问一个受保护的 jdbcTemplate 实例变量,你可以使用它来运行 SQL 语句以查询数据库。你可以使用这样的查询来确认运行与数据库相关的应用程序代码之前和之后的数据库状态,而 Spring 会确保这些查询在与应用程序代码相同的事务范围内运行。
当与 ORM 工具一起使用时,请确保避免产生误报。AbstractTransactionalJUnit4SpringContextTests 还提供了便捷方法,这些方法通过使用jdbcTemplate 委托给 JdbcTestUtils 中的方法。此外,AbstractTransactionalJUnit4SpringContextTests 提供了一个 executeSqlScript(..) 方法,用于在配置的 DataSource 上运行 SQL 脚本。
这些类是为了方便扩展而设计的。如果你不希望你的测试类与 Spring 特定的类层次结构绑定在一起,你可以通过使用 @RunWith(SpringRunner.class) 或 Spring 的 JUnit 规则来配置你自己的自定义测试类。
JUnit Jupiter 的 Spring 扩展
Spring TestContext Framework 提供了与 JUnit 5 中引入的 JUnit Jupiter 测试框架的完全集成。通过用 @ExtendWith(SpringExtension.class) 注解测试类,你可以实现基于标准 JUnit Jupiter 的单元和集成测试,同时享受 TestContext 框架带来的好处,例如支持加载应用程序上下文、测试实例的依赖注入、事务性测试方法执行等。
此外,由于 JUnit Jupiter 提供了丰富的扩展 API,Spring 在此基础上提供了以下特性,这些特性超出了 Spring 对 JUnit 4 和 TestNG 的支持范围:
- 测试构造函数、测试方法和测试生命周期回调方法的依赖注入。
- 基于 SpEL 表达式、环境变量、系统属性等条件的强大测试执行支持。
- 自定义组合注解,将 Spring 和 JUnit Jupiter 的注解结合在一起。
以下代码示例展示了如何配置一个测试类以结合使用 SpringExtension 和
`@ContextConfiguration`:
// Instructs JUnit Jupiter to extend the test with Spring support.
@ExtendWith(SpringExtension.class)
// Instructs Spring to load an ApplicationContext from TestConfig.class
@ContextConfiguration(classes = TestConfig.class)
class SimpleTests {

	@Test
	void testMethod() {
		// test logic...
	}
}
由于也可以在 JUnit 5 中将注解用作元注解,Spring 提供了 @SpringJUnitConfig 和 @SpringJUnitWebConfig 组合注解,以简化测试 ApplicationContext 和 JUnit Jupiter 的配置。
以下示例使用 @SpringJUnitConfig 来减少前一个示例中使用的配置量:
// Instructs Spring to register the SpringExtension with JUnit
// Jupiter and load an ApplicationContext from TestConfig.class
@SpringJUnitConfig(TestConfig.class)
class SimpleTests {

	@Test
	void testMethod() {
		// test logic...
	}
}
类似地,以下示例使用 @SpringJUnitWebConfig 来为 JUnit Jupiter 创建一个 WebApplicationContext:
// Instructs Spring to register the SpringExtension with JUnit
// Jupiter and load a WebApplicationContext from TestWebConfig.class
@SpringJUnitWebConfig(TestWebConfig.class)
class SimpleWebTests {

	@Test
	void testMethod() {
		// test logic...
	}
}
使用 SpringExtension 进行依赖注入
SpringExtension 实现了 JUnit Jupiter 的 ParameterResolver 扩展 API,这使得 Spring 可以为测试构造函数、测试方法和测试生命周期回调方法提供依赖注入。
具体来说,SpringExtension 可以将从测试的 ApplicationContext 中获取的依赖注入到使用 Spring 的 @BeforeTransaction 和 @AfterTransaction,或 JUnit 的 @BeforeAll、@AfterAll、@BeforeEach、@AfterEach、@Test、@RepeatedTest、@ParameterizedTest 等注解的测试构造函数和方法中。
构造器注入
如果 JUnit Jupiter 测试类的一个构造函数中的特定参数是 ApplicationContext 类型(或其子类型),或者该参数被 @Autowired、@Qualifier 或 @Value 注解或元注解标记,Spring 将会使用测试 ApplicationContext 中对应的 bean 或值来注入该特定参数的值。
Spring 也可以配置为自动装配测试类构造器的所有参数,如果该构造器被认为是可自动装配的。构造器被认为是可自动装配的,如果满足以下条件之一(按优先级顺序)。
- 构造器被
@Autowired注解标记。 - 测试类上存在
@TestConstructor或其元注解,并且autowireMode属性被设置为ALL。 - 默认测试构造器自动装配模式已被更改为
ALL。
如果一个测试类的构造器被认为是可自动装配的,Spring 将负责解析构造器中所有参数的参数值。因此,JUnit Jupiter 中注册的其他 ParameterResolver 无法为这样的构造器解析参数。
如果在使用 @DirtiesContext 来在测试方法之前或之后关闭测试的 ApplicationContext 的情况下,测试类不应该将构造器注入与 JUnit Jupiter 的 @TestInstance(PER_CLASS) 支持一起使用。
原因在于 @TestInstance(PER_CLASS) 指示 JUnit Jupiter 在测试方法调用之间缓存测试实例。因此,测试实例将保留对最初从随后关闭的 ApplicationContext 中注入的 bean 的引用。由于在这种情况下测试类的构造器只会被调用一次,因此不会再次发生依赖注入,随后的测试将与来自已关闭的 ApplicationContext 的 bean 交互,这可能会导致错误。
要在使用 @TestInstance(PER_CLASS) 的同时与 “before test method” 或 “after test method” 模式的 @DirtiesContext 配合使用,必须将 Spring 的依赖配置为通过字段或 setter 方法注入,以便在测试方法调用之间重新注入它们。
在以下示例中,Spring 将从通过 TestConfig.class 加载的 ApplicationContext 中注入 OrderService bean 到 OrderServiceIntegrationTests 构造器中。
@SpringJUnitConfig(TestConfig.class)
class OrderServiceIntegrationTests {

	private final OrderService orderService;

	@Autowired
	OrderServiceIntegrationTests(OrderService orderService) {
		this.orderService = orderService;
	}

	// tests that use the injected OrderService
}
注意,这个特性允许测试依赖项是final,因此是不可变的。
如果 spring.test.constructor.autowire.mode 属性设置为 all,我们可以在前面的示例中省略构造器上的 @Autowired 声明,结果如下。
@SpringJUnitConfig(TestConfig.class)
class OrderServiceIntegrationTests {

	private final OrderService orderService;

	OrderServiceIntegrationTests(OrderService orderService) {
		this.orderService = orderService;
	}

	// tests that use the injected OrderService
}
方法注入
在 JUnit Jupiter 的测试方法或测试生命周期回调方法中,如果一个参数的类型是 ApplicationContext(或其子类型),或者该参数被 @Autowired、@Qualifier 或 @Value 注解或元注解标记,Spring 将会使用测试 ApplicationContext 中对应的 bean 为该特定参数注入值。
在以下示例中,Spring 将从通过 TestConfig.class 加载的 ApplicationContext 中注入 OrderService 到 deleteOrder() 测试方法中:
@SpringJUnitConfig(TestConfig.class)
class OrderServiceIntegrationTests {

	@Test
	void deleteOrder(@Autowired OrderService orderService) {
		// use orderService from the test's ApplicationContext
	}
}
由于 JUnit Jupiter 中 ParameterResolver 支持的健壮性,你不仅可以从 Spring 中,还可以从 JUnit Jupiter 本身或其他第三方扩展中,将多个依赖项注入到单个方法中。
以下示例展示了如何同时让 Spring 和 JUnit Jupiter 将依赖项注入到 placeOrderRepeatedly() 测试方法中。
@SpringJUnitConfig(TestConfig.class)
class OrderServiceIntegrationTests {

	@RepeatedTest(10)
	void placeOrderRepeatedly(RepetitionInfo repetitionInfo,
			@Autowired OrderService orderService) {

		// use orderService from the test's ApplicationContext
		// and repetitionInfo from JUnit Jupiter
	}
}
注意,使用 JUnit Jupiter 中的 @RepeatedTest 注解可以让测试方法访问 RepetitionInfo。
@Nested 测试类配置
从 Spring Framework 5.0 开始,Spring TestContext Framework 就支持在 JUnit Jupiter 的 @Nested 测试类上使用与测试相关的注解;然而,直到 Spring Framework 5.3 之前,类级别的测试配置注解并没有像从超类继承那样从包含类继承。
Spring Framework 5.3 引入了对从包含类继承测试类配置的一流支持,并且默认情况下会继承此类配置。要从默认的 INHERIT 模式更改为 OVERRIDE 模式,可以在单独的 @Nested 测试类上使用 @NestedTestConfiguration(EnclosingConfiguration.OVERRIDE) 注解。一个明确的 @NestedTestConfiguration 声明将应用于被注解的测试类以及其任何子类和嵌套类。因此,可以在顶层测试类上使用 @NestedTestConfiguration 注解,这将递归地应用于其所有嵌套测试类。
为了允许开发团队将默认设置更改为 OVERRIDE(例如,为了与 Spring Framework 5.0 到 5.2 版本兼容),可以通过 JVM 系统属性或在类路径的根目录下的 spring.properties 文件中全局更改默认模式。
虽然下面的“Hello World”示例非常简单,但它展示了如何在顶层类中声明公共配置,这些配置会被其 @Nested 测试类继承。在这个特定的示例中,只有 TestConfig 配置类被继承。每个嵌套的测试类都提供自己的一组激活的profile,从而导致每个嵌套的测试类都有一个不同的 ApplicationContext。
@SpringJUnitConfig(TestConfig.class)
class GreetingServiceTests {

	@Nested
	@ActiveProfiles("lang_en")
	class EnglishGreetings {

		@Test
		void hello(@Autowired GreetingService service) {
			assertThat(service.greetWorld()).isEqualTo("Hello World");
		}
	}

	@Nested
	@ActiveProfiles("lang_de")
	class GermanGreetings {

		@Test
		void hello(@Autowired GreetingService service) {
			assertThat(service.greetWorld()).isEqualTo("Hallo Welt");
		}
	}
}
TestNG 支持类
org.springframework.test.context.testng 包为基于 TestNG 的测试用例提供了以下支持类:
AbstractTestNGSpringContextTestsAbstractTransactionalTestNGSpringContextTests
AbstractTestNGSpringContextTests 是一个抽象的基础测试类,它将 Spring TestContext Framework 与 TestNG 环境中的显式 ApplicationContext 测试支持集成在一起。当你继承 AbstractTestNGSpringContextTests 时,你可以访问一个受保护的 applicationContext 实例变量,你可以使用它来执行显式的 bean 查找,或者测试整个上下文的状态。
AbstractTransactionalTestNGSpringContextTests 是 AbstractTestNGSpringContextTests 的一个抽象事务性扩展,它添加了一些便于 JDBC 访问的功能。这个类期望在 ApplicationContext 中定义一个 javax.sql.DataSource bean 和一个 PlatformTransactionManager bean。当你继承 AbstractTransactionalTestNGSpringContextTests 时,你可以访问一个受保护的 jdbcTemplate 实例变量,你可以使用这个变量来运行 SQL 语句查询数据库。你可以使用这些查询来确认运行与数据库相关的应用程序代码前后的数据库状态,而 Spring 确保这些查询在与应用程序代码相同的事务范围内运行。当与 ORM 工具一起使用时,请确保避免假阳性。AbstractTransactionalTestNGSpringContextTests 还提供了便利方法,这些方法通过使用 jdbcTemplate 将任务委托给 JdbcTestUtils 中的方法。此外,AbstractTransactionalTestNGSpringContextTests 提供了一个 executeSqlScript(..) 方法,用于在配置的 DataSource 上运行 SQL 脚本。
这些类是为了方便扩展而提供的。如果你不希望你的测试类与 Spring 特定的类层次结构绑定,你可以通过使用 @ContextConfiguration、@TestExecutionListeners 等注解,以及手动使用 TestContextManager 来配置你自己的自定义测试类。
对测试的预编译时支持(Ahead of Time Support for Tests)
本章介绍了在使用 Spring TestContext Framework 进行集成测试时,Spring 提供的预编译时(Ahead of Time, AOT)支持功能。
测试支持通过以下功能扩展了 Spring 的核心 AOT(预编译时)支持。
- 在构建时检测当前项目中所有使用 TestContext 框架来加载
ApplicationContext的集成测试:为基于 JUnit Jupiter 和 JUnit 4 的测试类提供显式支持,并为使用 Spring 核心测试注解的 TestNG 和其他测试框架提供隐式支持——只要这些测试是使用为当前项目注册的 JUnit 平台TestEngine运行的。 - 构建时的 AOT(预编译时)处理:当前项目中的每个唯一的测试
ApplicationContext都将为了 AOT 处理而被刷新。 - 运行时 AOT 支持:在 AOT 运行时模式下执行时,Spring 集成测试将使用经过 AOT 优化的
ApplicationContext,该上下文将透明地参与上下文缓存。
默认情况下,所有测试在 AOT 模式下都是启用的。但是,你可以通过在测试类或单独的测试方法上使用 @DisabledInAotMode 注解来选择性地禁用整个测试类或单独的测试方法。当使用 JUnit Jupiter 时,你可以通过 Jupiter 的 @EnabledInNativeImage 和 @DisabledInNativeImage 注解来选择性地在 GraalVM 原生镜像中启用或禁用测试。请注意,@DisabledInAotMode 在 GraalVM 原生镜像内运行时也会禁用带注解的测试类或测试方法,这与 JUnit Jupiter 的 @DisabledInNativeImage 注解类似。
默认情况下,如果在构建时的 AOT(预编译时)处理过程中遇到错误,将抛出异常,整个进程将立即失败。
如果你希望在遇到错误后继续进行构建时的 AOT(预编译时)处理,你可以禁用 failOnError 模式,这样错误将以 WARN 级别记录,或者在 DEBUG 级别记录更详细的信息。
可以通过在命令行或构建脚本中设置名为 spring.test.aot.processing.failOnError 的 JVM 系统属性为 false 来禁用 failOnError 模式。或者,你也可以通过 SpringProperties 机制设置相同的属性。
在 AOT 模式下,@ContextHierarchy 注解不受支持。
为了在 GraalVM 原生镜像中使用特定于测试的运行时提示,你有以下选项:
- 实现一个自定义的
TestRuntimeHintsRegistrar并通过META-INF/spring/aot.factories
将其全局注册。 - 实现一个自定义的
RuntimeHintsRegistrar并通过META-INF/spring/aot.factories
将其全局注册,或者通过@ImportRuntimeHints在测试类上进行本地注册。 - 使用
@Reflective或@RegisterReflectionForBinding注解来标记测试类。
TestRuntimeHintsRegistrar API 是核心 RuntimeHintsRegistrar API 的配套工具。如果你需要为测试支持注册全局提示,而这些提示不是特定于某个测试类的,那么比起使用特定于测试的 API,更推荐使用 RuntimeHintsRegistrar 来实现。
如果你实现了一个自定义的 ContextLoader,它必须实现 AotContextLoader 接口,以便提供 AOT 构建时处理和 AOT 运行时执行支持。但是请注意,Spring Framework 和 Spring Boot 提供的所有上下文加载器实现都已经实现了 AotContextLoader。
如果你实现了一个自定义的 TestExecutionListener,它必须实现 AotTestExecutionListener 接口,以便参与 AOT 处理。


 930
930


 被折叠的 条评论
为什么被折叠?
被折叠的 条评论
为什么被折叠?
 到【灌水乐园】发言


