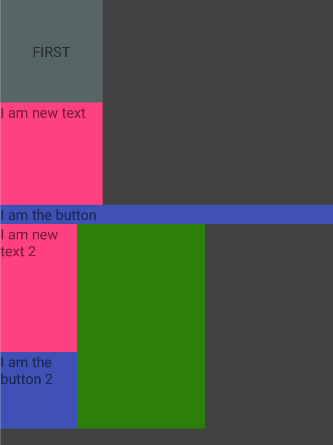
效果图
布局文件
<?xml version="1.0" encoding="utf-8"?>
<LinearLayout xmlns:android="http://schemas.android.com/apk/res/android"
    android:orientation="vertical"
    android:layout_width="match_parent"
    android:id="@+id/ll_add_context"
    android:background="#424242"
    android:layout_height="match_parent">
    <TextView
        android:layout_width="100dp"
        android:layout_height="100dp"
        android:background="#566667"
        android:gravity="center"
        android:text="FIRST"/>
</LinearLayout>
主页面代码
public class AFragment extends Fragment {
@Nullable
@Override
public View onCreateView(LayoutInflater inflater, ViewGroup container, Bundle savedInstanceState) {
View view =inflater.inflate(R.layout.fragment_a,null)
LinearLayout linearLayout=(LinearLayout)view.findViewById(R.id.ll_add_context)
linearLayout.setOrientation(LinearLayout.VERTICAL)
TextView textView=new TextView(getActivity())
textView.setBackgroundColor(getResources().getColor(R.color.colorAccent))
textView.setText("I am new text")
linearLayout.addView(textView)
LinearLayout.LayoutParams params=new LinearLayout.LayoutParams(200,200)
linearLayout.getChildAt(1).setLayoutParams(params)
TextView button=new TextView(getActivity())
button.setText("I am the button")
button.setBackgroundColor(getResources().getColor(R.color.colorPrimary))
linearLayout.addView(button)
RelativeLayout relativeLayout=new RelativeLayout(getActivity())
LinearLayout.LayoutParams params2=new LinearLayout.LayoutParams(400,400)
relativeLayout.setLayoutParams(params2)
relativeLayout.setBackgroundColor(getResources().getColor(R.color.green))
RelativeLayout.LayoutParams params3=new RelativeLayout.LayoutParams(150,250)
TextView textView2=new TextView(getActivity())
textView2.setId(Integer.valueOf(1))
textView2.setLayoutParams(params3)
textView2.setBackgroundColor(getResources().getColor(R.color.colorAccent))
textView2.setText("I am new text 2")
relativeLayout.addView(textView2)
RelativeLayout.LayoutParams params4=new RelativeLayout.LayoutParams(150,150)
params4.addRule(RelativeLayout.BELOW,textView2.getId())
TextView button2=new TextView(getActivity())
button2.setText("I am the button 2")
button2.setBackgroundColor(getResources().getColor(R.color.colorPrimary))
relativeLayout.addView(button2)
relativeLayout.getChildAt(1).setLayoutParams(params4)
linearLayout.addView(relativeLayout)
return view
}
}


 2014
2014


 被折叠的 条评论
为什么被折叠?
被折叠的 条评论
为什么被折叠?
 到【灌水乐园】发言


