


本文介绍Linux环境下Qt应用程序安装器(installer)的制作。
安装器(installer)是将应用程序安装到操作系统平台的可执行文件,它采用向导式对话框指导用户安装应用程序,如我们在Windows操作系统安装Office软件时,有1个向导让你选择安装哪些组件及安装位置等,最终将程序安装到你的机器上。
1.软件安装
安装器的制作需要使用Qt的"binarycreator",需确保程序已经安装,若没安装,可在官网下载安装,地址:Index of /official_releases/qt-installer-framework
2.创建目录
创建如下目录:
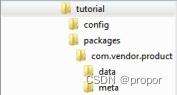
"tutorial"目录通常为应用程序名称。这里为了方便,写了个脚本(createdir.sh):
#!/bin/sh

mkdir config
mkdir packages

cd packages
mkdir com.vendor.product
cd com.vendor.product
mkdir data
mkdir meta

echo "done!"
将脚本拷贝到"tutorial"目录(名称可根据情况改变),赋予可执行权限,并执行,执行完删除。
sudo chmod a+x createdir.sh
./createdir.sh
rm create.sh
以项目"fixture"为例,执行完脚本后创建如下目录:
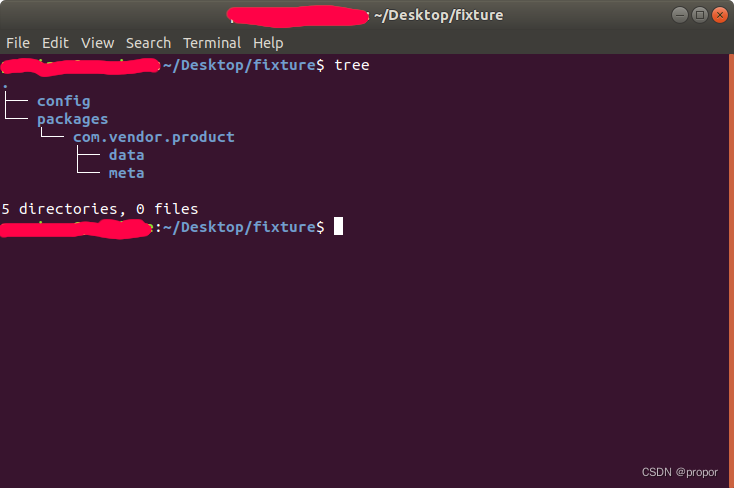
下面对各目录内容作详细描述。
3.config目录
在"config"目录下创建"config.xml"文件,内容如下:
<?xml version="1.0" encoding="UTF-8"?>
<Installer>
    <Name>Your application</Name>
    <Version>1.0.0</Version>
    <Title>Your application Installer</Title>
    <Publisher>Your vendor</Publisher>
    <StartMenuDir>Super App</StartMenuDir>
    <TargetDir>@HomeDir@/InstallationDirectory</TargetDir>
</Installer>
其中,
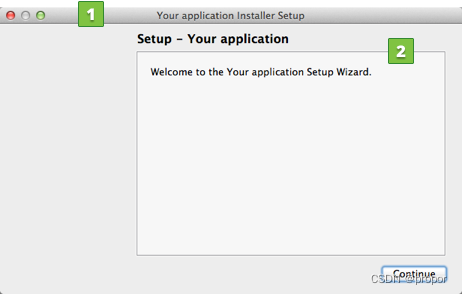
Name:安装程序开始时指示安装程序名称,如下图标记2所示。
Version:软件程序版本。
Title:安装器的标题栏显示内容,如下图标记1所示。
Publish:软件供应商名称。
StartMenuDir:创建在启动菜单中目录名称。
TargetDir:应用程序默认安装位置,当然,用户在安装过程中也可以自己选择。
以上内容可以根据实际情况修改。
至此,我们完成了“config”文件夹的内容。
4.data目录
"data"目录为我们放置打包后的应用程序的地方,Qt应用程序打包方法可参见我以前的博文(Linux环境下Qt应用程序打包与发布-CSDN博客),这里就不详细介绍了。把打包后的所有内容拷贝到这里。
至此,我们完成了“data”文件夹的内容。
5.meta目录
1)安装脚本
在"meta"目录下创建"installscript.qs"文件,内容如下:
/****************************************************************************
**
** Copyright (C) 2017 The Qt Company Ltd.
** Contact: https://www.qt.io/licensing/
**
** This file is part of the FOO module of the Qt Toolkit.
**
** $QT_BEGIN_LICENSE:GPL-EXCEPT$
** Commercial License Usage
** Licensees holding valid commercial Qt licenses may use this file in
** accordance with the commercial license agreement provided with the
** Software or, alternatively, in accordance with the terms contained in
** a written agreement between you and The Qt Company. For licensing terms
** and conditions see https://www.qt.io/terms-conditions. For further
** information use the contact form at https://www.qt.io/contact-us.
**
** GNU General Public License Usage
** Alternatively, this file may be used under the terms of the GNU
** General Public License version 3 as published by the Free Software
** Foundation with exceptions as appearing in the file LICENSE.GPL3-EXCEPT
** included in the packaging of this file. Please review the following
** information to ensure the GNU General Public License requirements will
** be met: https://www.gnu.org/licenses/gpl-3.0.html.
**
** $QT_END_LICENSE$
**
****************************************************************************/

function Component()
{
    // constructor
    component.loaded.connect(this, Component.prototype.loaded);
    if (!installer.addWizardPage(component, "Page", QInstaller.TargetDirectory))
        console.log("Could not add the dynamic page.");
}

Component.prototype.isDefault = function()
{
    // select the component by default
    return true;
}

Component.prototype.createOperations = function()
{
    try {
        // call the base create operations function
        component.createOperations();
    } catch (e) {
        console.log(e);
    }
}

Component.prototype.loaded = function ()
{
    var page = gui.pageByObjectName("DynamicPage");
    if (page != null) {
        console.log("Connecting the dynamic page entered signal.");
        page.entered.connect(Component.prototype.dynamicPageEntered);
    }
}

Component.prototype.dynamicPageEntered = function ()
{
    var pageWidget = gui.pageWidgetByObjectName("DynamicPage");
    if (pageWidget != null) {
        console.log("Setting the widgets label text.")
        pageWidget.m_pageLabel.text = "This is a dynamically created page.";
    }
}
这里的内容,可根据实际情况添加或减少。
2)许可文件
在"meta"目录下创建"license.txt"文件,内容可自己定义,主要是关于软件安装许可方面的内容。
3)包描述文件
在"meta"目录下创建"package.xml"文件,内容如下:
<?xml version="1.0" encoding="UTF-8"?>
<Package>
    <DisplayName>The root component</DisplayName>
    <Description>Install this example.</Description>
    <Version>0.1.0-1</Version>
    <ReleaseDate>2010-09-21</ReleaseDate>
    <Licenses>
        <License name="Beer Public License Agreement" file="license.txt" />
    </Licenses>
    <Default>script</Default>
    <Script>installscript.qs</Script>
</Package>
这里,
DisplayName:软件安装时,由用户选择勾选的组件,如下图1标记1。
Description:软件安装时,右侧描述,如下图1标记2。
Version:软件版本。
ReleaseDate:发布日期。
Licenses:许可,这里可指示许可文件名称,也就是2)中的"license.txt"文件,内容将显示在向导对话框中,如下图2中标记1。
Script:安装脚本,也就是1)中的"installscript.qs"文件。
以上内容可以根据实际情况修改。
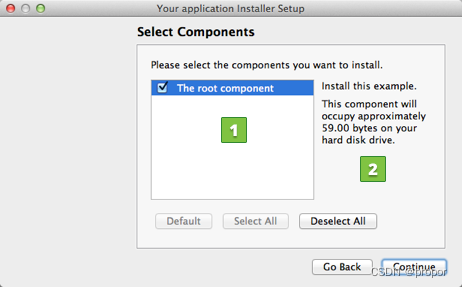
图1
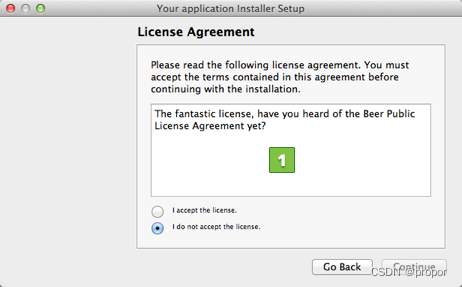
图2
至此,我们完成了“meta”文件夹的内容。
6.制作
切换到主目录下,也即"tutorial"目录,输入指令:
export PATH=/opt/Qt5.13.2/QtIFW-4.3.0/bin:$PATH
binarycreator -c config/config.xml -p packages YourInstaller
这里的"QtIFW-4.3.0"目录为你实际安装的版本,路径也类似,"YourInstaller"可自己根据实际情况指定。
至此,我们完成了程序安装器的制作。
总结,本文介绍了Linux环境下Qt应用程序安装器(installer)的制作。


 4678
4678


 被折叠的 条评论
为什么被折叠?
被折叠的 条评论
为什么被折叠?
 到【灌水乐园】发言


