


目录
静态库和动态库
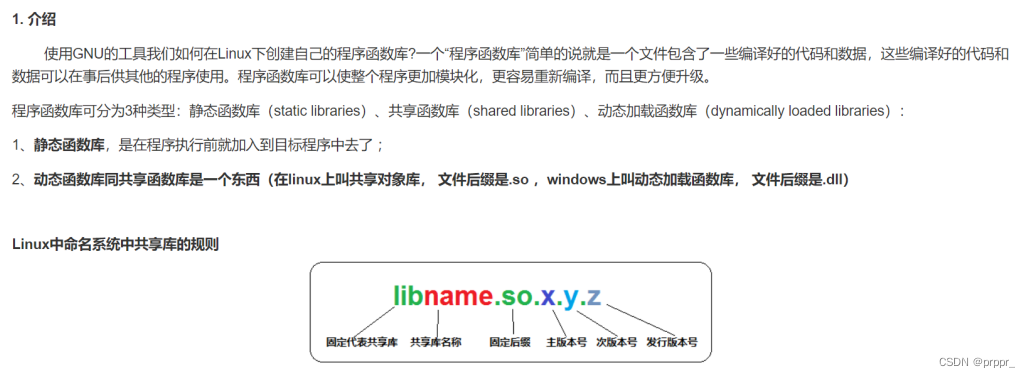
静态库
静态库优缺点
静态函数库,是在程序执行前(编译)就加入到目标程序中去了 ;
优点: 运行快
发布程序无需提供静态库,因为已经在app中,移植方便
缺点:大

动态库
动态库优缺点
动态函数库,是在程序执行时动态(临时)由目标程序去调用
缺点: 运行慢
优点: 小

静态库的制作
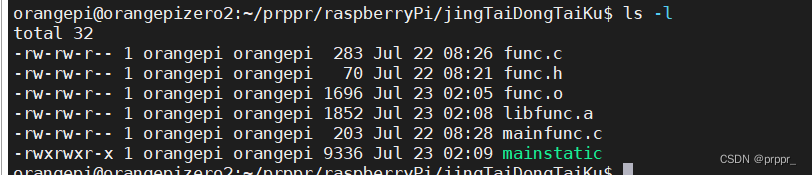
- gcc func.c -c 生成func.o文件
- ar rcs libfunc.a func.o func.o文件生成libfunc.a静态库文件
静态库的使用
3. gcc mainfunc.c -lfunc -L ./ -o mainProStatic
解释:-lfunc -l是制定要用的静态库,库名砍头去尾 原是libfunc.a
-L告诉gcc编译器从-L制定的路径去找静态库。默认是从/usr/lib /usr/local/lib去找
动态库的制作
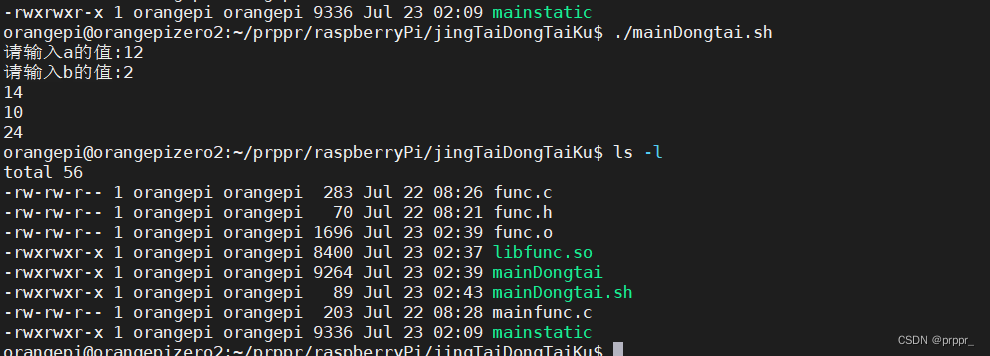
a. gcc -shared -fpic func.c -o libcalc.so //编译func.c 生成动态库 名字叫libfunc.so
解释:-shared 指定生成动态库 -fpic 标准,fPIC 选项作用于编译阶段,在生成目标文件时就得使用该选项,以生成位置无关的代码。
动态库的使用
b. gcc mainfunc.c -lfunc -L ./ -o mainDongtai
c. 会找不到 需要配置环境为了方便 用脚本执行 mainDongtai.sh ----chmod +x mainDongtai.sh
export LD_LIBRARY_PATH="/home/orangepi/prppr/raspberryPi/jingTaiDongTaiKu"
./mainDongtai.
解释:编译mainfunc.c 和libfunc.so -L在当前目录查找 当前目录生成mainDongtai可执行文件
外设库wiringPi
编译 gcc demo.c -lwiringPi 有线程的要链lpthread
继电器
#include <stdio.h>
#include <wiringPi.h>
#include <stdlib.h>
#include <string.h>

#define switch1  0
#define switch2  1
#define switch3  2
#define switch4  5
int main()
{
        char cmd[32] = {'\0'};

        if(wiringPiSetup() == -1){
                printf("wiringPiSetup faile!!\n");
                exit(-1);
        }
        pinMode(switch1,OUTPUT);//模式为输出
        digitalWrite(switch1,HIGH);//初始化该引脚为高电平 不导通

        pinMode(switch2,OUTPUT);//模式为输出
        digitalWrite(switch2,HIGH);//初始化该引脚为高电平 不导通

        pinMode(switch3,OUTPUT);//模式为输出
        digitalWrite(switch3,HIGH);//初始化该引脚为高电平 不导通

        pinMode(switch4,OUTPUT);//模式为输出
        digitalWrite(switch4,HIGH);//初始化该引脚为高电平 不导通

        while(1){
                printf("请输入s1/2/3/4 no 或 off\n");
                memset(cmd,'\0',sizeof(cmd));

                gets(cmd);//scanf 回车会干扰
                if(strstr(cmd,"s1 no") != NULL){ //如果输入为s1 no 则给引脚 继电器1 写入高电平
                        digitalWrite(switch1,LOW);//该继电器高电平触发
                }
                else if(strstr(cmd,"s1 off") != NULL){
                        digitalWrite(switch1,HIGH);//低电平断开
                }


                else if(strstr(cmd,"s2 no") != NULL){ //如果输入为s1 no 则给引脚 继电器1 写入高电平
                        digitalWrite(switch2,LOW);//该继电器高电平触发
                }
                else if(strstr(cmd,"s2 off") != NULL){
                        digitalWrite(switch2,HIGH);//低电平断开
                }

                else if(strstr(cmd,"s3 no") != NULL){ //如果输入为s1 no 则给引脚 继电器1 写入高电平
                        digitalWrite(switch3,LOW);//该继电器高电平触发
                }
                else if(strstr(cmd,"s3 off") != NULL){
                        digitalWrite(switch3,HIGH);//低电平断开
                }

                else if(strstr(cmd,"s4 no") != NULL){ //如果输入为s1 no 则给引脚 继电器1 写入高电平
                        digitalWrite(switch4,LOW);//该继电器高电平触发
                }
                else if(strstr(cmd,"s4 off") != NULL){
                        digitalWrite(switch4,HIGH);//低电平断开
                }
                else if(strstr(cmd,"all no") != NULL){ //如果输入为s1 no 则给引脚 继电器1 写入高电平
                        digitalWrite(switch1,LOW);//该继电器高电平触发
                        digitalWrite(switch2,LOW);//该继电器高电平触发
                        digitalWrite(switch3,LOW);//该继电器高电平触发
                        digitalWrite(switch4,LOW);//该继电器高电平触发
                }
                else if(strstr(cmd,"all off") != NULL){
                        digitalWrite(switch1,HIGH);//低电平断开
                        digitalWrite(switch2,HIGH);//低电平断开
                        digitalWrite(switch3,HIGH);//低电平断开
                        digitalWrite(switch4,HIGH);//低电平断开
                }
                else{
                        printf("输入错误!!\n");
                }


        }

        return 0;
}
超声波
#include <stdio.h>
#include <wiringPi.h>
#include <sys/time.h>
#include <stdlib.h>
#include <unistd.h>
#define trig  0
#define echo  1


double disHandler()
{
        double dis;
        struct timeval start;
        struct timeval stop;

        digitalWrite(trig,LOW);
        usleep(2);
        digitalWrite(trig,HIGH);
        usleep(12);

        digitalWrite(trig,LOW);
        while(!digitalRead(echo));
        gettimeofday(&start,NULL);
        while(digitalRead(echo));
        gettimeofday(&stop,NULL);
        long time = 1000000*(stop.tv_sec - start.tv_sec) + (stop.tv_usec - start.tv_usec);
        dis = (double)time*0.000001*34000/2;
        return dis;
}

int main()
{
        double dis = 0;

        if(wiringPiSetup() == -1){
                printf("wiringPiSetup faile!!\n");
                exit(-1);
        }

        pinMode(trig,OUTPUT);
        pinMode(echo,INPUT);

        while(1){
                dis = disHandler();
                printf("dis:%.2lf cm\n",dis);
                sleep(1);
        }
        return 0;
}
串口通信
根据wiringPi库下的serialTest.c 自己封装了一个serialTool.c ---》 serialTool.h 在串口中使用
解释:find -iname serial* 查找
编译:gcc uart.c serialTool.c 有线程的要链线程

serialTool.c
#include <stdio.h>
#include <stdlib.h>
#include <stdint.h>
#include <stdarg.h>
#include <string.h>
#include <termios.h>
#include <unistd.h>
#include <fcntl.h>
#include <sys/ioctl.h>
#include <sys/types.h>
#include <sys/stat.h>

#include "wiringSerial.h"


int myserialOpen (const char *device, const int baud)//根据硬件地址和波特率打开串口
{
        struct termios options ;
        speed_t myBaud ;
        int status, fd ;
        switch (baud){
                case    4800:   myBaud =    B4800 ; break ;
                case    9600:   myBaud =    B9600 ; break ;
                case  115200:   myBaud =  B115200 ; break ;
                default:
                return -2 ;
        }
        if ((fd = open (device, O_RDWR | O_NOCTTY | O_NDELAY | O_NONBLOCK)) == -1)
                return -1 ;

        fcntl (fd, F_SETFL, O_RDWR) ;

        // Get and modify current options:

        tcgetattr (fd, &options) ;

        cfmakeraw   (&options) ;
        cfsetispeed (&options, myBaud) ;
        cfsetospeed (&options, myBaud) ;

        options.c_cflag |= (CLOCAL | CREAD) ;
        options.c_cflag &= ~PARENB ;
        options.c_cflag &= ~CSTOPB ;
        options.c_cflag &= ~CSIZE ;
        options.c_cflag |= CS8 ;
        options.c_lflag &= ~(ICANON | ECHO | ECHOE | ISIG) ;
        options.c_oflag &= ~OPOST ;

        options.c_cc [VMIN]  =   0 ;
        options.c_cc [VTIME] = 100 ;    // Ten seconds (100 deciseconds)

        tcsetattr (fd, TCSANOW, &options) ;

        ioctl (fd, TIOCMGET, &status);

        status |= TIOCM_DTR ;
        status |= TIOCM_RTS ;

        ioctl (fd, TIOCMSET, &status);

        usleep (10000) ;        // 10mS

        return fd ;

}

void myserialClose (const int fd)//关闭串口
{
        close (fd) ;
}


void myserialSendstring (const int fd, const char *s)//串口发送字符串
{
        int ret;
        ret = write (fd, s, strlen (s));
        if (ret < 0)
                printf("Serial Puts Error\n");
}

int myserialGetchar (const int fd)//串口接收单个字符
{
        char x ;

        if (read (fd, &x, 1) != 1)
                return -1 ;

        return x;
}
int myserialGetstring (const int fd,char *buffer)//串口接收字符串
{
        int n_read;
        n_read = read(fd,buffer,32);
        return n_read;
}
serialTool.h
int myserialOpen (const char *device, const int baud);//打开函数
void myserialClose (const int fd);//关闭函数
void myserialSendstring (const int fd, const char *s);//发送字符串
int myserialGetchar (const int fd);//获取单个字符
int myserialGetstring (const int fd,char *buffer);//获取字符串
uart.c
#include <stdio.h>
#include <stdlib.h>
#include <stdint.h>
#include <stdarg.h>
#include <string.h>
#include <termios.h>
#include <unistd.h>
#include <fcntl.h>
#include <sys/ioctl.h>
#include <sys/types.h>
#include <sys/stat.h>

#include "wiringSerial.h"
#include <pthread.h>
#include <unistd.h>
#include "serialTool.h"//-----“”先找该目录下三个函数 open write read

int fd;
void* readSerial()
{
        char buff[32];
        while(1){
                memset(buff,'\0',sizeof(buff));//清空
                myserialGetstring(fd,buff);
                printf("Get-->%s\n",buff);//创建线程1 调用seriaTool.h中的接收函数 并打印
        }
}

void* sendSerial()
{
        char buff[32];
        while(1){
                memset(buff,'\0',sizeof(buff));//清空
                scanf("%s",buff);
                myserialSendstring(fd,buff);//创建线程2 输入内容放到buff中 调用serialTool.h中的发送函数 把buff传过去
        }
}


int main(int argc,char **argv)
{


        char deviceName[32] = {'\0'};

        pthread_t readt;//线程读 接收
        pthread_t sendt;//线程写 发送

        if(argc < 2){
                printf("usage:%s xxx /dev/ttyS?\n",argv[0]);
                exit(-1);
        }

        strcpy(deviceName,argv[1]);
        if((fd = myserialOpen(deviceName,115200)) == -1){
                printf("serialopen faile!!\n");
                exit(-1);
        }


        pthread_create(&readt,NULL,(void*)readSerial,NULL);//--4--读取线程  调用readSerial函数读取
        pthread_create(&sendt,NULL,(void*)sendSerial,NULL);//--5--发送线程  调用sendSerial函数发送

        pthread_join(readt,NULL);
        pthread_join(sendt,NULL);

        return 0;
}
通过语音模块发送数据给串口控制开关灯
#include <stdio.h>
#include <stdlib.h>
#include <stdint.h>
#include <stdarg.h>
#include <string.h>
#include <termios.h>
#include <unistd.h>
#include <fcntl.h>
#include <sys/ioctl.h>
#include <sys/types.h>
#include <sys/stat.h>

#include "wiringSerial.h"
#include <pthread.h>
#include <unistd.h>
#include "serialTool.h"//-----“”先找该目录下三个函数 open write read
//因为用的自己封装的库 所以不用wiringPiSetup

int main()
{

        int fd;
        char readBuff[128] = {'\0'};
        int n_read = 0;

        if((fd = myserialOpen("/dev/ttyS5",115200)) == -1){//打开串口
                printf("serialopen faile!!\n");
                exit(-1);
        }


        while(1){//不断读取
                n_read = read(fd,readBuff,sizeof(readBuff));
                if(n_read == 0){//不会一直阻塞读取 当没有读到数据则不往后执行
                        printf("coertime!!\n");
                        continue;
                }
                else if(strstr(readBuff,"open") != NULL){//如果读到数据含有open 则开灯并清空
                        printf("open light\n");
                }
                else if(strstr(readBuff,"close") != NULL){
                        printf("close light\n");
                }
                memset(readBuff,'\0',128);
        }
        return 0;
}
orangepi交叉编译
//参考 : 全志H616交叉编译工具链的安装与使用_C有点难。的博客-CSDN博客
orangepi 交叉编译的工具
a. 电脑:Ubuntu 18.04 和VMwere Tools
//参考博文:VM Tools安装过程_vmtools安装_闫渭丘的博客-CSDN博客
//vmware tools无效_vmware tools安装后重启仍不生效_天空之城Aloha2020的博客-CSDN博客
b. 开发板:orangepi-zero2
c. 交叉编译器:aarch64-none-linux-gnu-
下载工具到Windows上并上传到Ubuntu虚拟机
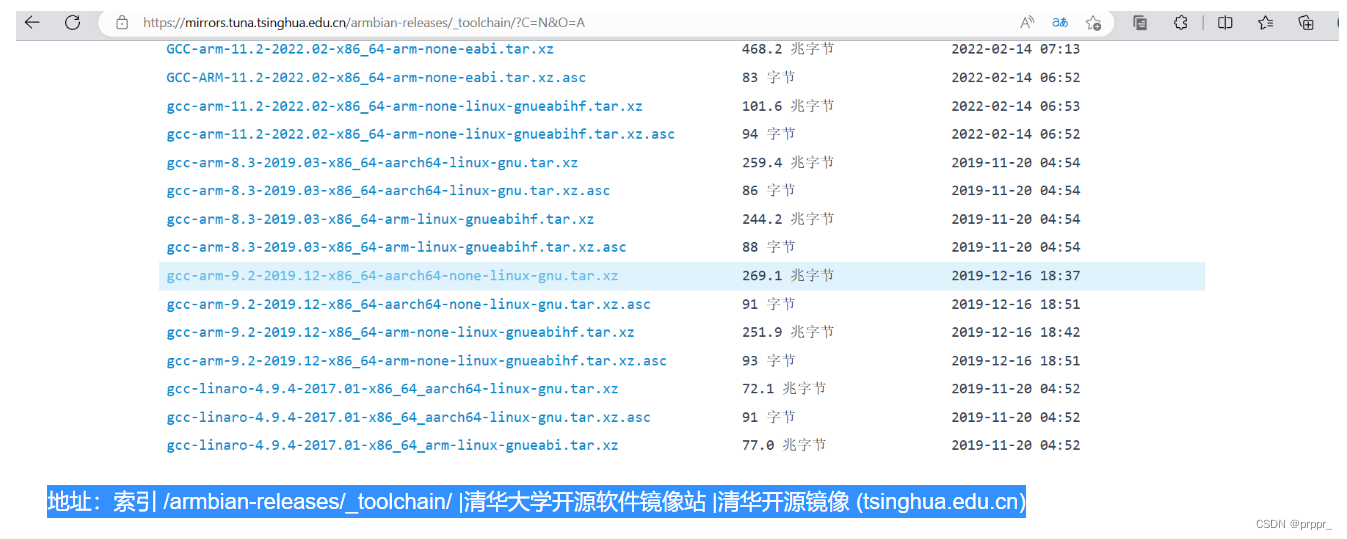
解压
cp /home/ygl/gcc-arm-9.2-2019.12-x86_64-aarch64-none-linux-gnu.tar.xz /home/orangpiZero2
tar -xf gcc-arm-9.2-2019.12-x86_64-aarch64-none-linux-gnu.tar.xz
cd gcc-arm-9.2-2019.12-x86_64-aarch64-none-linux-gnu/bin

设置环境变量临时有效
输出环境变量 echo $PATH
输出结果为:
/usr/local/sbin:/usr/local/bin:/usr/sbin:/usr/bin:/sbin:/bin:/usr/games:/usr/local/games:/snap/bin
pwd显示当前路径
export PATH=/usr/local/sbin:/usr/local/bin:/usr/sbin:/usr/bin:/sbin:/bin:/usr/games:/usr/local/games:/snap/bin:/home/ygl/orangePiZero2/gcc-arm-9.2-2019.12-x86_64-aarch64-none-linux-gnu/bin
设置永久有效
修改工作目录的 .bashrc 是一个隐藏文件,用来配置命令终端
vi /home/ygl/.bashrc
在最后一行加入
export PATH=/usr/local/sbin:/usr/local/bin:/usr/sbin:/usr/bin:/sbin:/bin:/usr/games:/usr/local/games:/snap/bin:/home/ygl/orangePiZero2/gcc-arm-9.2-2019.12-x86_64-aarch64-none-linux-gnu/bin
保存并推出 source /home/ygl/.bashrc 使其生效
测试
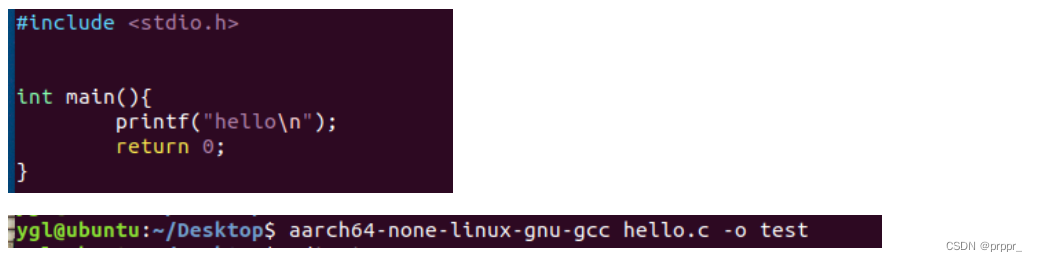
在虚拟机编写hello.c并用交叉编译工具编译为 test可执行文件
 查看文件类型

把test上传到orangepiZer2上
指令:scp test orangepi@192.168.1.5:/home/orangepi/prppr
带wiringpi库的交叉编译
1.带wiringpi库的交叉编译如何进行
(1)正常我们要先交叉编译wiringpi库,编译出的库适合开发板,这时交叉编译可执行程序的时候,链接库的格式也是正确的。
(2)通过 -I 指定头文件-L指定库
2.将库所需的文件拷贝到上位机
进入开发板/usr/local/lib目录下拷贝libwiringPi.so.2.46到上位机的/home/ygl/orangePiZero2目录下
进入开发板/usr/local/lib目录下拷贝libwiringPiDev.so.2.46到上位机的/home/ygl/orangePiZero2目录下
scp libwiringPi.so.2.46 prppr@192.168.1.9:/home/prppr/orangePiZero2
scp libwiringPiDev.so.2.46 prppr@192.168.1.9:/home/prppr/orangePiZero2
3.创建软链接
参考文章: https://www.cnblogs.com/zhangna1998517/p/11347364.html
概念 :软链接相当于一个快捷方式,实际上是一个文本文件存放的是另外一个文件的位置信息。软链接就是在你选定的位置上生成一个镜像,不占用磁盘空间。
ln -s 源文件 目标文件
ln -s libwiringPi.so.2.46 libwiringPi.so
ln -s libwiringPiDev.so.2.46 libwiringPiDev.so
ln -s libwiringPi.so.2.50 libwiringPi.so
指令 参数 要被链接的文件 软链接文件名字
硬链接:
硬链接会在你选定的位置上生成一个和源文件相同大小的文件
ln 源文件 目标文件
4.将wiringpi上传到上位机
将orangepiZero2上的wiringpi-master.zip上传到上位机并解压
5. 编写脚本
编写build.sh脚本 交叉编译带wiringPi库的文件:把wiringOP-master在当前目录解压并通过软链接找到外设库
aarch64-none-linux-gnu-gcc $1 -I ./wiringOP-master/wiringPi -L. -lwiringPi -lwiringPiDev -lpthread -lm -lcrypt -lrt -g -o $2
给予其执行权限:chmod +x build.sh
执行:./build.sh demo2.c jiaoChaDemo
上位机软链接交叉编译后上传到开发板:scp test orangepi@192.168.1.5:/home/orangepi/prppr
脚本相当于 : aarch64-none-linux-gnu-gcc demo2.c -I ./wiringOP-master/wiringPi -L. -lwiringPi -lwiringPiDev
-
-I ./wiringOP-master/wiringPi:这个选项告诉编译器在给定的路径中查找头文件(包含文件)。在这个例子中,编译器将在./wiringOP-master/wiringPi路径中查找所需的头文件。 -
-L.:这个选项告诉编译器在当前目录(.)中查找库文件。编译器将在当前目录中查找后面指定的库文件。
树莓派交叉编译
1. 交叉编译是什么,为什么要交叉编译
======================================是什么?
交叉编译 是在一个平台上生成另一个平台上的可执行代码。
我们再windows上面编写C51代码,并编译成可执行代码,如xx.hex,
是在c51上面运行,不是在windows上面运行
我们在ubuntu上面编写树莓派的代码,并编译成可执行代码,如a.out,
是在树莓派上面运行,不是在ubuntu linux上面运行
编译:是在一个平台上生成在该平台上的可执行代码
C51 交叉编译的发生在keil(集成环境上面)
stm32
=============================为什么要交叉编译?
平台上不允许或不能够安装我们所需要的编译器比如C51
1.因为目的平台上的资源贫乏,无法运行我们所需要编译器
2.树莓派是不是就不需要交叉编译?
错。也要 树莓派有时又是因为目的平台还没有建立,连操作系统都没有,根本谈不上运行什么编译器。
操作系统也是代码,也要编译!
平台运行需要两样至少东西:bootloader(启动引导代码)以及操作系统核心
宿主机(host) :编辑和编译程序的平台,一般是基于X86的PC机,通常也被称为主机。
目标机(target):用户开发的系统,通常都是非X86平台。host编译得到的可执行代码在target上运行。
===========================交叉编译需要用到什么工具?
交叉编译器、交叉编译工具链
****************************************************************************************************************************
2. 交叉编译工具链的安装
https://github.com/raspberrypi/
从共享文件夹拷贝到工作目录
cp /mnt/hgfs/share/tools-master.zip .
解压
unzip tools-master.zip
cd /home/CLC/lessonPI/tools-master/arm-bcm2708/gcc-linaro-arm-linux-gnueabihf-raspbian-x64/bin
pwd获得路径
echo $PATH 获得当前环境变量的值
2.1 临时有效,配置环境变量
PATH 环境变量
export PATH=/usr/local/sbin:/usr/local/bin:/usr/sbin:/usr/bin:/sbin:/bin:/usr/games:/home/CLC/lessonPI/tools-master/arm-bcm2708/gcc-linaro-arm-linux-gnueabihf-raspbian-x64/bin
2.2 永久有效,配置环境变量
修改工作目录下的.bashrc 隐藏文件,配置命令终端的
vi /home/CLC/.bashrc
在文件最后一行加入:
export PATH=/usr/local/sbin:/usr/local/bin:/usr/sbin:/usr/bin:/sbin:/bin:/usr/games:/home/CLC/lessonPI/tools-master/arm-bcm2708/gcc-linaro-arm-linux-gnueabihf-raspbian-x64/bin
source /home/CLC/.bashrc 加载配置文件,马上生效配置。
****************************************************************************************************************************
3. 交叉编译服务端客户端
交叉编译:
检查下交叉编译工具对不对:
arm-linux-gnueabihf-gcc -v
4.8.3
arm-linux-gnueabihf-gcc xxx.c -o xxx
如何把编译生成的可执行文件下载到开发板:
scp clientInPi pi@192.168.43.30:/home/pi
指令 文件名 开发板用户名@开发板地址:开发板的绝对路径
****************************************************************************************************************************
4. 带wiringPi库的交叉编译如何进行
1. 正常我们先要交叉编译wiringPi库,编译出的库适合树莓派,这时候交叉编译可执行程序的试试,链接库的格式也是正确的。
2. 通过-I -L来指定
因为链接的库的格式不对,是宿主机的平台,出现以下错误
arm-linux-gnueabihf-gcc demo2.c -I /home/CLC/lessonPI/WiringPi/wiringPi -lwiringPi
/home/CLC/lessonPI/tools-master/arm-bcm2708/gcc-linaro-arm-linux-gnueabihf-raspbian-x64/bin/../lib/gcc/arm-linux-gnueabihf/4.8.3/../../../../arm-linux-gnueabihf/bin/ld: cannot find -lwiringPi
collect2: error: ld returned 1 exit status
把树莓派的wringPI库拿上来用
软链接:
参考文章: https://www.cnblogs.com/zhangna1998517/p/11347364.html
概念:
1. 软链接文件有类似于Windows的快捷方式。
2. 在符号连接中,文件实际上是一个文本文件,其中包含的有另一文件的位置信息。
3. 你选定的位置上生成一个文件的镜像,不会占用磁盘空间
如何生成:
ln -s libwiringPi.so.2.50 libwiringPi.so
指令 参数 要被链接的文件 软链接文件名字
硬链接:ln libwiringPi.so.2.50 libwiringPi.so
它会在你选定的位置上生成一个和源文件大小相同的文件
********************************************************************************************************************************


 592
592


 被折叠的 条评论
为什么被折叠?
被折叠的 条评论
为什么被折叠?
 到【灌水乐园】发言


