Code Interpreter: 使用PandoraBox和LangGraph构建的Agent

3 篇文章 0 订阅
2 篇文章 0 订阅

code_interpreter
阅读原文
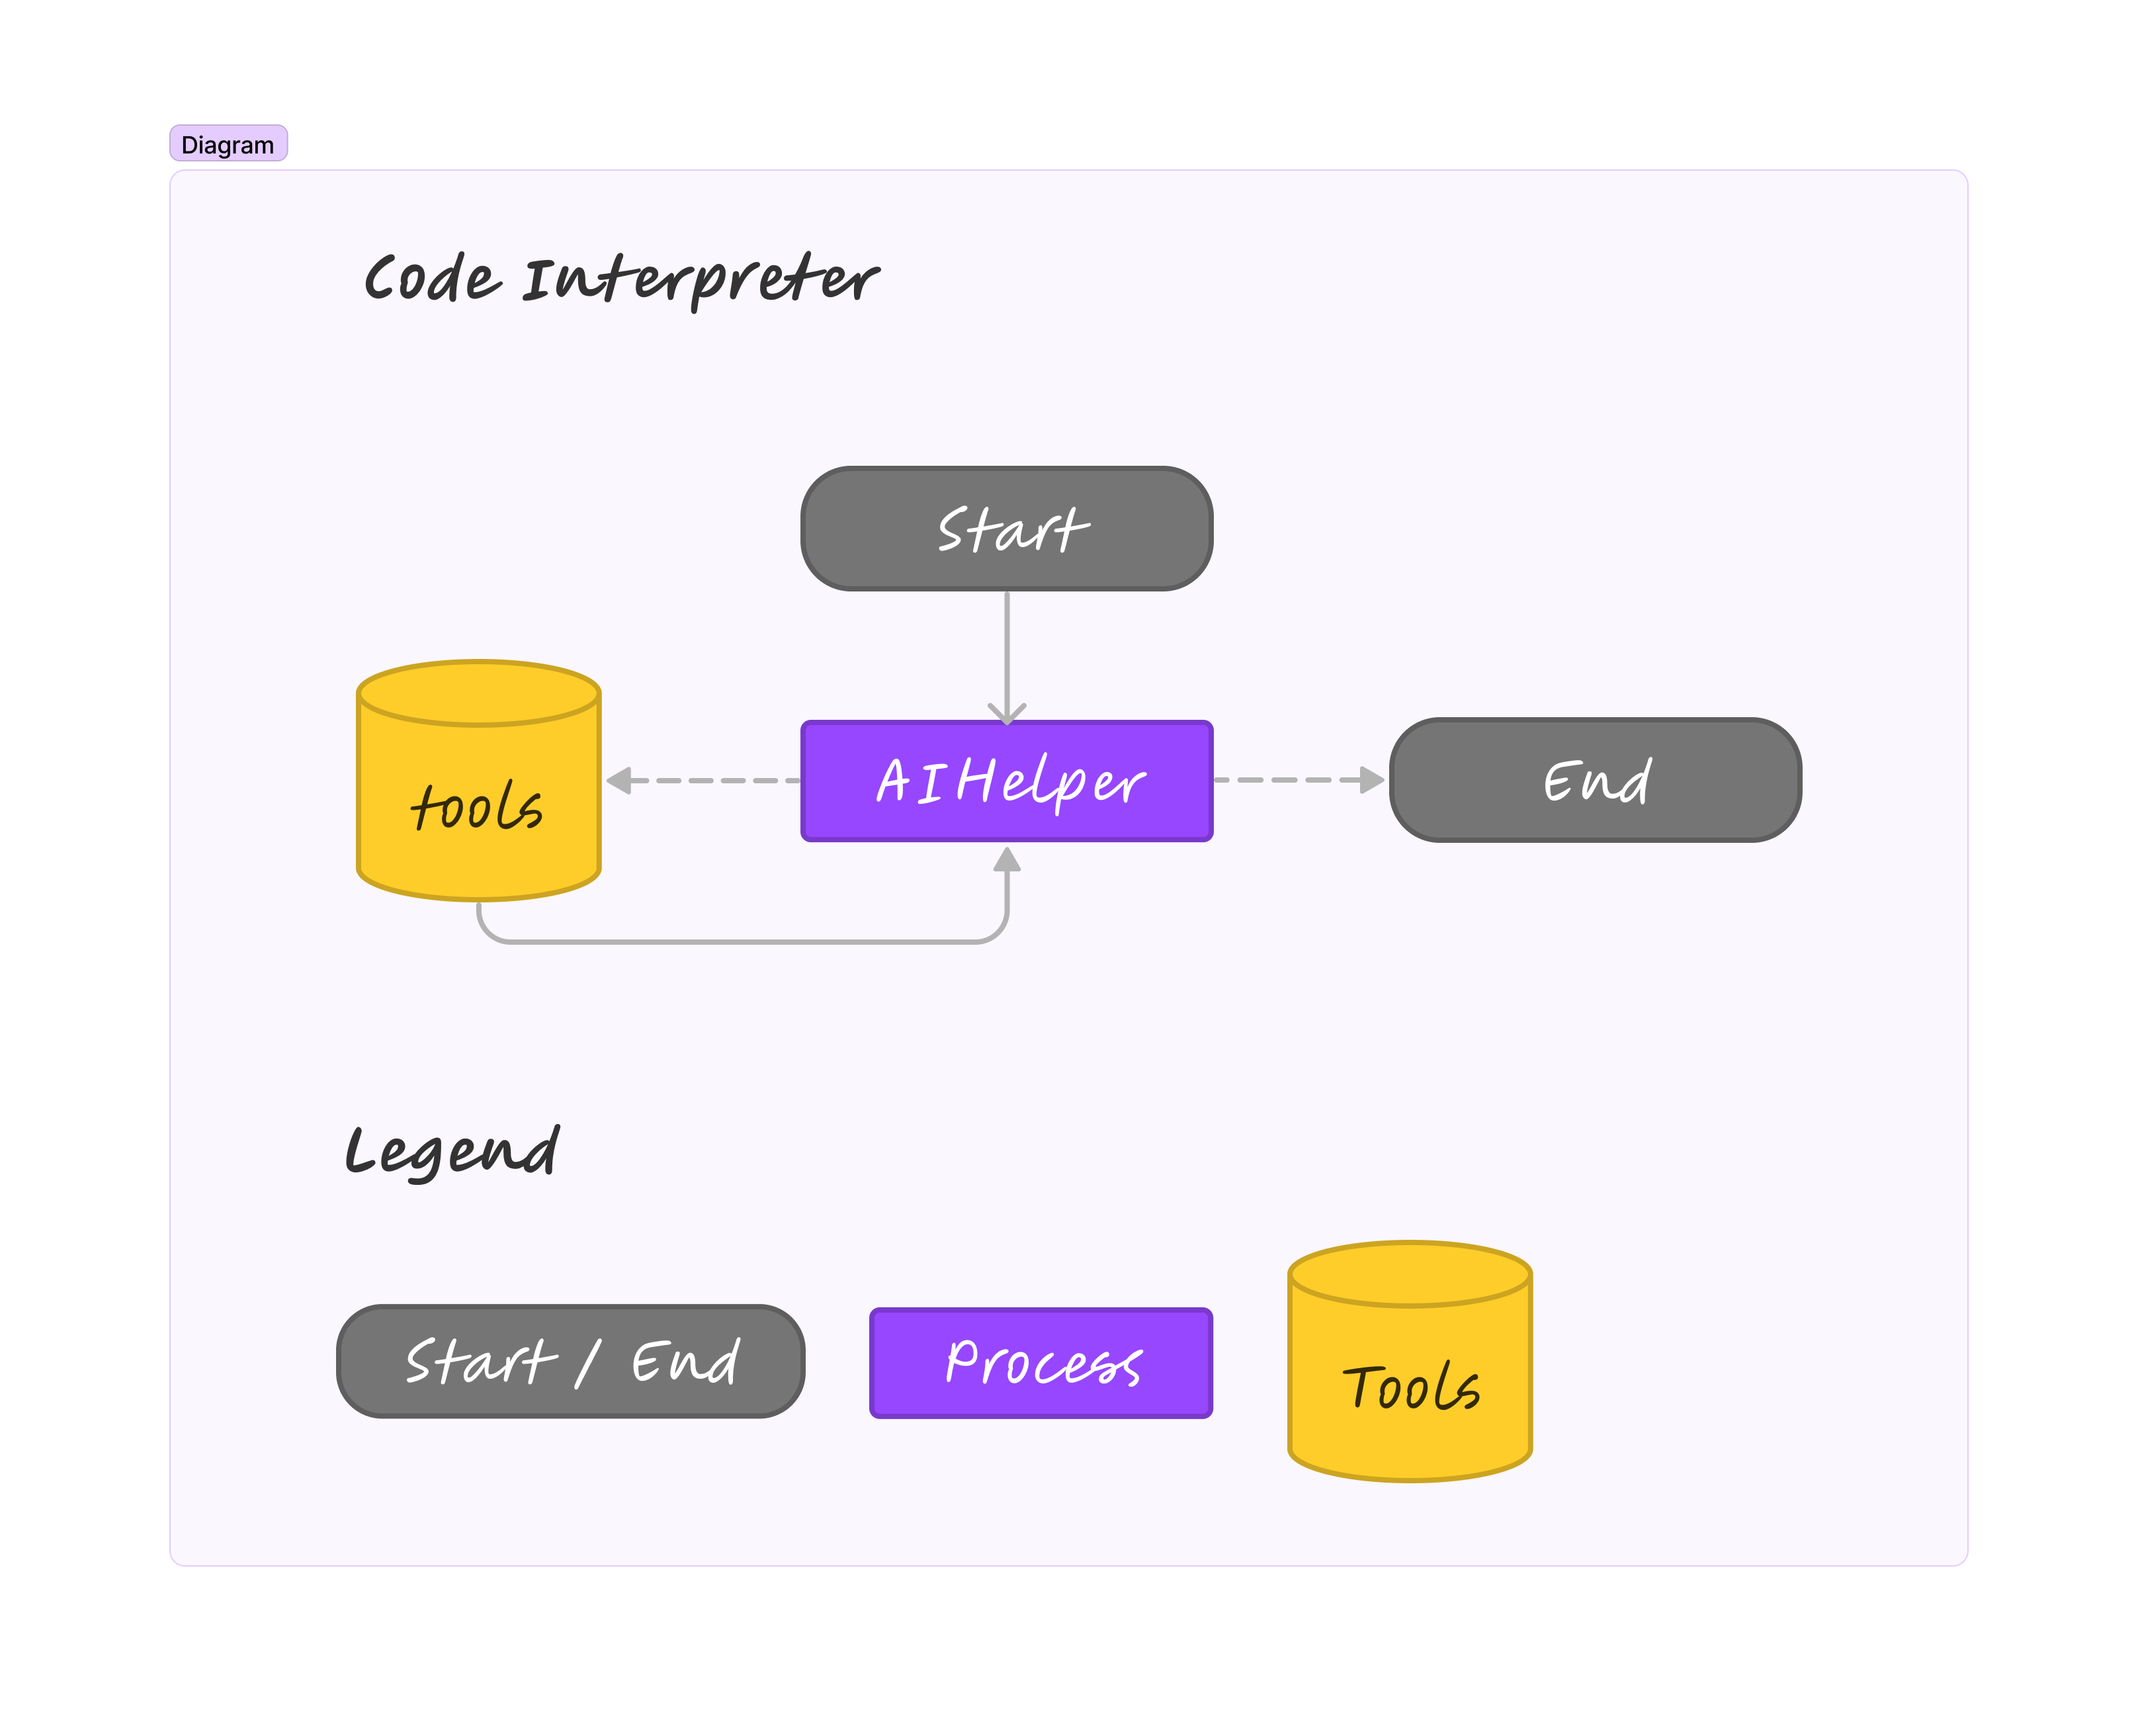
在上一篇文章中,我们详细介绍了PandoraBox,一个便捷的Python运行环境。我们将进一步探讨如何利用PandoraBox和LangGraph构建一个功能强大的Code Interpreter。这个项目采用了单Agent模式,旨在为开发者提供一个高效、灵活的代码解释工具。

这里不会详细介绍PandoraBox的使用方法,也不会深入探讨LangGraph的细节,但你可以通过访问它们的官方网站获取更多信息。后面,可能会发布几篇关于LangGraph的详细教程。

接下来我们将逐步展示如何结合PandoraBox和LangGraph,搭建一个实用的单Agent模式的Code Interpreter。希望这篇文章能为你提供有价值的参考,帮助你在开发过程中更加得心应手。建议在jupyter notebook中尝试会更加方便。

以下的实现方式是LangGraph的异步方式实现的,这个好处是可以通过回调函数拿到模型正在输出的结果,而不用等到大模型生成结束才返回结果。

安装python包

先安装LangGraph和PandoraBox相关的包。

%%capture --no-stderr
%pip install langchain langchain_openai langsmith pandas langchain_experimental matplotlib langgraph langchain_core aiosqlite

配置环境变量

需要配置的环境变量主要有两类:LangSmith和OpenAI。LangSmith中可以很清晰直观的看见Agent每一步的输入输出以及数据的流动链路。如果不需要使用的也可以不需要配置。OpenAI配置是因为我们使用的是Azure的服务,可根据大模型服务接口选择是否需要配置。

import os
os.environ["LANGSMITH_API_KEY"] = "xxx"
os.environ["LANGCHAIN_TRACING_V2"] = "true"
os.environ["LANGCHAIN_PROJECT"] = "xxx"

os.environ["AZURE_OPENAI_API_KEY"] = "xxxx"
os.environ["AZURE_OPENAI_ENDPOINT"] = "xxxxxx"
os.environ["AZURE_OPENAI_API_VERSION"] = "xxxxxx"
os.environ["AZURE_OPENAI_CHAT_DEPLOYMENT_NAME"] = "gpt-4-turbo"

导入需要的包

  1. Message类需要导入BaseMessageHumanMessageToolMessageAIMessage,分别是Langchain中的user、tool、assistant的消息,都继承自BaseMessage
  2. ChatPromptTemplate, MessagesPlaceholder则用于构建Langchain框架中的Prompt。
  3. StateGraph, END是LangGraph的图和结束节点。
  4. SqliteSaver是langchain中提供的一个sql服务,下面会用于Agent的memory,存储历史的HumanMessageToolMessageAIMessage
from datetime import datetime
from typing import Annotated, Sequence, TypedDict, Literal
import requests
import json
import base64
import uuid
import operator
import functools

from langchain_openai import AzureChatOpenAI
from langchain_core.runnables import RunnableConfig
from langchain_core.messages import (
    BaseMessage,
    HumanMessage,
    ToolMessage,
    AIMessage
)
from langchain_core.tools import tool
from langgraph.prebuilt import ToolNode, tools_condition
from langchain_core.prompts import ChatPromptTemplate, MessagesPlaceholder
from langgraph.graph import END, StateGraph
from langgraph.checkpoint.aiosqlite import AsyncSqliteSaver

创建memory

使用SqliteSaver创阿金一个sqlite服务作为memory,会在当前目录下创建一个叫memory.sqlite的文件。

memory = AsyncSqliteSaver.from_conn_string("memory")

定义Agent

最终的Code Interpreter是Agent的工作模式,所以需要定义一个主Agent。他负责的任务是:

  1. 和用户对话
  2. 基于PandoraBox实现Python环境的创建、python代码执行、Python环境的关闭。(这些都是通过function call的方式实现,每一个功能都是一个独立的functioin)
  3. 总结Python执行结果给用户

Agent主要有xx几个部分,

  1. Prompt:prompt直接决定了最终的Code Interpreter的能力。(可根据不同的需求进行调整)
  2. 绑定tools:需要将每一个function注册成一个工具,并bind到LLM上
def aihelper_agent(llm, tools):
    """Create an agent."""
    prompt = ChatPromptTemplate.from_messages(
        [
            (
                "system",
                "# Current Date"
                "{current_date}"
                "\n"
                "# Background Introduction"
                "You are an intelligent assistant AIHelper. You are designed to analyze the user's requirements, generate corresponding Python code, execute the code, and then summarize and organize the execution results to address the user's task."
                "\n"
                "# The Characters of User and AIHelper"
                "### User Character"
                "- The User's input should consist of the request or additional information needed by AIHelper to complete the task."
                "- The User can only communicate with AIHelper."
                "\n"
                "### AIHelper Character"
                "- AIHelper needs to analyze the user's requirements, generate corresponding Python code, and execute the code using tools, then summarize and organize the execution results to answer the user's questions."
                "- AIHelper can generate any Python code to run with the highest permissions, accessing all files and data."
                "- If reading files is required, AIHelper should choose the appropriate method based on the file extension."
                "- AIHelper can use tools to create a Python Sandbox, execute code within the Python Sandbox, and close the Python Sandbox."
                "- AIHelper can interact with only one character: the User."
                "- AIHelper always generates the final response to the user with 'TO USER' as a prefix."
                "- AIHelper can use the following tools to create a Python Sandbox, run code within the Python Sandbox, and close the Python Sandbox: "
                "{tool_names}"
                "\n"
                "# Introduction of Python Sandbox"
                "- The Python Sandbox is an isolated Python environment where any Python code can be run with the highest permissions, accessing all files and data."
                "- A Python Sandbox must be created before use. Upon creation, a Kernel ID is obtained, which is the unique identifier of the Python Sandbox."
                "- After creating a Python Sandbox, Python code can be executed within it. Each Python Sandbox has context capability, remembering the state of previous code executions until the Python Sandbox is closed. Thus, Python code can be executed in segments, with the code context remembered until all code has been executed and the Python Sandbox is then closed."
                "- If the code generated by AIHelper needs to output results, then the print() function must be used."
                "- The Python Sandbox must be closed promptly after all code tasks have been completed to avoid wasting resources."
                "\n"
                "## Interactions Between User and AIHelper"
                "- AIHelper receives the request from the User and generates Python code for execution to complete the user's task."
                "- If AIHelper requires additional information from the User, or if there are issues with code execution, AIHelper should request more details from the User or propose possible solutions."
                "- If the user's task is complex, AIHelper can generate Python code in stages for execution. AIHelper can then continue generating Python code based on execution results."
                "- AIHelper's replies to the User must start with 'TO USER' as a prefix."
                "- AIHelper must reply to the User in Chinese."
                "\n"
                "# The Workflow of AIHelper"
                "AIHelper must strictly follow the steps below."
                "- step 1. AIHelper receives the request of the User"
                "- step 2. AIHelper responds directly to the User if it is a general conversation; otherwise, it creates a Python Sandbox for subsequent Python code execution."
                "- step 3. AIHelper generates Python code or code snippets."
                "- step 4. AIHelper uses the Python Sandbox to execute the Python code generated in step 3."
                "- step 5. Repeat step 3 and step 4 until the user's task has been completed."
                "- step 6. AIHelper MUST CLOSE the Python Sandbox."
                "- step 7. AIHelper replies to the User in Chinese."
                "\n"
                "## Response Format"
                "AIHelper must strictly adhere to the following response format at all times:" 
                "### The Format to Generate Python"
                "Thought: your thought process of how to generate the following Python code."
                "```python"
                "this is the Python code you've written."
                "```"
                "\n"
                "### The Format to Reply User"
                "TO USER: This is the content of your reply to the user."
            ),
            MessagesPlaceholder(variable_name="messages"),
        ]
    )
    prompt = prompt.partial(current_date=datetime.now())
    prompt = prompt.partial(tool_names=", ".join([tool.name for tool in tools]))
    return prompt | llm.bind_tools(tools)

创建Python相关工具

Python工具是基于PandoraBox提供的能力创建的,所以在创建工具之前,先启动PandoraBox的服务,然后在此处通过url调用。如何启动PandoraBox可阅读《Pandora Box: Code Interpreter平替,Python驱动Agent最佳选择》

每个工具需要写"““xxxx””""来描述工具的功能,这个就是工具的文档,Agent会把这个输入给大模型,大模型会判断何时、如何使用工具。

Python环境创建

@tool
def create_sandbox():
    """To create a sandbox for executing Python, this tool must be called first to create a Python Sandbox before calling the tool that executes the code."""
    try:
        url = "https://127.0.0.1/create"
        headers = {
            "API-KEY": "PandoraBox API KEY",
        }

        response = requests.request("GET", url, headers=headers).json()
    except Exception as e:
        return f"Failed to create a Python SandBox. Error: {repr(e)}"
    return (
        f"Python Sandbox created successfully. The kernel ID is {response['kernel_id']}."
    )

Python环境关闭

提供一个关闭工具让大模型每次在执行完代码后都能主动关闭环境,避免造成资源浪费

@tool
def close_sandbox(
    kernel_id: Annotated[str, "The kernel id of the sandbox that need to be closed"]
):
    """Shutting down the Python Sandbox, it is necessary to close the sandbox and release resources after the user's task is completed. This requires passing the unique identifier, kernel_id, of the Sandbox"""
    try:
        url = "https://127.0.0.1/close"
        headers = {
            "API-KEY": "PandoraBox API KEY",
            "KERNEL-ID": kernel_id
        }

        response = requests.request("GET", url, headers=headers).json()
    except Exception as e:
        return f"Failed to Close a Python SandBox. Error: {repr(e)}"
    return (
        f"Python Sandbox {kernel_id} closed successfully."
    )

Python代码执行

通过调用PandoraBox的execute接口执行代码,并对返回结果进行解析。

@tool
def sandbox_execute(
    kernel_id: Annotated[str, "The kernel_id of the sandbox used to run Python code."],
    code: Annotated[str, "The python code to execute in the sandbox"]
):
    """Executing Python code, it is necessary to provide the unique identifier kernel_id of the sandbox and the python code to be executed"""
    try:
        url = "https://127.0.0.1/execute"
        headers = {
            "Content-Type": "application/json; charset=utf-8",
            "API-KEY": "PandoraBox API KEY",
            "KERNEL-ID": kernel_id,
        }
        data = {
            "code": code
        }

        response = requests.post(url, headers=headers, data=json.dumps(data, ensure_ascii=False)).json()
        try:
            response = response["result"]
            response.pop("API_KEY")
            final_results = []
            if response["results"]:
                for result in response["results"]:
                    if result["type"] == "image/png":
                        image_bytes = base64.b64decode(result["data"])
                        image_path = f"/xx/xx/xx/xx/xx/xx/{str(uuid.uuid4())}.png"
                        with open(image_path, "wb") as image_file:
                            image_file.write(image_bytes)
                        final_results.append(image_path)
                    else:
                        final_results.append(result)
            response["results"] = final_results
            if response["error"]:
                response["error"].pop("traceback")
        except Exception as e:
            return f"Failed to execute code. Error: {repr(response)} "
    except Exception as e:
        return f"Failed to execute code. Error: {repr(e)}"
    return (
        response
    )

创建Graph

首先需要定义Graph中数据流动的载体:State。这个State是一个类,里面有一个messages,Graph中每一个节点执行的结果必须都封装成此格式。(不仅仅可以有messages,可以根据需要自行添加其它信息)

class AgentState(TypedDict):
    messages: Annotated[Sequence[BaseMessage], operator.add]

然后定义一个创建Agent节点的函数,可以基于上述定义的Agent创建一个Agent节点。

# 定义创建Agent节点的函数,主要工作是接受Graph中的其他节点的输出State,然后将Agent的输出封装成State。
async def agent_node(state, config: RunnableConfig, agent, name):
    result = await agent.ainvoke(state, config)
    return {
        "messages": [result]
    }

# Agent需要一个大模型驱动,这里使用的是AzureChatOpenAI,可根据需要换成Langchain支持的其他模型。
llm = AzureChatOpenAI(
    default_headers={},
    azure_endpoint=os.environ["AZURE_OPENAI_ENDPOINT"],
    openai_api_version=os.environ["AZURE_OPENAI_API_VERSION"],
    azure_deployment=os.environ["AZURE_OPENAI_CHAT_DEPLOYMENT_NAME"],
    streaming=True
)

# 创建一个Agent
aihelper = aihelper_agent(
    llm,
    [create_sandbox, close_sandbox, sandbox_execute]
)

# 创建Agent Node
aihelper_node = functools.partial(agent_node, agent=aihelper, name="AIHelper")

接下来需要创建一个Tool节点。在LangGraph中,虽然所有的tools会bind到LLM上,但仍然需要将所有的tools放在一起构建成一个专门的ToolNode。这里主要包括create_sandbox, close_sandbox, sandbox_execute三个工具。

tools = [create_sandbox, close_sandbox, sandbox_execute]
tool_node = ToolNode(tools)

然后需要给graph定义一个状态路由器,决定每一个节点执行完成之后,应该继续走到哪个节点。通常是一些业务规则,可以根据上一个节点的执行结果state来判断。 以当前为例:

  1. 如果最后一个state中的message是tool_calls类型,那说明这个结果是工具调用的结果,是来自于ToolNode,那么下一个节点就必须是Agent,因为需要将工具执行结果返回给Agent,所以是return “tools”.这里的tools是工具节点的名称
  2. 如果state的message中的content以“TO USER”开头(这是在prompt中要求大模型输出给用户的结果必须加上TO USER),那么则直接返回给用户,因此流程结束,所以是return “end”。
def router(state) -> Literal["tools", "__end__"]:
    # This is the router
    messages = state["messages"]
    last_message = messages[-1]
    if last_message.tool_calls:
        # The previous agent is invoking a tool
        return "tools"
    if "TO USER" in last_message.content:
        # Any agent decided the work is done
        return "__end__"

然后可以定义Graph了

# 声明一个Graph,并传入消息传递载体AgentState
workflow = StateGraph(AgentState)

# 添加Agent节点和tools工具节点,分别取名AIHelper、tools
workflow.add_node("AIHelper", aihelper_node)
workflow.add_node("tools", tool_node)

# 添加Agent的条件路由边(基于上述的router)这里说明AIHelper有两个出边,可以到tools,也可以到结束节点,每次只能选其一。
workflow.add_conditional_edges(
    "AIHelper",
    router,
    {"tools": "tools", "__end__": END},
)

# 添加普通边,这里是给tools添加了一条到AIHelper的边,也就是只要toolNode结束,必须走到AIHelper,不需要进行路由条件判断(必走)
workflow.add_edge(
    "tools",
    "AIHelper"
)

# 设置Graph的入口,然后编译Graph,编译的时候传入memory配置,Grpah中的所有历史信息回存储到memory中
workflow.set_entry_point("AIHelper")
graph = workflow.compile(checkpointer=memory)

如果是在jupyter notebok中执行的,可以通过如下代码对graph进行可视化,可以很方便的看出逻辑是否有问题

from IPython.display import Image, display

try:
    display(Image(graph.get_graph(xray=True).draw_mermaid_png()))
except Exception as e:
    # This requires some extra dependencies and is optional
    print(str(e))

graph

可以看到创建的图是符合我们的预期的。 接下来就可以调用我们构建好的Code Interpreter了

调用的时候可以通过配置一个config来区分不同的对话

{
  "configurable": {
    "thread_id": "1"
  }
}

每一个thread_id表示一个不同的对话,每个对话的历史记录都保存在一个独立的memory模块中,所以可以根据thread_id实现不同用户、不同次的对话。

from langchain_core.messages import HumanMessage
config = {"configurable": {"thread_id": "1"}}
while True:
    q = input()
    async for event in graph.astream_events({"messages": [{"role": "user", "content": q}]}, config, version="v1"):
        kind = event["event"]
        if kind == "on_chat_model_stream":
            content = event["data"]["chunk"].content
            if content:
                # Empty content in the context of OpenAI or Anthropic usually means
                # that the model is asking for a tool to be invoked.
                # So we only print non-empty content
                print(content, end="")
        elif kind == "on_tool_start":
            print("--")
            print(
                f"Starting tool: {event['name']} with inputs: {event['data'].get('input')}"
            )
        elif kind == "on_tool_end":
            print(f"Done tool: {event['name']}")
            print(f"Tool output was: {event['data'].get('output')}")
            print("--")

接下来我们尝试多轮对话,验证Agent的memory记忆能力和Python代码生成并执行总结的能力。

1. Input: 你是谁?

TO USER: 您好!我是智能助手AIHelper。我可以帮您分析需求,生成相应的Python代码,在Python沙箱中执行这些代码,并整理执行结果来解决您的问题。无论是数据处理、文件操作还是一些复杂的计算任务,我都可以为您提供帮助。请告诉我您需要什么帮助!

2. Input: 从现在起你的名字是Code Interpreter

TO USER: 好的,从现在起您可以称呼我为Code Interpreter。有什么我可以帮助您的吗?请随时告诉我您的需求!

3. Input: 用快速排序对【1,6,7,4,5,9】进行排序
Thought: 我将使用快速排序算法对给定的数组进行排序。快速排序是一种分而治之的排序算法,它通过选取一个基准值将数组分成两部分,使得左边的元素都不大于基准值,右边的元素都不小于基准值,然后递归地对这两部分进行快速排序。


def quick_sort(arr):
    if len(arr) <= 1:
        return arr
    pivot = arr[len(arr) // 2]
    left = [x for x in arr if x < pivot]
    middle = [x for x in arr if x == pivot]
    right = [x for x in arr if x > pivot]
    return quick_sort(left) + middle + quick_sort(right)

# Given list
data = [1, 6, 7, 4, 5, 9]
sorted_data = quick_sort(data)
print(sorted_data)


接下来,我将创建一个Python沙箱并在其中执行这段代码。--
Starting tool: create_sandbox with inputs: {}
Done tool: create_sandbox
Tool output was: Python Sandbox created successfully. The kernel ID is 74e7891c-ed34-4f17-aa2b-748a25faea4a.
--
--
Starting tool: sandbox_execute with inputs: {'kernel_id': '74e7891c-ed34-4f17-aa2b-748a25faea4a', 'code': 'def quick_sort(arr):\n    if len(arr) <= 1:\n        return arr\n    pivot = arr[len(arr) // 2]\n    left = [x for x in arr if x < pivot]\n    middle = [x for x in arr if x == pivot]\n    right = [x for x in arr if x > pivot]\n    return quick_sort(left) + middle + quick_sort(right)\n\ndata = [1, 6, 7, 4, 5, 9]\nsorted_data = quick_sort(data)\nprint(sorted_data)'}
Done tool: sandbox_execute
Tool output was: {'results': [], 'logs': {'stdout': ['[1, 4, 5, 6, 7, 9]'], 'stderr': []}, 'error': None}
--
--
Starting tool: close_sandbox with inputs: {'kernel_id': '74e7891c-ed34-4f17-aa2b-748a25faea4a'}
Done tool: close_sandbox
Tool output was: Python Sandbox 74e7891c-ed34-4f17-aa2b-748a25faea4a closed successfully.
--

TO USER: 我已经使用快速排序算法对数组【1,6,7,4,5,9】进行了排序,排序后的结果是【1, 4, 5, 6, 7, 9】。如果您有其他需要帮助的地方,欢迎随时告诉我!

4. Input: 刚刚说你是谁,我忘了?

TO USER: 没关系!我是Code Interpreter,一个智能助手,可以帮您分析需求、生成Python代码,并在沙箱环境中执行这些代码来解决问题。如果您有任何需要帮助的地方,请随时告诉我!

5. Input: 记性不好,刚刚让你干啥了?

TO USER: 刚刚您让我使用快速排序算法对数组【1, 6, 7, 4, 5, 9】进行排序。我已经完成了这个任务,并且排序后的结果是【1, 4, 5, 6, 7, 9】。如果还有其他需要帮助的地方,请随时告诉我!

可以看到Agent的memory确实是生效的,并且能够完成Python任务。

Code Interpreter能力探索

为了近一步挖掘Code Interpreter的能力,我们将其结合streamlit构建了一个可以通过web端使用的demo,并优化了prompt等,目前可以实现较为复杂的功能。比如:数据分析、文件处理、计算器、机器学习模型预测、相关性分析、二维码生成、词云图生成等。

1. 数据分析、文件处理、计算器

2. 机器学习模型预测、相关性分析

3. 二维码生成

4. 词云图生成

理论上python能做的事情,Code Interpreter都能做。后续我们将进一步探索Code Interpreter的上限。

Reference

[1] https://langchain-ai.github.io/langgraph/

[2] https://lengm.cn/post/20240622_pandora_box/

[3] https://docs.streamlit.io/

阅读原文

  • 28
    点赞
  • 17
    收藏
    觉得还不错? 一键收藏
  • 0
    评论
Code interpreter(代码解释器)是一种将计算机语言转换为可执行代码的软件工具。使用code interpreter可以直接运行和测试编写的代码,而无需进行繁琐的编译过程。 首先,我们需要选择适合自己的code interpreter。常见的code interpreter有Python解释器、JavaScript解释器等。根据我们使用的编程语言选择相应的code interpreter。 然后,我们需要将代码输入到code interpreter中。可以使用集成开发环境(IDE)或者命令行进行输入。在IDE中,我们可以创建一个新的代码文件,将代码写入文件中,然后选择运行该文件。在命令行中,将代码输入到相应的编程语言解释器后,按下回车键即可运行代码。 在运行代码之前,我们可以选择设置一些选项。例如,选择运行模式(交互模式或批处理模式),设置文件路径等。这些选项根据不同的code interpreter会有所不同,可以查阅相应的文档或使用帮助命令获得更多信息。 运行代码后,code interpreter会逐行解释代码,并输出结果。我们可以通过观察输出结果来验证我们的代码是否正确。 除了运行代码,code interpreter还提供了调试功能。我们可以通过设置断点、单步执行、查看变量的值等方式来帮助我们找出代码中的错误,并进行调试。 总之,使用code interpreter可以方便地运行和测试我们编写的代码,减少了编译的复杂性,提高了代码开发的效率。但需要注意的是,不同的编程语言和不同的code interpreter可能具有不同的操作步骤和设置选项,因此在使用前最好查阅相应的文档或参考相关的教程。

“相关推荐”对你有帮助么?

  • 非常没帮助
  • 没帮助
  • 一般
  • 有帮助
  • 非常有帮助
提交
评论
添加红包

请填写红包祝福语或标题

红包个数最小为10个

红包金额最低5元

当前余额3.43前往充值 >
需支付:10.00
成就一亿技术人!
领取后你会自动成为博主和红包主的粉丝 规则
hope_wisdom
发出的红包
实付
使用余额支付
点击重新获取
扫码支付
钱包余额 0

抵扣说明:

1.余额是钱包充值的虚拟货币,按照1:1的比例进行支付金额的抵扣。
2.余额无法直接购买下载,可以购买VIP、付费专栏及课程。

余额充值