


前言
架构说简单点就是一堆技术、框架、工具的组合,至于怎么组合,这就非常考验架构师的经验和水平。一个优秀的架构,可以让开发效率变得更加高效,为企业节省更多的成本。程序员可将自己更多的精力放在业务需求的实现上,不会被底层的复杂技术细节所干扰。
架构师(或从事架构工作的人)就像是探险者一样,他们走在团队的前面,为大家铺.路,带领大家找到成功捷径。此外,做架构工作不能照搬别人所谓的最佳实践,而要根据自身实际情况,因地制宜地灵活选择,设计最为合理的架构。架构的目的是为了让业务变得更加容易落地,降低开发成本与统--开发规范。架构师的职责就是避免大家踩坑,他们需要将自己的经验总结下来,并带领大家走最正确的路。架构师不只是在体验探险的凶险和快乐,而是把探险所积累的经验沉淀下来,让后面更多的人从中受益。
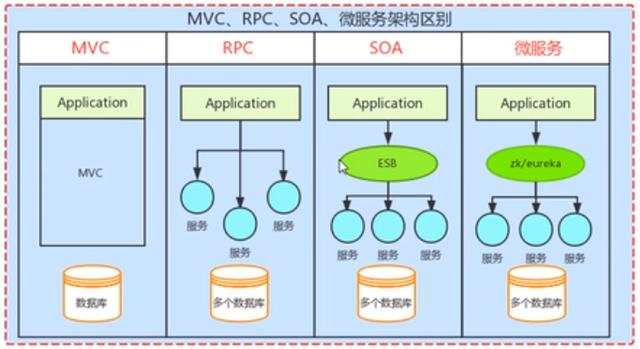
随着互联网浪潮风起云涌,互联网行业发展非常迅猛。此时将所有业务集中实现在一个应用上的做法已经满足不了公司及业务发展的需要了。基于面向服务体系架构来构建系统成了互联网架构师构建系统的不二选择,而面向服务体系架构能够落地的基础技术之一就是分布式服务框架。
RPC框架原理
RPC ( Remote Procedure Call,远程过程调用)一般用来实现部署在不同机器上的系统之间的方法调用,使得程序能够像访问本地系统资源一样,通过网络传输去访问远端系统资源。RPC框架实现的架构原理都是类似的,如下图所示。
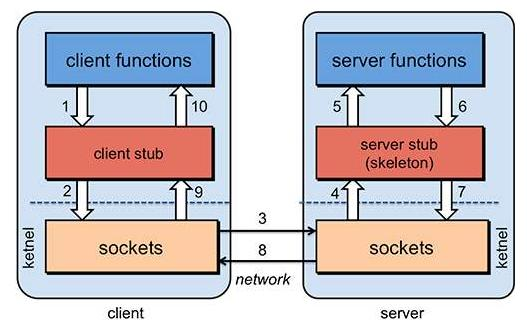
在该架构中,下面几个方面是重点。
- Client Code: 客户端调用方代码实现,负责发起RPC调用,为调用方用户提供使用API。
- Serialization/Deserialization: 负责对RPC调用通过网络传输的内容进行序列化与反序列化,不同的RPC框架有不同的实现机制。主要分为文本与二进制两大类。文本类别的序列化机制主要有XML与JSON两种格式,二进制类别的序列化机制常见的有Java原生的序列化机制,以及Hessian. protobuf、Thrift. Avro、 Kryo、MessagePack等,不同的序列化方式在可读性、码流大小、支持的数据类型及性能等方面都存在较大差异,需要用户根据自己的实际情况进行甄别与筛选。
- Stub Proxy:可以看作是一-种代理对象,屏蔽RPC调用过程中复杂的网络处理逻辑,使得PRC调用透明化,能够保持与本地调用一样的代码风格。
- Transport:作为RPC框架底层的通信传输模块,- -般通过Socket 在客户端与服务端之间传递请求与应答消息。
- ServerCode:服务端服务业务逻辑具体的实现。下面几节分别针对目前常用的几类RPC框架做介绍。
RMI介绍
Java RMI ( Remote Method Invocation)是一种基于Java的远程方法调用技术,是Java特有的一-种RPC实现。它能够使部署在不同主机上的Java对象之间进行透明的通信与方法调用,如下图所示。
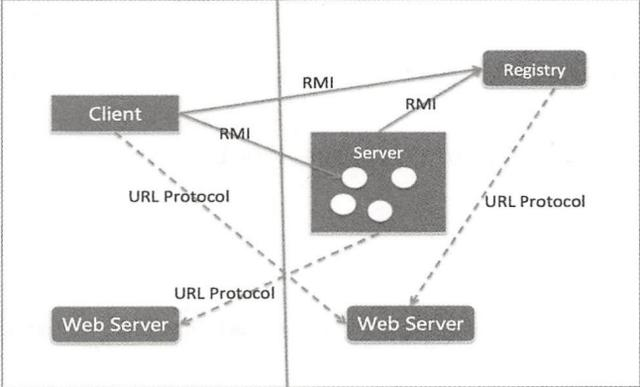
RMI特性总结如下所述。
支持真正的面向对象的多态性。 而完全支持面向对象也是RMI相对于其他RPC框架的优势之一。
- Java 语言独有,不支持其他语言,能够完美地支持Java语言所独有的特性。
- 使用了 Java原生的序列化机制,所有序列化对象必须实现java.io.Serializable接口。
- 底层通信基于BIO (同步阻塞I/O) 实现的Socket完成。
因Java原生序列化机制与BIO通信机制本身存在性能问题,导致RMI的性能较差, .对性能要求高的使用场景不推荐该方案。
原生RMI代码示例
RMI使用示例如下所述
定义RMI对外服务接口HelloService:
import java. rmi . Remote;
import java. rmi . RemoteException;


public interface HelloService extends Remote {
String sayHello (String someOne) throws RemoteException;
}
RMI接口方法定义必须显式声明抛出RemoteException异常
服务端接口实现HelloServicelmpl:
import java. rmi . RemoteException;
import java. rmi . server .Unicas tRemoteobject;
public class Hel loServiceImpl extends UnicastRemoteobject implements
HelloService {
private static final long serialVersionUID = -6190513770400890033L;
public HelloServiceImpl () throws RemoteException {
super() ;
}
@Override
public String sayHe11o (String someOne) throws RemoteException {
return "Hello," + someOne;
}
服务端方法实现必须继承UnicastRemoteObject 类,该类定义了服务调用方与服务提供方对象实例,并建立一对一的连接。
服务端RMI服务启动代码:
import java . rmi . Naming;
import java. rmi . registry . LocateRegistry;
public class ServerMain {
public static void main(String[] args) throws Exception {
//创建服务
HelloService helloService = new HelloServiceImpl () ;
//注册服务
LocateRegistry . createRegistry(8801) ;
Naming . bind ("rmi://localhost: 8801 /helloService", helloService) ;
System. out.println ("ServerMain provide RPC service now") ;
}
}
客户端远程调用RMI服务代码:
import rmi . study . server . HelloService;
import java. rmi .Naming; .
public class ClientMain {
public static void main (String[] args) throws Exception {
//服务引入
HelloService helloService = (HelloService) Naming. lookup ("rmi://
localhost : 8801/helloService") ;
//调用远程方法
System. out. println ("RMI服务器返回的结果是:”+ helloService .sayHello
("liyebing"));
}
}
首先运行服务端程序ServerMain,然后运行ClientMain,运行结果如下:
RMI服务器返回的结果是: Hello, liyebingRMI穿透防火墙
RMI的通信端口是随机产生的,因此有可能会被防火墙拦截。为了防止被防火墙拦截,需要强制指定RMI的通信端口。一般通过自定义一个RMISocketFactory 类来实现,代码如下:
import java. io. IOException;
import java.net. ServerSocket;
import java.net. Socket;
import java. rmi . server . RMISocketFactory;
public class Cus tomerSocketFactory extends RMISocketFactory {
//指定通信端口,防止被防火墙拦截
@Override
public Socket createSocket (String host, int port) throws IOException {
return new Socket (host, port) ;
}
@Override
public ServerSocket createServerSocket (int port) throws IOException {
if (port == 0) {
port = 8501;
}
System. out.println("rmi notify port:" + port) ;
return new ServerSocket (port) ;
}
}
然后将新定义的类注入到Rmiserver端,代码如下:
import java. rmi . Naming;
import java. rmi . registry . LocateRegistry;
import java. rmi . server . RMISocketFactory;
public class ServiceMain {
public static void main(String[] args) throws Exception{
LocateRegistry. createRegistry(8801) ;
//指定通信端口,防止被防火墙拦截
RMISocketFactory . setSocketFactory (new Custome rSocketFactory()) ;
HelloService helloService = new HelloServiceImpl () ;
Naming.bind ("rmi://localhost: 8801/helloService" , helloService) ;
System. out.println ("ServiceMain provide RPC service now.") ;
}
}
CXF/Axis2介绍
WebService是一种跨平台的RPC技术协议。WebService技术栈由SOAP(SampleObject Access Protocol, 简易对象访问协议)、UDDI ( Universal Description, Discovery and Integration,统一描述、发现与集成)、WSDL ( Web Services Description Language,网络服务描述语言)组成。其中,SOAP是一种使用XML进行数据编码的通信协议,独立于平台,独立于语言,简单可扩展,因为SOAP基于HTTP协议进行数据传输,故能绕过防火墙。SOAP提供了一种标准方法,使得运行在不同的操作系统并使用不同技术和编程语言的应用程序可以互相通信。UDDI 是一个独立于平台的框架,是一种通用描述、发现与集成服务。WSDL是使用XML编写的网络服务描述语言,用来描述WebService,以及如何访问WebService。
下面介绍Java开发中常用的两种WebServic实现:CXF与Axis2。.
CXF介绍
Apache CXF是一个开源的WebService RPC框架,是两个著名的开源项目ObjectWebCeltix和CodehausXFire合并后的产物。ApacheCXF包含一个范围广泛、功能齐全的集合。主要有以下特点。
- 支持Web Services标准,包括SOAP (SOAP1.1和SOAP1.2) 规范,WSI BasicProfile、WSDL、WS- Addressing、WS-Policy、WS-ReliableMessageing、 WS-Security等。
- 支持JSR相关规范和标准,包括JAX-WS (Java API for XML-Based Web .Services2.0)、JAX-RS( The Java API for RESTful Web Services)、SAAJ( SOAP withAttachments API for Java)。
- 支持多种传输协议和协议绑定、数据绑定。
- 协议绑定: SOAP、REST/HTTP、XML。
- 数据绑定: JAXB 2.X、Aegis、 Apache XMLBeans等。
下面通过一个集成Spring基于Maven的JavaWeb项目来说明CXF的用法。为了演示方便,将WebService 的服务端与客户端代写到了一个工程里面。工程的结构如下所示。
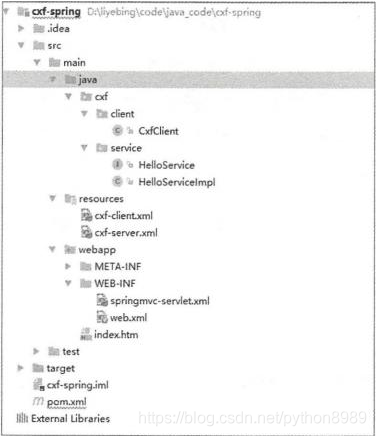
CXF集成SpringMaven项目示例关键代码如下所述。
定义服务端服务接口HelloService, 其中接口使用注解@WebService标明是一个WebService远程服务接口:
package Cxf .service;
import javax. jws . WebService;
@WebService
public interface HelloService {
public String sayHello (String content) ;
package Cxf .service;
import javax. jws . WebService;
@WebService (endpointInterface = "Cxf . service. HelloService")
public class HelloServiceImpl implements HelloService {
public String sayHe11o (String content) {
return "hello," + content;
}
}
上述代码中WebService服务接口的实现类为HelloServicelmpl,同时使用注解@WebService,并通过endpointInterface指明对应的接口实现cxf.service.HelloService。
cxf-server.xml配置的主体内容如下:
<import resource="classpath :META- INF/cxf/cxf.xml"/>
<import resource="classpath :META-INE/cxf/cxf-servlet .xml"/>
<j axws :endpoint
id="hel loWorld"
impl ementor="cxf . service . HelloServiceImpl" address=" /HelloWorld"/>
web.xml配置如下:
<?xml version="1.0" encoding="UTF-8"?>
<web-app xmlns :xsi="http:/ /www. w3. org/2001/XMLSchema- instance"
xmlns="http:/ /java. sun. com/ xml /ns/ javaee"
xsi : schemaLocation="http:/ /java. sun. com/ xml/ns/javaee
http://java. sun. com/ xml/ns/javaee/web-app_ _2_ 5. xsd"
id="WebApp_ ID" version="2.5">
<display-name>cxf-spring</display-name>
<context-param>
<param-name>contextConf igLocat ion</ param-name>
<param-value>classpath: cxf-server .xml</param-value>
</context-param>
<listener>
<listener-class>
org. spr ingf ramework . web. context . ContextLoaderListener
</ 1 istener-class>
</listener>
<servlet>
<servlet-name>CXFServlet</ servlet-name>
<servlet-class>org. apache . cxf. transport. servlet . CXFServlet</servlet- -class>
<load-on-startup>1</load-on-startup>
</servlet>
<servlet-mapping>
<servlet-name>CXFServlet</ servlet-name>
<url-pattern>/ws/ *</url-pattern>
</ servlet-mapping>
</ web-app>
pom.xml Maven依赖配置如下:
<modelVersion>4.0.0</modelVersion>
<groupId>cxf-spr ing-study</groupId>
<artifactId>cxf-spring</artifactId>
<version>1.0- SNAPSHOT</version>
<packaging>war</packaging>
<properties>
<cxf. version>3.1.7</cxf. version>
<spring. version>4.0.9. RELEASE</ spring . version>
</properties>
<dependencies>
<dependency>
<groupId>org . spring f ramework</groupId>
<arti factId>spring-context</arti factId>
<version>$ {spring. version}</version>
</ dependency>
<dependency>
<groupId>org . spr ingframework</groupId>
<artifactId>spr ing-webmvc</arti factId>
<version>$ { spring. version}</version>
</dependency>
<dependency>
<groupId>org . springf ramework</ groupId>
<artifactId>spr ing-context-support</artifactId>
<version>$ { spring. version}</version>
</ dependency>
<dependency>
<groupId>org . apache .cxf</groupId>
<arti factId>cxf-rt- frontend-jaxws</arti factId>
<version>$ {cxf. version}</version>
</dependency>
<dependency>
<groupId>org . apache. cxf</groupId>
<artifactId>cxf-rt-transports-http</artifactId>
<version>${cxf. version}</version>
</dependency>
<dependency>
<groupId>org .apache .cxf</groupId>
<arti factId>cxf-rt-transports-http-jetty</artifactId>
<version>${cxf. version}</version>
</ dependency>
</dependencies>
在Tomcat Web容器中部署运行,结果如下图所示。
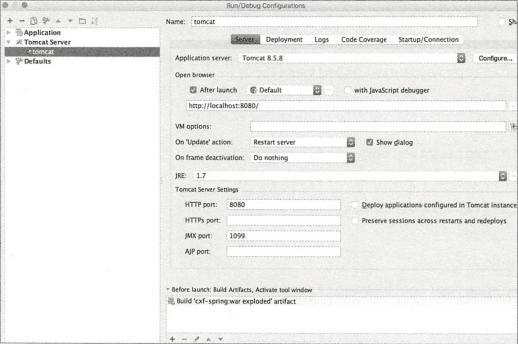
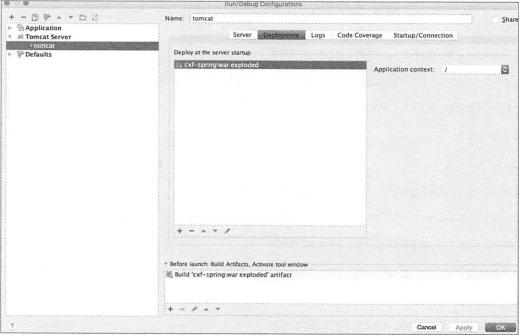
在Tomcat中部署运行
然后在浏览器中运行localhost:8080/ws/HelloWorld?wsdl,得到下图所示的结果,说明WebService服务端服务发布完成。
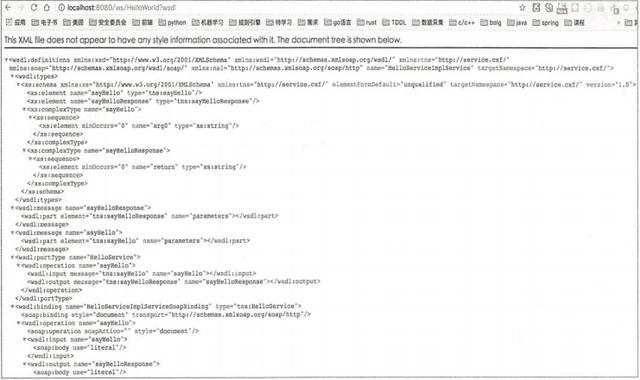
CXF WebService服务发布WSDL文件
下面介绍客户端如何调用服务端发布的WebService服务。
首先配置服务的引入信息cxf-client.xml,主体内容如下:
<jaxws:client id="helloClient"
serviceClass="cxf . service . HelloService"
address="http://localhost : 8080/ws/HelloWorld" />
</beans>
其中serviceClass配置服务端发布的WebService服务接口,address为服务端服务访问HTTP地址( WebService采用HTTP协议通信)。
最后,编写客户端调用类CxfClient:
package cxf.client;
import cxf . service. HelloService;
import org. springframework. context . ApplicationContext;
import org. springf ramework. context . support .ClassPathXmlApplicationContext;
public class CxfClient {
public static void main (String[] args) {
ApplicationContext context = new ClassPathXmlAppl icationContext
("classpath:cxf-client.xml") ;
HelloService client = (HelloService) context. getBean ("helloClient") ;
System. out .println (client . sayHel1o ("liyebing")) ;
}
}
运行结果如下
hello, liyebingAxis2介绍
Apache Axis2是Axis的后续版本,是新- -代的SOAP引擎,是CXF之外另一个非常流行的Web Services/SOAP/WSDL 实现,且同时存在Java语言与C语言两种实现。这里就Java语言的实现做一个介绍。
Axis2主要有以下特点。
- 高性能: Axis2具有自己的轻量级对象模型AXIOM,且采用StAX ( Streaming APIfor XML)技术,具有更优秀的性能表现,比Axis1.x的内存消耗更低。
- 热部署:Axis2配备了在系统启动和运行时部署Web服务和处理程序的功能。换句话说,可以将新服务添加到系统,而不必关闭服务器。只需将所需的Web服务归档存储在存储库的services目录中,部署模型将自动部署该服务并使其可供.使用。.
- 异步服务支持: Axis2 支持使用非阻塞客户端和传输的异步,以及Web服务和异步Web服务调用。
- WSDL支持:Axis2支持Web服务描述语言版本1.1和2.0,它允许轻松构建存根以访问远程服务,还可以自动导出来自Axis2的已部署服务的机器可读描述。
下面通过一个集成Spring基于Maven的JavaWeb项目来说明Axis2的用法。为了演示方便,将WebService的服务端与客户端代码写到了一个工程里面。工程的结构如下图所示
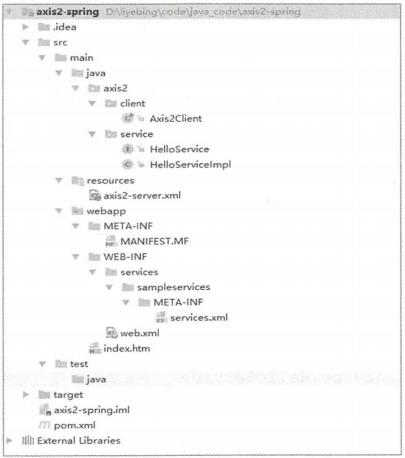
Axis2WebService服务端关键代码如下所述。
定义WebService服务接口:
package axis2. service;
public interface HelloService {
public String sayHello(String content) ;
}
服务接口HelloService 实现:
package axis2. service;
public class HelloServiceImpl implements HelloService {
public String sayHello (String content) {
return "hello," + content;
}
配置文件axis2-server.xml用来声明Spring 服务Bean实例:
<bean id="hel loService" class="axis2. service . HelloServiceImpl"/>配置文件services.xml用来描述Axis2服务:
<serviceGroup>
<service name="HelloService">
<description>Spring POJO Axis2 example</description>
<parameter name="ServiceClass">
axis2. service. HelloService
</pa rameter>
<parameter
name="Service0bjectSupplier"> org.apache .axis2. extensions.
spring . receivers. SpringServletContextobjectSupplier
</parameter>
<parameter name="Spr ingBeanName">helloService</ parameter>
<messageReceivers>
<messageReceiver mep="http:/ /www.w3. org/2004/08/wsdl/ in-out" class="org.
apache .axis2. rpc. receivers . RPCMessageReceiver" />
</messageReceivers>
</ service>
</ serviceGroup>
其中web.xml内容如下:
<?xml version="1. 0" encoding="UTF-8"?>
<web-app xmlns:xsi="http:/ /www. w3. org/2001/XMLSchema- instance"
xmlns="http:/ /java. sun. com/ xml /ns/javaee"
xsi : schemaLocation="http://java. sun. com/ xml/ns/javaee
http://java . sun. com/ xml/ ns/javaee/web-app_ _2_ _5.xsd"
id="WebApp_ ID" version="2.5">
<display-name>axis2-spring</display-name>
<context-param>
<par am-name>contextConf igLocation</param-name>
<param-value>classpath :axis2-server . xml</param-value>
</context-param>
<1 istener>
<1 istener-class>
org. spr ingf ramework. web. context . ContextLoaderListener
</listener-class>
</listener>
<servlet>
<servlet-name>Axi sServlet</ servlet-name>
<servlet-class>org . apache . axis2. transport .http . AxisServlet</servlet-class>
<load-on-startup>1</ load-on-startup>
</servlet>
<servlet -mapping>
<servlet-name>AxisServlet</servlet-name>
<url-pattern>/services/*</url-pattern>
</servlet-mapping>
</ web-app>
配置文件pom.xmlMaven依赖内容如下:
<modelVersion>4.0. 0< /modelVersion>
<groupId>axis2-spr ing- study</groupId>
<arti factId>axis2-spring</arti factId>
<version>1.0-SNAPSH0T</version>
<packaging>war</packaging>
<properties>
<axis2. version>1.7.4</axis2. version>
<spring. version>4.0.9. RELEASE</ spring. version>
</properties>
<dependencies>
<!-- spring -->
<dependency>
<groupId>org . spr ingf ramework</groupId>
<arti factId>spring-context</arti factId>
<version>$ {spring. version}</version>
</ dependency>
<dependency>
<groupId>org . springframework</groupId>
<arti factId>spring-web</arti factId>
<version>$ {spring. version}</version>
</ dependency>
<dependency>
<groupId>org . springframework</groupId>
<arti factId>spr ing-context-support</arti factId>
<vers ion>$ {spring. version}</version>
</ dependency>
<!-- axis2 -->
<dependency>
<groupId>org . apache . axis2</groupId>
<arti factId>axis2-transport-xmpp</arti factId>
<version>$ { axis2. version}</version>
</dependency>
<dependency>
<groupId>org. . apache . axis2</groupId>
<arti factId>axis2-transport-udp</arti factId>
<version>${axis2. version}</version>
</ dependency>
<dependency>
<groupId>org. apache. axis2</groupId>
<arti factId>axis2-transport-tcp</arti factId>
<version>$ { axis2. version}</version>
</dependency>
<dependency>
<groupId>org. apache. axis2</groupId>
<arti factId>axis2-webapp</arti factId>
<version>$ {axis2. version}</version>
</dependency>
<dependency>
<groupId>org. apache.axis2</groupId>
<arti factId>axis2 -xmlbeans</arti factId>
<version>$ {axis2. version}</version>
</dependency>
<dependency>
<groupId>org. apache. axis2</groupId>
<arti factId>axis2-spring</arti factId>
<version>${axis2. version}</version>
</dependency>
<dependency>
<groupId>org . apache. axis2</groupId>
<arti factId>axi s2- soapmonitor-servlet</arti factId>
<version>${axis2. version}</version>
</ dependency>
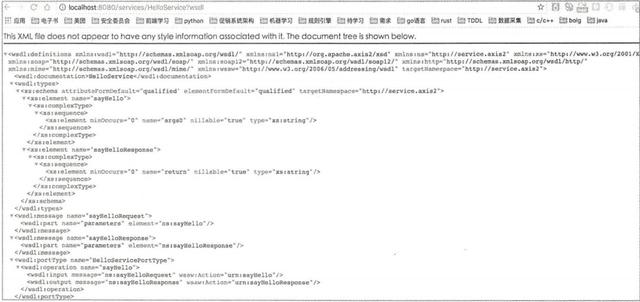
</dependencies>在Tomcat中部署运行,然后在浏览器中运行htp://ocalhos:8080/services/HelloService?wsdl,得到如下图所示的内容,说明WebService服务端发布完成。
Axis2客户端调用的方式有多种,下面介绍一种不用预生成代码的动态调用方式。
import org. apache . axis2. addressing . EndpointReference;
import org. apache . axis2. client .Options;
import org. apache .axis2. rpc .client. RPCServiceClient; .
import org. apache .axis2. transport . http. HTTPConstants;
import javax . xml .namespace . QName ; .
public class Axis2Client {
public static void main(String[] args) {
try {
EndpointReference targetEPR = new EndpointReference (
"http://localhost: 8080/services/HelloService") ;
RPCServiceClient serviceClient = new RPCServiceClient() ;
Options options = serviceCl ient . getOptions() ;
options . setManageSession(true) ;
options .setProperty (HTTPConstants. REUSE_ HTTP_ CLIENT, true) ;
options .setTo (targetEPR) ;
QName opQName = new QName ("http://service. axis2", "sayHello") ;
//设置调用参数
object[] paramArgs = new object[] {"liyebing"};
//处理返回数据
Class[] returnTypes = new Class[] {String.class};
object[]
response =
serviceClient. invokeBlocking (opQName,
paramArgs, returnTypes) ;
serviceCl ient . cleanupTransport () ;
String result = (String) response[0] ;
if (result == null) {
System. out . println ("HelloService didn't initialize!") ;
} else {
Sys tem. out .println (result) ;
}
} catch (Exception e) {
e.printStackTrace() ;
}
}
}
运行结果如下:
hello, liyebing总结
本文主要介绍日常开发常用的RPC框架,包括RMI、CXF、Axis2、,并就每一种RPC框架给出了实际可运行的代码示例,以及自己实现的一个简易版的RPC框架。


 3万+
3万+

 被折叠的 条评论
为什么被折叠?
被折叠的 条评论
为什么被折叠?
 到【灌水乐园】发言


