


目录
一、概述
1.1 多任务人脸属性分析
多任务人脸分析在多媒体、社交网络、计算机视觉等领域有着非常广泛的应用,不同于我们所熟知的“人脸检测”、“人脸验证”、“人脸比对”等技术,多任务人脸分析可以理解为:给定一张肖像图,算法自动给出对应的属性分析值,例如“是否戴了口罩”、“是否戴了墨镜”、“人脸是否模糊”、“性别”、“年龄”、“肤色”、“表情“等等。这里不同属性的预测代表不同的子任务,因此,多任务人脸分析是一个典型的多任务学习任务。

多任务学习可以简单理解为模型一次性可以同时处理两个以上的任务,而传统的模型通常只能解决一个特定的任务(例如性别识别、表情识别等)。进入Deep Learning时代,尤其是在CV相关的很多任务上,特征是可以共享的,此处“共享”可以理解为各个子任务上的特征存在一定的复用性,这种多任务训练出来的特征本身考虑了多任务之间的相关性,可以有效的去除各个子任务之间的特征冗余。也就是说通过共享网络设计,可以训练出来最精炼的特征,给多个子任务提取鉴别特征。
使用多任务学习模型可以大大减少系统执行流程的复杂度,使得原本需要串联的多个模型只需要在统一的模型下进行推理即可完成。
1.2 本文任务
本文基于飞桨PaddleClas算法套件,全流程记录多任务人脸属性分析的数据预处理、模型训练、评估、测试、部署等步骤,能够按照自己的定制化需求完成人脸相关属性的训练、推理和部署一条龙任务,能够打造出真正高性能的多任务人脸属性分析系统。同时,本文相关内容也可以无缝迁移到其它类似的多任务属性分析系统开发中。
由于需要使用英伟达GPU进行训练和推理,因此需要提前GPU服务器上装好配套的GPU显卡驱动、CUDA、CUDNN、TensorRT。具体安装教程可以请参考我的另一篇博客。本文服务器上开发环境如下:
- 操作系统:ubuntu18.04
- 深度学习框架:PaddlePaddle 2.3
- CUDA:10.2
- CUDNN:7.6.5
- TensorRT:6.0.1.8
二、环境配置
本文核心算法使用PaddlePaddle实现,因此首先需要安装PaddlePaddle。
2.1 安装PaddlePaddle
参考官网进行安装。本文系统为ubuntu(linux),cuda为10.2,使用Paddle2.3版本,对应的pip安装命令如下:
python -m pip install paddlepaddle-gpu==2.3.1 -i https://mirror.baidu.com/pypi/simple
2.2 安装PaddleClas
PaddleClas是PaddlePaddle框架配套的开源图像分类算法库,涵盖了众多开箱即用的图像分类算法,只需要做简单的配置就可以上手训练和推理,使用非常方便,本文将使用PaddleClas来训练多任务人脸属性分析算法。
为了加速下载,可以选择我的gitee镜像源:
git clone https://gitee.com/binghai228/PaddleClas.git
然后进行安装:
cd PaddleClas
sudo python setup.py install
在安装时可能会有个别的依赖库因为网络原因下载不下来,可以使用百度镜像源加速安装,例如:
pip install opencv-python==4.4.0.46 -i https://mirror.baidu.com/pypi/simple
另外在安装时可能会出现下面的错误:
error: importlib-metadata 4.8.3 is installed but importlib-metadata<4.3;
解决方法:
pip install flake8
三、算法模型开发
3.1 算法原理
本文使用PaddleClas提供的超轻量图像分类方案(PULC,Practical Ultra Lightweight image Classification)来开发和完成多任务人脸属性识别模型。从整个架构上看,它的基本原理跟一般的图像分类应用差别不大,都是先用基于卷积神经网络的backbone网络提取共性特征,然后在此基础上根据任务数提取对应的任务独有特征,然后使用多标签损失函数一起迭代计算。

这里值得说明的是PULC使用了轻量级PPLCNet作为backbone(也可以替换成其他模型),然后级联多标签损失函数来完成多任务分类。
在计算机视觉领域中,骨干网络的好坏直接影响到整个视觉任务的结果。近年来,有很多轻量级的骨干网络问世,尤其最近两年,各种 NAS 搜索出的网络层出不穷,这些网络要么主打 FLOPs 或者 Params 上的优势,要么主打 ARM 设备上的推理速度的优势,很少有网络专门针对 Intel CPU 做特定的优化,导致这些网络在 Intel CPU 端的推理速度并不是很完美。基于此,针对 Intel CPU 设备以及其加速库 MKLDNN ,飞桨团队设计了特定的骨干网络 PP-LCNet,比起其他的轻量级的 SOTA 模型,该骨干网络可以在不增加推理时间的情况下,进一步提升模型的性能,最终大幅度超越现有的 SOTA 模型。
PPLCNet网络结构整体如下图所示:

为了取得最佳的推理速度和推理精度,PPLCNet在四个方面做了改进:
- 更好的激活函数
自从卷积神经网络使用了 ReLU 激活函数后,网络性能得到了大幅度提升,近些年 ReLU 激活函数的变体也相继出现,如 Leaky-ReLU、P-ReLU、ELU 等。2017 年,谷歌大脑团队通过搜索的方式得到了 swish 激活函数,该激活函数在轻量级网络上表现优异,在 2019 年,MobileNetV3 的作者将该激活函数进一步优化为 h-swish,该激活函数去除了指数运算,速度更快,网络精度几乎不受影响,在轻量级网络上表现尤其优异。所以在 PP-LCNet 中,使用了该激活函数。

- 合适的位置添加 SE 模块
SE 模块是 SENet 提出的一种通道注意力机制,可以有效提升模型的精度。但是该模块同样会带来较大的延时,如何平衡精度和速度是一个难题。虽然在 MobileNetV3 等基于 NAS 搜索的网络中对 SE 模块的位置进行了搜索,但是并没有得出一般的结论。通过实验发现,SE 模块越靠近网络的尾部对模型精度的提升越大,因此,PP-LCNet 中的 SE 模块的位置选用了上面模型结构图中的方案。 - 合适的位置添加更大的卷积核
在 MixNet 的论文中,作者分析了卷积核大小对模型性能的影响,结论是在一定范围内大的卷积核可以提升模型的性能,但是超过这个范围会有损模型的性能,所以作者组合了一种 split-concat 范式的 MixConv,这种组合虽然可以提升模型的性能,但是不利于推理。飞桨研究员总结了一些更大的卷积核在不同位置的作用,类似 SE 模块的位置,更大的卷积核在网络的中后部作用更明显,与此同时,可以获得更快的推理速度。PP-LCNet 最终采取了这样的方案。 - GAP 后使用更大的 1x1 卷积层
在 GoogLeNet 之后,GAP(Global-Average-Pooling)后往往直接接分类层,但是在轻量级网络中,这样会导致 GAP 后提取的特征没有得到进一步的融合和加工。如果在此后使用一个更大的 1x1 卷积层(等同于 FC 层),GAP 后的特征便不会直接经过分类层,而是先进行了融合,并将融合的特征进行分类。这样可以在不影响模型推理速度的同时大大提升准确率。
3.2 数据集准备
3.2.1 使用labelme标注原始数据
对于多标签分类数据集我们可以使用labelme进行标注,具体安装方法请参考官网。
sudo pip3 install labelme
安装完成以后我们就可以开始进行标注了。
注意,由于我们这里是多标签标注,因此,为了方便我们创建标签,我们可以先用一个txt来把所有标签名写进去,然后再导入到labelme工具中,这样可以省去每次导入都要创建标签的麻烦,尤其是在标签比较多的时候。
先创建一个名为label.txt的标签文件,内容样式如下所示:
blur
mask
glass
hat
expression
每行表示一种类别。注意标签绝对不能用中文!!!
然后我们启动labelme,启动方式如下:
labelme --flags label.txt
注意,当前路径下必须有label.txt文件才能执行成功。启动后效果如下:

可以看到右侧已经将label.txt中的标签自动导入到Flags列表中了。
接下来我们单击菜单栏File-Open Dir,打开指定的图片文件夹目录。然后我们关闭掉File-Dave With Image Data复选菜单,这样我们保存的标注文件就不会保存原始图像数据了(否则标注文件太大了)。到这里,我们设置就全部结束了。
具体标注只需要根据每张图片自行在右侧Flags窗口中打上标记就可以。如下图所示:

标注的文件自动以json文件保存,内容如下所示:
{
  "version": "4.6.0",
  "flags": {
    "naked": false,
    "strange": false,
    "mask": false,
    "hair": false,
    "hat": false,
    "glass": false,
    "blur": false,
    "light": false,
    "hand": false,
    "scarf": false,
    "necklace": false,
    "earrings": false,
    "smoke": false,
    "uniform": false,
    "ps": false,
    "unrealperson": true
  },
  "shapes": [],
  "imagePath": "1.jpg",
  "imageData": null,
  "imageHeight": 1717,
  "imageWidth": 1280
}
其中flag字段中的每一项就代码标注的每一个属性。imagePath字段表示当前标注的图片名称。
标注完后所有的json标注文件都存放在每张图片对应的同目录下,其名称与图片名称相同。如下图所示:

3.2.2 数据集格式转化
数据集标注完以后我们需要对其进行转换,转换成适合PaddleClas处理的数据集形式。
数据集基本形式如下
dataset
├── images1
│   ├── 000001.jpg
│   ├── 000002.jpg
...
├── images2
│   ├── 080001.jpg
│   ├── 080002.jpg
...
├── train_list.txt
├── val_list.txt
├── test_list.txt
其中train_list.txt、val_list.txt、test_list.txt分别表示训练、验证、测试文件列表,用于后续算法训练、验证和测试。一个典型的train_list.txt内容如下所示:
images1/080001.jpg	0,0,1,0,0,0,0,0,0,0,0,0,0,1,0,0,0,0,0,0,1,0,1,1,0,0
images1/080002.jpg	0,0,0,1,0,0,0,0,0,0,0,1,0,0,0,1,0,0,0,0,1,0,0,1,0,0
images2/080003.jpg	0,0,1,0,0,0,0,0,0,0,0,0,1,0,0,0,0,1,0,0,0,1,1,0,1,0
images1/080004.jpg	0,0,1,0,0,0,0,0,0,0,0,1,0,0,0,0,0,0,0,0,1,0,1,0,1,0
每一行表示一个样本,前面images1/080001.jpg表示图片路径,后面01序列串表示每个属性是否包含,例如对于戴口罩这个属性,约定如果这张图片包含口罩就为1,不包含就为0。各个属性之间用逗号分隔。图片路径和序列串之间用’\t’分隔符隔开。
下面的代码用于执行转换操作,对于我的任务来说共需要标注16个属性。因此,下面的转换代码需要各位读者结合自己的实际任务进行微改(注意,单独将名为good的文件夹放在了face_attribute_dataset目录下面,这个子文件夹用于存放没有任何属性的照片,这个子文件夹不需要标注,默认所有属性都赋值为0):
# 导入系统库
import cv2
import os
import json
import random

# 导入自定义库
from tools import getFileList, writeFileLst

def main():
    '''
    主函数
    '''
    # 检索文件夹
    org_img_folder = 'face_attribute_dataset'

    # 训练集占比
    ratio = 0.9

    # 属性个数
    class_num = 16

     # 检索good文件夹图片
    imgList = getFileList(os.path.join(org_img_folder,'good'), [])
    print('本次执行检索到 ' + str(len(imgList)) + ' 个文件\n')

    # 循环处理每个文件
    fileList = []
    for imgFile in imgList:
        # 读取json文件
        print(imgFile)

        # 解析图像路径
        img = cv2.imread(imgFile, cv2.IMREAD_COLOR)
        if img is None:
            continue

        # 解析属性
        attList = [0] * class_num

        # 拼接写入的字符串
        img_path = imgFile
        img_path = img_path.replace(org_img_folder + '\\', "")
        img_path = img_path.replace('\\', '/') + '\t'
        for i in range(len(attList)):
            img_path += str(attList[i]) + ','
        file_path = img_path[:-1] + '\n'
        fileList.append(file_path)

    # 检索json文件
    jsonList = getFileList(org_img_folder, [], ext='json')
    print('本次执行检索到 ' + str(len(jsonList)) + ' 个文件\n')

    # 循环处理每个文件
    for jsonFile in jsonList:
        # 读取json文件
        print(jsonFile)
        current_dir = os.path.dirname(jsonFile)  # 当前文件所在的目录

        # 解析图像路径
        jsondata = json.load(open(jsonFile))
        if not 'imagePath' in jsondata:
            continue
        img_path = os.path.join(current_dir, jsondata['imagePath'])
        img = cv2.imread(img_path, cv2.IMREAD_COLOR)
        if img is None:
            continue

        # 解析属性
        flags = jsondata['flags']
        attList = [0] * len(flags)
        i = 0
        for key in flags:
            attList[i] = flags[key] + 0
            i += 1
        if sum(attList) == 0:
            continue

        # 拼接写入的字符串
        img_path = img_path.replace(org_img_folder + '\\', "")
        img_path = img_path.replace('\\', '/') + '\t'
        for i in range(len(attList)):
            img_path += str(attList[i]) + ','
        file_path = img_path[:-1] + '\n'
        fileList.append(file_path)


    # 拆分数据
    random.shuffle(fileList)
    train_num = int(ratio * len(fileList))
    train_list = fileList[0:train_num]
    val_list = fileList[train_num:]

    # 写入数据
    train_list_path = os.path.join(org_img_folder, 'train_list.txt')
    val_list_path = os.path.join(org_img_folder, 'val_list.txt')

    writeFileLst(train_list_path, train_list)
    writeFileLst(val_list_path, val_list)

    print('处理完毕')


if __name__ == "__main__":
    '''
    程序入口
    '''
    main()
其中tools.py用于存放相关工具函数,完整内容如下:
import os
import base64

# 循环读取图像
def getFileList(dir,Filelist, ext=None):
    """
    获取文件夹及其子文件夹中文件列表
    输入 dir:文件夹根目录
    输入 ext: 扩展名
    返回: 文件路径列表
    """
    newDir = dir
    if os.path.isfile(dir):
        if ext is None:
            Filelist.append(dir)
        else:
            if ext in dir[-4:]:
                Filelist.append(dir)

    elif os.path.isdir(dir):
        for s in os.listdir(dir):
            newDir=os.path.join(dir,s)
            getFileList(newDir, Filelist, ext)

    return Filelist


def cv2_to_base64(image):
    '''
    图像二进制数据转base64
    '''
    return base64.b64encode(image).decode('utf8')


def writeFileLst(list_path,filelist):
    '''
    写入文件列表
    '''
    if os.path.exists(list_path):
        os.remove(list_path)
    with open(os.path.join(list_path), 'w') as f:
        for filename in filelist:
            f.write(filename)  # 写入list.txt
到这里,整个数据集需要的train_list.txt和val_list.txt就制作完了。接下来就进入正式的模型训练和验证阶段了。
3.3 训练和评估
PaddleClas提供好了非常方便的训练接口,只需要按照官方文档说明进行操作即可。具体操作时只需要修改对应的配置文件,对照自己的数据集修改相关参数,然后启动即可。
进入PaddleClas目录下,然后创建一个config.yaml配置文件,内容如下:
# global configs
Global:
  checkpoints: null   # 断点继续训练的模型
  pretrained_model: null  # 预训练模型
  output_dir: "./output/"  # 输出结果目录
  device: "gpu"  # 使用GPU进行训练
  save_interval: 1  # 保存间隔
  eval_during_train: True
  eval_interval: 1
  epochs: 100  # 总的训练迭代次数
  print_batch_step: 10
  use_visualdl: True  # 是否开启visualdl监控
  # used for static mode and model export
  image_shape: [3, 256, 192]  # 静态图导出时固定的图像尺寸,此处为3通道,高度256,宽度192
  save_inference_dir: "./inference"  # 静态图导出目录
  use_multilabel: True  # 是否使用多标签分类模式

# model architecture
Arch:
  name: "PPLCNet_x1_0"  # 定义backbone模型
  # name: "ResNet101_vd"
  # name: "PPHGNet_small"
  pretrained: True  # 是否使用预训练的backbone模型
  use_ssld: True
  class_num: 16   #  多标签分类总的类别数

# loss function config for traing/eval process
Loss:
  Train:
    - MultiLabelLoss:
        weight: 1.0
        weight_ratio: True
        size_sum: True
  Eval:
    - MultiLabelLoss:
        weight: 1.0
        weight_ratio: True
        size_sum: True

Optimizer:
  name: Momentum
  momentum: 0.9
  lr:
    name: Cosine
    learning_rate: 0.01
    warmup_epoch: 5
  regularizer:
    name: 'L2'
    coeff: 0.0005

# data loader for train and eval
DataLoader:
  Train:
    dataset:
      name: MultiLabelDataset   # 多标签分类数据集格式
      image_root: "dataset/face_attribute_dataset/"   # 数据集根目录
      cls_label_path: "dataset/face_attribute_dataset/train_list.txt"  # 训练文件列表
      label_ratio: True
      transform_ops:
        - DecodeImage:
            to_rgb: True
            channel_first: False
        - ResizeImage:
            size: [192, 256]
        - TimmAutoAugment:
            prob: 0.8
            config_str: rand-m9-mstd0.5-inc1
            interpolation: bicubic
            img_size: [192, 256] # 图像尺寸,宽度192,高度256
        - Padv2:
            size: [212, 276]
            pad_mode: 1
            fill_value: 0
        - RandomCropImage:
            size: [192, 256] # 图像随机裁剪尺寸,宽度192,高度256
        - RandFlipImage:
            flip_code: 1
        - NormalizeImage:
            scale: 1.0/255.0
            mean: [0.485, 0.456, 0.406]
            std: [0.229, 0.224, 0.225]
            order: ''
        - RandomErasing:
            EPSILON: 0.4
            sl: 0.02
            sh: 1.0/3.0
            r1: 0.3
            attempt: 10
            use_log_aspect: True
            mode: pixel
    sampler:
      name: DistributedBatchSampler
      batch_size: 64   # 训练时batchsize
      drop_last: True
      shuffle: True
    loader:
      num_workers: 4
      use_shared_memory: True
  Eval:
    dataset:
      name: MultiLabelDataset
      image_root: "dataset/face_attribute_dataset/"  # 数据集目录
      cls_label_path: "dataset/face_attribute_dataset/val_list.txt"  #验证集列表
      label_ratio: True
      transform_ops:
        - DecodeImage:
            to_rgb: True
            channel_first: False
        - ResizeImage:
            size: [192, 256]  # 验证时图像缩放尺寸,宽度192,高度256
        - NormalizeImage:
            scale: 1.0/255.0
            mean: [0.485, 0.456, 0.406]
            std: [0.229, 0.224, 0.225]
            order: ''
    sampler:
      name: DistributedBatchSampler
      batch_size: 64  # 验证时batchsize
      drop_last: False
      shuffle: False
    loader:
      num_workers: 4
      use_shared_memory: True

Infer:
  infer_imgs: dataset/face_attribute_dataset/test/090004.jpg
  batch_size: 10
  transforms:
    - DecodeImage:
        to_rgb: True
        channel_first: False
    - ResizeImage:
        size: [192, 256]  # 推理时图像缩放尺寸,宽度192,高度256
    - NormalizeImage:
        scale: 1.0/255.0
        mean: [0.485, 0.456, 0.406]
        std: [0.229, 0.224, 0.225]
        order: ''
    - ToCHWImage:
  PostProcess:
    name: PersonAttribute
    threshold: 0.5  #default threshold
    glasses_threshold: 0.3  #threshold only for glasses
    hold_threshold: 0.6 #threshold only for hold

Metric:
  Eval:
    - ATTRMetric:
上面的各参数需要结合自己的数据集路径进行修改。对于关键参数已经给了中文注释。将上述文件配置好以后我们就可以开始训练了。
使用下面的命令进行单机四卡分布式训练:
export CUDA_VISIBLE_DEVICES=0,1,2,3
python3 -m paddle.distributed.launch \
    --gpus="0,1,2,3" \
    tools/train.py \
        -c ./config.yaml
在训练的时候会给出当前最佳best_model的评估指标。
想要快速验证不同的算法模型性能,可以通过修改config.yaml文件实现基准模型替换,具体如下所示:
Arch:
   name: "PPHGNet_small"
所有PaddleClas支持的模型可以从pplc/arch/backbone/init.py文件中查看。
下面是各个模型评估性能对比:
| backbone | 精度(MA) | 模型大小(M) |
|---|---|---|
| ResNet101_vd | 0.903 | 166 |
| PPLCNet_x1_0 | 0.869 | 6 |
| PPLCNetV2_base | 0.889 | 21 |
| PPHGNet_small | 0.902 | 87 |
| HRNet_W48_C | 0.899 | 294 |
| PPLCNet_x2_5 | 0.897 | 30 |
| PPHGNet_base | 0.897 | 271 |
由于我们采用的backbone模型都使用了预训练模型,因此整个训练收敛速度是比较快的。可以使用下面的命令查看训练过程:
visualdl --logdir vdl
如下图所示:


对于我自己的项目来说,由于对精度要求较高,因此综合精度和推理速度,最后选择PPHGNet_small。
四、部署
4.1 静态图导出
为了方便后面工业环境部署,我们需要将训练好的动态图模型转换成静态图模型,转换代码如下所示:
python3 tools/export_model.py \
    -c config.yaml \
    -o Global.pretrained_model=output/PPHGNet_small/epoch_45 \
    -o Global.save_inference_dir=output/static_models/PPHGNet_small
转换完成后在output/static_models/PPHGNet_small目录下会生成具体的静态图模型文件:
- inference.pdiparams
- inference.pdiparams.info
- inference.pdmodel
4.2 paddle serving高性能部署
PaddleServing的相关介绍和使用请参考我的另一篇博客。这里需要注意,对于我的项目来说精度要求较高,为了能有效提高人脸属性分析的精度,我在具体执行人脸属性分析前会先进行抠图操作,即先从复杂的环境中将人提取出来,去除背景图像的干扰,这样再进行人脸属性评估精度会提高不少。当然,这就要求我们的训练数据也需要先去除背景,这个我们可以采用PaddleSeg套件中的人像抠图算法实现。在官网也提供了训练好的人像抠图静态图模型,我们只需要直接使用就行。
由于我们一共使用了两个模型:人像抠图、人脸属性分析,因此,在部署PaddleServing时我们就需要采用Pipeline级联方式。
首先转换抠图模型:
python -m paddle_serving_client.convert \
    --dirname ./models/matting \
    --model_filename model.pdmodel \
    --params_filename model.pdiparams
转换完成后会生成serving_server和serving_client,这就是Paddle Serving部署需要的模型文件。我们将其改名为matting_serving_server和matting_serving_client。
接下来转换人脸属性分析模型:
python -m paddle_serving_client.convert \
    --dirname ./models/eval \
    --model_filename inference.pdmodel \
    --params_filename inference.pdiparams
同样的,我们将生成的serving_server和serving_client改名为eval_serving_server和eval_serving_client。
接下来,我们创建一个名为config.yml的部署参数文件,内容如下:
dag:
  is_thread_op: true  # True为线程模型;False为进程模型
  use_profile: false  # 是否开启性能分析
  retry: 1 # 重试次数

http_port: 27006 # http端口

build_dag_each_worker: false  #False表示框架在进程内创建一条DAG;True表示框架会在每个进程内创建多个独立的DAG

worker_num: 1    # 最大并发数。当build_dag_each_worker=True时, 框架会创建worker_num个进程,每个进程内构建grpcSever和DAG

op:
  # 抠图模块
  matting:
    concurrency: 1   # 并发数,is_thread_op=True时,为线程并发;否则为进程并发
    local_service_conf:
      client_type: local_predictor  # client类型,包括brpc, grpc和local_predictor.local_predictor
      device_type: 1  # device_type, 0=cpu, 1=gpu, 2=tensorRT, 3=arm cpu, 4=kunlun xpu
      devices: '0'  # 当devices为""或不写时为CPU预测;当devices为"0", "0,1,2"时为GPU预测,表示使用的GPU卡
      fetch_list:  #Fetch结果列表,model中fetch_var的alias_name为准, 如果没有设置则全部返回
      - tmp_75
      ir_optim: True   # 开启内存优化
      batch_size: 1
      model_config: matting_serving_server/    # 服务器模型存放路径

  # 合规性评估模块
  eval:
    concurrency: 1   # 并发数,is_thread_op=True时,为线程并发;否则为进程并发
    local_service_conf:
      client_type: local_predictor  # client类型,包括brpc, grpc和local_predictor.local_predictor
      device_type: 1  # device_type, 0=cpu, 1=gpu, 2=tensorRT, 3=arm cpu, 4=kunlun xpu
      devices: '0'  # 当devices为""或不写时为CPU预测;当devices为"0", "0,1,2"时为GPU预测,表示使用的GPU卡
      fetch_list:  #Fetch结果列表,model中fetch_var的alias_name为准, 如果没有设置则全部返回
      - sigmoid_12.tmp_0
      ir_optim: True   # 开启内存优化
      batch_size: 1
      model_config: eval_serving_server/    # 服务器模型存放路径
最后我们编写服务启动脚本web_service.py,内容如下:
# 导入依赖库
import numpy as np
import cv2
from paddle_serving_app.reader import *
import base64
from paddle_serving_server.web_service import WebService, Op
from io import BytesIO


class MattingOp(Op):
    '''
    定义抠图算子
    '''
    def init_op(self):
        '''
        初始化
        '''
        self.ref_size = 512
        self.img_width = self.ref_size
        self.img_height = self.ref_size
        self.img_preprocess = Sequential([
            #BGR2RGB(),
            Div(255.0),
            #Normalize([0.485, 0.456, 0.406], [0.229, 0.224, 0.225], False),
            #Resize(self.ref_size),
            Transpose((2, 0, 1))
        ])


    def preprocess(self, input_dicts, data_id, log_id):
        '''
        预处理
        '''
        (_, input_dict), = input_dicts.items()
        imgs = []
        for key in input_dict.keys():
            # 解码图像
            data = base64.b64decode(input_dict[key].encode('utf8'))
            data = np.fromstring(data, np.uint8)
            im = cv2.imdecode(data, cv2.IMREAD_COLOR)
            self.img = im
            self.img_height,self.img_width,_ = im.shape
            # 短边对齐,长边设置为32整数倍(根据算法模型要求)
            im_h, im_w, _ = im.shape
            if im_w >= im_h:
                im_rh = self.ref_size
                im_rw = int(im_w *1.0 / im_h * self.ref_size)
            elif im_w < im_h:
                im_rw = self.ref_size
                im_rh = int(im_h *1.0 / im_w * self.ref_size)
            im_rw = im_rw - im_rw % 32
            im_rh = im_rh - im_rh % 32
            im = cv2.resize(im,(im_rw,im_rh))

            # cv2转tensor
            im = self.img_preprocess(im)
            imgs.append({
                "img": im[np.newaxis, :],
            })

        # 准备输入数据
        feed_dict = {
            "img": np.concatenate(
                [x["img"] for x in imgs], axis=0),
        }
        return feed_dict, False, None, ""

    def postprocess(self, input_dicts, fetch_dict, data_id, log_id):
        '''
        后处理
        '''
        # 取出掩码图
        alpha = fetch_dict["tmp_75"]
        alpha = alpha.squeeze(0).squeeze(0)
        alpha = (alpha * 255).astype('uint8')
        alpha = cv2.resize(alpha, (self.img_width, self.img_height), interpolation=cv2.INTER_NEAREST)
        print(alpha.shape)

        # 与白背景合成
        bg = np.ones((self.img_height,self.img_width), np.uint8) * 255
        bg = cv2.cvtColor(bg, cv2.COLOR_GRAY2BGR)
        alpha = cv2.cvtColor(alpha, cv2.COLOR_GRAY2BGR)
        alpha = alpha.astype(np.float32)/255.0
        bg = bg.astype(np.float32)
        img = self.img.astype(np.float32) * alpha + (1 - alpha) * bg
        img = img.astype(np.uint8)

        # 封装返回
        out_dict = {"img": img}
        return out_dict, None, ""


class EvalOp(Op):
    '''
    定义不合规识别工序
    '''
    def init_op(self):
        '''
        初始化
        '''
        self.target_width = 192
        self.target_height = 256

        self.img_preprocess = Sequential([
            BGR2RGB(),
            Div(255.0),
            Normalize([0.485, 0.456, 0.406], [0.229, 0.224, 0.225], False),
            Resize((self.target_width, self.target_height)),
            Transpose((2, 0, 1))
        ])

    def preprocess(self, input_dicts, data_id, log_id):
        '''
        预处理
        '''
        (_, input_dict), = input_dicts.items()
        img = input_dict["img"]

        feed_dict = {}

        # 预处理
        img = self.img_preprocess(img)

        # 封装输入数据
        feed_dict["x"] = img[np.newaxis, :, :, :]

        return feed_dict, False, None, ""

    def postprocess(self, input_dicts, fetch_dict, data_id, log_id):
        '''
        后处理
        '''
        # 取出检测结果
        scores = fetch_dict["sigmoid_12.tmp_0"].squeeze(0)
        print(scores.shape)

        #封装成字典返回
        # bytesio = BytesIO()
        # np.savetxt(bytesio, scores)
        # content = bytesio.getvalue()
        # b64_code = base64.b64encode(content)
        # scores = str(b64_code, encoding='utf-8')
        res = ''
        for i in range(len(scores)):
            res += (str("%.2f" % scores[i])+',')

        # 返回
        out_dict = {"scores": res}
        return out_dict, None, ""


class FaceEvalService(WebService):
    '''
    定义服务(级联抠图和人脸属性评估模型)
    '''
    def get_pipeline_response(self, read_op):
        matting_op = MattingOp(name="matting", input_ops=[read_op])
        eval_op = EvalOp(name="eval", input_ops=[matting_op])
        return eval_op


# 创建服务
face_service = FaceEvalService(name="faceeval")
# 加载配置文件
face_service.prepare_pipeline_config("config.yml")
# 启动服务
face_service.run_service()
到这里我们就可以使用命令启动服务了:
python web_service.py
4.3 Python客户端请求
客户端请求代码如下:
# 导入依赖库
import requests
import json
import base64


def cv2_to_base64(image):
    return base64.b64encode(image).decode('utf8')


# 定义http接口
url = "http://172.19.17.101:27006/faceeval/prediction"

# 打开待预测的图像文件
img_path = 'test/48.png'
with open(img_path, 'rb') as file:
    image_data1 = file.read()

# 采用base64编码图像文件
image = cv2_to_base64(image_data1)

# 按照特定格式封装成字典
data = {"key": ["image"], "value": [image]}

# 发送请求
r = requests.post(url=url, data=json.dumps(data))

# 解析返回值
r = r.json()
scores = r["value"][0]
print(scores)
如下图所示:
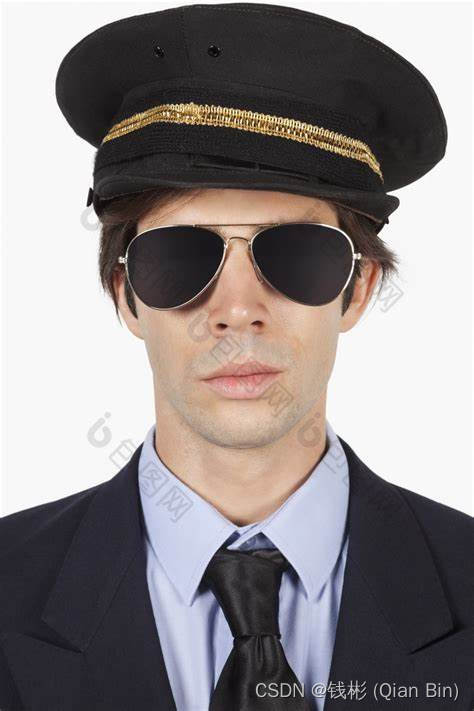
最后返回的结果就是每个属性的score值。如下所示:
0.00,0.00,0.00,0.00,1.00,0.98,0.03,0.12,0.00,0.00,0.00,0.00,0.00,0.00,0.00,0.00,
可以看到有两个属性值特别大,这两个属性值分别对应戴帽子、戴墨镜。应该说检测是比较准的。
五、小结
本文基于PaddleClas开源库实现了完整的人脸多标签属性分析功能。本文更偏重应用,对于亟需开发上线人脸属性分析功能的相关读者可以参考本文快速完成开发任务。对于有较高精度要求的读者,也可以在本文基础上,继续深入研究算法,结合本文部署流程,开发出商业级别的人脸属性分析应用。
想要继续深入学习Paddle的读者,今年年末我会出版一本书籍《深度学习与图像处理—基于PaddlePaddle》,欢迎关注和支持。
由于水平有限,文中如果有错误或更优的解决方案也请读者在评论区指正。欢迎大家一起探讨。
参考文献
【1】J. Cao, Y. Li and Z. Zhang, “Partially Shared Multi-task Convolutional Neural Network with Local Constraint for Face Attribute Learning,” IEEE Conference on Computer Vision and Pattern Recognition, 2018, pp. 4290-4299.


 766
766

 被折叠的 条评论
为什么被折叠?
被折叠的 条评论
为什么被折叠?
 到【灌水乐园】发言


