


第一部分:使用Google Map的地图服务 ,实现定位、画出两点之间的路径(google map)的规划路径。
第二部分:使用MapABC 地图服务,实现定位,实现导航功能。
首先:
第一部分:使用GoogleMap地图服务
Android 中基于位置的服务体现在两个方面:地图API和位置API。这两个API是彼此隔离的,都拥有自己的包。例如,地图包为:com.google.android.maps,而位置包为:android.location.
地图API是Android 中基于位置服务的一个组成部分。地图包包含在屏幕上显示地图、处理用户与地图之间的交互等。
一、在使用Google Maps服务之前,首先要从Google 那里获得map-api的密钥,否则的话,机器上只会出现透明的小方格。
获得map-api密钥的方法:
http://www.eoeandroid.com/home-space-uid-511333-do-blog-id-320.html
二、MapView 和MapActivity
Android 中的许多地图技术都依赖于MapViewUI 控件和android.app.Activity的扩展MapActivity. 在Android 中,MapView 和MapActivity 负责用户显示和操作地图的主要工作。
要使用MapView,首先需要在MapActivity对其进行实例化操作,需要设置android.apiKey属性 如:android:apiKey=” api - key ”;
使用地图服务需要需要加上的相应权限:
在地图上的数据来自Google Maps,因此需要加上访问互联网所需要的权限;还需要使用基于位置的服务(地图、GPS等权限)
几种权限如下:
<uses-permission
android:name="android.permission.INTERNET"/>
<uses-permission android:name="android.permission.ACCESS_FINE_LOCATION"/>
<uses-permission android:name="android.permission.ACCESS_COARSE_LOCATION">
</uses-permission>
三、MapActivity 的XML文件
<?xml version="1.0"encoding="utf-8"?>
<FrameLayout xmlns:android="http://schemas.android.com/apk/res/android"
android:orientation="vertical" android:layout_width="fill_parent"
android:layout_height="fill_parent" android:background="#FFF5F5F5"
android:id="@+id/rootLayout">
<com.google.android.maps.MapView
android:id="@+id/mapview" android:layout_width="fill_parent"
android:layout_height="fill_parent" android:apiKey="02R-4Bv4xDriietFm*****Xolp21Y9IVvtkUNw"
android:clickable="true" android:enabled="true"/>
<LinearLayout xmlns:android="http://schemas.android.com/apk/res/android"
android:orientation="vertical" android:layout_width="wrap_content"
android:layout_height="fill_parent" android:padding="1px"
android:gravity="bottom">
<Button android:id="@+id/navigation_google"
android:layout_width="wrap_content" android:layout_height="wrap_content"
android:text="导航" />
<Button android:id="@+id/getlocation_google"
android:layout_width="wrap_content" android:layout_height="wrap_content"
android:text="定位" />
</LinearLayout>
<LinearLayout android:layout_height="wrap_content"
android:paddingTop="35dip" android:orientation="horizontal"
android:visibility="gone" android:id="@+id/my_loc"
android:layout_width="fill_parent">
<TextView android:id="@+id/get_myloction"android:textColor="@color/black"
android:layout_width="wrap_content" android:layout_height="wrap_content"
android:layout_weight="1.0" />
</LinearLayout>
</FrameLayout>
四、加载XML布局的MapActivity的扩展类
/**
* @author by qiannuo
* Create time: 2011-09-16
* E_mail:qiannuo0317@163.com
* QQ:405923111
* eoeandroid:http://www.eoeandroid.com/space-uid-511333.html
* CSDN: http://blog.csdn.net/qiannuo
*
* Title:MyMapActivity google map
* 功能:定位 、导航、显示地图
*/
public class MyMapActivity extends MapActivity {
public static final String TAG = "google_MapActivity";
LocationManager m_LocationManager;
public MyLocationOverlay myPosition;
MapController mMapController;
MapView mMapView;
public MapView mapView;
GeoPoint fromGeoPoint, toGeoPoint;
public void onCreate(Bundle savedInstanceState) {
super.onCreate(savedInstanceState);
setContentView(R.layout.map);
// 地图设置
mapView = (MapView) findViewById(R.id.mapview);
MapController mymapController = mapView.getController();
mapView.setSatellite(false);
mapView.setStreetView(true);
mymapController.setZoom(13);
mapView.setBuiltInZoomControls(true);
// 要显示地图的中心位置
Double lng = 116.239085 * 1E6;
Double lat = 32.301822 * 1E6;
GeoPoint point = new GeoPoint(lat.intValue(), lng.intValue());
mymapController.animateTo(point);
mymapController.setZoom(15);
}
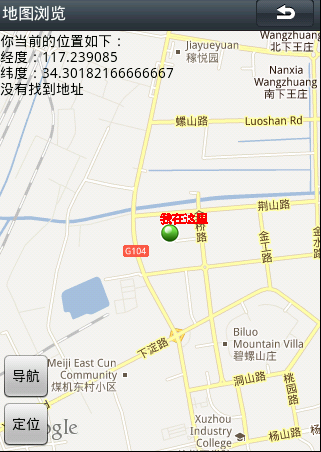
五.定位
我们使用一个按钮来确定定位的使用。当我们按下定位按钮时,在地图中会显示我们的位置: 如图所示:
//定位
Button getlocation_google = (Button) findViewById(R.id.getlocation_google);
getlocation_google.setOnClickListener(new OnClickListener(){
public void onClick(View arg0) {
Log.i(TAG, "点击了定位按钮");
// 在这里获取定位信息
m_LocationManager = (LocationManager) MyMapActivity.this
.getSystemService(Context.LOCATION_SERVICE);
mMapController =mapView.getController();
// 在这里 需要重写LocationListener()方法
myPosition = new MyLocationOverlay();
List<Overlay> overlays = mapView.getOverlays();
overlays.add(myPosition);
//设置Criteria(服务商)的信息 提供最优的地理位置信息服务
Criteria criteria = new Criteria();
//经度要求
criteria.setAccuracy(Criteria.ACCURACY_FINE);
criteria.setAltitudeRequired(false);
criteria.setBearingRequired(false);
criteria.setCostAllowed(false);
criteria.setPowerRequirement(Criteria.POWER_LOW); // 较少的电量消耗
//取得效果最好的criteria 在google map 提供的定位中有 GPS定位 WIFI定位 基站定位等,各种定位的方式效果是不一样的
String provider = m_LocationManager.getBestProvider(criteria,true);
//取得坐标的相关信息
Location location = m_LocationManager.getLastKnownLocation(provider);
//设置为起始点
fromGeoPoint = getGeoByLocation(location);
Log.i(TAG, "fromGeoPoint= " + fromGeoPoint); //打印起始点
updataWithNewLocation(location);
m_LocationManager.requestLocationUpdates(
provider, 3000, 0, MyLocationListener);
}
});
// updataWithNewLocation()方法:
private void updataWithNewLocation(Location location){
String LnglatString;
//把找到的地址显现在顶部
LinearLayout my_loc = (LinearLayout) MyMapActivity.this.findViewById(R.id.my_loc);
TextView get_myloction = (TextView) MyMapActivity.this.findViewById(R.id.get_myloction);
String addressString = "没有找到地址\n";
if(location != null){
//为绘制标志的设计坐标
myPosition.setLocation(location);
//取得纬度和经度
Double geoLat = location.getLatitude() * 1E6; //纬度
Double geoLng = location.getLongitude() * 1E6; //经度
//将其转换为int型
GeoPoint point = newGeoPoint(geoLat.intValue(),geoLng.intValue());
//定位到指定坐标
mMapController.animateTo(point);
Double lng = location.getLongitude();
Double lat = location.getLatitude();
LnglatString = "经度:" + lng + "\n纬度:" + lat;
//取出地理的经纬度
Double longitude = (int)location.getLongitude()/1E6;
Double latitude = (int)location.getLatitude()/1E6;
//根据地理环境来确定编码
Geocoder gc = new Geocoder(MyMapActivity.this, Locale.getDefault());
try {
//取得地址相关的一些信息、经度和纬度
//反地址编码,不知道为什么,在我的机器上 返回来的值为null ,在这里先保留,找到原因//后在补充
List<Address> addresses =gc.getFromLocation(latitude, longitude, 1);
StringBuilder sBuilder = new StringBuilder();
if (addresses.size() > 0) {
Address address = addresses.get(0);
for(int i = 0; i< address.getMaxAddressLineIndex(); i++)
sBuilder.append(address.getAddressLine(i)).append("\n");
sBuilder.append(address.getLocality()).append("\n");
sBuilder.append(address.getCountryName());
sBuilder.append(address.getPostalCode());
addressString = sBuilder.toString();
}
} catch (Exception e) {
}
}else{
LnglatString = "没有找到坐标";
}
//把相关信息显示在屏幕上
my_loc.setVisibility(View.VISIBLE); //将LinearLayout显示出来
get_myloction.setText("你当前的位置如下:\n" + LnglatString + "\n" + addressString);
my_loc.setOnClickListener(new OnClickListener() {
public void onClick(View arg0) {
//点击确定时,让界面消失
LinearLayout my_loc = (LinearLayout) MyMapActivity.this.findViewById(R.id.my_loc);
my_loc.setVisibility(View.GONE);
}
});
}
//重新实例化MyLocationListener
LocationListener MyLocationListener = new LocationListener() {
public void onStatusChanged(String provider, int status, Bundleextars) {}
public void onProviderEnabled(String arg0) {}
public void onProviderDisabled(String provider) {
updataWithNewLocation(null);
}
public void onLocationChanged(Location location) {
Log.i(TAG, "MyLocationListener::onLocationChanged..");
if (location != null) {
Log.i(TAG, "得到地理坐标的经度:" + location.getLongitude());
Log.i(TAG, "得到地理坐标的纬度:" + location.getLatitude());
}
updataWithNewLocation(location);
}
};
// MyLocationOverlay继承Overlay 实现在地图上标记处自己的位置
class MyLocationOverlay extends Overlay{
Location m_Location;
//在更新坐标时,设置该坐标,以便画图
public void setLocation(Location location){
m_Location = location;
}
public void draw(Canvas canvas, MapView mapView, boolean shadow) {
super.draw(canvas, mapView, shadow);
Paint paint = new Paint();
Point myScreenCoords = new Point();
GeoPoint tempGeoPoint = new GeoPoint((int)(m_Location.getLatitude() * 1E6),(int)(m_Location.getLongitude() * 1E6));
mapView.getProjection().toPixels(tempGeoPoint,myScreenCoords);
paint.setStrokeWidth(1);
paint.setARGB(255, 255, 0, 0);
paint.setStyle(Paint.Style.STROKE);
//定位好位置后,在位置上画图片,已标注出来
Bitmap bmp = BitmapFactory.decodeResource(getResources(),R.drawable.marker_gpsvalid);
//四个参数的含义是
/** API文档
public void drawBitmap (Bitmapbitmap, float left, float top, Paint paint)
Since: API Level 1 Draw thespecified bitmap, with its top/left corner at (x,y), using the specified paint,transformed by the current matrix.
Note: if the paint contains amaskfilter that generates a mask which extends beyond the bitmap's originalwidth/height (e.g. BlurMaskFilter), then the bitmap will be drawn as if it werein a Shader with CLAMP mode. Thus the color outside of the originalwidth/height will be the edge color replicated.If the bitmap and canvas havedifferent densities, this function will take care of automatically scaling thebitmap to
draw at the same density as thecanvas.Parameters bitmap The bitmap tobe drawnleft The position of the leftside of the bitmap being drawn
top The position of the top side of the bitmap being drawn paint The paint used to draw the bitmap (may benull)
*/
canvas.drawBitmap(bmp, myScreenCoords.x, myScreenCoords.y, paint);
canvas.drawText("我在这里", myScreenCoords.x, myScreenCoords.y, paint);
return ;
}
}
六、实现导航功能
/**
* 我们看到的正式版本的Android SDK 中,删除了原有M5版本里的DrivingDirection package,所以无法通过程序来规划导航路线,虽然无法自行设计
* 导航录线,但可以调用手机内置的地图程序来传递导航坐标来规划路径
* 摘自:Android SDK开发范例大全 2
*/
Google Map 上实现规划路径:
在google map上并不能直接画出两点直接的的路径(暂时我是这么理解的),而在MapABC 提供了相应的API调用(Android 地图使用的第二部分)。
当我们点击地图上的到按钮时,会出现以下对话框:
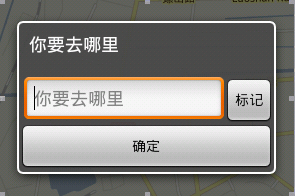
两点直接的路径(现在定位到的地址 - 输入想要去的地址):
代码如下:
//导航
Button navigation_google =(Button) findViewById(R.id.navigation_google);
navigation_google.setOnClickListener(new OnClickListener(){
public void onClick(View arg0) {
Log.i(TAG, "点击了导航按钮");
navigation_dialog("你要去哪里", "wecan get it!");
}
});
// navigation_dialog
private void navigation_dialog(String header, String content) {
final Dialog dialog = new Dialog(MyMapActivity.this);
dialog.setContentView(R.layout.router);
dialog.setTitle(header);
dialog.setCancelable(true);
Button router_ok = (Button) dialog.findViewById(R.id.router_ok);
router_ok.setOnClickListener(new OnClickListener() {
public void onClick(View arg0) {
//写入终点
EditText put_destination = (EditText)dialog.findViewById(R.id.put_destination);
if(put_destination.getText().toString() == null){
Toast.makeText(MyMapActivity.this,"关键字不能为空",Toast.LENGTH_SHORT).show();
}
if(fromGeoPoint == null){
Toast.makeText(MyMapActivity.this,"没有获得起始点,您需要按“定位”后键获得当前地址",Toast.LENGTH_LONG).show();
}
if (put_destination.getText().toString() != null && fromGeoPoint != null) {
toGeoPoint = getGeoByAddress(put_destination.getText().toString());
String strTo = put_destination.getText().toString();
Log.i(TAG, "获得终点的地址" + toGeoPoint);
Log.i(TAG, "获得了起始点得地址===" + fromGeoPoint);
Intent navigation_intent = new Intent();
navigation_intent.setAction(android.content.Intent.ACTION_VIEW);
/* 传入路径规划所需要的地标地址 */
/** String strFrom = “shanghai”;
String strTo =”hangzhou”;
String uri = "http://maps.google.com/maps?f=d&saddr="
+ strFrom+ "&daddr="
+strTo + "&hl=tw"
*/ navigation_intent.setData(Uri.parse("http://maps.google.com/maps?f=d&saddr="
+GeoPointToString(fromGeoPoint) + "&daddr="
+strTo + "&hl=tw"));
startActivity(navigation_intent);
}
}
});
dialog.show();
}
/* 将GeoPoint里的经纬度以String,String回传 */
private StringGeoPointToString(GeoPoint gp)
{
String strReturn = "";
try
{
/* 当Location存在 */
if (gp != null)
{
double geoLatitude = (int)gp.getLatitudeE6() / 1E6;
double geoLongitude = (int) gp.getLongitudeE6()/ 1E6;
strReturn = String.valueOf(geoLatitude)+ ","
+ String.valueOf(geoLongitude);
}
} catch (Exception e)
{
e.printStackTrace();
}
return strReturn;
}
/* 传入Location对象,取回其GeoPoint对象 fromGeoPoint */
private GeoPointgetGeoByLocation(Location location)
{
GeoPoint gp = null;
try
{
/* 当Location存在 */
if (location != null)
{
double geoLatitude =location.getLatitude() * 1E6;
double geoLongitude = location.getLongitude() * 1E6;
gp = new GeoPoint((int) geoLatitude, (int) geoLongitude);
}
} catch (Exception e)
{
e.printStackTrace();
}
return gp;
}
/* 输入地址,取得其GeoPoint对象 toGeoPoint*/
private GeoPointgetGeoByAddress(String strSearchAddress)
{
GeoPoint gp = null;
try
{
if (strSearchAddress!= "")
{
GeocodermGeocoder01 = new Geocoder(MyMapActivity.this, Locale.getDefault());
List<Address>lstAddress = mGeocoder01.getFromLocationName(
strSearchAddress, 1);
if(!lstAddress.isEmpty())
{
AddressadsLocation = lstAddress.get(0);
double geoLatitude =adsLocation.getLatitude() * 1E6;
double geoLongitude =adsLocation.getLongitude() * 1E6;
gp = new GeoPoint((int) geoLatitude, (int) geoLongitude);
}
}
} catch (Exception e)
{
e.printStackTrace();
}
return gp;
}
期待完善的地方: 能够根据经纬度找到具体的地址,能够直接在地图上实现两点直接路径的绘制
参考文献: Android SDK开发范例大全 2 eoeandroid论坛
Android 应用开发揭秘
Android 2 高级编程
精通Android 2
一些网摘


 4282
4282


 被折叠的 条评论
为什么被折叠?
被折叠的 条评论
为什么被折叠?
 到【灌水乐园】发言


