


 本文讲述了作者为了解决女友晚上睡觉怕黑的问题,动手制作了一个可通过手机控制的智能小夜灯。通过手机发送信号给服务器,服务器再将指令传递给ESP8266模块,控制电路的通断。文中详细介绍了从构思、电路设计到服务端、ESP8266客户端和手机端的程序实现过程。
构思
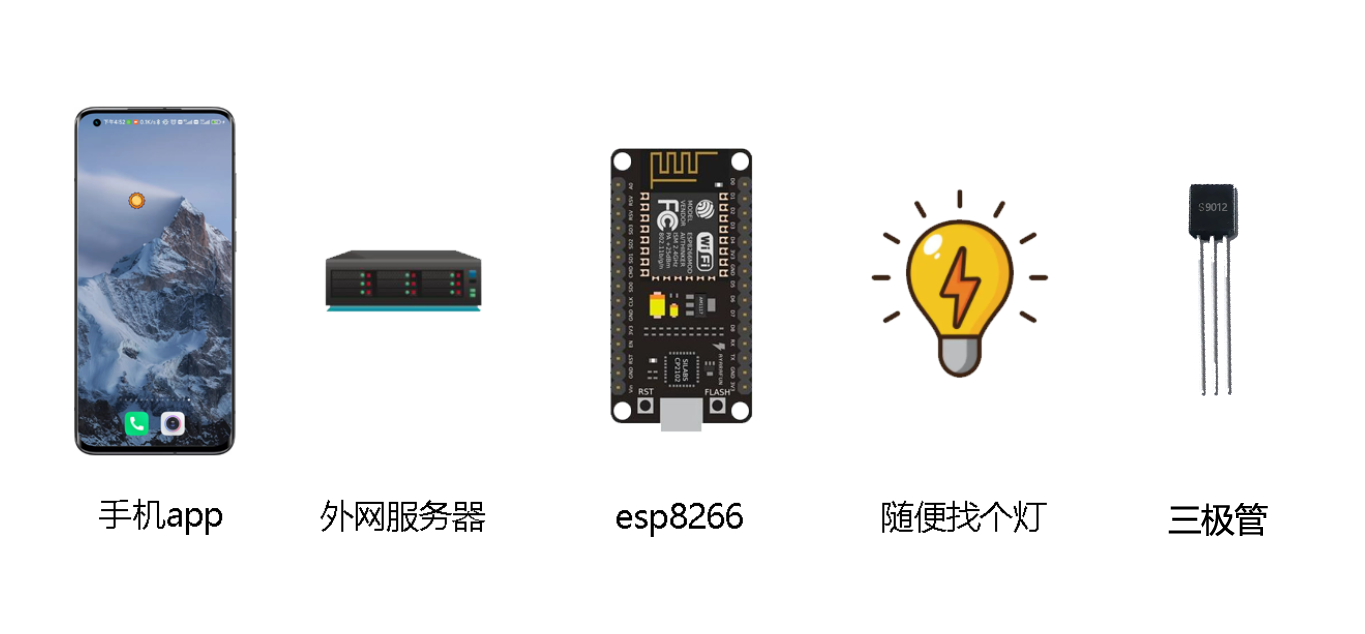
目的明确,我们要做一个可以在手机上面控制的小夜灯,构思咋构思 睡一晚第二天就目明心扉了,需要的硬件设备请看图,整体的设计流程就是
手机发送信号给服务器,
服务器吧信息发送给esp8266,
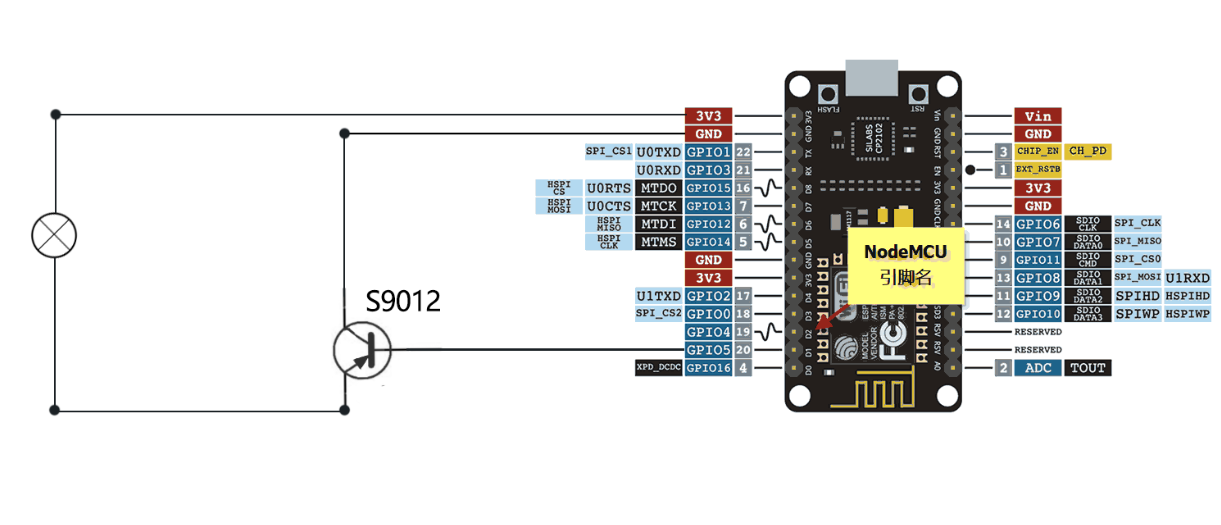
esp8266 通过控制GPIO高低电平通过三极管来控制电路的通断。
电路设计
程序部分
因需要服务端主动发送数据给esp8266所以选择了socket通讯, 服务器端负责接受与发送消息,手机负责发送消息给服务器,esp8266连接服务器的socket服务端,等待服务端发送消息,因socket长连接长时间不进行通讯就会自动断开,所有设计中esp8266过一段时间就会进行一次断开操作,防止长时间socket连接双方无通讯信息造成连接自动断开问题。
首先是服务端
因为我们的目的很明确,所以服务端可以写的比较简单一些,就在收到某些信息的时候广播指定的信息就好。
from socketserver import BaseRequestHandler, ThreadingTCPServer
import threading

BUF_SIZE = 1024

all_clients = []


class Handler(BaseRequestHandler):
    def handle(self):
        address, pid = self.client_address
        print('%s connected!' % address)
        global all_clients
        if self.request not in all_clients:
            all_clients.append(self.request)

        while True:
            try:
                data = self.request.recv(BUF_SIZE)
                if len(data) > 0:
                    print('receive=', data.decode('utf-8').strip())
                    cur_thread = threading.current_thread()
                    # response = '{}:{}'.format(cur_thread.ident,data)
                    response = ''
                    # 通知esp 切换灯状态
                    if "on" in data.decode('utf-8'):
                        response = "start"
                    # 当前状态为开灯 通知给app
                    if "1" in data.decode('utf-8'):
                        response = "1"
                    # 当前状态为关灯 通知给app
                    if "0" in data.decode('utf-8'):
                        response = "0"

                    if len(all_clients) == 1:
                        # 如果发现就一个用户则通知不在线
                        response = 'no'
                        self.request.sendall(response.encode('utf-8'))
                    else:
                        # 给 所有连接者 广播消息
                        all_clientsto = []
                        for clients in all_clients:
                            try:
                                if clients != self.request:
                                    clients.sendall(response.encode('utf-8'))
                                all_clientsto.append(clients)
                            except :
                                print("发现僵尸客户端.自动剔除")
                        all_clients.clear()
                        all_clients = all_clientsto
                    print('发送:', response)
                else:
                    print('close')
                    break
            except ConnectionResetError:
                print(address,"  应用断开连接..")
                try:
                    all_clients.remove(self.request)
                except:
                    pass
                break

if __name__ == '__main__':
    HOST = '172.25.18.127'   ## 如果是外网服务器这里必须是外网ip,不能使用127.0.0.1 ,这样会导致 客户端连接不上
    PORT = 1112
    ADDR = (HOST, PORT)
    server = ThreadingTCPServer(ADDR, Handler)  # 参数为监听地址和已建立连接的处理类
    print('listening')
    server.serve_forever()  # 监听,建立好TCP连接后,为该连接创建新的socket和线程,并由处理类中的handle方法处理
    print(server)
ESP8266客户端
这里原理很简单,
第一步直接开灯。
第二步连接wifi。
第三步连接服务器。
第四步等待接受消息。
第五步接受相应消息做出相应的动作(设置GPIO端口高低电平)控制电路通断。
import socket  # 连接socket 通讯
import time  # 延时函数
import network  # 连接wifi
import machine  # 串口通讯

# 服务器地址
socketHost = '8.142.9.82'

# 服务器端口号
socketPost = 1112

# PIO 端口号  esp8266开发版上面的小LED端口,用于警示当前程序所处的状态  如未连接wifi则LED会相隔一秒闪烁一次
GPIO = 2
# GIPO5  就是三极管的中间脚位所连接的端口
GPIOTO = 5


# wifi 列表
WIFI = [{
    "name": "CMCC-jAGb",
    "password": "2gxju227"
}, {
    "name": "Mi 10 Ultra",
    "password": "11111111"
}, {
    "name": "秋枫",
    "password": "11111111"
}]
# 开机开灯  防止找不到网络导致灯不能正常打开
machine.Pin(GPIOTO, machine.Pin.OUT, value=1)

sta_if = network.WLAN(network.STA_IF)
sta_if.active(True)

a = True

while a:
    sta_if.scan()  # 扫描当前可连接的WiFi名称
    for wifi in sta_if.scan():
        for meWifi in WIFI:
            if meWifi['name'] == wifi[0].decode('utf8'):
                print('当前wifi:' + meWifi['name'])
                sta_if.connect(meWifi['name'], meWifi['password'])
                sta_if.isconnected()
                a = False
    if not a:
        p2se = machine.Pin(GPIO, machine.Pin.OUT)
        p2se.value(0)
        break
    time.sleep(1)
    p2 = machine.Pin(GPIO, machine.Pin.IN)
    p2a = machine.Pin(GPIO, machine.Pin.OUT)
    if p2.value() == 0:
        p2a.value(1)
        print('灭')
    else:
        p2a.value(0)
        print('亮')
    if 2 == 1:
        break

while True:
    print("esp8266连接服务器>>>")
    try:
        client = socket.socket()
        client.settimeout(100)
        client.connect((socketHost, socketPost))
        while True:
            try:
                data = client.recv(1024)
                print(data.decode('utf-8'))
                if "1" in data.decode('utf-8'):
                    print('开灯..')
                    # 获取状态
                    p2a = machine.Pin(GPIOTO, machine.Pin.OUT, value=1)
                elif "0" in data.decode('utf-8'):
                    print('关灯..')
                    # 获取状态
                    p2a = machine.Pin(GPIOTO, machine.Pin.OUT, value=0)
            except Exception as e:
                if "ETIMEDOUT" in str(e):
                    client.send('hear'.encode('utf-8'))
                    print("断开与服务器连接")
                else:
                    raise Exception(str(e))
    except Exception as e:
        print("网络异常正在重连接..." + str(e))
        # 下次连接
        time.sleep(2)
    finally:
        client.close()
手机端
为了方便操作就把开关做成了一个小组件样式,可以随意拖放到桌面上,解决频繁切换应用的麻烦。
package cn.qsub.smarthome;

import android.app.PendingIntent;
import android.appwidget.AppWidgetManager;
import android.appwidget.AppWidgetProvider;
import android.content.ComponentName;
import android.content.Context;
import android.content.Intent;
import android.os.Bundle;
import android.util.Log;
import android.view.View;
import android.widget.EditText;
import android.widget.RemoteViews;
import android.widget.TextView;
import android.widget.Toast;

import androidx.appcompat.app.AppCompatActivity;

import java.io.BufferedReader;
import java.io.BufferedWriter;
import java.io.DataInputStream;
import java.io.DataOutputStream;
import java.io.IOException;
import java.io.InputStreamReader;
import java.io.OutputStreamWriter;
import java.io.PrintWriter;
import java.math.BigDecimal;
import java.net.Socket;
import java.util.concurrent.ExecutorService;
import java.util.concurrent.Executors;

/**
 * Implementation of App Widget functionality.
 */
public class NewAppWidget extends AppWidgetProvider {

    //定义一个action,这个action要在AndroidMainfest中去定义,不然识别不到,名字是自定义的
    private static final String CLICK_ACTION = "cn.qsub.smarthome.CLICK";
    private static final String CLICK_ACTION2 = "cn.qsub.smarthome.CLICK2";
    //服务器地址
    public static final String HOST = "8.142.9.82";
    //服务器端口号
    public static final int PORT = 1112;


    @Override
    public void onUpdate(Context context, AppWidgetManager appWidgetManager, int[] appWidgetIds) {
        // There may be multiple widgets active, so update all of them
        super.onUpdate(context, appWidgetManager, appWidgetIds);
        Log.e("===>", "11");
        for (int appWidgetId : appWidgetIds) {

            //创建一个远程view,绑定我们要操控的widget布局文件
            RemoteViews remoteViews = new RemoteViews(context.getPackageName(), R.layout.new_app_widget);
            Intent intentClick = new Intent();
            //这个必须要设置,不然点击效果会无效
            intentClick.setClass(context, NewAppWidget.class);
            intentClick.setAction(CLICK_ACTION);
            //PendingIntent表示的是一种即将发生的意图,区别于Intent它不是立即会发生的
            PendingIntent pendingIntent = PendingIntent.getBroadcast(context, 0, intentClick, PendingIntent.FLAG_UPDATE_CURRENT);
            //为布局文件中的按钮设置点击监听
            remoteViews.setOnClickPendingIntent(R.id.smartLamp, pendingIntent);

            Intent intentClick2 = new Intent();
            //这个必须要设置,不然点击效果会无效
            intentClick2.setClass(context, NewAppWidget.class);
            intentClick2.setAction(CLICK_ACTION2);
            //PendingIntent表示的是一种即将发生的意图,区别于Intent它不是立即会发生的
            PendingIntent pendingIntent2 = PendingIntent.getBroadcast(context, 0, intentClick2, PendingIntent.FLAG_UPDATE_CURRENT);
            //为布局文件中的按钮设置点击监听
            remoteViews.setOnClickPendingIntent(R.id.smartLampOff, pendingIntent2);
            //告诉AppWidgetManager对当前应用程序小部件执行更新
            appWidgetManager.updateAppWidget(appWidgetId, remoteViews);
        }
    }


    //onReceive不存在widget生命周期中,它是用来接收广播,通知全局的


    private Context context = null;

    /**
     * 接收窗口小部件点击时发送的广播
     *
     * @param contexts
     * @param intent
     */
    @Override
    public void onReceive(final Context contexts, Intent intent) {
        System.out.println("111");
        super.onReceive(contexts, intent);

        //当我们点击桌面上的widget按钮(这个按钮我们在onUpdate中已经为它设置了监听),widget就会发送广播
        //这个广播我们也在onUpdate中为它设置好了意图,设置了action,在这里我们接收到对应的action并做相应处理
        context = contexts;
        if (intent.getAction().equals(CLICK_ACTION)) {
//            //因为点击按钮后要对布局中的文本进行更新,所以需要创建一个远程view
            Toast.makeText(context, "早~", Toast.LENGTH_LONG).show();
            Thread Thread =  new Thread(new Runnable() {
                @Override
                public void run() {
                    AppWidgetManager appWidgetManager = AppWidgetManager.getInstance(context);
                    RemoteViews remoteViews = new RemoteViews(context.getPackageName(), R.layout.new_app_widget);
                    System.out.println("11122");
                    Socket socket = null;
                    try {
                        //创建一个流套接字并将其连接到指定主机上的指定端口号
                        socket = new Socket(HOST, PORT);
                        //读取服务器端数据
                        DataInputStream input = new DataInputStream(socket.getInputStream());
                        //向服务器端发送数据
                        DataOutputStream out = new DataOutputStream(socket.getOutputStream());
                        // 开灯
                        out.writeUTF("1");
                        remoteViews.setInt(R.id.smartLamp, "setBackgroundResource", R.color.tm);
                        remoteViews.setInt(R.id.smartLampOff, "setBackgroundResource", R.drawable.moon);
                        out.close();
                        input.close();
                    } catch (Exception e) {
                        e.printStackTrace();
                    } finally {
                        if (socket != null) {
                            try {
                                socket.close();
                                System.out.println("socket is closed");
                            } catch (IOException e) {
                                socket = null;
                                System.out.println("客户端 finally 异常:" + e.getMessage());
                            }
                        }
                    }
		            //更新widget
                    appWidgetManager.updateAppWidget(new ComponentName(context, NewAppWidget.class), remoteViews);
                }
            });
            Thread.start();
        }else if (intent.getAction().equals(CLICK_ACTION2)){
            Toast.makeText(context, "晚安", Toast.LENGTH_LONG).show();
            Thread Thread =  new Thread(new Runnable() {
                @Override
                public void run() {
                    AppWidgetManager appWidgetManager = AppWidgetManager.getInstance(context);
                    RemoteViews remoteViews = new RemoteViews(context.getPackageName(), R.layout.new_app_widget);
                    System.out.println("111");
                    Socket socket = null;
                    try {
                        //创建一个流套接字并将其连接到指定主机上的指定端口号
                        socket = new Socket(HOST, PORT);
                        //读取服务器端数据
                        DataInputStream input = new DataInputStream(socket.getInputStream());
                        //向服务器端发送数据
                        DataOutputStream out = new DataOutputStream(socket.getOutputStream());
                        // 开灯
                        out.writeUTF("0");
                        remoteViews.setInt(R.id.smartLampOff, "setBackgroundResource", R.color.tm);
                        remoteViews.setInt(R.id.smartLamp, "setBackgroundResource", R.drawable.sun);
                        out.close();
                        input.close();
                    } catch (Exception e) {
                        e.printStackTrace();
                    } finally {
                        if (socket != null) {
                            try {
                                socket.close();
                                System.out.println("socket is closed");
                            } catch (IOException e) {
                                socket = null;
                                System.out.println("客户端 finally 异常:" + e.getMessage());
                            }
                        }
                    }
            		//更新widget
                    appWidgetManager.updateAppWidget(new ComponentName(context, NewAppWidget.class), remoteViews);
                }
            });
            Thread.start();


        }


    }


    @Override
    public void onEnabled(Context context) {
        Log.e("===>", "33");
        // Enter relevant functionality for when the first widget is created
    }

    @Override
    public void onDisabled(Context context) {
        Log.e("===>", "44");
        // Enter relevant functionality for when the last widget is disabled
    }

    static void updateAppWidget(Context context, AppWidgetManager appWidgetManager, int appWidgetId) {
        Log.e("===>", "55");
//        CharSequence widgetText = context.getString(R.string.appwidget_text);
        // Construct the RemoteViews object
        RemoteViews views = new RemoteViews(context.getPackageName(), R.layout.new_app_widget);
//        views.setTextViewText(R.id.smartLamp, widgetText);

        // Instruct the widget manager to update the widget
        appWidgetManager.updateAppWidget(appWidgetId, views);
    }
}
- 权限文件
<?xml version="1.0" encoding="utf-8"?>
<manifest xmlns:android="http://schemas.android.com/apk/res/android"
    package="cn.qsub.smarthome" >
    <uses-permission android:name="android.permission.INTERNET"/>
    <uses-permission android:name="android.permission.ACCESS_NETWORK_STATE"/>

    <application
        android:allowBackup="true"
        android:icon="@mipmap/ic_launcher"
        android:label="@string/app_name"
        android:roundIcon="@mipmap/ic_launcher_round"
        android:supportsRtl="true"
        android:theme="@style/AppTheme" >
        <receiver android:name=".NewAppWidget" >
            <intent-filter>
                <action android:name="android.appwidget.action.APPWIDGET_UPDATE" />
                <!--这个和SimpleWidgetProvider中的CLICK_ACTION对应-->
                <action android:name="cn.qsub.smarthome.CLICK"/>
                <action android:name="cn.qsub.smarthome.CLICK2"/>
            </intent-filter>

            <meta-data
                android:name="android.appwidget.provider"
                android:resource="@xml/new_app_widget_info" />
        </receiver>

        <activity android:name=".MainActivity" >
            <intent-filter>
                <action android:name="android.intent.action.MAIN" />
                <category android:name="android.intent.category.LAUNCHER" />
            </intent-filter>
        </activity>
    </application>

</manifest>
最后来看看效果吧!

参考文献
https://blog.csdn.net/weixin_45020839/article/details/105807767
https://zhuanlan.zhihu.com/p/64299874
https://codingdict.com/sources/py/machine/17375.html
http://www.taichi-maker.com/homepage/esp8266-nodemcu-iot/esp8266-nodemcu-tutorial-index/nodemcu-board/
LmacRxBlk:1 问题
https://forum.micropython.org/viewtopic.php?t=3602


 7615
7615

 被折叠的 条评论
为什么被折叠?
被折叠的 条评论
为什么被折叠?
 到【灌水乐园】发言


