1、JMS与ActiveMQ
JMS API是在javax.jms包中定义的。ActiveMQ:active message queue:实现消息模型的框架。
官方网站:http://activemq.apache.org/
JMS即Java消息服务(Java Message Service)应用程序接口,是一个Java平台中关于面向消息中间件(MOM)的API,用于在两个应用程序之间,或分布式系统中发送消息,进行异步通信。Java消息服务是一个与具体平台无关的API,绝大多数MOM提供商都对JMS提供支持。
我们可以简单的理解:两个应用程序之间需要进行通信,我们使用一个JMS服务,进行中间的转发,通过JMS 的使用,我们可以解除两个程序之间的耦合。
2、JMS的优势
-
Asynchronous(异步)
JMS is asynchronous by default. So to receive a message, the client is not required to send the request. The message will arrive automatically to the client as they become available.(JMS 原本就是一个异步的消息服务,客户端获取消息的时候,不需要主动发送请求,消息会自动发送给可用的客户端)
-
Reliable(可靠)
JMS provides the facility of assurance that the message will delivered once and only once. You know that duplicate messages create problems. JMS helps you avoiding such problems.(JMS保证消息只会递送一次。大家都遇到过重复创建消息问题,而JMS能帮你避免该问题。)
3、JMS的消息模型
JMS具有两种通信模式:
1、Point-to-Point Messaging Domain (点对点)
2、Publish/Subscribe Messaging Domain (发布/订阅模式)
在JMS API出现之前,大部分产品使用“点对点”和“发布/订阅”中的任一方式来进行消息通讯。JMS定义了这两种消息发送模型的规范,它们相互独立。任何JMS的提供者可以实现其中的一种或两种模型,这是它们自己的选择。JMS规范提供了通用接口保证我们基于JMS API编写的程序适用于任何一种模型。
(1)、Point-to-Point Messaging Domain(点对点通信模型)
a、模式图:
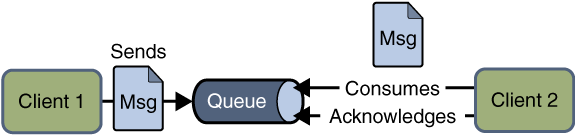
b、涉及到的概念:
在点对点通信模式中,应用程序由消息队列,发送方,接收方组成。每个消息都被发送到一个特定的队列,接收者从队列中获取消息。队列保留着消息,直到他们被消费或超时。
c、特点:
-
-
- 每个消息只要一个消费者
- 发送者和接收者在时间上是没有时间的约束,也就是说发送者在发送完消息之后,不管接收者有没有接受消息,都不会影响发送方发送消息到消息队列中。
- 发送方不管是否在发送消息,接收方都可以从消息队列中去到消息(The receiver can fetch message whether it is running or not when the sender sends the message)
- 接收方在接收完消息之后,需要向消息队列应答成功
(2)、Publish/Subscribe Messaging Domain(发布/订阅通信模型)
a、模式图:
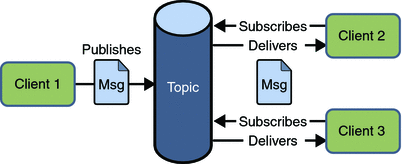
b、涉及到的概念:
在发布/订阅消息模型中,发布者发布一个消息,该消息通过topic传递给所有的客户端。该模式下,发布者与订阅者都是匿名的,即发布者与订阅者都不知道对方是谁。并且可以动态的发布与订阅Topic。Topic主要用于保存和传递消息,且会一直保存消息直到消息被传递给客户端。
c、特点:
-
-
- 一个消息可以传递个多个订阅者(即:一个消息可以有多个接受方)
- 发布者与订阅者具有时间约束,针对某个主题(Topic)的订阅者,它必须创建一个订阅者之后,才能消费发布者的消息,而且为了消费消息,订阅者必须保持运行的状态。
- 为了缓和这样严格的时间相关性,JMS允许订阅者创建一个可持久化的订阅。这样,即使订阅者没有被激活(运行),它也能接收到发布者的消息。
4、JMS接收消息
在JMS中,消息的产生和消息是异步的。对于消费来说,JMS的消息者可以通过两种方式来消费消息。
(1)、同步(Synchronous)
在同步消费信息模式模式中,订阅者/接收方通过调用 receive()方法来接收消息。在receive()方法中,线程会阻塞直到消息到达或者到指定时间后消息仍未到达。
(2)、异步(Asynchronous)
使用异步方式接收消息的话,消息订阅者需注册一个消息监听者,类似于事件监听器,只要消息到达,JMS服务提供者会通过调用监听器的onMessage()递送消息。
5、JMS编程模型

(1)、Connection Factories
创建Connection对象的工厂,针对两种不同的jms消息模型,分别有QueueConnectionFactory和TopicConnectionFactory两种。可以通过JNDI来查找ConnectionFactory对象。客户端使用一个连接工厂对象连接到JMS服务提供者,它创建了JMS服务提供者和客户端之间的连接。JMS客户端(如发送者或接受者)会在JNDI名字空间中搜索并获取该连接。使用该连接,客户端能够与目的地通讯,往队列或话题发送/接收消息。
QueueConnectionFactory queueConnFactory = (QueueConnectionFactory) initialCtx.lookup ("primaryQCF");
Queue purchaseQueue = (Queue) initialCtx.lookup ("Purchase_Queue");
Queue returnQueue = (Queue) initialCtx.lookup ("Return_Queue");
(2)、Destination
目的地指明消息被发送的目的地以及客户端接收消息的来源。JMS使用两种目的地,队列和话题。如下代码指定了一个队列和话题:
创建一个队列Session:
QueueSession ses = con.createQueueSession (false, Session.AUTO_ACKNOWLEDGE);  //get the Queue object
Queue t = (Queue) ctx.lookup ("myQueue");  //create QueueReceiver
QueueReceiver receiver = ses.createReceiver(t);
创建一个Topic Session:
QueueSession ses = con.createQueueSession (false, Session.AUTO_ACKNOWLEDGE);  //get the Queue object
Queue t = (Queue) ctx.lookup ("myQueue");  //create QueueReceiver
QueueReceiver receiver = ses.createReceiver(t);
(3)、Connection
Connection表示在客户端和JMS系统之间建立的链接(对TCP/IP socket的包装)。Connection可以产生一个或多个Session。跟ConnectionFactory一样,Connection也有两种类型:QueueConnection和TopicConnection。
连接对象封装了与JMS提供者之间的虚拟连接,如果我们有一个ConnectionFactory对象,可以使用它来创建一个连接。
Connection connection = connectionFactory.createConnection();
(4)、Session
Session 是我们对消息进行操作的接口,可以通过session创建生产者、消费者、消息等。Session 提供了事务的功能,如果需要使用session发送/接收多个消息时,可以将这些发送/接收动作放到一个事务中。
我们可以在连接创建完成之后创建session:
Session session = connection.createSession(false, Session.AUTO_ACKNOWLEDGE);
这里面提供了参数两个参数,第一个参数是是否支持事务,第二个是事务的类型
(5)、Producter
消息生产者由Session创建,用于往目的地发送消息。生产者实现MessageProducer接口,我们可以为目的地、队列或话题创建生产者;
MessageProducer producer = session.createProducer(dest);
MessageProducer producer = session.createProducer(queue);
MessageProducer producer = session.createProducer(topic);
(6)、Consumer
消息消费者由Session创建,用于接收被发送到Destination的消息。
MessageConsumer consumer = session.createConsumer(dest);
MessageConsumer consumer = session.createConsumer(queue);
MessageConsumer consumer = session.createConsumer(topic);
(7)、MessageListener
消息监听器。如果注册了消息监听器,一旦消息到达,将自动调用监听器的onMessage方法。EJB中的MDB(Message-Driven Bean)就是一种MessageListener。
(二)java并发编程:阻塞队列
自从Java 1.5之后,在java.util.concurrent包下提供了若干个阻塞队列,主要有以下几个:
1、ArrayBlockingQueue:基于数组实现的一个阻塞队列,在创建ArrayBlockingQueue对象时必须指定容量大小,并且可以指定公平性和非公平性,默
认情况下为非公平的,即不保证等待时间最长的队列最优先能够访问队列。
2、LinkedBlockingQueue:基于链表实现的一个阻塞队列,在创建LinkedBlockingQueue对象时如果不指定容量大小,则默认大小为Integer.MAX_VALUE
3、PriorityBlockingQueue:以上2种队列都是先进先出队列,而PriorityBlockingQueue却不是,它会按照元素的优先级对元素进行排序,按照优先级
顺序出队,每次出队的元素都是优先级最高的元素。注意,此阻塞队列为无界阻塞队列,即容量没有上限(通过源码就可以知道,它没有容器满的信号
标志),前面2种都是有界队列。
4、DelayQueue:基于PriorityQueue,一种延时阻塞队列,DelayQueue中的元素只有当其指定的延迟时间到了,才能够从队列中获取到该元素。
DelayQueue也是一个无界队列,因此往队列中插入数据的操作(生产者)永远不会被阻塞,而只有获取数据的操作(消费者)才会被阻塞。
(三)JMS基础概念
| JMS Parent | PTP:点对点 | Pub/Sub:发布/订阅 |
| ConnectionFactory | QueueConnectionFactory | TopicConnectionFactory |
| Connection | QueueConnection | TopicConnection |
| Destination | Queue | Topic |
| Session | QueueSession | TopicSession |
| MessageProducer | QueueSender | TopicPublisher |
| MessageConsumer | QueueReceiver | TopicSubscriber
|
一、消息(Message)
消息是消息服务器在客户端之间发送的一条条信息。有五种接口,不同的类型消息。1. StreamMessage -- Java原始值的数据流 2. MapMessage--一组名/值对 3.TextMessage--一个字符串对象 4. ObjectMessage--一个序列化的 Java对象 5.BytesMessage--一个未解释字节的数据流。
消息由以下几部分组成:
消息头(header):JMS消息头包含了许多字段,它们是消息发送后由JMS提供者或消息发送者产生,用来表示消息、设置优先权和失效时间等等,并且为消息确定路由。
属性(property):由消息发送者产生,用来添加删除消息头以外的附加信息。
消息体(body):由消息发送者产生。
二、目标(Destination)
目标是受控对象。在JMS中表示一个队列或者一个主题。
发送消息的基本步骤:
(1)、创建连接使用的工厂类JMS ConnectionFactory
(2)、使用管理对象JMS ConnectionFactory建立连接Connection,并启动
(3)、使用连接Connection 建立会话Session
(4)、使用会话Session和管理对象Destination创建消息生产者MessageSender
(5)、使用消息生产者MessageSender发送消息
消息接收者从JMS接受消息的步骤
(1)、创建连接使用的工厂类JMS ConnectionFactory
(2)、使用管理对象JMS ConnectionFactory建立连接Connection,并启动
(3)、使用连接Connection 建立会话Session
(4)、使用会话Session和管理对象Destination创建消息接收者MessageReceiver
(5)、使用消息接收者MessageReceiver接受消息,需要用setMessageListener将MessageListener接口绑定到MessageReceiver消息接收者必须实现了MessageListener接口,需要定义onMessage事件方法。
(四)程序实例
1.JMS方式
接受者
public class MessageReceiver {
public static final String BROKER_URL = "tcp://localhost:61616";
public static final String DESTINATION = "hoo.mq.queue";
public static void run() throws Exception {
Connection connection = null;
Session session = null;
try {
ConnectionFactory factory = new ActiveMQConnectionFactory(ActiveMQConnection.DEFAULT_USER, ActiveMQConnection.DEFAULT_PASSWORD, BROKER_URL);
connection = factory.createConnection();
connection.start();
session = connection.createSession(Boolean.TRUE, Session.AUTO_ACKNOWLEDGE);
Destination destination = session.createQueue(DESTINATION);
MessageConsumer consumer = session.createConsumer(destination);
while (true) {
Message message = consumer.receive(1000 * 100);
TextMessage text = (TextMessage) message;
if (text != null) {
System.out.println("接收:" + text.getText());
} else {
break;
}
}
session.commit();
} catch (Exception e) {
throw e;
} finally {
if (session != null) {
session.close();
}
if (connection != null) {
connection.close();
}
}
}
public static void main(String[] args) throws Exception {
MessageReceiver.run();
}
}
- 1
- 2
- 3
- 4
- 5
- 6
- 7
- 8
- 9
- 10
- 11
- 12
- 13
- 14
- 15
- 16
- 17
- 18
- 19
- 20
- 21
- 22
- 23
- 24
- 25
- 26
- 27
- 28
- 29
- 30
- 31
- 32
- 33
- 34
- 35
- 36
- 37
- 38
- 39
- 40
- 41
- 42
- 43
- 44
- 45
- 46
- 47
- 48
- 49
- 50
- 51
发送者
public class MessageSender {
public static final int SEND_NUM = 5;
public static final String BROKER_URL = "tcp://localhost:61616";
public static final String DESTINATION = "hoo.mq.queue";
@SuppressWarnings("unused")
private static void sendMessage(Session session, MessageProducer producer) throws JMSException{
for (int i = 0; i < SEND_NUM; i++) {
String message = "发送消息第" + (i + 1) + "条";
TextMessage text = session.createTextMessage(message);
System.out.println(message);
producer.send(text);
}
}
public static void run() throws Exception {
Connection connection = null;
Session session = null;
try {
ConnectionFactory factory = new ActiveMQConnectionFactory(ActiveMQConnection.DEFAULT_USER, ActiveMQConnection.DEFAULT_PASSWORD, BROKER_URL);
connection = factory.createConnection();
connection.start();
session = connection.createSession(Boolean.TRUE, Session.AUTO_ACKNOWLEDGE);
Destination destination = session.createQueue(DESTINATION);
MessageProducer producer = session.createProducer(destination);
producer.setDeliveryMode(DeliveryMode.NON_PERSISTENT);
sendMessage(session, producer);
session.commit();
} catch (Exception e) {
throw e;
} finally {
if (session != null) {
session.close();
}
if (connection != null) {
connection.close();
}
}
}
public static void main(String[] args) {
try {
MessageSender.run();
} catch (Exception e) {
e.printStackTrace();
}
}
}
- 1
- 2
- 3
- 4
- 5
- 6
- 7
- 8
- 9
- 10
- 11
- 12
- 13
- 14
- 15
- 16
- 17
- 18
- 19
- 20
- 21
- 22
- 23
- 24
- 25
- 26
- 27
- 28
- 29
- 30
- 31
- 32
- 33
- 34
- 35
- 36
- 37
- 38
- 39
- 40
- 41
- 42
- 43
- 44
- 45
- 46
- 47
- 48
- 49
- 50
- 51
- 52
- 53
- 54
- 55
- 56
- 57
- 58
- 59
- 60
- Queue方式
接受者
public class QueueReceiver {
public static final String BROKER_URL = "tcp://localhost:61616";
public static final String TARGET = "test.queue";
public static void run() throws Exception {
QueueConnection connection = null;
QueueSession session = null;
try {
QueueConnectionFactory factory = new ActiveMQConnectionFactory(ActiveMQConnection.DEFAULT_USER, ActiveMQConnection.DEFAULT_PASSWORD, BROKER_URL);
connection = factory.createQueueConnection();
connection.start();
session = connection.createQueueSession(Boolean.TRUE, Session.AUTO_ACKNOWLEDGE);
Queue queue = session.createQueue(TARGET);
javax.jms.QueueReceiver receiver = session.createReceiver(queue);
receiver.setMessageListener(new MessageListener() {
public void onMessage(Message msg) {
if (msg != null) {
MapMessage map = (MapMessage) msg;
try {
System.out.println(map.getLong("time") + "接收#" + map.getString("text"));
} catch (JMSException e) {
e.printStackTrace();
}
}
}
});
Thread.sleep(1000 * 100);
session.commit();
} catch (Exception e) {
throw e;
} finally {
if (session != null) {
session.close();
}
if (connection != null) {
connection.close();
}
}
}
public static void main(String[] args) throws Exception {
QueueReceiver.run();
}
}
- 1
- 2
- 3
- 4
- 5
- 6
- 7
- 8
- 9
- 10
- 11
- 12
- 13
- 14
- 15
- 16
- 17
- 18
- 19
- 20
- 21
- 22
- 23
- 24
- 25
- 26
- 27
- 28
- 29
- 30
- 31
- 32
- 33
- 34
- 35
- 36
- 37
- 38
- 39
- 40
- 41
- 42
- 43
- 44
- 45
- 46
- 47
- 48
- 49
- 50
- 51
- 52
- 53
- 54
- 55
发送者
public class QueueSender {
public static final int SEND_NUM = 5;
public static final String BROKER_URL = "tcp://localhost:61616";
public static final String DESTINATION = "test.queue";
public static void sendMessage(QueueSession session, javax.jms.QueueSender sender) throws Exception {
for (int i = 0; i < SEND_NUM; i++) {
String message = "发送消息第" + (i + 1) + "条";
MapMessage map = session.createMapMessage();
map.setString("text", message);
map.setLong("time", System.currentTimeMillis());
System.out.println(map);
sender.send(map);
}
}
public static void run() throws Exception {
QueueConnection connection = null;
QueueSession session = null;
try {
QueueConnectionFactory factory = new ActiveMQConnectionFactory(ActiveMQConnection.DEFAULT_USER, ActiveMQConnection.DEFAULT_PASSWORD, BROKER_URL);
connection = factory.createQueueConnection();
connection.start();
session = connection.createQueueSession(Boolean.TRUE, Session.AUTO_ACKNOWLEDGE);
Queue queue = session.createQueue(DESTINATION);
javax.jms.QueueSender sender = session.createSender(queue);
sender.setDeliveryMode(DeliveryMode.NON_PERSISTENT);
sendMessage(session, sender);
session.commit();
} catch (Exception e) {
throw e;
} finally {
if (session != null) {
session.close();
}
if (connection != null) {
connection.close();
}
}
}
public static void main(String[] args) throws Exception {
QueueSender.run();
}
}
- 1
- 2
- 3
- 4
- 5
- 6
- 7
- 8
- 9
- 10
- 11
- 12
- 13
- 14
- 15
- 16
- 17
- 18
- 19
- 20
- 21
- 22
- 23
- 24
- 25
- 26
- 27
- 28
- 29
- 30
- 31
- 32
- 33
- 34
- 35
- 36
- 37
- 38
- 39
- 40
- 41
- 42
- 43
- 44
- 45
- 46
- 47
- 48
- 49
- 50
- 51
- 52
- 53
- 54
- 55
- 56
- 57
- 58
3.topic方式
接受者
public class TopicReceiver {
public static final String BROKER_URL = "tcp://localhost:61616";
public static final String TARGET = "hoo.mq.topic";
public static void run() throws Exception {
TopicConnection connection = null;
TopicSession session = null;
try {
TopicConnectionFactory factory = new ActiveMQConnectionFactory(ActiveMQConnection.DEFAULT_USER, ActiveMQConnection.DEFAULT_PASSWORD, BROKER_URL);
connection = factory.createTopicConnection();
connection.start();
session = connection.createTopicSession(Boolean.TRUE, Session.AUTO_ACKNOWLEDGE);
Topic topic = session.createTopic(TARGET);
TopicSubscriber subscriber = session.createSubscriber(topic);
subscriber.setMessageListener(new MessageListener() {
public void onMessage(Message msg) {
if (msg != null) {
MapMessage map = (MapMessage) msg;
try {
System.out.println(map.getLong("time") + "接收#" + map.getString("text"));
} catch (JMSException e) {
e.printStackTrace();
}
}
}
});
Thread.sleep(1000 * 100);
session.commit();
} catch (Exception e) {
throw e;
} finally {
if (session != null) {
session.close();
}
if (connection != null) {
connection.close();
}
}
}
public static void main(String[] args) throws Exception {
TopicReceiver.run();
}
}
- 1
- 2
- 3
- 4
- 5
- 6
- 7
- 8
- 9
- 10
- 11
- 12
- 13
- 14
- 15
- 16
- 17
- 18
- 19
- 20
- 21
- 22
- 23
- 24
- 25
- 26
- 27
- 28
- 29
- 30
- 31
- 32
- 33
- 34
- 35
- 36
- 37
- 38
- 39
- 40
- 41
- 42
- 43
- 44
- 45
- 46
- 47
- 48
- 49
- 50
- 51
- 52
- 53
- 54
- 55
- 56
- 57
发送者
public class TopicSender {
public static final int SEND_NUM = 5;
public static final String BROKER_URL = "tcp://localhost:61616";
public static final String DESTINATION = "hoo.mq.topic";
public static void sendMessage(TopicSession session, TopicPublisher publisher) throws Exception {
for (int i = 0; i < SEND_NUM; i++) {
String message = "发送消息第" + (i + 1) + "条";
MapMessage map = session.createMapMessage();
map.setString("text", message);
map.setLong("time", System.currentTimeMillis());
System.out.println(map);
publisher.send(map);
}
}
public static void run() throws Exception {
TopicConnection connection = null;
TopicSession session = null;
try {
TopicConnectionFactory factory = new ActiveMQConnectionFactory(ActiveMQConnection.DEFAULT_USER, ActiveMQConnection.DEFAULT_PASSWORD, BROKER_URL);
connection = factory.createTopicConnection();
connection.start();
session = connection.createTopicSession(Boolean.TRUE, Session.AUTO_ACKNOWLEDGE);
Topic topic = session.createTopic(DESTINATION);
TopicPublisher publisher = session.createPublisher(topic);
publisher.setDeliveryMode(DeliveryMode.NON_PERSISTENT);
sendMessage(session, publisher);
session.commit();
} catch (Exception e) {
throw e;
} finally {
if (session != null) {
session.close();
}
if (connection != null) {
connection.close();
}
}
}
public static void main(String[] args) throws Exception {
TopicSender.run();
}
}
- 1
- 2
- 3
- 4
- 5
- 6
- 7
- 8
- 9
- 10
- 11
- 12
- 13
- 14
- 15
- 16
- 17
- 18
- 19
- 20
- 21
- 22
- 23
- 24
- 25
- 26
- 27
- 28
- 29
- 30
- 31
- 32
- 33
- 34
- 35
- 36
- 37
- 38
- 39
- 40
- 41
- 42
- 43
- 44
- 45
- 46
- 47
- 48
- 49
- 50
- 51
- 52
- 53
- 54
- 55
- 56
- 57
- 58
- 59
4.集成spring
引入jar包
     <dependency>
        <groupId>org.apache.activemq</groupId>
        <artifactId>activemq-all</artifactId>
        <version>5.14.1</version>
     </dependency>
     <dependency>
        <groupId>org.springframework</groupId>
        <artifactId>spring-jms</artifactId>
        <version>4.0.8.RELEASE</version>
     </dependency>
     <dependency>
        <groupId>org.springframework</groupId>
        <artifactId>spring-messaging</artifactId>
        <version>4.0.8.RELEASE</version>
     </dependency>
     <dependency>
        <groupId>org.apache.activemq</groupId>
        <artifactId>activemq-spring</artifactId>
        <version>5.14.1</version>
     </dependency>
- 1
- 2
- 3
- 4
- 5
- 6
- 7
- 8
- 9
- 10
- 11
- 12
- 13
- 14
- 15
- 16
- 17
- 18
- 19
- 20
配置文件spring-context-activemq.xml:
<?xml version="1.0" encoding="UTF-8"?>
<beans xmlns="http://www.springframework.org/schema/beans"
xmlns:context="http://www.springframework.org/schema/context"
xmlns:xsi="http://www.w3.org/2001/XMLSchema-instance" xmlns:amq="http://activemq.apache.org/schema/core"
xmlns:jms="http://www.springframework.org/schema/jms"
xsi:schemaLocation="http://www.springframework.org/schema/beans
http://www.springframework.org/schema/beans/spring-beans-4.0.xsd
http://www.springframework.org/schema/context
http://www.springframework.org/schema/context/spring-context-4.0.xsd
http://www.springframework.org/schema/jms
http://www.springframework.org/schema/jms/spring-jms-4.0.xsd
http://activemq.apache.org/schema/core
http://activemq.apache.org/schema/core/activemq-core-5.14.1.xsd">
<description>spring-activeMQ</description>
<amq:connectionFactory id="amqConnectionFactory" brokerURL="tcp://127.0.0.1:61616" userName="admin" password="admin"></amq:connectionFactory>
<bean id="connectionFactory" class="org.springframework.jms.connection.CachingConnectionFactory">
<constructor-arg ref="amqConnectionFactory"></constructor-arg>
<property name="sessionCacheSize" value="100" />
</bean>
<bean id="jmsQueueTemplate" class="org.springframework.jms.core.JmsTemplate">
<constructor-arg ref="connectionFactory"></constructor-arg>
<property name="pubSubDomain" value="false" />
</bean>
<bean id="jmsTopicTemplate" class="org.springframework.jms.core.JmsTemplate">
<constructor-arg ref="connectionFactory"></constructor-arg>
<property name="pubSubDomain" value="true" />
</bean>
<bean id="queueReceiver" class="com.drink.modules.activemq.QueueReceiver"></bean>
<jms:listener-container destination-type="queue" container-type="default" connection-factory="connectionFactory" acknowledge="auto">
<jms:listener destination="test.queue" ref="queueReceiver"/>
</jms:listener-container>
<bean id="topicReceiver" class="com.drink.modules.activemq.TopicReceiver"></bean>
<jms:listener-container destination-type="topic" container-type="default" connection-factory="connectionFactory" acknowledge="auto">
<jms:listener destination="test.topic" ref="topicReceiver"/>
</jms:listener-container>
</beans>
- 1
- 2
- 3
- 4
- 5
- 6
- 7
- 8
- 9
- 10
- 11
- 12
- 13
- 14
- 15
- 16
- 17
- 18
- 19
- 20
- 21
- 22
- 23
- 24
- 25
- 26
- 27
- 28
- 29
- 30
- 31
- 32
- 33
- 34
- 35
- 36
- 37
- 38
- 39
- 40
- 41
- 42
- 43
- 44
- 45
- 46
- 47
- 48
- 49
- 50
- 51
- 52
Queue接收文件:
public class QueueReceiver implements MessageListener {
    @Override
    public void onMessage(Message message) {
         try {
            System.out.println("QueueReceiver接收到消息:"+((TextMessage)message).getText());
        } catch (JMSException e) {
            e.printStackTrace();
        }
    }
}
Topic接收文件:
public class TopicReceiver implements MessageListener {
    @Override
    public void onMessage(Message message) {
        try {
            System.out.println("TopicReceiver接收到消息:"+((TextMessage)message).getText());
        } catch (JMSException e) {
            e.printStackTrace();
        }
    }
}
Queue发送文件:
@Component("queueSender")
public class QueueSender {
    @Autowired
    @Qualifier("jmsQueueTemplate")
    private JmsTemplate jmsTemplate;

    public void send(String queueName, final String message){
        jmsTemplate.send(queueName,new MessageCreator() {
            @Override
            public Message createMessage(Session session) throws JMSException {
                return session.createTextMessage(message);
            }
        });
    }
}
Topic发送文件:
@Component("topicSender")
public class TopicSender {
    @Autowired
    @Qualifier("jmsTopicTemplate")
    private JmsTemplate jmsTemplate;
    public void send(String queueName, final String message){
        jmsTemplate.send(queueName,new MessageCreator() {
            @Override
            public Message createMessage(Session session) throws JMSException {
                return session.createTextMessage(message);
            }
        });
    }
}
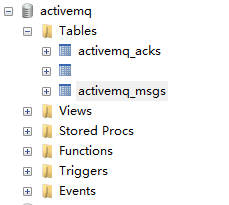
4.持久化到数据配置
在mysql中手动创建一个名称为activemq的数据库,注意编码格式。
将mysql驱动的jar包拷贝到apache-activemq-5.14.1\lib目录下
修改conf下的activemq.xml文件
将默认的
<jdbcPersistenceAdapter dataSource="#mysql-ds" createTablesOnStartup="true" />
修改为
<jdbcPersistenceAdapter dataSource="#mysql-ds" createTablesOnStartup="true"/>
在broker节点后添加数据源
 <bean id="mysql-ds" class="org.apache.commons.dbcp2.BasicDataSource" destroy-method="close">
 <property name="driverClassName" value="com.mysql.jdbc.Driver"/>
 <property name="url" value="jdbc:mysql://localhost/activemq"/>
 <property name="username" value="root"/>
 <property name="password" value="123456"/>
 <property name="poolPreparedStatements" value="true"/>
 </bean>
**注意:这里的版本是5.14.1,dbcp的包是commons-dbcp2-2.1.1.jar,所以这里的class为org.apache.commons.dbcp2.BasicDataSource,
低版本的MQ配置为org.apache.commons.dbcp.BasicDataSource**
首次启动后就会看到数据库的创建的三张表
编码中发送者需要设置持久化的方式
        // 创建消息发送者
        javax.jms.QueueSender sender = session.createSender(queue);
        // 设置持久化模式
        sender.setDeliveryMode(DeliveryMode.PERSISTENT);
spring中在JmsTemplate模板配置中设置
<bean id="jmsQueueTemplate" class="org.springframework.jms.core.JmsTemplate">
    <!-- 这个connectionFactory对应的是我们定义的Spring提供的那个ConnectionFactory对象 -->
    <constructor-arg ref="connectionFactory"></constructor-arg>
    <!-- 非pub/sub模型(发布/订阅),即队列模式 -->
    <property name="pubSubDomain" value="false" />
    <!--1为非持久化,2为持久化-->
    <property name="deliveryMode" value="2" />
</bean>
http://blog.csdn.net/u011216417/article/details/51470004
http://blog.csdn.net/wl_627292578/article/details/53161585


 9554
9554


 被折叠的 条评论
为什么被折叠?
被折叠的 条评论
为什么被折叠?
 到【灌水乐园】发言


