


这篇文章翻译至denny britz的博客。
一、数据预处理
这个情感分析的数据集来自Rotten Tomatoes的电影评论,总共10662个样本,一半正例,一半负例,词汇的数目大概2万个。
任何机器学习能够得到很好的执行,数据预处理都很重要。首先,简单介绍下其数据预处理的过程:
1、从原始文件中载入正例和负例;
2、对数据进行清理;
3、设定最大句子长度是59,不足的补符号;
4、建立一个字典,映射字到0-18765。
简单说明一下,第3步保证输入的句子长度一致,CNN本来是处理图像的,所以,我们要做的像个图片一样,因此要求长度一致。
二、CNN模型设计
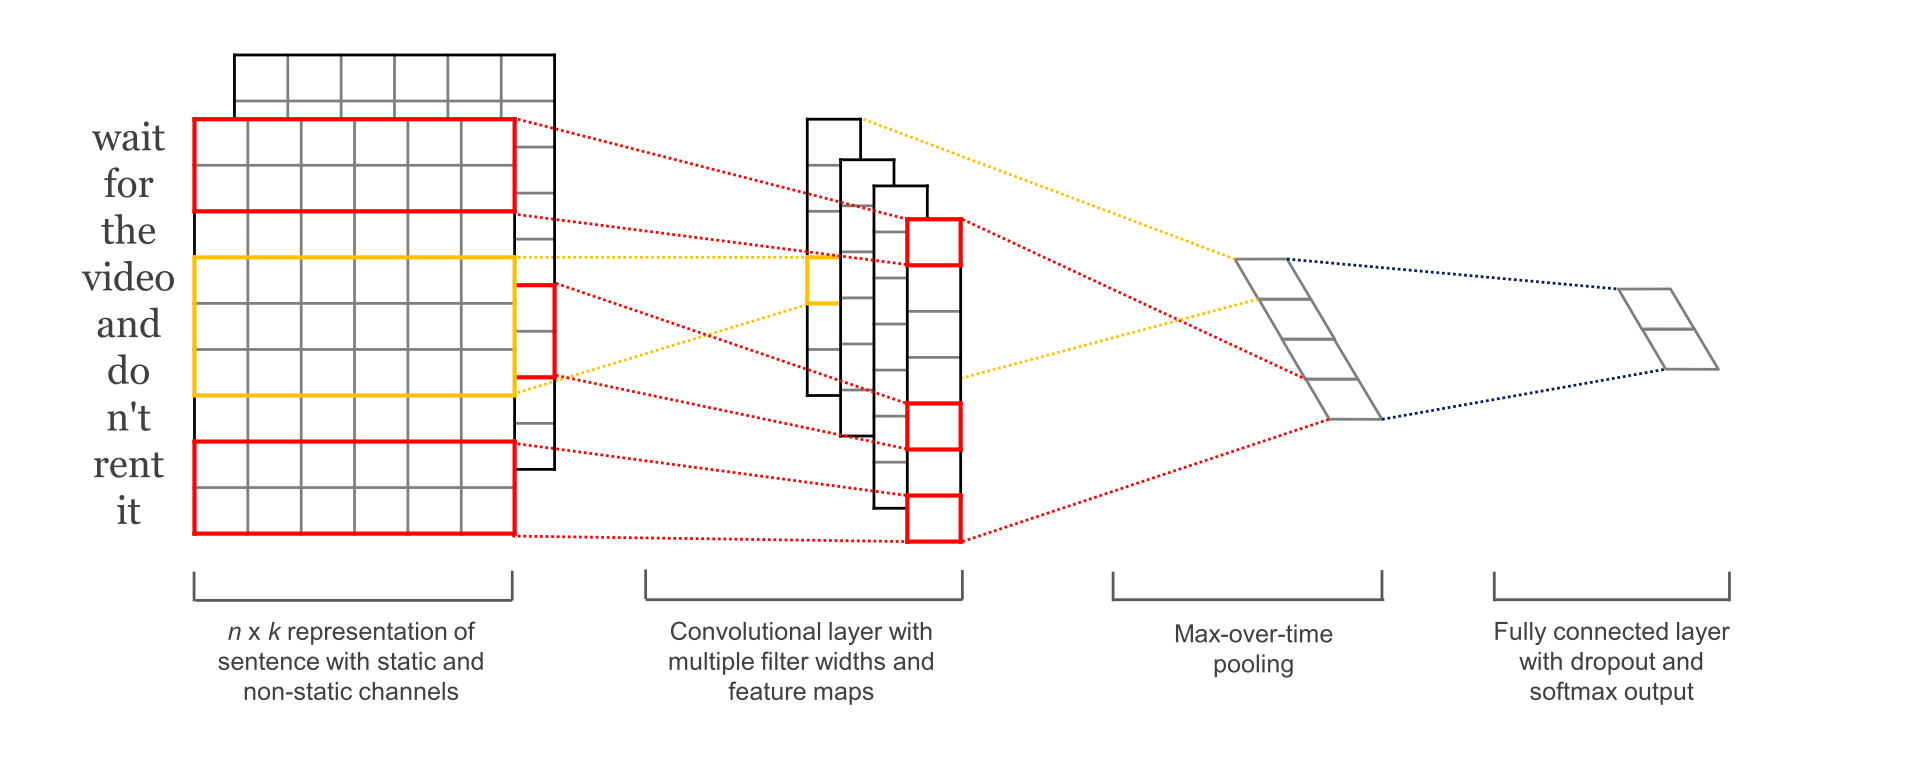
这个图已经画的相当6了。
第一层词嵌入,用word2vec把词语映射为128维的向量。第二层是卷积层,这个卷积层比较特别,用了多个过滤器的大小。例如,每次分别划分3,4或5个字词;第三层,池化层,在这里采用的最大池化,并将所有卷积层的结果放在一个长的特征向量上,然后加上dropout正则,最后用softmax输出结果。
下面是代码实现。
为了更好的处理超参数,我们把代码都放在一个TextCNN类里面:
import tensorflow as tf
import numpy as np

class TextCNN(object):
    """
    A CNN for text classification.
    Uses an embedding layer, followed by a convolutional, max-pooling and softmax layer.
    """
    def __init__(
      self, sequence_length, num_classes, vocab_size,
      embedding_size, filter_sizes, num_filters):
        # Implementation...
sequence_length-句子的长度,59;
num_classes-分类的数目,2;
vocab_size-字典的长度;
embedding_size-我们映射的向量维度大小,128;
filter_sizes-卷积层过滤器的大小,[3, 4, 5];
num_filters-过滤器的深度。
1、输入
定义输入数据的placeholder和dropout。
# Placeholders for input, output and dropout

self.input_x=tf.placeholder(tf.int32[None,sequence_length], name="input_x")
self.input_y=tf.placeholder(tf.float32[None,num_classes], name="input_y")
self.dropout_keep_prob=tf.placeholder(tf.float32,name="dropout_keep_prob")
tf.placeholder相当于一个坑,等着填呢。第二个参数是tensor的shape,None表示这个维度可以是任意数。在样例中,第一个维度是批数据的大小,用None表示,可以是任意大小的批数据。
2、词嵌入层
with tf.device('/cpu:0'), tf.name_scope("embedding"):
    W = tf.Variable(
        tf.random_uniform([vocab_size, embedding_size], -1.0, 1.0),
        name="W")
    self.embedded_chars = tf.nn.embedding_lookup(W, self.input_x)
    self.embedded_chars_expanded = tf.expand_dims(self.embedded_chars, -1)
这里用的随机生成的vector。最后的tf.expand_dims()来扩充数据,生成[[None, sequence_length, embedding_size, 1]这种格式。因为TensorFlow的局基层conv2d需要一个4维的tensor(batch,width,height,channel)
3、卷积池化层
pooled_outputs = []
for i, filter_size in enumerate(filter_sizes):
    with tf.name_scope("conv-maxpool-%s" % filter_size):
        # Convolution Layer
        filter_shape = [filter_size, embedding_size, 1, num_filters]
        W = tf.Variable(tf.truncated_normal(filter_shape, stddev=0.1), name="W")
        b = tf.Variable(tf.constant(0.1, shape=[num_filters]), name="b")
        conv = tf.nn.conv2d(
            self.embedded_chars_expanded,
            W,
            strides=[1, 1, 1, 1],
            padding="VALID",
            name="conv")
        # Apply nonlinearity
        h = tf.nn.relu(tf.nn.bias_add(conv, b), name="relu")
        # Max-pooling over the outputs
        pooled = tf.nn.max_pool(
            h,
            ksize=[1, sequence_length - filter_size + 1, 1, 1],
            strides=[1, 1, 1, 1],
            padding='VALID',
            name="pool")
        pooled_outputs.append(pooled)

# Combine all the pooled features
num_filters_total = num_filters * len(filter_sizes)
self.h_pool = tf.concat(3, pooled_outputs)
self.h_pool_flat = tf.reshape(self.h_pool, [-1, num_filters_total])
我们先建立卷积层,然后是最大池化层。因为我们卷积层的过滤器选择了多个,所以我们需要对它们进行迭代,为每一个过滤器都建立一个layer,然后把结果汇聚到一个大的向量里。
这里需要说明的是,和图像不同的地方,就是我们文字不能跨行过滤,因为那样会没有意义。
4、设置dropout(训练时候用)
# Add dropout
with tf.name_scope("dropout"):
    self.h_drop = tf.nn.dropout(self.h_pool_flat, self.dropout_keep_prob)
5、评分和预测(最后的全连接层)
with tf.name_scope("output"):
    W = tf.Variable(tf.truncated_normal([num_filters_total, num_classes], stddev=0.1), name="W")
    b = tf.Variable(tf.constant(0.1, shape=[num_classes]), name="b")
    self.scores = tf.nn.xw_plus_b(self.h_drop, W, b, name="scores")
    self.predictions = tf.argmax(self.scores, 1, name="predictions")
6、设置损失函数和准确率计算
# Calculate mean cross-entropy loss
with tf.name_scope("loss"):
    losses = tf.nn.softmax_cross_entropy_with_logits(self.scores, self.input_y)
    self.loss = tf.reduce_mean(losses)
这里使用的交叉熵损失函数
# Calculate Accuracy
with tf.name_scope("accuracy"):
    correct_predictions = tf.equal(self.predictions, tf.argmax(self.input_y, 1))
    self.accuracy = tf.reduce_mean(tf.cast(correct_predictions, "float"), name="accuracy")
剩下的,按照常规步骤走就可以了。


 1576
1576

 被折叠的 条评论
为什么被折叠?
被折叠的 条评论
为什么被折叠?
 到【灌水乐园】发言


