


昨天看了一下这个控件,感觉特别方便,Google总算能像Apple那样愿意在安卓中加入一些比较省心好用的控件了。这个控件属于google官方的material design库中的控件,所以要先配置gradle
这是直接添加,然后就会在布局中出现3个tab,点击还有动画效果,非常的完美。
这段代码很简单,就是每次创建viewpager的一个页面的时候,我就在这个页面中间放一个Textview,内容来自于数组。 然后返回的标题也是从数组中取出来的元素。
compile 'com.android.support:design:22.2.0'这样就添加成功了。
然后在布局文件中写入全名
<android.support.design.widget.TabLayout
    android:id="@+id/tablayout"
    android:layout_width="match_parent"
    android:layout_height="wrap_content" />
这个东西相当于以前的tabhost,可以放在下面也可以放在上面,具体可以看我的这个文章: 将Tablayout放在布局的底部 不过他可比tabhost厉害多了,看看下面的东西:
TabLayout.Tab tab1 = tablayout.newTab().setText("table1");
        TabLayout.Tab tab2 = tablayout.newTab().setText("table2");
        TabLayout.Tab tab3 = tablayout.newTab().setText("table3");
        tablayout.addTab(tab1);
        tablayout.addTab(tab2);
        tablayout.addTab(tab3);
这是直接添加,然后就会在布局中出现3个tab,点击还有动画效果,非常的完美。
这个现在是没法用的,给大家看一个非常非常棒的功能,首先一看到这个我们想到的就是关联Viewpager,然后监听这两个控件的事件,然后进行相应的UI变化的处理,之前的项目都是这么做的,好麻烦,现在不用这么做了,给大家看一下这个控件的牛逼之处。
首先要在布局中添加一个viewpager,这是我最终的activity_main.xml
<LinearLayout xmlns:android="http://schemas.android.com/apk/res/android"
    xmlns:app="http://schemas.android.com/apk/res-auto"
    xmlns:tools="http://schemas.android.com/tools"
    android:layout_width="match_parent"
    android:layout_height="match_parent"
    android:orientation="vertical"
    tools:context=".MainActivity">

    <android.support.v7.widget.Toolbar
        android:id="@+id/toolbar"
        android:layout_width="match_parent"
        android:layout_height="wrap_content"
        android:background="#ff5722"
        android:minHeight="50dp"
        app:popupTheme="@style/ThemeOverlay.AppCompat.Light"
        app:theme="@style/ThemeOverlay.AppCompat.Dark.ActionBar"></android.support.v7.widget.Toolbar>


    <android.support.design.widget.TabLayout
        android:id="@+id/tablayout"
        android:layout_width="match_parent"
        android:layout_height="wrap_content" />

    <android.support.v4.view.ViewPager
        android:id="@+id/tab_vp"
        android:layout_width="match_parent"
        android:layout_height="0dp"
        android:layout_weight="1" />


    <Button
        android:id="@+id/button"
        android:layout_width="wrap_content"
        android:layout_height="wrap_content"
        android:layout_gravity="center|clip_vertical"
        android:paddingBottom="@dimen/activity_vertical_margin"
        android:paddingLeft="@dimen/activity_horizontal_margin"
        android:paddingRight="@dimen/activity_horizontal_margin"
        android:paddingTop="@dimen/activity_vertical_margin"
        android:text="@string/hello_world"
        android:textColor="#000"
        android:textSize="20sp" />


</LinearLayout>
既然要用viewpager,就要写一个viiewpager的适配器 TabPagerAdapter.java
package com.example.lenovo.myapplication.adapter;

import android.content.Context;
import android.support.v4.view.PagerAdapter;
import android.support.v4.view.ViewPager;
import android.view.Gravity;
import android.view.View;
import android.view.ViewGroup;
import android.widget.TextView;

/**
 * Created by Lenovo on 2015-08-22.
 */
public class TabPagerAdapter extends PagerAdapter {

    private String[] mdata;
    private Context mcontext;
    public TabPagerAdapter(String[] data,Context Context){
        mdata=data;
        mcontext=Context;
    }

    @Override
    public int getCount() {
        return mdata.length;
    }

    @Override
    public boolean isViewFromObject(View view, Object object) {
        return view==object;
    }

    @Override
    public Object instantiateItem(ViewGroup container, int position) {
        TextView tvContent = new TextView(mcontext);
        tvContent.setText(mdata[position]);
        tvContent.setGravity(Gravity.CENTER);
        container.addView(tvContent,
                ViewPager.LayoutParams.MATCH_PARENT, ViewPager.LayoutParams.WRAP_CONTENT);
        return tvContent;    }

    @Override
    public void destroyItem(ViewGroup container, int position, Object object) {
//        super.destroyItem(container, position, object);
        container.removeView((View) object);
    }

    @Override
    public CharSequence getPageTitle(int position) {
        return mdata[position];
    }
}
这段代码很简单,就是每次创建viewpager的一个页面的时候,我就在这个页面中间放一个Textview,内容来自于数组。 然后返回的标题也是从数组中取出来的元素。
在Mainactivity.java文件中,我们只需几个很简单的步骤就可以使用了
首先 声明
private TabLayout tablayout;
private ViewPager viewpager;
接下来就是findview
tablayout = (TabLayout) findViewById(R.id.tablayout);
viewpager= (ViewPager) findViewById(R.id.tab_vp);
在接下来就要注意了,这里设置滑动模式是为了在tab特别多的情况下,不会被挤压。
//viewpager的适配器
TabPagerAdapter adapter=new TabPagerAdapter(DATA,this);

//设置tablayout为滑动模式
tablayout.setTabMode(TabLayout.MODE_SCROLLABLE);
很简单
//设置viewpager的适配器
viewpager.setAdapter(adapter);
//给tablayout设置viewpager
tablayout.setupWithViewPager(viewpager);
大功告成,就这么几行代码,给大家看一下运行效果
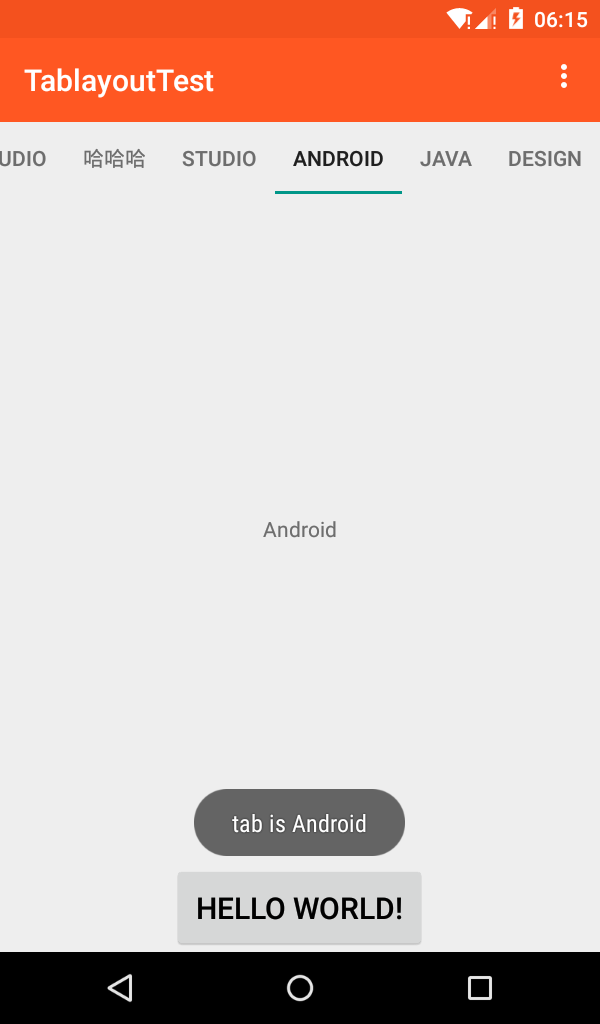
本来要上传gif的,后来一直没有录制成功,就先在这里展示一些截图。


 4768
4768


 被折叠的 条评论
为什么被折叠?
被折叠的 条评论
为什么被折叠?
 到【灌水乐园】发言


