


一、前言
Transformer原本主要应用于NLP领域。2020年一篇文章An Image is Worth 16x16 Words: Transformers for Image Recognition at Scale横空出世,将NLP领域的Transformer借鉴到CV领域,即ViT(Vision Transformer),在多个视觉任务中取得了成功。个人觉得,要想透彻理解ViT,根源还是在代码上。因此,本文在这个pytorch源码的基础上,对ViT作一点分享。希望大家批评指正!如果感觉有帮助,请点赞收藏!
二、原理理解
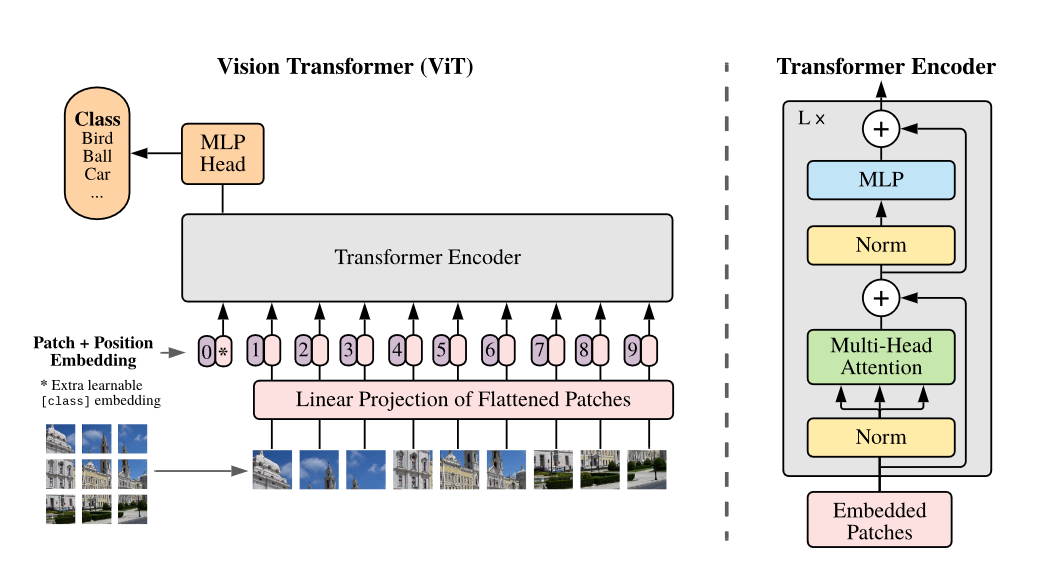
从架构图可以看出,ViT主要步骤如下:
- Patch Embedding:首先,对原始输入图像作切块处理。假设输入的图像大小为224×224,我们将图像切成一个个固定大小为16×16的方块,每一个小方块就是一个patch,那么每张图像中patch的个数为(224×224)/(16×16) = 196个。切块后,我们得到了196个[16, 16, 3]的patch,我们把这些patch送入Linear Projection of Flattened Patches(Embedding层),这个层的作用是将输入序列展平。所以输出后也有196个token,每个token的维度经过展平后为16×16×3 = 768,所以输出的维度为[196, 768]。不难看出,Patch Embedding的作用是将一个CV问题通过切块和展平转化为一个NLP问题。
- Position Embedding: 我们知道,图像的每个patch和文本一样,也有先后顺序,是不能随意打乱的,所以我们需要再给每个token添加位置信息。类比BERT模型,我们还需要添加一个特殊字符class token。那么,最终要输入到Transformer Encoder的序列维度为[197, 768]。Position Embedding的作用是添加位置信息。
- Transformer Encoder:将维度为[197, 768]的序列输入到标准的Transformer Encoder中。
- MLP Head:Transformer Encoder的输出其实也是一个序列,但是在ViT模型中只使用了class token的输出,将其送入MLP模块中,最终输出分类结果。MLP Head的作用是用于最终的分类。
说完了上面的步骤,我们来看一个动图辅助理解:

三、代码详解
1.Patch Embedding
在实际代码实现中,反而没有上面步骤1那么复杂,我们只需通过卷积和展平操作即可实现Patch Embedding。使用卷积核大小为16×16,步长(stride)为16,卷积核个数为768,卷积后再展平,size变化为:[224, 224, 3] -> [14, 14, 768] -> [196, 768]。
代码如下:
class PatchEmbed(nn.Module):
    """
    对2D图像作Patch Embedding操作
    """
    def __int__(self, img_size=224, patch_size=16, in_c=3, embed_dim=768, norm_layer=None):
        """
        此函数用于初始化相关参数
        :param img_size: 输入图像的大小
        :param patch_size: 一个patch的大小
        :param in_c: 输入图像的通道数
        :param embed_dim: 输出的每个token的维度
        :param norm_layer: 指定归一化方式,默认为None
        """
        super().__init__()
        img_size = (img_size, img_size)  # 224 -> (224, 224)
        patch_size = (patch_size, patch_size)  # 16 -> (16, 16)
        self.img_size = img_size
        self.patch_size = patch_size
        self.grid_size = (img_size[0] // patch_size[0], img_size[1] // img_size[1])  # 计算原始图像被划分为(14, 14)个小块
        self.num_patches = self.grid_size[0] * self.grid_size[1]  # 计算patch的个数为14*14=196个
        # 定义卷积层
        self.proj = nn.Conv2d(in_channels=in_c, out_channels=embed_dim, kernel_size=patch_size, stride=patch_size)
        # 定义归一化方式
        self.norm = norm_layer(embed_dim) if norm_layer else nn.Identity()

    def forward(self, x):
        """
        此函数用于前向传播
        :param x: 原始图像
        :return: 处理后的图像
        """
        B, C, H, W = x.shape
        # 检查图像高宽和预先设定是否一致,不一致则报错
        assert H == self.img_size[0] and W == self.img_size[1], \
            f"Input image size ({H}*{W}) doesn't match model ({self.img_size[0]}*{self.img_size[1]})."
        # 对图像依次作卷积、展平和调换处理: [B, C, H, W] -> [B, C, HW] -> [B, HW, C]
        x = self.proj(x).flatten(2).transpose(1, 2)
        # 归一化处理
        x = self.norm(x)
        return x
2.Transformer Encoder
下面这段代码是Transformer Encoder中Attention类,用于实现红框中的部分:

class Attention(nn.Module)
    def __int__(self,
                dim,
                num_heads=8,
                qkv_bias=False,
                qk_scale=None,
                attn_drop_ratio=0.,
                proj_drop_ratio=0.):
        """
        此函数用于初始化相关参数
        :param dim: 输入token的维度
        :param num_heads: 注意力多头数量
        :param qkv_bias: 是否使用偏置,默认False
        :param qk_scale: 缩放因子
        :param attn_drop_ratio: 注意力的比例
        :param proj_drop_ratio: 投影的比例
        """
        super(Attention, self).__init__()
        self.num_heads = num_heads
        head_dim = dim // num_heads  # 计算每一个头的维度
        self.scale = qk_scale or head_dim ** -0.5  # 得到根号d_k分之一的值
        self.qkv = nn.Linear(dim, dim * 3, bias=qkv_bias)  # 通过全连接层生成得到qkv
        self.attn_drop = nn.Dropout(attn_drop_ratio)
        self.proj = nn.Linear(dim, dim)
        self.proj_drop = nn.Dropout(proj_drop_ratio)

    def forward(self, x):
        """
        此函数用于前向传播
        :param x: 输入序列
        :return: 处理后的序列
        """
        # [batch_size, num_patches + 1, total_embed_dim]
        B, N, C = x.shape

        # qkv(): -> [batch_size, num_patches + 1, 3 * total_embed_dim]
        # reshape: -> [batch_size, num_patches + 1, 3, num_heads, embed_dim_per_head]
        # permute: -> [3, batch_size, num_heads, num_patches + 1, embed_dim_per_head]
        qkv = self.qkv(x).reshape(B, N, 3, self.num_heads, C // self.num_heads).permute(2, 0, 3, 1, 4)
        # [batch_size, num_heads, num_patches + 1, embed_dim_per_head]
        q, k, v = qkv[0], qkv[1], qkv[2]

        # transpose: -> [batch_size, num_heads, embed_dim_per_head, num_patches + 1]
        # @: multiply -> [batch_size, num_heads, num_patches + 1, num_patches + 1]
        attn = (q @ k.transpose(-2, -1)) * self.scale
        attn = attn.softmax(dim=-1)
        attn = self.attn_drop(attn)

        # @: multiply -> [batch_size, num_heads, num_patches + 1, embed_dim_per_head]
        # transpose: -> [batch_size, num_patches + 1, num_heads, embed_dim_per_head]
        # reshape: -> [batch_size, num_patches + 1, total_embed_dim]
        x = (attn @ v).transpose(1, 2).reshape(B, N, C)
        x = self.proj(x)
        x = self.proj_drop(x)
        return x
下面一段代码是Transformer Encoder中Mlp类,用于实现用于实现红框中的部分:

class Mlp(nn.Module):
    def __init__(self, in_features, hidden_features=None, out_features=None, act_layer=nn.GELU, drop=0.):
        super().__init__()
        out_features = out_features or in_features
        hidden_features = hidden_features or in_features
        self.fc1 = nn.Linear(in_features, hidden_features)
        self.act = act_layer()
        self.fc2 = nn.Linear(hidden_features, out_features)
        self.drop = nn.Dropout(drop)

    def forward(self, x):
        x = self.fc1(x)
        x = self.act(x)
        x = self.drop(x)
        x = self.fc2(x)
        x = self.drop(x)
        return x
最后,我们利用Block类实现了Transformer Encoder,其中用到了上面两个Attention和Mlp类:

class Block(nn.Module):
    def __init__(self,
                 dim,
                 num_heads,
                 mlp_ratio=4.,
                 qkv_bias=False,
                 qk_scale=None,
                 drop_ratio=0.,
                 attn_drop_ratio=0.,
                 drop_path_ratio=0.,
                 act_layer=nn.GELU,
                 norm_layer=nn.LayerNorm):
        super(Block, self).__init__()
        self.norm1 = norm_layer(dim)
        self.attn = Attention(dim, num_heads=num_heads, qkv_bias=qkv_bias, qk_scale=qk_scale,
                              attn_drop_ratio=attn_drop_ratio, proj_drop_ratio=drop_ratio)
        # NOTE: drop path for stochastic depth, we shall see if this is better than dropout here
        self.drop_path = DropPath(drop_path_ratio) if drop_path_ratio > 0. else nn.Identity()
        self.norm2 = norm_layer(dim)
        mlp_hidden_dim = int(dim * mlp_ratio)
        self.mlp = Mlp(in_features=dim, hidden_features=mlp_hidden_dim, act_layer=act_layer, drop=drop_ratio)

    def forward(self, x):
        x = x + self.drop_path(self.attn(self.norm1(x)))
        x = x + self.drop_path(self.mlp(self.norm2(x)))
        return x
3.VisionTransformer
讲解了前面几个重要的模块源码后,下面我们就可以实现Vision Transformer整个架构了,代码的流程和ViT架构图也是一致的:
class VisionTransformer(nn.Module):
    def __init__(self, img_size=224, patch_size=16, in_c=3, num_classes=1000,
                 embed_dim=768, depth=12, num_heads=12, mlp_ratio=4.0, qkv_bias=True,
                 qk_scale=None, representation_size=None, distilled=False, drop_ratio=0.,
                 attn_drop_ratio=0., drop_path_ratio=0., embed_layer=PatchEmbed, norm_layer=None,
                 act_layer=None):
        super(VisionTransformer, self).__init__()
        self.num_classes = num_classes
        self.num_features = self.embed_dim = embed_dim  # num_features for consistency with other models
        self.num_tokens = 2 if distilled else 1
        norm_layer = norm_layer or partial(nn.LayerNorm, eps=1e-6)
        act_layer = act_layer or nn.GELU

        self.patch_embed = embed_layer(img_size=img_size, patch_size=patch_size, in_c=in_c, embed_dim=embed_dim)
        num_patches = self.patch_embed.num_patches

        self.cls_token = nn.Parameter(torch.zeros(1, 1, embed_dim))
        self.dist_token = nn.Parameter(torch.zeros(1, 1, embed_dim)) if distilled else None
        self.pos_embed = nn.Parameter(torch.zeros(1, num_patches + self.num_tokens, embed_dim))
        self.pos_drop = nn.Dropout(p=drop_ratio)

        dpr = [x.item() for x in torch.linspace(0, drop_path_ratio, depth)]  # stochastic depth decay rule
        self.blocks = nn.Sequential(*[
            Block(dim=embed_dim, num_heads=num_heads, mlp_ratio=mlp_ratio, qkv_bias=qkv_bias, qk_scale=qk_scale,
                  drop_ratio=drop_ratio, attn_drop_ratio=attn_drop_ratio, drop_path_ratio=dpr[i],
                  norm_layer=norm_layer, act_layer=act_layer)
            for i in range(depth)
        ])
        self.norm = norm_layer(embed_dim)

        # Representation layer
        if representation_size and not distilled:
            self.has_logits = True
            self.num_features = representation_size
            self.pre_logits = nn.Sequential(OrderedDict([
                ("fc", nn.Linear(embed_dim, representation_size)),
                ("act", nn.Tanh())
            ]))
        else:
            self.has_logits = False
            self.pre_logits = nn.Identity()

        # Classifier head(s)
        self.head = nn.Linear(self.num_features, num_classes) if num_classes > 0 else nn.Identity()
        self.head_dist = None
        if distilled:
            self.head_dist = nn.Linear(self.embed_dim, self.num_classes) if num_classes > 0 else nn.Identity()

        # Weight init
        nn.init.trunc_normal_(self.pos_embed, std=0.02)
        if self.dist_token is not None:
            nn.init.trunc_normal_(self.dist_token, std=0.02)

        nn.init.trunc_normal_(self.cls_token, std=0.02)
        self.apply(_init_vit_weights)

    def forward_features(self, x):
        # [B, C, H, W] -> [B, num_patches, embed_dim]
        x = self.patch_embed(x)  # [B, 196, 768]
        # [1, 1, 768] -> [B, 1, 768]
        cls_token = self.cls_token.expand(x.shape[0], -1, -1)
        if self.dist_token is None:
            x = torch.cat((cls_token, x), dim=1)  # [B, 197, 768]
        else:
            x = torch.cat((cls_token, self.dist_token.expand(x.shape[0], -1, -1), x), dim=1)

        x = self.pos_drop(x + self.pos_embed)
        x = self.blocks(x)
        x = self.norm(x)
        if self.dist_token is None:
            return self.pre_logits(x[:, 0])
        else:
            return x[:, 0], x[:, 1]

    def forward(self, x):
        x = self.forward_features(x)
        if self.head_dist is not None:
            x, x_dist = self.head(x[0]), self.head_dist(x[1])
            if self.training and not torch.jit.is_scripting():
                # during inference, return the average of both classifier predictions
                return x, x_dist
            else:
                return (x + x_dist) / 2
        else:
            x = self.head(x)
        return x
四、总结
ViT模型的主要思想是将输入图像分成多个小块,然后将每个小块转换为一个向量,最终将这些向量拼接起来形成一个序列。模型的核心部分是多层 Transformer 编码器,其中每个编码器包含一个多头自注意力机制和一个全连接前馈网络。模型的输出是一个分类器的输出。需要注意的是,上述的代码仅选取了模型中的关键部分,全部的代码可以在下面的参考文献中找到。
参考文献
1.ViT(Vision Transformer)解析:https://zhuanlan.zhihu.com/p/445122996
2. 全网最强ViT (Vision Transformer)原理及代码解析:https://zhuanlan.zhihu.com/p/427388113
3. 使用pytorch搭建Vision Transformer(vit)模型:https://b23.tv/ghNqAgU
4. Visual Transformer (ViT)模型结构以及原理解析:https://www.jianshu.com/p/d4bc4f540c62
5. 参考代码:https://github.com/WZMIAOMIAO/deep-learning-for-image-processing/tree/master/pytorch_classification/vision_transformer


 1230
1230


 被折叠的 条评论
为什么被折叠?
被折叠的 条评论
为什么被折叠?
 到【灌水乐园】发言


