目标检测中的mAP计算(包括代码)

0x00 基本概念

在说明mAP这个概念之前,我们先要说一下两个新的概念:precisionrecall。这是论文中经常提及的两个概念。我们举这样的一个例子:

我们现在有一个检测的任务,但是这个任务数据中包含了。那么我们这个时候就有一个问题,我们怎么描述一个物体被检测出来呢?为此,我们引入了IOU这个概念

目标检测中的IOU计算问题

我们规定IOU > 0.5表示物体被检测出来,否则没有。

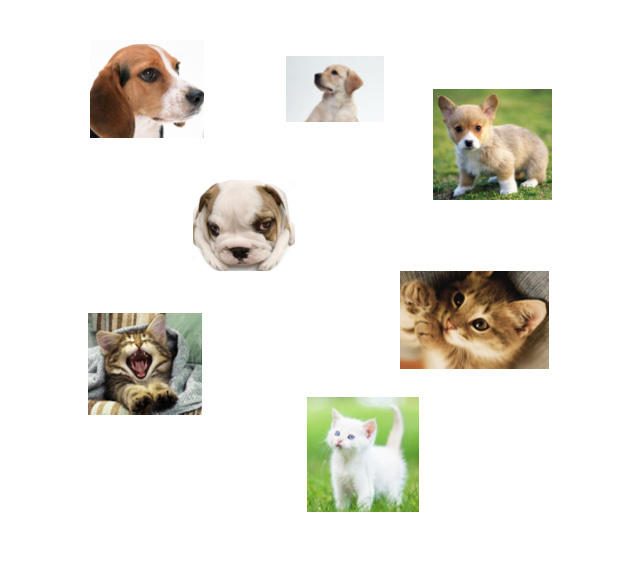
现在我们有了这个指标,我们开始跑数据。假设我们已经把网络训练好了,接着找来一张图片测试(这张图片上有四个和三只),测试结果这样的(我们的目标是找图片中的

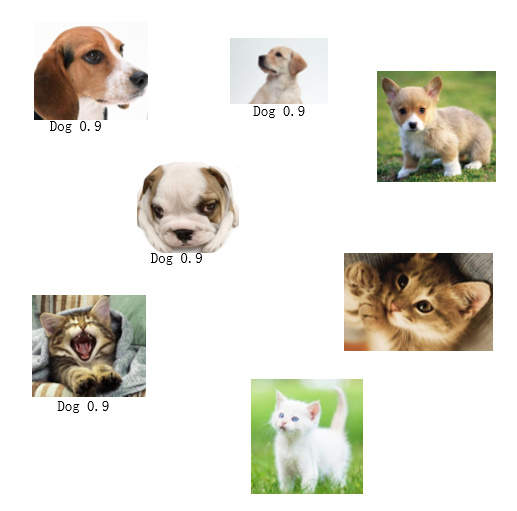
标注的数字表示IOU值,我们只选择IOU > 0.5的物体。

那么,这个时候问题又出现了,我们怎么描述我们检测的结果怎么样呢?这个时候就出现了precisionrecall。我们先不急着说明这两个概念是什么,我们先看上面的结果,我们发现,我们要找的目标是,结果查找的目标中有,这显然不是我们希望看到的。我们希望通过一个指标去描述这个问题,所以我们提出了precisionprecision是描述查找一个目标的精准率。我们还发现一个问题,就是我们漏找了,明明右上角是一只,结果没有找出来,为了表述这个问题,所以我们提出recallrecall是描述查找一个目标的漏检率,recall很多地方翻译为召回率,我更喜欢称它为漏检率或查全率。
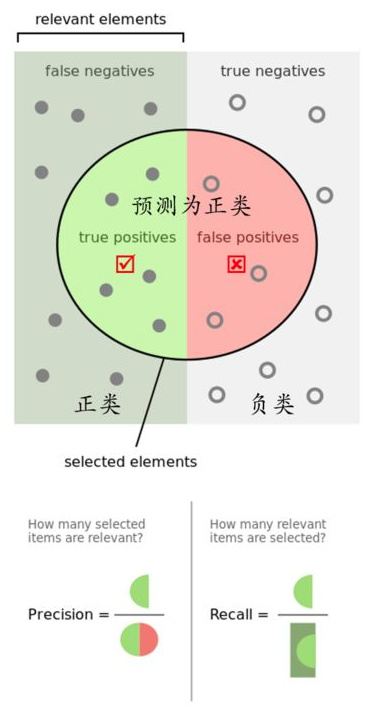
我们将被正确识别的,称为True positives。我们将被正确识别的称为True negatives。为什么会有这个概念?什么是被正确识别的?我们知道我们这里的目标是找,那么那些我们没有标注的,是不是从反向说明我们的查找准确率(precision)呢?接着,我们定义被错误识别为False positives。被错误识别为称为False negatives(就是右上角的狗,受IOU指标影响)。这些概念很重要,不要记错了!!!

接着我们就定义

  • p r e c i s i o n = T r u e p o s i t i v e s T r u e p o s i t i v e s + F a l s e p o s i t i v e s precision=\frac{True positives}{True positives+False positives} precision=Truepositives+FalsepositivesTruepositives
  • r e c a l l = T r u e p o s i t i v e s T r u e p o s i t i v e s + F a l s e n e g a t i v e s recall=\frac{Truepositives}{Truepositives+Falsenegatives} recall=Truepositives+FalsenegativesTruepositives

我们就很容易的计算出这里的 p r e c i s i o n = 3 4 precision=\frac{3}{4} precision=43 r e c a l l = 3 4 recall=\frac{3}{4} recall=43 。最后说一点,如果我们把IOU标准设置为IOU > 0的话,这个时候的recall会越来越接近于1,而相应的precision也会降低,这很容易理解。

另外还有一个概念accuracy

  • a c c u r a c y = T r u e p o s i t i v e s + T r u e n e g a t i v e s T r u e p o s i t i v e s + F a l s e n e g a t i v e s + T r u e n e g a t i v e s + F a l s e p o s i t i v e s accuracy=\frac{Truepositives+Truenegatives}{Truepositives+Falsenegatives+Truenegatives+Falsepositives} accuracy=Truepositives+Falsenegatives+Truenegatives+FalsepositivesTruepositives+Truenegatives

我们这里很容易计算出 a c c u r a c y = 3 + 1 3 + 1 + 2 + 1 = 4 7 accuracy=\frac{3+1}{3+1+2+1}=\frac{4}{7} accuracy=3+1+2+13+1=74。最后放一张很经典的图片

0x01 代码

我们这里使用的评估脚本是按照VOC数据集的标准来的,预测结果按如下格式:

  • <image identifier> <confidence> <left> <top> <right> <buttom>

VOC数据集总共有20类,也就是说,我们最后要得到20个结果文件。例如,对于car,输出结果

comp3_det_test_car.txt:
	000004 0.702732 89 112 516 466

得到这些文件后,我们可以通过以下脚本,计算对应的mAP

GitHub forks

我这里简单提一下脚本中的AP计算问题

def voc_ap(rec, prec, use_07_metric=False):
    if use_07_metric:
        # 11 point metric
        ap = 0.
        for t in np.arange(0., 1.1, 0.1):
            if np.sum(rec >= t) == 0:
                p = 0
            else:
                p = np.max(prec[rec >= t])
            ap = ap + p / 11.
    else:
        mrec = np.concatenate(([0.], rec, [1.]))
        mpre = np.concatenate(([0.], prec, [0.]))
        for i in range(mpre.size - 1, 0, -1):
            mpre[i - 1] = np.maximum(mpre[i - 1], mpre[i])
        i = np.where(mrec[1:] != mrec[:-1])[0]
        ap = np.sum((mrec[i + 1] - mrec[i]) * mpre[i + 1])
    return ap

我们注意到这里的AP计算有两种

  • 11点插值法,这个算法的思路很简单。就是选取0,0.1,0.2…1,这样的11个点,分别对应不同的recall级别,根据不同的级别计算最大precision,然后求出它的平均值。
  • 第二种就是我们文中提到的方法

reference:

The PASCAL Visual Object Classes Challenge (VOC2007)

如有任何问题,希望大家指出,谢谢O(∩_∩)O

目标检测计算机视觉领域的一个重要任务,它的目标是在图像或视频准确地识别和定位特定对象。Python提供了许多强大的库和框架来实现目标检测,其最流行的是OpenCV和TensorFlow Object Detection API。 1. OpenCV:OpenCV是一个广泛使用的计算机视觉库,它提供了许多用于图像处理和分析的函数和工具。在OpenCV,可以使用Haar级联分类器或基于特征的级联分类器(HOG)来进行目标检测。以下是一个使用OpenCV进行目标检测的示例代码: ```python import cv2 # 加载分类器 cascade_path = 'path/to/haarcascade_frontalface_default.xml' face_cascade = cv2.CascadeClassifier(cascade_path) # 加载图像 image_path = 'path/to/image.jpg' image = cv2.imread(image_path) # 转换为灰度图像 gray = cv2.cvtColor(image, cv2.COLOR_BGR2GRAY) # 目标检测 faces = face_cascade.detectMultiScale(gray, scaleFactor=1.1, minNeighbors=5, minSize=(30, 30)) # 绘制边界框 for (x, y, w, h) in faces: cv2.rectangle(image, (x, y), (x+w, y+h), (0, 255, 0), 2) # 显示结果 cv2.imshow('Detected Faces', image) cv2.waitKey(0) cv2.destroyAllWindows() ``` 2. TensorFlow Object Detection API:TensorFlow Object Detection API是一个基于TensorFlow的开源框架,提供了训练和部署目标检测模型的工具和库。它支持多种目标检测算法,如Faster R-CNN、SSD和YOLO等。以下是一个使用TensorFlow Object Detection API进行目标检测的示例代码: ```python import tensorflow as tf from object_detection.utils import label_map_util from object_detection.utils import visualization_utils as vis_util import cv2 # 加载模型和标签映射 model_path = 'path/to/frozen_inference_graph.pb' label_map_path = 'path/to/label_map.pbtxt' num_classes = 90 detection_graph = tf.Graph() with detection_graph.as_default(): od_graph_def = tf.GraphDef() with tf.gfile.GFile(model_path, 'rb') as fid: serialized_graph = fid.read() od_graph_def.ParseFromString(serialized_graph) tf.import_graph_def(od_graph_def, name='') label_map = label_map_util.load_labelmap(label_map_path) categories = label_map_util.convert_label_map_to_categories(label_map, max_num_classes=num_classes, use_display_name=True) category_index = label_map_util.create_category_index(categories) # 加载图像 image_path = 'path/to/image.jpg' image = cv2.imread(image_path) image_expanded = np.expand_dims(image, axis=0) # 运行目标检测 with detection_graph.as_default(): with tf.Session(graph=detection_graph) as sess: # 获取输入和输出张量 image_tensor = detection_graph.get_tensor_by_name('image_tensor:0') boxes = detection_graph.get_tensor_by_name('detection_boxes:0') scores = detection_graph.get_tensor_by_name('detection_scores:0') classes = detection_graph.get_tensor_by_name('detection_classes:0') num_detections = detection_graph.get_tensor_by_name('num_detections:0') # 进行目标检测 (boxes, scores, classes, num_detections) = sess.run([boxes, scores, classes, num_detections], feed_dict={image_tensor: image_expanded}) # 可视化结果 vis_util.visualize_boxes_and_labels_on_image_array(image, np.squeeze(boxes), np.squeeze(classes).astype(np.int32), np.squeeze(scores), category_index, use_normalized_coordinates=True, line_thickness=8) # 显示结果 cv2.imshow('Detected Objects', image) cv2.waitKey(0) cv2.destroyAllWindows() ```
评论 16
添加红包

请填写红包祝福语或标题

红包个数最小为10个

红包金额最低5元

当前余额3.43前往充值 >
需支付:10.00
成就一亿技术人!
领取后你会自动成为博主和红包主的粉丝 规则
hope_wisdom
发出的红包
实付
使用余额支付
点击重新获取
扫码支付
钱包余额 0

抵扣说明:

1.余额是钱包充值的虚拟货币,按照1:1的比例进行支付金额的抵扣。
2.余额无法直接购买下载,可以购买VIP、付费专栏及课程。

余额充值