


tex中的一些小技巧
- 常用的数学宏包
- 让公式的label显示在正文中
- 数学论文中必不可少的三个宏包
- 在文章中画一条横线
- 给文字加上删除线
- 数学符号的字体
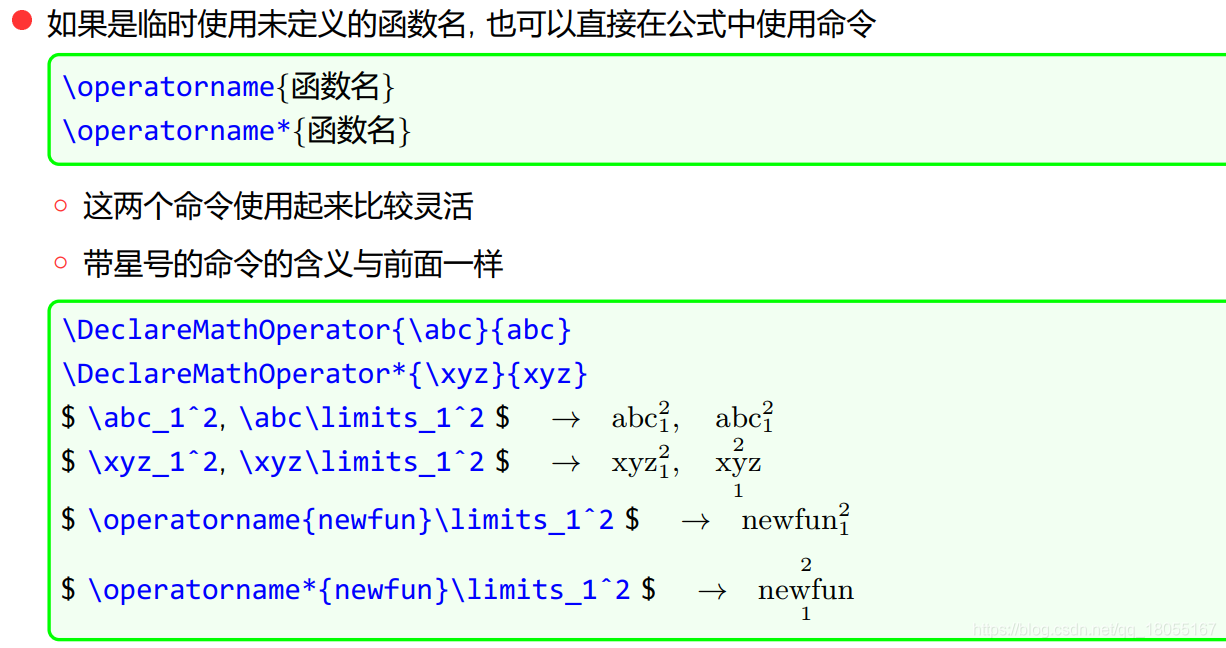
- 定义新的数学函数
- 带圈数字
- 长箭头
- 大括号公式
- 使数学公式自动换行
- 中文结构字体的设置
- 给公式加框
- 由一个tex文件中引用另一个tex文件的label
- 实现首行缩进
- 实现文本两端对齐
- 在tex中代码的环境
- 实现公式分页显示
- tex输入空行
- 让定理名称和内容换行现实
- 让公式中局部放大
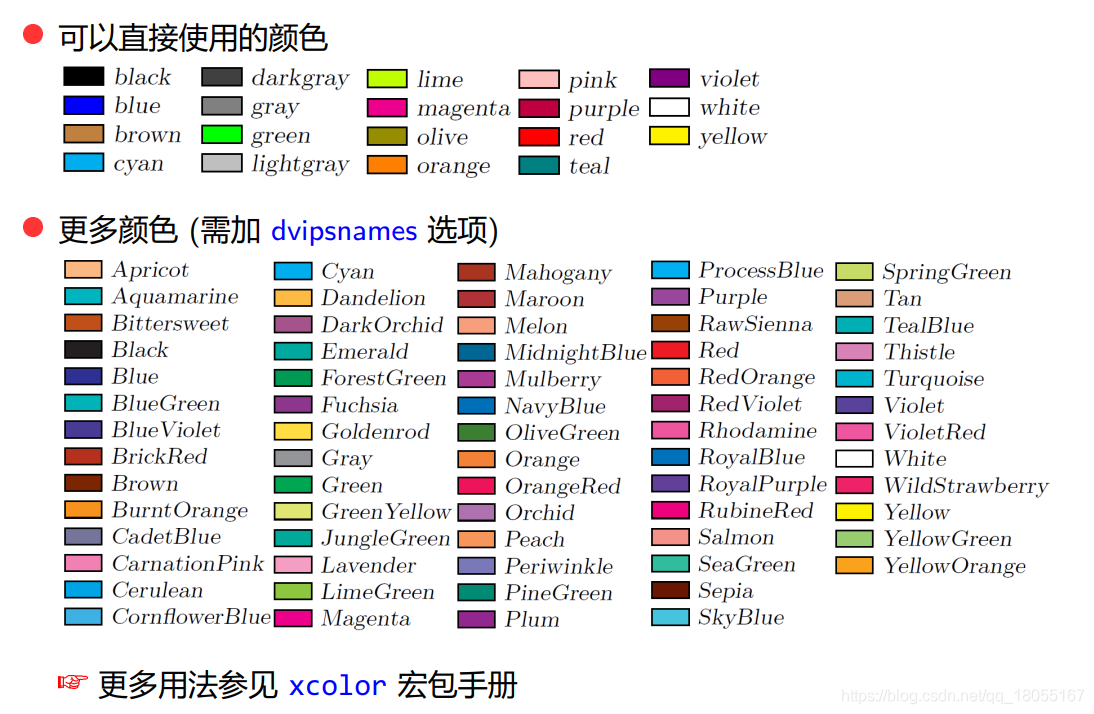
- xcolor宏包的使用方法
- 将公式局部着色
- 定义可插入目录的定理环境
- proof环境的定义
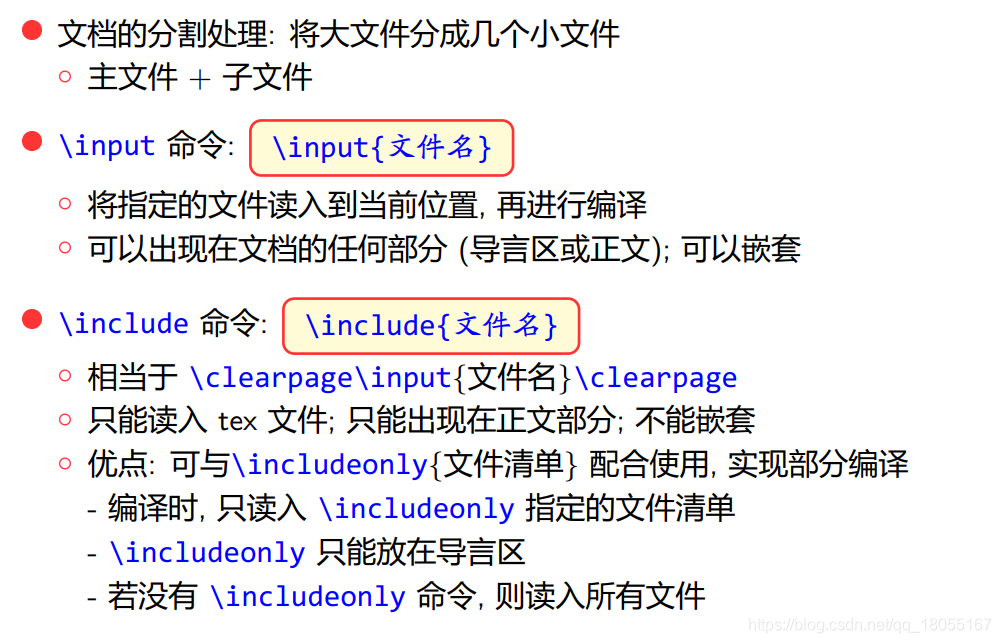
- \input和\include的使用方法
- 设置图片位置
- 多图片排列
- 设置四周边距
- 重新定义figure和table的名称和计数器
- align公式环境中的小细节
常用的数学宏包
\usepackage{amsmath}%基本的数学包
\usepackage{amsthm}%定理环境
\usepackage{amssymb}%更多的数学符号
让公式的label显示在正文中
在正文前面加入下面的宏包就可以了
\usepackage{showlabels}
数学论文中必不可少的三个宏包
amsmath:一般数学符号的宏包;
amssymb:特殊字体的数学字符宏包;
amsthm:提供数学的定理环境等
在文章中画一条横线
主要代码:
\rule[升高距离]{宽度}{高度}
举例:
\noindent\rule[0.25\baselineskip]{\textwidth}{1pt}
其中,\baselineskip是指行间距。
给文字加上删除线
对于英文来说:
在导言区中使用
\usepackage{ulem}
\normalem
然后在正文中使用
\sout{XXX}
对于中文来说使用宏包`usepackage{CJKulem}`
\sout{想加删除线的中文}
数学符号的字体
\usepackage{amsmath, amsthm}
\mathrm{R}
R
\mathrm{R}
R
\newcommand\diff{\,\mathrm{d}}
d
\mathrm{d}
d
\mathbb{R}
R
\mathbb{R}
R
\mathbf{R}
R
\mathbf{R}
R
\mathbf{x}
x
\mathbf{x}
x
\boldsymbol{x}
x
\boldsymbol{x}
x
\mathcal{R}
R
\mathcal{R}
R
\mathscr{R}
R
\mathscr{R}
R
\usepackage{bm} \bm{R}
R
\bm{R}
R
定义新的数学函数

带圈数字
tex中自带的命令\textcircled{数字}可以生成带圈数字,但是效果很差,如下所示:

另一种方法是利用pifont宏包,那里面有很漂亮的带圈的各种数字符号(仅限于阿拉伯数字, 如果想使用加圈的中文“一”至“九”就不行了)。在.tex 文件中尝试下列命令 :\ding{172}~\ding{211}。不过一个致命的缺点是,只提供1-10的带圈数字。详细可参考:https://jingyan.baidu.com/article/1709ad80df48c80735c4f052.html
第三种,比较好的方法是利用tikz宏包自己重写命令:
\usepackage{tikz}
\newcommand*{\circled}[1]{\lower.7ex\hbox{\tikz\draw (0pt, 0pt)%
    circle (.5em) node {\makebox[1em][c]{\small #1}};}}
效果如下:
可见在处理三位数的时候还得调整半径或者数字的大小。
其他一些方法可以参考:
https://blog.csdn.net/tsingke/article/details/105961016
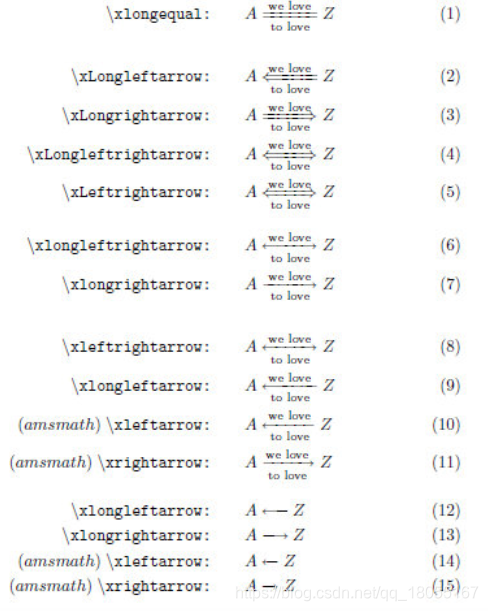
长箭头
\underrightarrow{contents}
c
o
n
t
e
n
t
s
→
\underrightarrow{contents}
contents
A\stackrel{\underleftrightarrow{contents}}{ }B
A
c
o
n
t
e
n
t
s
↔
B
A\stackrel{\underleftrightarrow{contents}}{ }B
A
contentsB
A\stackrel{\underrightarrow{contents}}{ }B
A
c
o
n
t
e
n
t
s
→
B
A\stackrel{\underrightarrow{contents}}{ }B
AcontentsB
A\stackrel{\underleftarrow{contents}}{ }B
A
c
o
n
t
e
n
t
s
←
B
A\stackrel{\underleftarrow{contents}}{ }B
AcontentsB
\rightarrow
→
\rightarrow
→
\longrightarrow
⟶
\longrightarrow
⟶
\Longrightarrow
⟹
\Longrightarrow
⟹
后来看了amsmath宏包的说明文档发现可以这样:
\xleftarrow[under]{above}
←
u
n
d
e
r
a
b
o
v
e
\xleftarrow[under]{above}
aboveunder
\xleftarrow[under]{above}
→
u
n
d
e
r
a
b
o
v
e
\xrightarrow[under]{above}
aboveunder
(amsmath) \xleftarrow:
(amsmath) \xrightarrow:
(amsmath) \xleftarrow:
(amsmath) \xrightarrow:
\usepackage{extarrows}中还包含下面的命令:
\xLongleftarrow:
\xLongrightarrow:
\xLongleftrightarrow:
\xLeftrightarrow:
\xlongleftrightarrow:
\xlongrightarrow:
\xleftrightarrow:
\xlongleftarrow:
\xlongleftarrow:
\xlongrightarrow:
大括号公式
%\usepackage{cases}
 \begin{numcases}{f(x)=}
 x+1\\
 x+2.
 \end{numcases}

如果在align环境中使用cases公式只会有个编号,也就是当作一个公式看待,而使用numcases是把公式当作多个看待。
使数学公式自动换行
\usepackage{breqn}%用于可以自动换行的数学公式环境
中文结构字体的设置
\renewcommand{\abstractname}{摘\quad 要}
\renewcommand{\contentsname}{目\hspace{2em}录}
\renewcommand{\figurename}{图}
\renewcommand{\tablename}{表}
\renewcommand{\partname}{部分}
\renewcommand{\listfigurename}{\bfseries 插图目录}
\renewcommand{\listtablename}{\bfseries 表格目录}
\renewcommand{\refname}{\bfseries 参考文献}
\renewcommand{\appendixname}{\bfseries 附\hspace{2em}录}
\renewcommand{\indexname}{\bfseries 索\hspace{2em}引}
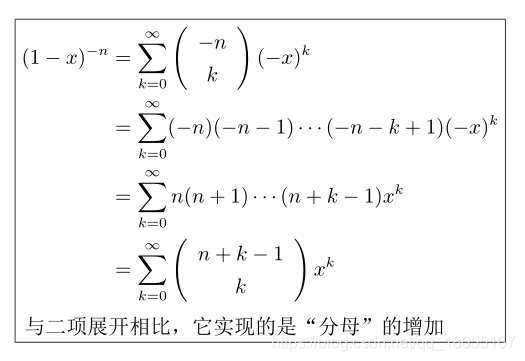
给公式加框
利用empheq宏包
\begin{empheq}[box=\fbox]{align*}
(1-x)^{-n}&=\sums^\infty_{k=0}\left(
\begin{array}{c}
-n \\
k \\
\end{array}
\right)(-x)^k\\
&=\sums^\infty_{k=0}(-n)(-n-1)\cdots(-n-k+1)(-x)^k\\
&=\sums^\infty_{k=0}n(n+1)\cdots(n+k-1)x^k\\
&=\sums^\infty_{k=0}\left(
\begin{array}{c}
n+k-1 \\
k \\
\end{array}
\right)x^k\\
&\text{\hspace{-1.5cm}与二项展开相比,它实现的是“分母”的增加}
\end{empheq}
效果:
由一个tex文件中引用另一个tex文件的label
例如引用test.tex文件中的label, 只需在头文件中加入
\usepackage{xr}
\externaldocument{test}
实现首行缩进
\usepackage{indentfirst}
\setlength{\parindent}{2em}
实现文本两端对齐
windit中提供了左右对齐的环境,对于两端对齐可以用这样的方法:
1.加入包\usepackage{ragged2e}
2.在需要对齐的文字前面添加\justifying
在tex中代码的环境
首先,需要在文件头中写入下面代码
\usepackage{listings}
 \lstset{language=R}%代码语言使用的是R
 \lstset{
     numbers=left,
     numberstyle= \tiny,
     keywordstyle= \color{ blue!70},
     commentstyle= \color{red!50!green!50!blue!50},
     frame=shadowbox, % 阴影效果
     rulesepcolor= \color{ red!20!green!20!blue!20} ,
     escapeinside=``, % 英文分号中可写入中文
     xleftmargin=2em,xrightmargin=2em, aboveskip=1em,
    framexleftmargin=2em
 }
 \lstset{breaklines}%自动将长的代码行换行排版
 \lstset{extendedchars=false}%解决代码跨页时,章节标题,页眉等汉字不显示的问题
其次,正文中按下面的方法写入代码
{\footnotesize%实际字体的调整
\begin{lstlisting}
    fit=lm(x~y)
    a=a+b
\end{lstlisting}
}
实现公式分页显示
只需在文件头中写入
\allowdisplaybreaks
tex输入空行
\viskp\baselineskip
\viskp\baselineskip
让定理名称和内容换行现实
需要使用宏包ntheorem, 但是它会和amsthm冲突
\usepackage{ntheorem}
\theoremstyle{break}
让公式中局部放大
{\small text}
{\tiny text}
{\large text}
以上这些命令可以让局部文本放大,但是不能让局部公式放大,但是\scalebox{2}{$a$}可以实现公式的局部放大,需要加载\usepackage{graphicx}。
语法:
\scalebox{水平缩放因子}[垂直缩放因子]{对象}
使用实例:
\begin{equation}
\scalebox{2}{$a$}+b=c
\end{equation}

xcolor宏包的使用方法
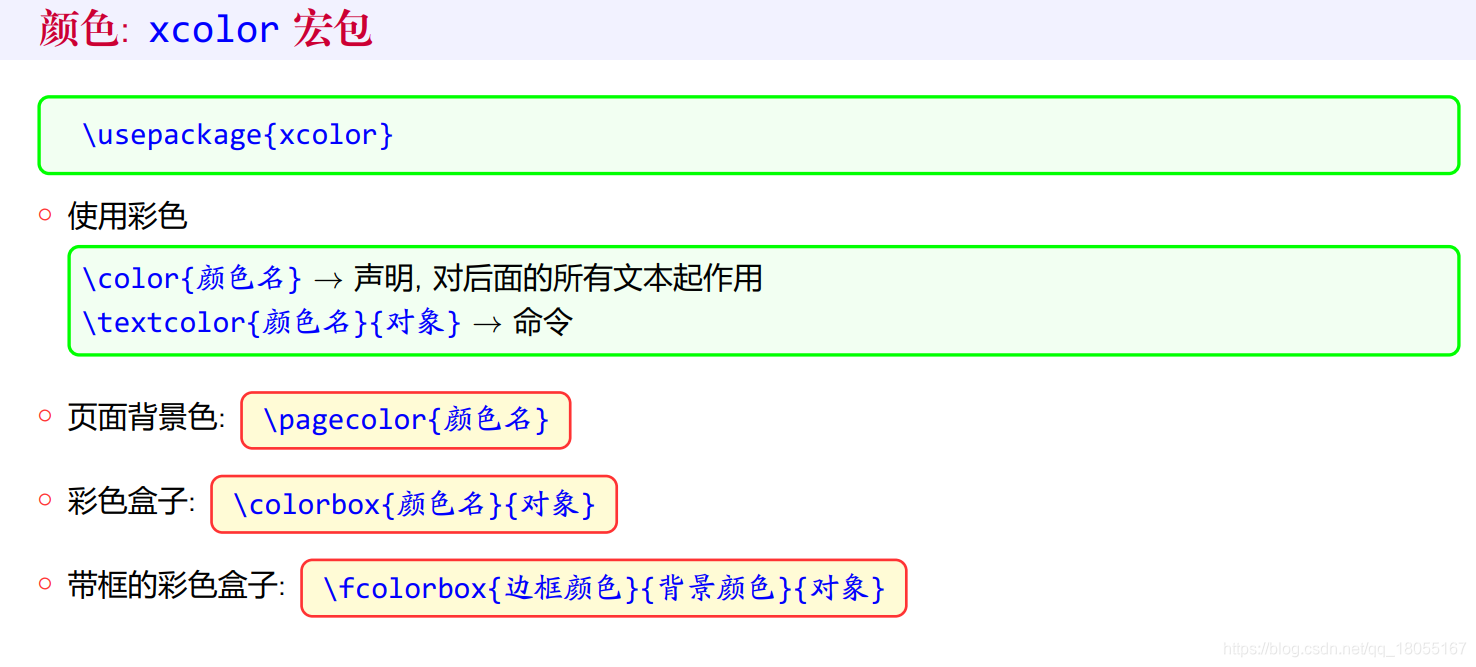
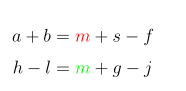
将公式局部着色
利用\textcolor{red}{text}或者\color{red}就可以实现,但是{}中不能有&,实例如下:
\begin{align}
a+b&=\textcolor{red}{m}+s-f\\
h-l&={\color{green}m}+g-j
\end{align}
定义可插入目录的定理环境
\newtheorem{thm}{Theorem}
\newenvironment{theorem}[1]{
\stepcounter{thm}
\phantomsection
\addcontentsline{toc}{subsection}{Theorem \thethm}
\addtocounter{thm}{-1}
\begin{thm}#1
}{
\end{thm}
}
proof环境的定义
\newenvironment{proof}{\par\textbf{Proof:~~}}{\par\hfill \ensuremath{\Box}\par}
\input和\include的使用方法
设置图片位置
%\usepackage{graphics}
\graphicspath{{figures/}}%讲图片路径设置为figure文件夹
\graphicspath{{pdf/}{png/}{jpg/}}%设置多个文件夹
多图片排列
%\usepackage{graphicx}
%\usepackage{caption,subcaption}(和subfigure会冲突)
\begin{figure}
\centering
\begin{subfigure}[t]{0.4\textwidth}
\includegraphics[width=\textwidth]{ddd.jpg}
\caption{pic1}
\label{1}
\end{subfigure}
\qquad
\begin{subfigure}[t]{0.4\textwidth}
\includegraphics[width=\textwidth]{ddd.jpg}
\caption{pic1}
\label{2}
\end{subfigure}
\begin{subfigure}[b]{0.4\textwidth}
\includegraphics[width=\textwidth]{ddd.jpg}
\caption{pic1}
\label{3}
\end{subfigure}
\qquad
\begin{subfigure}[b]{0.4\textwidth}
\includegraphics[width=\textwidth]{ddd.jpg}
\caption{pic1}
\label{4}
\end{subfigure}
\end{figure}
对齐选项:
- [t]:表示子图顶部对齐(top alignment)。
- [b]:表示子图底部对齐(bottom alignment)。
- [c]:表示子图居中对齐(center alignment)。
效果:

或者利用subfigure+minipage,或者只用minipage来实现,可参考:
https://blog.csdn.net/a6822342/article/details/80533135
https://blog.csdn.net/qq_39709535/article/details/126004197
设置四周边距
\usepackage[left=1cm, right=1cm,top=2cm, bottom=2cm]{geometry}
重新定义figure和table的名称和计数器
\renewcommand{\figurename}{Figure}
\renewcommand{\tablename}{Table}
\renewcommand{\thefigure}{R.\arabic{figure}}
\renewcommand{\thetable}{R.\arabic{table}}
align公式环境中的小细节
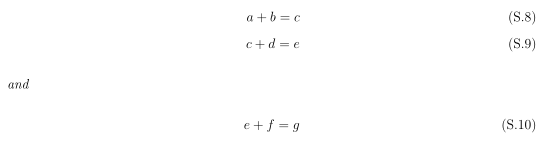
在公式中定格写入文本使用命令\intertext{XX}例如:
\begin{align}
a+b=c\\
c+d=e
\intertext{and}
e+f=g
\end{align}
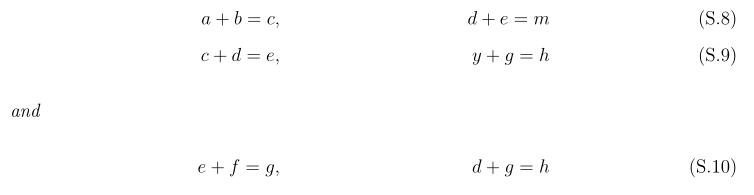
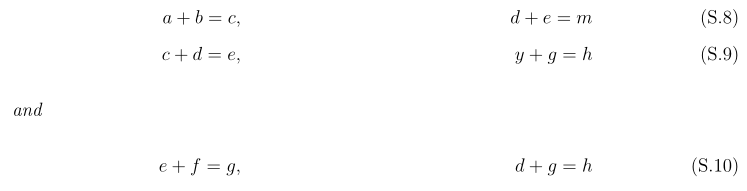
利用\minalignsep{XX}可以改变两列之间的距离,但是只能在原始的基础上进行增加,例如:
\renewcommand\minalignsep{0cm}
\begin{align}
a+b=c,&&d+e=m\\
c+d=e,&&y+g=h
\intertext{and}
e+f=g,&&d+g=h
\end{align}
\renewcommand\minalignsep{6cm}
\begin{align}
a+b=c,&&d+e=m\\
c+d=e,&&y+g=h
\intertext{and}
e+f=g,&&d+g=h
\end{align}


 857
857

 被折叠的 条评论
为什么被折叠?
被折叠的 条评论
为什么被折叠?
 到【灌水乐园】发言


