


模块创建
1.勾选SpringMVC与MySQL坐标
2.修改配置文件为yml格式
3.设置端口为80方便访问
实体类快速开发
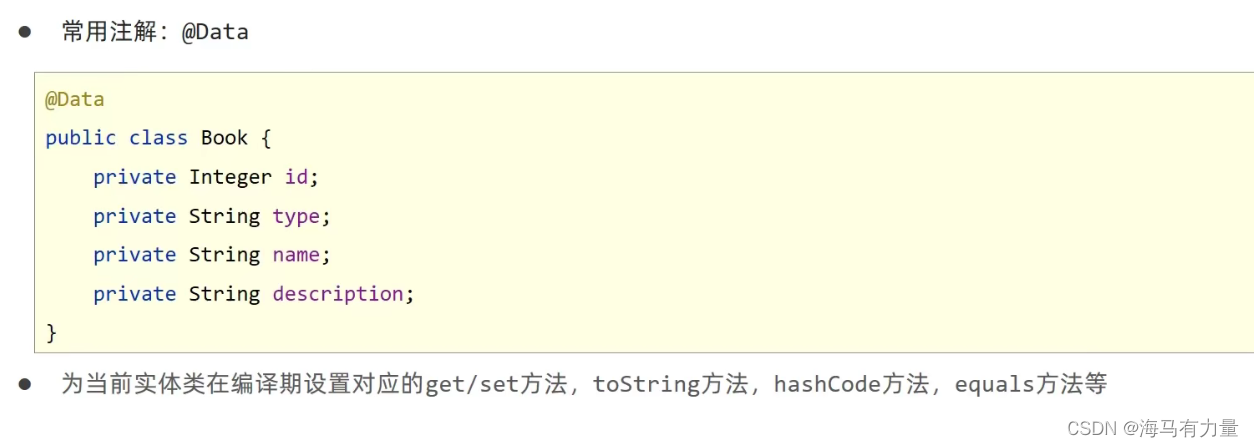
1.实体类制作
2.使用lombok简化开发
●导入lombok无需指定版本,由SpringBoot提供版本
●@Data注解
数据层
数据层标准开发(CRUD)
1.手工导入starter坐标(2个)
<dependency>
 <groupId>com.baomidou</groupId>
    <artifactId>mybatis-plus-boot-starter</artifactId>
    <version>3.4.2</version>
</dependency>
<dependency>
    <groupId>com.alibaba</groupId>
    <artifactId>druid-spring-boot-starter</artifactId>
    <version>1.2.6</version>
</dependency>
2.配置数据源与MyBatisPlus对应的配置
server:
  port: 80

spring:
  datasource:
    druid:
      driver-class-name: com.mysql.cj.jdbc.Driver
      url: jdbc:mysql://localhost:3306/test?characterEncoding=utf8&useSSL=false&serverTimezone=UTC&rewriteBatchedStatements=true
      username: root
      password: 123

mybatis-plus:
  global-config:
    db-config:
      id-type: auto
3.开发Dao接口( 继承BaseMapper )
@Mapper
@Repository
public interface BookDao extends BaseMapper<Book> {
}
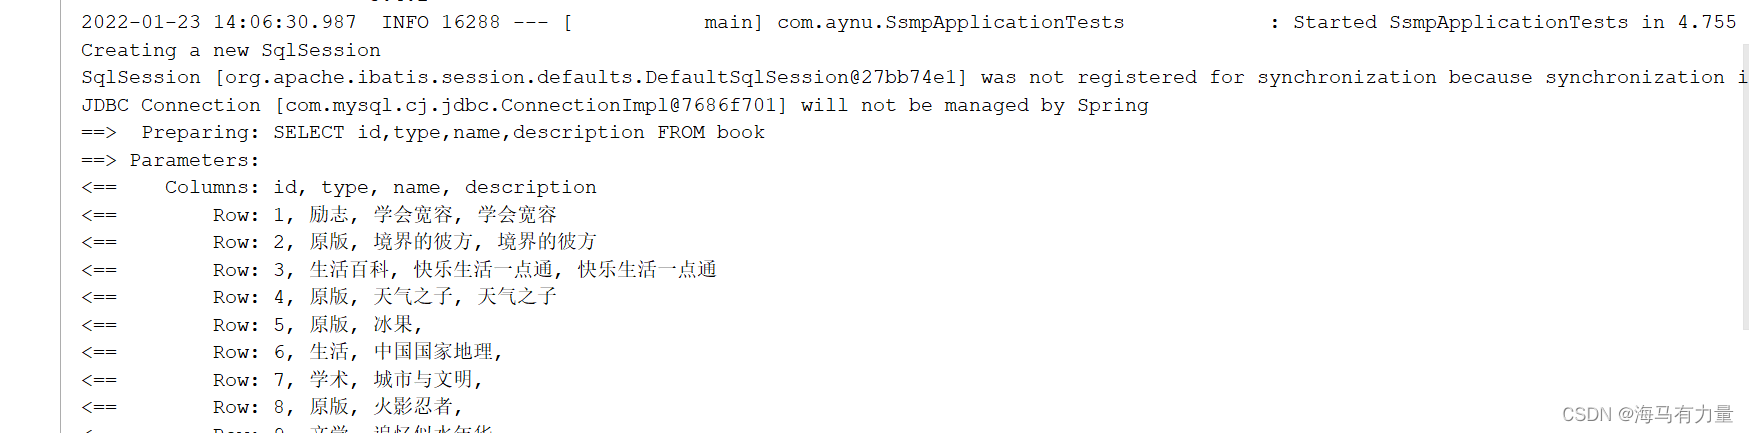
4.制作测试类测试Dao功能是否有效
@SpringBootTest
class SsmpApplicationTests {

    @Autowired
    private BookDao bookDao;

    @Test
    void findById() {
        System.out.println(bookDao.selectById(1));
    }

    @Test
    void update() {
        Book book = new Book();
        book.setId(23);
        book.setType("testabc");
        book.setName("test");
        book.setDescription("test");
        bookDao.updateById(book);
    }

    @Test
    void save() {
        Book book = new Book();
        book.setType("test");
        book.setName("test");
        book.setDescription("test");
        bookDao.insert(book);
    }

    @Test
    void delete() {
        bookDao.deleteById(23);
    }

    @Test
    void getAll() {
        System.out.println(bookDao.selectList(null));
    }
}
开启mp运行日志
mybatis-plus:
  configuration:
    log-impl: org.apache.ibatis.logging.stdout.StdOutImpl
mp分页查询
1.使用IPage封装分页数据
@Test
  void getPage() {
      IPage page = new Page(1,5);
      bookDao.selectPage(page,null);
      System.out.println("当前页:"+page.getCurrent());
      System.out.println("条数:"+page.getSize());
      System.out.println("总条数:"+page.getTotal());
      System.out.println("总页数:"+page.getPages());
      System.out.println("查询的数据:"+page.getRecords());
  }
2.分页操作依赖MyBatisPlus分页拦截器实现功能
@Configuration
public class Mpconfig {

    @Bean
    public MybatisPlusInterceptor mybatisPlusInterceptor(){
    	//定义拦截器
        MybatisPlusInterceptor mybatisPlusInterceptor = new MybatisPlusInterceptor();
        //设置拦截器
        mybatisPlusInterceptor.addInnerInterceptor(new PaginationInnerInterceptor());
        return mybatisPlusInterceptor;
    }
}
3.借助MyBatisPlus日志查阅执行SQL语句

条件查询
1.使用QueryWrapper对象封装查询条件
    @Test
    void getBy() {
        QueryWrapper<Book> qw = new QueryWrapper<>();
        qw.like("name","生");
        bookDao.selectList(qw);
    }
2.推荐使用LambdaQueryWrapper对象(使用QueryWrapper对象封装查询条件,推荐使用LambdaQueryWrapper对象,所有查询操作封装成方法调用)
 @Test
    void getBy2() {
        String name = "1";
        LambdaQueryWrapper<Book> lqw = new LambdaQueryWrapper<>();
        lqw.like(name != null,Book::getName,name); //第一个条件若不为空,则按条件查询
        bookDao.selectList(lqw);
    }
3.所有查询操作封装成方法调用
4.查询条件支持动态条件拼装
业务层
业务层标准开发
业务层开发
●Service层接口定义与数据层接口定义具有较大区别,不要混用
数据层:◆selectByUserNameAndPassword (String username , String password);
业务层:◆login(String username , String password);
基础CRUD开发
1.Service接口名称定义成业务名称,并与Dao接口名称进行区分
@Service
public class BookServiceImpl implements BookService{

    @Autowired
    private BookDao bookDao;

    @Override
    public boolean save(Book book) {
        return bookDao.insert(book)>0;
    }

    @Override
    public boolean update(Book book) {
        return bookDao.updateById(book)>0;
    }

    @Override
    public boolean delect(Integer id) {
        return bookDao.deleteById(id)>0;
    }

    @Override
    public Book getById(Integer id) {
        return bookDao.selectById(id);
    }

    @Override
    public List<Book> getAll() {
        return bookDao.selectList(null);
    }

    @Override
    public IPage<Book> getPage(int currectPage, int pageSize) {
        IPage page = new Page(currectPage,pageSize);
        bookDao.selectPage(page,null);
        return page;
    }
}
2.制作测试类测试Service功能是否有效
@SpringBootTest
class BookServiceTests {

    @Autowired
    private BookService bookService;

    @Test
    void findById() {
        System.out.println(bookService.getById(1));
    }

    @Test
    void update() {
        Book book = new Book();
        book.setId(24);
        book.setType("testabc");
        book.setName("test");
        book.setDescription("test");
        bookService.update(book);
    }

    @Test
    void save() {
        Book book = new Book();
        book.setType("test");
        book.setName("test");
        book.setDescription("test");
        bookService.save(book);
    }

    @Test
    void delete() {
        bookService.delect(24);
    }

    @Test
    void getAll() {
        bookService.getAll();
    }

      @Test
    void getPage() {
        IPage<Book> page = bookService.getPage(2, 5);
        System.out.println("当前页:"+page.getCurrent());
        System.out.println("条数:"+page.getSize());
        System.out.println("总条数:"+page.getTotal());
        System.out.println("总页数:"+page.getPages());
        System.out.println("查询的数据:"+page.getRecords());
    }

}
基于MP开发

1.使用通用接口( ISerivce) 快速开发Service
public interface IBookService extends IService<Book> {
    boolean saveBook(Book book);
}
2.使用通用实现类(ServiceImp1<M,T>) 快速开发ServiceImpl
@Service
public class BookServiceImpl2 extends ServiceImpl<BookDao,Book> implements IBookService {

    @Autowired
    private BookDao bookDao;

    @Override
    public boolean saveBook(Book book) {
        return bookDao.insert(book)>0;
    }
}
3.可以在通用接口基础上做功能重载或功能追加
4.注意重载时不要覆盖原始操作,避免原始提供的功能丢失
@SpringBootTest
class BookServiceTests2 {

    @Autowired
    private IBookService bookService;

    @Test
    void findById() {
        System.out.println(bookService.getById(1));
    }
      @Test
    void getPage() {
        IPage<Book> page = new Page<Book>(2,5);
        bookService.page(page);
        System.out.println("当前页:"+page.getCurrent());
        System.out.println("条数:"+page.getSize());
        System.out.println("总条数:"+page.getTotal());
        System.out.println("总页数:"+page.getPages());
        System.out.println("查询的数据:"+page.getRecords());
    }

}
视图层
视图层标准开发
1.基于Restful制作表现层接口
●新增: POST
●删除: DELETE
●修改: PUT
●查询: GET
2.接收参数
●实体数据: @RequestBody
●路径变量: @PathVariable
@RestController
@RequestMapping("/books")
public class BookController {

    @Autowired
    private IBookService bookService;

    @GetMapping
    public List<Book> getAll(){
        return bookService.list();
    }

    @PostMapping
    public Boolean save(@RequestBody Book book){
        return bookService.save(book);
    }

    @PutMapping
    public Boolean update(@RequestBody Book book){
        return bookService.updateById(book);
    }

    @DeleteMapping("{id}")
    public Boolean delete(@PathVariable Integer id){
        return bookService.removeById(id);
    }

    @GetMapping("{id}")
    public Book getById(@PathVariable Integer id){
        return bookService.getById(id);
    }

    @GetMapping("{currectPage}/{pageSize}")
    public IPage<Book> getPage(@PathVariable int currectPage,@PathVariable int pageSize){
        return bookService.getPage(currectPage,pageSize);
    }
}
数据一致性处理(R对象)

1.设计统一的返回值结果类型便于前端开发读取数据
@Data
public class R {

    private Boolean flag;

    private Object data;

    public R() {
    }

    public R(Boolean flag) {
        this.flag = flag;
    }

    public R(Boolean flag, Object data) {
        this.flag = flag;
        this.data = data;
    }

}
2.返回值结果类型可以根据需求自行设定,没有固定格式
@RestController
@RequestMapping("/books")
public class BookController2 {

    @Autowired
    private IBookService bookService;

    @GetMapping
    public R getAll(){
        return new R(true,bookService.list());
    }

    @PostMapping
    public R save(@RequestBody Book book){
        return new R(bookService.save(book));
    }

    @PutMapping
    public R update(@RequestBody Book book){
        return new R(bookService.updateById(book));
    }

    @DeleteMapping("{id}")
    public R delete(@PathVariable Integer id){
        return new R(bookService.removeById(id));
    }

    @GetMapping("{id}")
    public R getById(@PathVariable Integer id){
        return new R(true,bookService.getById(id));
    }

    @GetMapping("{currectPage}/{pageSize}")
    public R getPage(@PathVariable int currectPage,@PathVariable int pageSize){
        return new R(true,bookService.getPage(currectPage,pageSize));
    }
}
3.返回值结果模型类用于后端与前端进行数据格式统一,也称为前后
端数据协议
前后端调用
1.单体项目中页面放置在resources/static目录下
2.created钩子函数用于初始化页面时发起调用
//钩子函数,VUE对象初始化完成后自动执行
 created() {
      //调用查询全部数据的操作
      this.getAll();
      console.log("run");
  },
3.页面使用axios发送异步请求获取数据后确认前后端是否联通
 getAll() {
   axios.get("/books").then((res)=>{
         console.log((res.data));
     });
 },
异常消息处理
1.使用注解@RestControllerAdvice定义SpringMVC异常处理器用来处理异常的
2.异常处理器必须被扫描加载,否则无法生效
//作为springmvc的异常处理器
@RestControllerAdvice
public class ProjectExceptionAdvice {

    @ExceptionHandler(Exception.class)
    public R doException(Exception ex){
        //记录日志,发送信息给运维,ex对象发送给开发人员
        ex.printStackTrace();
        return new R("服务器故障,请稍后再试");
    }

}
@Data
public class R {
    private Boolean flag;
    private Object data;
    private String msg;

    public R(Boolean flag, String msg) {
        this.flag = flag;
        this.msg = msg;
    }

    public R(String msg) {
        this.flag = false;
        this.msg = msg;
    }
}
3.表现层返回结果的模型类中添加消息属性用来传递消息到页面
@PostMapping
public R save(@RequestBody Book book) throws Exception {
    //if(book.getName().equals("123")) throw new Exception();
    boolean flag = bookService.save(book);
    return new R(flag,flag ? "添加成功!" : "添加失败!");
}
分页
1.使用el分页组件
2.定义分页组件绑定的数据模型
3.异步调用获取分页数据
4.分页数据页面回显
  //切换页码
  handleCurrentChange(currentPage) {
      //修改页码值为当前的页码值
      this.pagination.currentPage = currentPage;
      //执行查询
      this.getAll();
  },

  //弹出添加窗口
  handleCreate() {
      this.dialogFormVisible = true;
      this.resetForm();
  },
最后一条数据在第一条,删除后可跳转到最后一页,不处理的话在空的一页。
@GetMapping("{currectPage}/{pageSize}")
    public R getPage(@PathVariable int currectPage,@PathVariable int pageSize){
        IPage<Book> page = bookService.getPage(currectPage,pageSize);
        //如果当前页码值大于了总页码值,那么重新执行查询操作,使用最大页码值作为当前页码值
        if(currectPage>page.getPages()){
            page = bookService.getPage((int)page.getPages(),pageSize);
        }
        return new R(true,page);
    }
条件查询
1.定义查询条件数据模型( 当前封装到分页数据模型中)
pagination: {//分页相关模型数据
currentPage: 1,//当前页码
pageSize:10,//每页显示的记录数
total:0,//总记录数
type:"",
name:"",
description:""
2.异步调用分页功能并通过请求参数传递数据到后台
 getAll() {
	//组织参数,传递url地址
     param = "?type="+this.pagination.type;
     param += "&name="+this.pagination.name;
     param += "&description="+this.pagination.description;
     console.log(param);

     axios.get("/books/"+this.pagination.currentPage+"/"+this.pagination.pageSize+param).then((res)=>{
         this.pagination.currentPage = res.data.data.current;
         this.pagination.pageSize = res.data.data.size;
         this.pagination.total = res.data.data.total;
         this.dataList = res.data.data.records;
     });
 },
 @GetMapping("{currectPage}/{pageSize}")
 public R getPage(@PathVariable int currectPage,@PathVariable int pageSize,Book book){
     System.out.println(book);
     IPage<Book> page = bookService.getPage(currectPage,pageSize,book);
     //如果当前页码值大于了总页码值,那么重新执行查询操作,使用最大页码值作为当前页码值
     if(currectPage>page.getPages()){
         page = bookService.getPage((int)page.getPages(),pageSize,book);
     }
     return new R(true,page);
 }
@Service
public class BookServiceImpl2 extends ServiceImpl<BookDao,Book> implements IBookService {
    @Override
    public IPage<Book> getPage(int currentPage, int pageSize, Book book) {
        LambdaQueryWrapper<Book> lqm = new LambdaQueryWrapper<Book>();
        lqm.like(Strings.isNotEmpty(book.getType()),Book::getType,book.getType());
        lqm.like(Strings.isNotEmpty(book.getName()),Book::getName,book.getName());
        lqm.like(Strings.isNotEmpty(book.getDescription()),Book::getDescription,book.getDescription());
        IPage page = new Page(currentPage, pageSize);
        bookDao.selectPage(page,lqm);
        return page;
    }
}


 315
315


 被折叠的 条评论
为什么被折叠?
被折叠的 条评论
为什么被折叠?
 到【灌水乐园】发言


